Overclock Intel’s Non-K CPUs – YOU’LL NEED THIS Z170A MOTHERBOARD
Sadly, non-K overclocking is only available on this particular chipset.
You may also like:
[display-posts category=”processor” posts_per_page=”5″]
AN OLD BIOS FILE
New Z170A boards ship with the overclock hack patched out, but the old files still exist at https://overclocking.guide/intel-skylake-non-k-overclocking-bios-list.
ONCE UPON A TIME, Asrock did something wonderful for owners of Intel’s non-K Skylake CPUs. For years previously, the benefit of buying a pricier K chip was that it was fully unlocked for overclocking, but in 2016, the rulebook was ripped up when a particular feature in Asrock’s Z170A boards allowed base clock multiplier tweaking on those erstwhile locked K CPUs. Before long, MSI, Asus, Gigabyte, and the whole gang were offering the same BIOS feature, which disabled integrated graphics and turbo boosting in order to enable overclocking. Intel was understandably less than pleased about this—the company’s entire product hierarchy was suddenly jumbled up like a fallen Jenga tower— and just a couple of months later, overclocking features disappeared from Z170A boards.
In terms of outward appearances, the story pretty much ended there. Non-K chips returned to their previous station as staunchly locked cheaper chips, and the tech universe’s natural order was restored. But those old BIOS files still exist, and are still available to download, so if you’re currently running a non-K Skylake chip on a Z170A board, you can absolutely still make use of that old feature, and produce a significant performance boost for absolutely zero outlay and minimal time investment. Here’s how. -PHIL iwaniuk
CHECK YOUR SYSTEM’S COMPATIBILITY
The first order of business is to figure out whether your CPU and motherboard can hack this, er, hack. Essentially, the full gamut of non-K Skylake CPUs are fair game for this, starting at the entry level with the Pentium G4400, and extending right the way up to the Core i7-6700. T chips are compatible, too. It’s worth bearing in mind that the overclocking potential of a Pentium CPU is going to be much lower than a Core i7, and this BIOS hack isn’t going to turn one into the other. It’s free additional performance whatever the chip, though [Image A].
As for motherboards, check this handy web page for a full list of the Asus, Asrock, MSI, and Gigabyte boards: https://overclocking.guide/intel-skylake-non-k-overclocking-bios-list. If it’s a Z170A motherboard, it’s extremely likely that you have the hardware to pull this off.
FIND THE OLD FILE
In order to enable overclocking, you need to flash your motherboard to an older BIOS that predates Intel clamping down on the practice. Doing so has pros and cons: Older firmware might produce hardware conflicts or cause any problems your motherboard model had at launch to re-emerge, because you’re
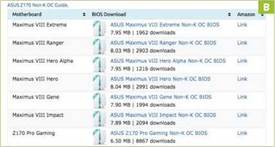
effectively rolling back all manufacturer support to late 2016. In our experience, though, this is unlikely. If the worst comes to the worst, and you have a USB port that Windows keeps discovering and forgetting every 10 seconds after flashing your BIOS, you can always install the newer version again to remove the issue. To start the ball rolling, head to the site we’ve linked to in step one. You’ll see a list of motherboards, each with a BIOS file to download. Simply locate your own motherboard model and download the BIOS file [Image B].
FLASH YOUR MOBO’S BIOS
There was a time when flashing your BIOS was a scary process. One power outage or erroneously
OFF THE CLOCK
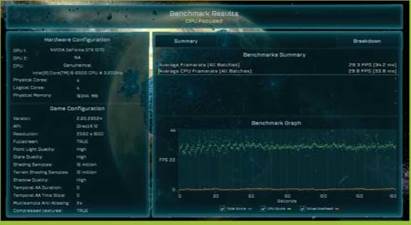
How much extra performance can you squeeze out of a non-K chip? We’ll use a Core i5-6500, and run some benchmarks to demonstrate. It’s overclocked by 1.1GHz, from 3.2GHz to 4.3GHz, while the RAM is at just over 3,200MHz. First up is Heaven 4.0, a GPU-intensive app that doesn’t show much improvement for that extra 1.1GHz: 50.2fps at stock speeds, and 50.3fps overclocked. Heartbreaking. Things get more encouraging when running CPU-intensive RTS Ashes of the Singularity: Escalation, though: 25.8fps at stock, 29.3fps overclocked. Cinebench R15 sees a jump from 524 to 727, while Middle-Earth: Shadow of War jumps from 52fps to 62fps. Result!
placed file, and it was goodnight Irene for your motherboard. These UEFI BIOS-enabled days, it’s a reasonably simple process, so there’s no need to read your hardware its rights, or call in any precautionary priests. Simply copy the BIOS file you downloaded in step two to a USB drive—the root directory is fine. Now reboot your PC, and press Del when the prompt appears. Welcome to the BIOS. Here you’ll see a flash utility within the main options that enables you to select a new—or old — BIOS file, and install it. Simple.
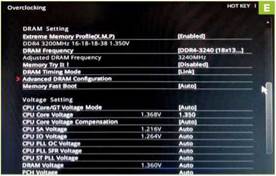
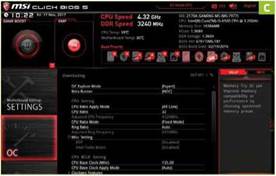
ENABLE THE MAGIC SETTINGS
After the faintly terrifying BIOS installation bar has been filled and the machine restarts, re-enter the BIOS and head to the overclocking options. The exact options vary depending on your motherboard, but the important one is “SKY OC.” This is the feature that disables turbo and integrated graphics, and allows big BCLK overclocking. On MSI boards, you need to enable “Expert mode” in the overclocking screen first, then enable “SKY OC.” Your non-K chip is now ready to be buffed up [Image C].
SET YOUR INITIAL OVERCLOCK
Any BCLK value above 100 boosts the CPU’s base clock— our Core i5-6500 can handle 135 with liquid cooling, for reference, but we recommend starting with 110, and increasing by 10 after every stable test. Increasing the BCLK also increases RAM frequency automatically, so you need to modify that RAM value to speeds you know your sticks can handle next. When you’re setting the first stable overclock, don’t go more than 100MHz above your RAM’s advertised frequency. Our DDR4 modules can hack up to
3,200MHz, which allows plenty of headroom. The only other value to worry about is core clock voltage. You can crank this up to 1.35V without frying anything, and may be able to lower it again after setting stable values elsewhere.
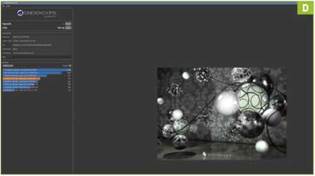
TEST IT OUT
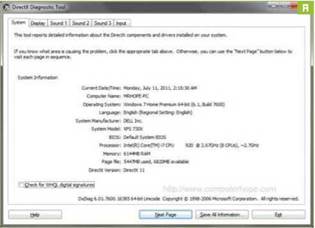
If you set and saved your overclocked values, and your machine booted to Windows, that’s a good sign. It doesn’t mean you’ve achieved a stable overclock, though. You need to stress test your machine by running a synthetic benchmark in order to figure out whether your values are stable, so load up Cinebench R15 and run 5-10 CPU tests. After that workout, you’ll either see a blue screen or know your numbers are solid [Image D].
TWEAK THE NUMBERS
So, you’ve got a stable performance boost for free, on a chip that was never intended to provide it. Hooray! What’s next? Trying to squeeze still more performance out of it [Image E]. Obviously. Steady incremental increases of the BCLK value back in the BIOS is the next item on the agenda, then, although we can’t stress enough that going beyond 1.35V is a risk/reward equation that simply isn’t worth it. Limit yourself to that voltage, and then see what your CPU and RAM can handle by repeating step six. Eventually, you’ll hit the ceiling, and at that point, you can enjoy the satisfaction of having performed a hardware upgrade for absolutely nothing.