Unetbootin Review
Written by Adam Hunt
When I set out to do a review of a new release of an Ubuntu flavor, I download the ISO file, do a SHA256 check on it, and then write it to a USB stick so it can be booted up and tested. Read our Unetbootin Review.
Normally, I use Ubuntu’s Startup Disk Creator to write the ISO to the USB. Startup Disk Creator comes already installed on all the Ubuntu flavors, it is easy to use and generally works fine on ISOs for Ubuntu, Kubuntu, Lubuntu and Xubuntu.
When I did my previous review of Ubuntu Unity 20.04 LTS, Startup Disk Creator was able to write that distribution, but I ran into an impasse with Ubuntu Unity 20.10. Startup Disk Creator would not accept the ISO file for writing.
My first attempt at a workaround was to use “dd” from the command-line. It sort of worked, as it wrote Ubuntu Unity 20.10 to the stick, but it would not boot. I needed something better.
These days, lots of free software applications designed to write ISOs to USBs are available, including BalenaEtcher, Ventoy, and MultibootUSB, but I decided to try an old favorite, UNetbootin.
Background
UNetbootin, short for “Universal Netboot Installer”, has been around for a while; its first release was in April 2007. It is developed by Geza
Kovacs and released under a GPL version 2 (or later) free software license.
I first used UNetbootin in December 2010 to install Lubuntu 10.10 on a netbook, one of those mini-sized laptops that were popular back then. In a way, netbooks were ahead of their time, not only small and light, they came without a CD/DVD optical drive which was how most Linux distributions were installed at that time. Back then, the Ubuntu Startup Disk Creator couldn’t write Lubuntu (it can today), so UNetbootin was the answer and it did the job perfectly.
UNetbootin can be used to install a large number of Linux and BSD distributions, including rescue disks too. Only a single installation can be written on each USB stick, though, as it does not support multiple installations.
Other than being able to write many more Linux distributions than the Startup Disk Creator, UNetbootin also leaves the USB stick in its native FAT32 format (File Allocation Table, 32-bit). Startup Disk Creator formats it in ISO format, meaning that to use it again for general file use, the user must reformat the stick with Gparted or similar.
Getting UNetbootin
UNetbootin used to be available in the Ubuntu repositories, making it very easy to install. Sadly, the package maintainer, Laszlo Boszormenyi, has not updated the package, and the last version available is for Ubuntu 16.04 LTS Xenial Xerus.
The good news is that Kovacs has his own Personal Package Archive (PPA) on LaunchPad and that makes it fairly easy to add the PPA and then install the application on any Ubuntu flavor from a terminal with:
sudo add-apt-repository ppa:gezakovacs/ppa
sudo apt-get update sudo apt-get install unetbootin
There are also installation packages in the repositories for several other Linux distributions including Arch, Debian, Fedora, Gentoo and SUSE Linux, plus Windows .exe and Mac .dmg files. There are also 32-bit and 64-bit binaries.bin files available, as well as source code for compiling.
For the Ubuntu installation, UNetbootin is a small package, just 224 kB to download, although it has the following dependencies: libc6, libgcc-s1, libqt4-network, libqtcore4, libqtgui4, libstdc++6, mtools, p7zip-full, syslinux, syslinux- common and udev. It will retrieve these on installation, if not already there.
Using UNetbootin
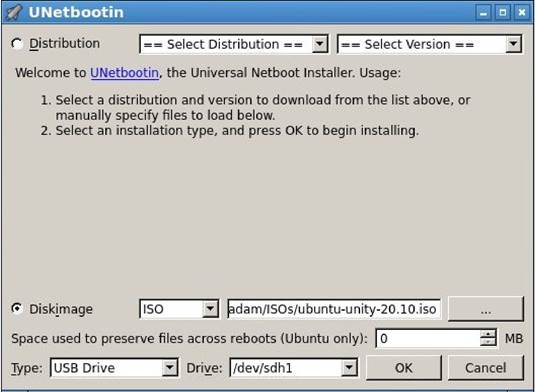
Opening UNetbootin from the system tools menu shows a really simple interface. It does look a bit dated, though, like something from Windows 98.
For writing, the target USB
needs to be formatted to FAT32, which is the way almost all USB drives come out-of-the-box.
The Linux or BSD distribution can be chosen from a list at the top of the interface in the “Distribution” section, and UNetbootin will actually go and retrieve it. Alternatively, an ISO file already downloaded to the user’s local computer and designated under “Diskimage” can be used. All that remains is to select the USB stick, click “OK” and UNetbootin does the rest automatically.
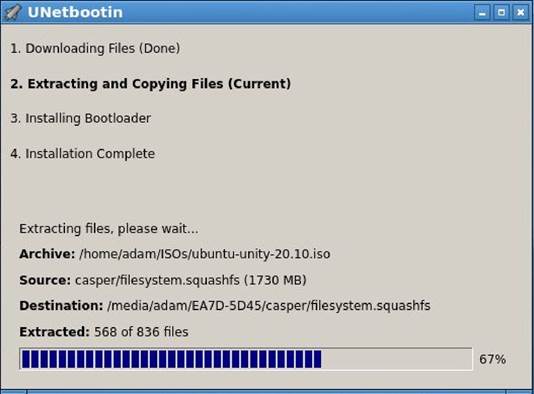
UNetbootin gives progress indications while writing, and then a completion screen when done. From there, the stick will work the same as if it had been written with Startup Disk Creator, booting up normally to run a live session or used to install the operating system.
To return to using the USB stick for storing files, etc, just delete the files from the USB stick, as it will still be in FAT32 format.
Conclusions
Despite the rather dated- looking interface, UNetbootin works perfectly, allowing the writing of almost any Linux or BSD distribution to a USB stick for testing or installation. It is a great example of the Unix philosophy: an application that does one thing and does it well.
External links
Official website: https://unetbootin.github.io/

What's eating my storage


