Customise Windows 11 with your own widgets
BeWidgets
You can set the height and width of each widget, and choose whether it’s locked or movable. The app uses the same visual style as Windows 11, so it integrates seamlessly with your desktop, and you can automatically generate a colour scheme based on your current Windows settings.

When you’ve set up several widgets and positioned them as you like, you can save your layout and bring it back with a single click at a later date. However, we found things got a little glitchy once we started trying to store multiple layouts, as switching between them caused our widgets to disappear altogether.

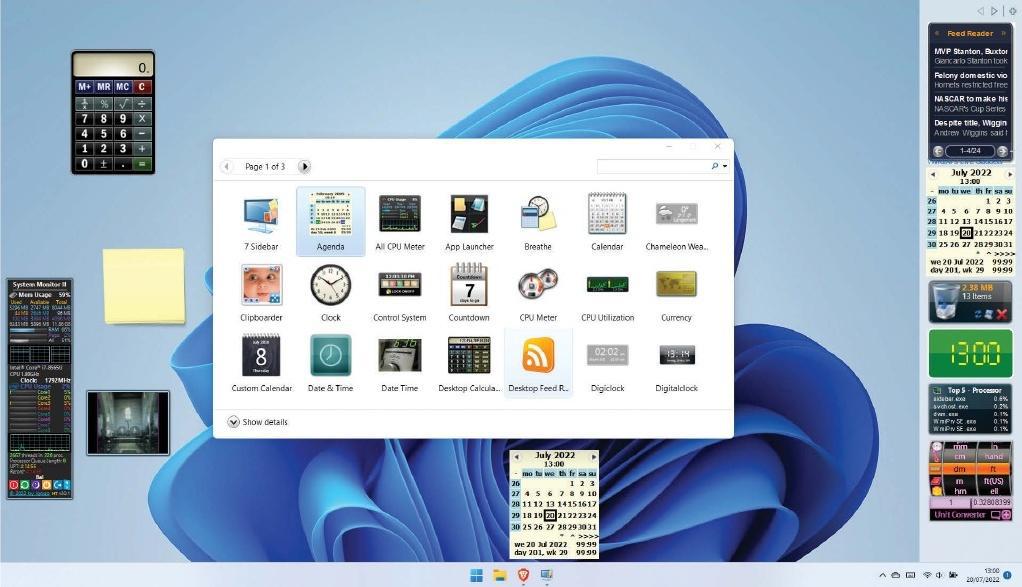
8Gadget
8gadgetpack.net
Launching 8Gadget is like winding back the clock. Its widgets have a glossy retro look that stands out in this age of muted colours, transparency and flat design. You can even choose to keep them in a sidebar, where they used to live in Windows Vista, though if you add too many gadgets for the sidebar, they slip onto a second pane where they’re not immediately visible. Still, you can reorder widgets, and move them between sidebar pages by dragging them beyond the top or bottom of the stack.
You can’t customise your widgets’ appearance as you can with Widget Launcher and BeWidgets, but the selection of 61 gadgets includes several that duplicate the same basic functions, so you can pick those that best suit your style. For example, there are five weather gadgets and seven clocks, separate from the calendars and agendas. With a little careful curation you can get your preferred selection of mini apps quietly running away in the background.
You can tweak the information that’s shown: the weather gadget can be customised for your local area (or somewhere else if you’re planning a holiday), while the process monitor lets you select which processes are included, as well as the colours used.
The 8Gadget organiser, in which you pick the gadgets you want to show, doesn’t need to be running for your gadgets to remain active, and when you close it, it disappears, leaving the gadgets behind. You can restore it by launching 8GadgetPack Tools from the Start menu and clicking Add Gadget. The Tools interface also lets you disable the sidebar, and reassign Windows-G to launch your gadgets, if you’re not already using this shortcut to access the Windows Game Bar.
Live Tiles Anywhere
tinyurl.com/APC512LT
Live Tiles were one of the defining features of Windows 10, but with Windows 11 they’re gone. If you want them back, Live Tiles Anywhere is the answer – and it’s arguably more useful than the original implementation, as it puts Live Tiles directly on the desktop rather than hiding them away in the Start menu.
Creating a tile is a simple case of working your way through a wizard and selecting what the tile should link to. At its simplest you can launch an installed app with a click or open a specific web page. However, things get more interesting and more useful when your selected program has live updates, as with the Money and Weather tiles (see image, below). You can define a visual style for your tile or have the program automatically pick it up from the tile contents.
Rainmeter
rainmeter.net
Don’t be fooled by Rainmeter’s name. While you can certainly use it to enliven your desktop with weather-related widgets, its skills go far beyond this.
Rainmeter refers to its widgets as “skins” for different data readouts, but they work just like any other desktop gadget. Each skin displays a defined set of information, or a shortcut to a simple task such as sending a search term to Google. Seven skins come preinstalled, which you can enable and disable from the context menu on any gadget, or through the System Tray app.
The skins themselves are small and neat, with a “quiet” appearance. You can drag them wherever you choose, but if you bring one within a few pixels of a neighbouring skin it will snap into position, helping to keep your desktop tidy. When you close a skin, its position is saved, and it will reopen in that spot the next time you open it. You can also turn this option on and off on a skin-by-skin basis, as well as tweaking transparency and hover-over behaviour, and setting whether each gadget should be always on top.
Rainmeter isn’t just about pre-written skins, however: it’s also extensible, allowing anyone to create their own gadgets using nothing more than a text editor such as Notepad. There are dozens of third-party skins you can freely download and add to your own Rainmeter installation – the Rainmeter forums are a good place to find them (forum. rainmeter.net/viewforum. php?f=27). You can even write your own, using the documentation at docs.rainmeter. net/manual/skins – we’ve used this as a reference in creating our own widget, as shown in the box on the right, which displays a random photo from our library.


CREATE A RANDOM IMAGE CAROUSEL IN RAINMETER
1 Right-click the Rainmeter icon in the System Tray and select Manage. Make sure the Skins tab is active and click the folder icon to the right of the “Active skins” drop-down menu to create a new skin. Click “Add folder”; Rainmeter will now create a folder called NewFolder. Press Return to accept this name, click “Add skin” and Rainmaker will create a skin called NewSkin.ini. Press Return to accept the name; you can rename both the folder and the skin, but we’ll keep the default names just for clarity. Click Close.
2 Click NewSkin.ini in the left-hand pane of the Manage dialog, then click the Edit button. This opens the skin definition file in your default text editor. You’ll see a line saying “Update=1000”: this tells Rainmeter how often to refresh the content of your skin, in milliseconds. This is probably too often for an image carousel, so change the number to 300000 – now it will update every five minutes. If you’re creating a skin for distribution, you might also add some credits to the Metadata section below, but we can leave those blank for now.
3 The section at the bottom of the file holds the code that makes the skin work. Delete the placeholder [MeterString] line, and the default line of code below it; in their place, enter the lines:
[MeasureImage] Measure=Plugin Plugin=QuotePlugin PathName=C:\Users\nik\OneDrive\Pictures\originals\
In the last line, substitute the path to a folder on your system that contains photos. This code tells Rainmeter that you want to use the measure function to derive the dimensions of an element passed to it by a plugin – specifically the QuotePlugin, which takes either a random line from a text file or a random file from a folder. The file is taken from the folder specified by the PathName variable.
4 Now, leave a blank line beneath your Path variable and add a new section as follows:
[ShowImage]
Meter=Image
MeasureName=MeasureImage
W=400
PreserveAspectRatio=1
This code tells Rainmeter to use the Image function to take the output of the MeasureImage function and display the image with a width of 400 pixels. Save your file and close it. Now, with the NewSkin.ini file still selected in the Manage dialog, click Load. You should see a random image from your specified folder displayed in a floating frame on your desktop; in five minutes, it will be replaced by a new one.