Is your SSD getting dangerously full without reason? Darien Graham-Smith explores where all your space has gone – and how to free up space
Table of Contents
What my drive is full ?
It’s been observed that data seems to expand to fill the available storage, and that’s certainly true when it comes to PCs. It’s horribly easy to accumulate files without thinking about disk space, until there’s suddenly none left.
Yet it’s not entirely our fault. Desktop applications just keep getting bigger and games can be enormous: Cyberpunk 2077 calls for 70GB of hard disk space, while Hitman 3 weighs in at 80GB. Meanwhile, disk sizes have stagnated as we’ve switched from cheap mechanical disks to much faster – but pricier – SSDs.
If you’re constantly running out of space, therefore, don’t feel too bad: that’s just the way the technology is at the moment. In five or ten years it will probably be possible to buy a huge SSD for a tiny price, but for now we must manage our limited space as best we can.
What is on my SSD?
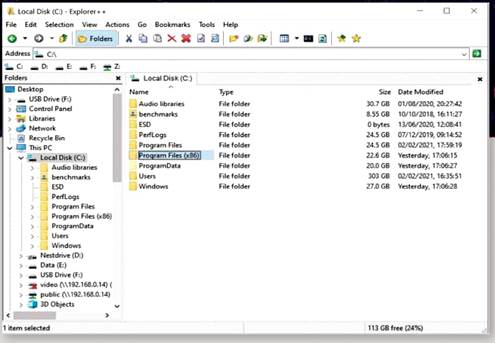
Windows doesn’t exactly make it easy to see what’s consuming your disk space. If you open an Explorer window, it will show you the sizes of any files in the current directory, but the “size” column is left blank for folders. If you want to find out the total size of a folder’s contents, you must right-click on it, select “Properties” and wait, possibly for a minute or more, while Windows scans its contents and calculates the total size. It’s a cumbersome process that’s hardly convenient for quickly spotting which folders are consuming more than their fair share of storage.
You can’t customise the Explorer window to show folder sizes, but you can use a replacement file manager, such as the open-source Explorer++ (explorerplusplus.com), which offers such an option (you’ll find it under Tools I Options I Files and Folders).
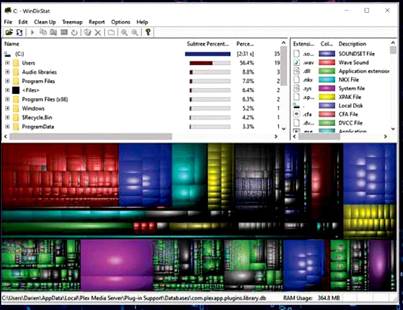
Alternatively, you can keep a disk usage analysis tool on hand to keep tabs on the state of your storage. Our favorite is another open-source utility called WinDirStat, which you can download from windirstat.net. This shows a directory tree view with folder sizes, similar to Explorer++, and
Once you’ve been using Windows for a year or two, your hard disk will probably be laden with unneeded items
adds a clever (if garish) visualisation of space usage, which is organised by directory and colour-coded by file type. This can help you to instantly spot any massive files, or identify when a collection of MP3S or JPEG images is becoming unwieldy.
How to free up space
If you have an acute need to free up space, deleting a few plus-sized downloads or temporary files is a great quick fix. However, it’s not just the big files you need to look out for. Once you’ve been using Windows for a year or two, your disk will probably be laden with unneeded items that are individually quite reasonably sized, but which add up to tens or even hundreds of gigabytes.
It goes without saying that if you want to free up space, the first step is to empty your Recycle Bin – but we’re going to say it anyway because it’s a very easy thing to forget about. Once an item has gone from your desktop. Documents folder or wherever, the principle of “out of sight, out of mind” tends to apply, yet that file can lurk in the bin indefinitely and take up as much space as ever.
Once your Recycle Bin is definitively emptied, your next stop should be the Storage page in the Settings app. The main pane shows how much space is in use on your primary hard disk, with bar graphs to represent how much of that is taken up by documents, applications and so forth. For the top graph, the full length of the bar represents the total size of the disk, whereas in the subgraphs below the bar represents used space, with the coloured sections showing what proportion of that is accounted for by different file types. It’s a bit confusing, but it can help you zero in on the dead wood.
You can click on the individual bars to get a closer look at each category of content. Some of these aren’t very useful – the Documents bar just opens an Explorer window on your Documents folder – but if you click on “Temporary files” you’ll see a breakdown of various types of system file that can safely be purged, along with a handy “Remove files” button, while clicking on Other shows you any unrecognised folders that contain large wodges of data. If you’re alarmed by the amount of space taken up by applications, you can click on the relevant bar to be taken to the
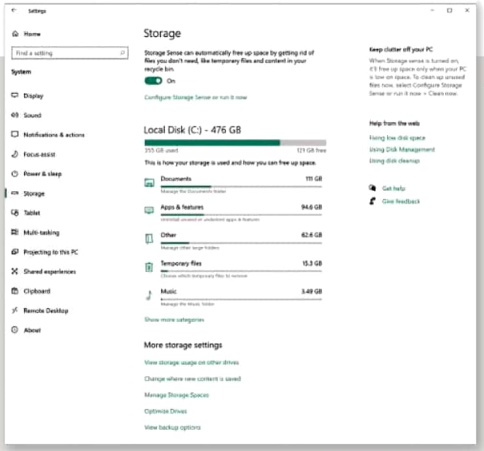
“Apps& features” Settings page. Click the “Sort by:” dropdown and you can immediately see which programs are eating up acres of disk space, and uninstall them there and then if you figure they’re not worth the gigabytes.
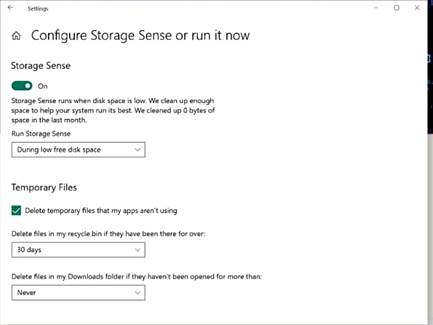
Another low-key feature but potentially a very useful one – is Storage Sense, which automatically cleans up temporary files and empties the Recycle Bin from time to time. It’s enabled with a simple switch at the top of the Storage pane; to set it up, click the link below labelled “Configure Storage Sense or run it now”. The page that opens will give you the option of clearing out unwanted files to a fixed schedule or when space runs low, and lets you choose whether to delete items that have been sitting untouched in your Downloads folder for more than a certain length of time. You can also click “Clean now” to give your hard disk an immediate sweep.
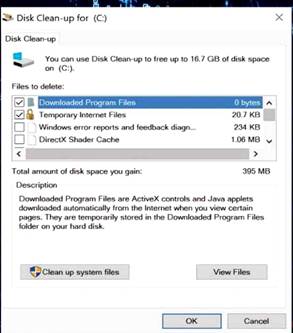
If you find all these different settings pages a tad fiddly, you can alternatively use the old Disk Clean-up tool, as introduced way back in Windows 98. It’s officially deprecated, meaning it could disappear in a future update, but it’s still available in the 20H2 release of Windows 10. and can be launched by name from the Start menu.
This tool lets you tick to clean
up eight categories of junk, including temporary files, downloads and system-generated thumbnails. Clicking the “Clean up system files” button will re-scan the system and add seven further clean-up categories, including backups of old system files that have been replaced by Windows Update and memory dump files generated when Windows crashes. On my system, these extra options accounted for 7.75GB of removable data. On the “More Options” tab you’ll also find links to remove unneeded programs, and to delete old System Restore data – although if your system has been flaky lately you might prefer to hang onto those restoration points just in case.
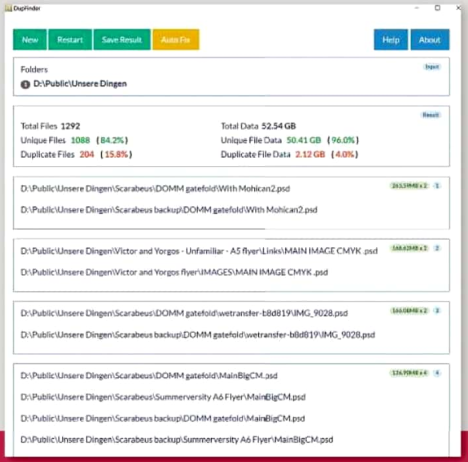
Finally, it’s worth checking your system for needlessly duplicated files, which can accrue when you end up downloading the same thing twice, or copying a folder from one location to another when you mean to move it. Windows doesn’t have an easy way of spotting duplicate files and folders, but a free tool called DupFinder (dupfinder.com) can scan your system for duplicates and even use content matching to find duplicates with different names.
GET OFF MY DRIVE
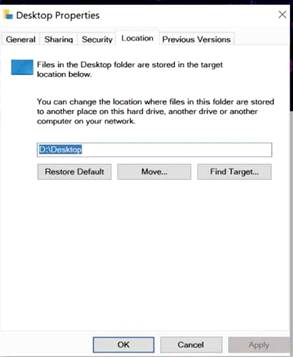
If your hard disk is full of files that you don’t want to delete, another possibility is to move them onto a different volume. If you’re using a desktop PC, it may have been supplied with a secondary drive for bulk storage; if not, you can probably install one. It might sound awkward to have your data spread across two different disks, but you can make the experience seamless by telling Windows to relocate your Desktop, Documents, Downloads and other folders onto the second disk.
To do this, right-click on one of these system folders in Explorer, open the Properties window, select the Location tab, click “Move…” and browse to your chosen destination. Once you click OK, Windows will offer to move all of your existing files across to the new location, so you can keep working exactly as before.
Things are a little less neat with a laptop, but you can use an external disk to store any files you don’t want permanently hogging space on your system drive. You can even move your personal folders onto a USB disk – although you’ll naturally experience error messages and missing data if you try to use the computer without that drive connected.
Alternatively, you might move your files onto a network drive. If you have another computer on your home network, you can easily set it up with a shared folder for overspill storage – although that computer will need to be kept switched on whenever you want to access your files. If you’re willing to invest a few hundred pounds, you could acquire a dedicated NAS appliance instead. Alternatively, some routers offer USB ports, into which you can plug in a standard hard disk for use as network storage. This doesn’t give you the RAID protection you would get with a dedicated NAS device, but it’s a lot cheaper and no
You’ll only have a few gigabytes by uninstalling components, but that could make a difference
worse than plugging an external hard disk directly into your laptop.
These solutions should all be fairly fuss free while you’re at home, but if you want to keep your network files available while you’re out and about, you may need to set up some sort of VPN access in your router. If that sounds too much like hard work, you might be better off with a dedicated cloud storage service. Microsoft’s OneDrive supports a feature called Files On Demand, which stores your files in the cloud, downloads them dynamically when you want to access them, then re-uploads them and reclaims the disk space when you’re done. You can turn it on by rightclicking on the OneDrive icon in your system tray, selecting Settings and ticking the box labelled “Save space and download files as you use them”.
Dropbox users on a paid plan can use a very similar system called Smart Sync: to make a file or folder resident in the cloud, right-click it and select Smart Sync I Online Only. In the main app Preferences you can also enable the option to “Save hard drive space automatically”, which will routinely enable the Online Only mode for any files or folders you haven’t accessed in a few months.
SLIMMING DOWN WINDOWS
So, you’ve cleared out your unwanted personal files, superfluous apps and
general Windows detritus. If you’re still hurting for space, it’s time to see if you can squeeze the operating system itself down a bit.
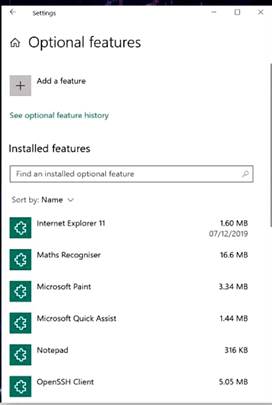
Start by auditing optional system components, and removing any you’re not using: this is a risk-free process because you can easily reinstall them should you later change your mind. This being Windows 10, there are two different places to check for optional components. First, open the Settings app, go to the “Apps & features” pane and click on “Optional features” to review and optionally remove apps such as Microsoft Paint and WordPad.
Next, search the Start menu for “Turn Windows features on or off”: the window that opens will show a long list of system components, such as Hyper-V and PowerShell 2.0. Untick anything that you don’t want and click OK to remove it. You’ll probably only save a few gigabytes at most by uninstalling components, but if space is at a premium that could make a difference – and at any rate, it’s a sensible idea from a security standpoint to disable any technologies you’re not using.
Another way to reduce Windows’ footprint is to clean up the WinSxS directory. If you’ve been analysing your disk usage, you may have noticed that large subdirectory inside your Windows folder – on my computer it weighs in at 9.56GB. The name stands for Windows Side by Side, and it’s used to store multiple versions of system components to ensure that all of the apps and drivers on your computer can access the resources they need (thus avoiding the “DLL Hell” issue that plagued older Windows releases).
Windows periodically scans the WinSxS folder for obsolete components, but you can tell it to do so right away by opening a command prompt as Administrator and entering the following command:
dism.exe /online /Cleanup- Image /StartComponentCleanupThe figures are different because Windows allocates space in atomic chunks, typically of 4KB in size. Thus, even if a file only contains 2KB bytes of data, it effectively occupies 4,096 bytes of disk space – and if the file grows to 4,097 bytes long, it spills over into another cluster and takes up 8,192 bytes on disk. The only exception is if a file is smaller than around 500 bytes, in which case NTFS stores it entirely in the file allocation table and Windows reports it as taking up zero bytes on the disk.
At this point you might be wondering how much “slack” space is being wasted in this way on your own hard disk. To find out, we first need to know the size of your clusters. Although most disks use 4KB clusters, devices that use an older FAT file system (or have been converted from one) might use a different measure, and volumes bigger than 16TB default to larger clusters. You can find out the cluster size of your main Windows disk by opening a command prompt as Administrator and entering:
fsutil fsinfo ntfsinfo c:Among the technical details that the command returns, the figure we’re looking for is “Bytes per cluster”; if your cluster size is 4KB, it tells us that, statistically, the average amount of slack space wasted by each file will be 2KB. Now we just need to know the total number of files on the disk, which you can discover by entering:
dir c:\ /s /aThis command will take a few minutes to enumerate all the files on your disk, including system and hidden files, and at the end you’ll see a count of total files found. In my case, it reported 1,182,157 files, so with 4KB clusters that implies around 2.4GB of slack space.
If you want to reclaim some of that space, you can do so by switching to smaller clusters. Technically speaking, the only real downside to this is that it leads to increased fragmentation, as files get split into hundreds or thousands of parts, and with an SSD that’s of very little consequence.
Practically, however, it’s probably not worth the hassle – because the only officially supported way to change the cluster size of a disk is to reformat it, and specify the desired allocation unit size at the point when the file system is created. There are commercial products that can perform an in-place, non-destructive conversion, but they’re pricey – one such package is Partition Wizard Pro, which costs $59 for a year-long licence from partitionwizard.com – and we’re not aware of any free tool that can do the job.
The process trundles along for some time, but it’s a free way to reclaim some space – it took around four minutes on my PC and slashed the size of the folder to 6.6GB.
COMPRESSING MATTERS
Removing files and features is all well and good, but there are plenty of items you can’t get rid of. However, what you can do is make them smaller: Windows has had transparent fulldisk compression built in since the very earliest days of the platform (the capability was introduced with MS-DOS 6 in 1993), and while this has a small impact on your CPU and RAM usage, it lets you make more efficient use of your precious storage.
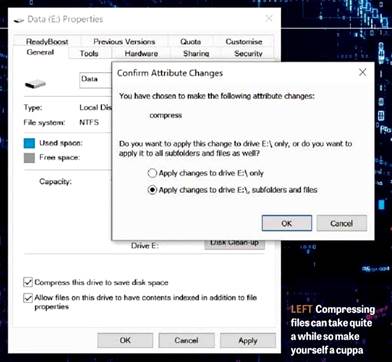
Even better, NTFS allows you to selectively compress individual files and folders, meaning you can shrink down any data you only occasionally access, while your system files and applications run at full speed with no hit to system resources. To compress a folder, right-click on it in Explorer and open its Properties window. Once there, click the “Advanced…” button, tick “Compress contents to save disk space” and hit OK. To compress an entire disk, simply right click on the volume in “This PC”, open the Properties window and tick the box labelled “Compress this drive to save disk space”.
Compression can take a while – Windows took more than ten minutes to compress my Desktop folder, but in doing so it reduced its size from 6.3GB to 3.6GB. Keep your expectations realistic, though: MP3S, photos and videos won’t get significantly smaller because they’re already stored in compressed formats. Note that compression is also only supported on drives with a cluster size of 4KB or less (see the “Cluster size and slack space” box above).
Windows 10 also supports a feature called CompactOS, which is designed to reduce the footprint of the OS without having to decompress every single file that’s accessed. It was designed for tablet-style systems with 32GB MMC system drives, but you can enable CompactOS on any Windows
PC: just open a command prompt as Administrator and then enter the following command:
compact.exe /CompactOS:always
To check whether CompactOS is enabled, re-enter the command, replacing the word “always” with the word “query”; to disable the feature, replace it with the word “never”.
DISABLING KEY FEATURES
If you’re really desperate for space, you might be able to save some room by disabling a handful of key Windows features.
First, if you’re working on a laptop, you can consider turning off the
It’s sometimes possible to find unallocated space or unwanted partitions on your hard disk
hibernation function, which stores a complete copy of your system’s memory on the hard disk when your computer goes to sleep. If you have 8GB of RAM, the hibernation file will be occupying 8GB of storage on your hard disk, which you can reclaim by opening a command prompt as Administrator and entering the following command:
powercfg.exe /h off
We’d suggest you use this ability with caution, though: if your battery goes flat while hibernation is disabled, the computer will power down and any unsaved data will be lost.
You can also disable the System Restore feature, which stores backup copies of your system state and components after you install new apps and updates. To open its settings, search the Start menu for “Create a restore point”, click “Configure” in the dialog box that appears, select “Disable system protection” and hit OK to confirm. Needless to say, once you’ve done this you won’t be able to roll back system changes – so be warned that, if an installation goes wrong in the future, you could end up with a complicated repair job on your hands.
FINDING EXTRA SPACE
If you’ve tried all the above measures and you’re still hungry for more space, one other possibility remains: make your drive bigger. That might sound like a rather optimistic bit of magic, but if you know what you’re doing it’s sometimes possible to find unallocated space or unwanted partitions on your hard disk and to use that capacity to extend your main system partition.
The first thing to do is inspect the layout of your hard disk. You can check this using Windows’ built-in Disk Management console, which can be tracked down in the Start menu under the name “Create and format disk partitions”. When it opens, you should see a map of all the disks installed in your system, divided up into their constituent partitions. This view isn’t remotely proportionate – on my computer, it shows a 77MB EFI system partition as around the third of the size of my main 475GB Windows drive – but it’s a handy overview of the lie of the land.
In an ideal world, you would see a big chunk of unallocated space on your disk right next to your C: drive. If you’re lucky enough to find such a thing, you can add it to your system drive by right-clicking on the Windows partition and selecting “Extend volume…”

In reality, though, you’re very unlikely to find a massive expanse of free space waiting for you in Disk Management. However, what you might spot is a partition that you no longer need – perhaps one left over from when you tried installing Linux in the past, or maybe a manufacturer’s recovery partition that you can now live without.
If you do decide to reorganise the layout of your primary hard disk, proceed with caution because even seemingly innocuous changes can lead to problems. Windows needs certain partitions to be in the right place on the disk, with the right properties, or the boot process will stop working and you’ll have one heck of a time fixing it.
We recommend that for any such task you ditch the Disk Management console entirely and use something more user-friendly, such as the free MiniTool Partition Wizard (partitionwizard.com). This will guide you through the process and help steer you away from any mistakes that could cause serious problems for your system.


