The complete guide: Decontaminate your PC
PC REELING FROM THE EFFECTS OF MALWARE? HARD DRIVE OVERLOADED WITH UNWANTED PROGRAMS AND DUPLICATE FILES? DISCOVER HOW TO CLEAN OUT ALL THE PC JUNK.
Despite your best efforts — and the occasional reinstall — Windows continues to accumulate junk files. Whether it’s simply cluttering up your hard drive with unused and unwanted programs or something more sinister, such as a malware infection or full-blown ransomware attack, the fact remains that your PC’s storage drive attracts detritus like a magnet. In this feature, we’ll show you how to fight back.
Table of Contents
- Check for malware
- Recover from stubborn infections
- Remove unwanted junkware
- Remove undesirables from your PC
- Remove more junk
- Visualise drive space
- Remove duplicate files
- Stay infection – and clutter-free
- Simplify Windows tweaks
- A full, destructive reinstall
- Restore programs, settings and data
- Start the install process
We’ll open by making sure your PC is completely free from infection — even if you’re diligent about security, it never hurts to make sure you’re not harbouring some particularly sneaky piece of malware. Crucially, we’ll reveal tips and tools that can help you shift most infections from your computer — including many ransomware variants that have your data or computer held hostage.
We’ll then move on to less malicious — but still unwanted — PUPs (potentially unwanted programs) before focusing our attention on other forms of junk, including leftover files and duplicate photos. And having carried out all the rubbish, we’ll reveal what security tools you need in place to prevent further infection, along with some tips for reining in program installations going forward — and how to carry out a complete Windows reinstall if you need to.
By the end of this feature, you’ll have reclaimed gigabytes of hard drive space and banished unwanted programs. Your PC will be faster, cleaner and — critically — safer to use.
Check for malware
Make sure your PC is free of ransomware and other infections, and if it’s not, discover how to deal with them.
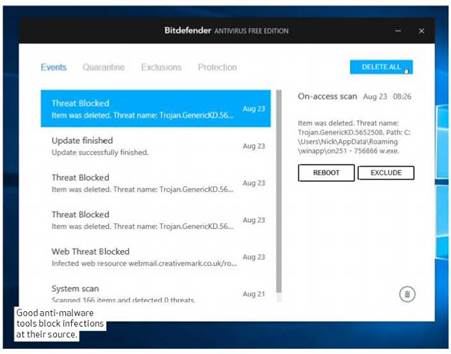
Step one of the decluttering process is to make sure your PC is infection-free. Start by opening your antivirus tool to search for malware infections such as worms, Trojans, rootkits and spyware. Make sure its definitions are up to date, then allow it to perform a full scan. If infections are found, follow the instructions to either quarantine or attempt removal of the malware — you’ll almost certainly be prompted to reboot when you’re done, in which case, run a full scan again to verify the infection has gone.
Some infections can be stubborn — if after two or three attempts the infection is still present, reboot into Safe mode. Those running Windows 7 should tap F8 when the computer starts to boot; Windows 8.1 and 10 users need to navigate to ‘Start > Settings > Update & security > Recovery’, then click ‘Restart now’. Under ‘Advanced start-up’, navigate to ‘Troubleshoot > Advanced Options > Start-up Settings’. Click Restart and press 5 to select ‘Enable Safe Mode with Networking’.
Once in Safe mode, try updating and running the scan again — most, but not all, malware should be sufficiently crippled in Safe mode to allow its complete removal. If the infection is still there, or you’re locked out of Safe mode, the step-by-step guide on the opposite page reveals further tools and tips to try.
“Most, if not all, malware should be sufficiently crippled in Safe mode to allow complete removal.”
WIDEN YOUR SCAN
Even if your main antivirus tool comes up clean, don’t assume you’re out of the woods. Let’s perform some additional scans with other tools to make sure. Malwarebytes Anti-Malware (www.malwarebytes.com) is our favorite security app for delivering a second opinion — it searches for a wider range of threats than most anti-malware tools, including potentially unwanted
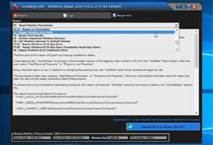
Tweaking.com’s Windows Repair tool can quickly undo damage left behind by malware.
programs that may come with spyware or other privacy issues. You’ll need to download and install the free version, but once in place you can update it and run a full scan as with your main security tool — it’ll even run in Safe mode.
If you want to go further, use the Emsisoft Emergency Kit — as featured in the step-by-step guide — to perform scans using two separate antivirus engines. Other portable tools worth adding to your security toolkit include ClamWin Portable (install this through portableapps.com) and VIPRE Rescue Disk (see the step-by-step guide).
Both may find and remove more stubborn infections. If you’re convinced you’ve been attacked by a rootkit, then open Malwarebytes and go to ‘Settings > Protection’ to flick the ‘Scan for rootkits’ option to On.
RECOVER FROM RANSOMWARE
If you encounter ransomware, don’t panic. This is doubly true if you have a backup somewhere — whatever else happens, you can wipe your PC’s storage drive and reinstall Windows and live with a small loss of data.
In cases where you’re locked out from your data, make a note of any demands (Bitcoin wallet address, file list of encrypted data and so on), which may give you access to your data later if the criminals are caught and the private keys used to scramble your files are released. Next, perform scans with all the anti-malware tools at your disposal to dispatch the underlying infection. Only when it’s removed should you visit noransom.kaspersky.com to see if your infection is covered by one of the six free ransomware decryption tools on offer. Other vendors worth checking out include AVG (www.avg.com/en-au/ransomware-decryption-tools). If you find yourself locked out of your PC by ransomware, try Trend Micro’s free Ransomware Screen Unlocker Tool (bit.ly/trendransomware), which can be run in Safe mode or prepared on another PC if you can’t even get that far.
After you’ve cleaned your PC, you may find certain functions haven’t been restored. Broken network connections can often be fixed with the help of NetAdapter Repair All In One (sourceforge.net/projects/netadapter).
If Safe mode still won’t work, or you’re locked out of key parts of your system, then run the Windows Repair Tool (www.tweaking.com). Not only does it give your PC the once-over, it’ll reset Registry and file permissions, and perform other much-needed repairs.
Recover from stubborn infections
1 ZAP NASTY MALWARE
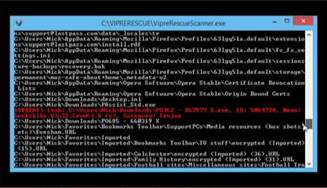
If you can restart your PC in Safe mode — see the main body text opposite to find out how — with networking, then go to www.vipre.com/support/rescue to download a free tool that specializes in removing stubborn malware. If you can’t get online in Safe mode, download it on a clean PC and transfer it across.
2 SCAN WITH TWO ENGINES
If you can boot your PC, but can’t get into Safe mode and have limited access to your system, download and install the portable Emsisoft Emergency Kit (www.emsisoft.com/en/software/eek) on to a USB flash drive on a clean PC. Be warned, it’s 311MB, so make sure the drive has enough free space.
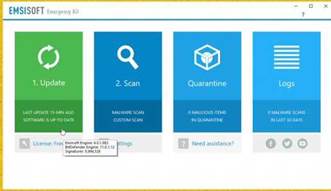
3 PREPARE THE SCANNER
Launch the tool on your clean PC, and select the Emergency Kit Scanner. Click Yes when prompted to download the latest updates. Once that’s done, close the tool and then plug the drive into your infected PC. Launch the scanner tool again — you should see that it’s now up to date.
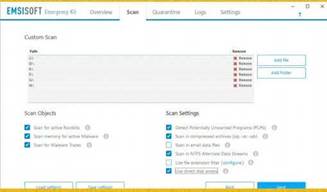
4 SCAN AND REMOVE
For basic malware infections, click Malware Scan. If you suspect that your PC has been infected by a rootkit, click Custom Scan and tick ‘Use direct disk access’ before clicking Next.
You can also perform a custom scan to root out potentially unwanted programs (PUPs) if you so wish.
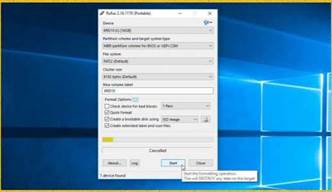
5 CREATE BOOTABLE DISC
If all else fails, create a Kaspersky Rescue Disk — download the ISO from support.kaspersky.com/viruses/rescuedisk to a clean PC. Either right-click the ISO and choose ‘Burn image’ or use a tool, such as Rufus (rufus.akeo.ie), to create bootable media stored on a USB flash drive.
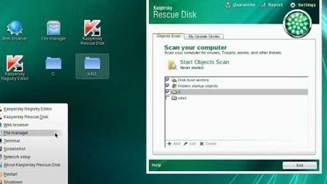
6 BOOT AND SCAN
Restart your PC from your boot media — if your PC has a UEFI and it doesn’t work, you’ll need to go into your UEFI settings to make sure that compatibility mode is enabled to support the rescue disk. Once loaded, let Kaspersky Rescue Disk scan and remove any infections, then reboot your machine.
Remove unwanted junkware
The worst offenders have been sent packing from your Windows PC, now it’s time to move on to the other undesirables.
Next, we’re moving on to programs, add-ons and files that inhabit a ‘grey area’ — these are potentially unwanted (hence the term PUPs) and fall into a number of categories. Most PUPs are installed alongside seemingly legitimate software — usually for financial reasons, an increasing number of supposedly free tools are bundled up inside installers that attempt to do more than simply install the original program.
These additional actions may be to attempt the installation of further programs. Others offer you browser toolbars while attempting to change your browser search settings or homepage. The offerings are usually legitimate, but the tactics used to get them on to your PC are not. Items are usually pre-selected, and it’s not always clear which options you need to select in order to remove those unwanted items thanks to confusingly worded buttons or dialog boxes.
Some security software can block these attempted installations at their
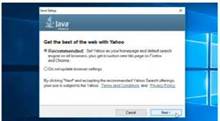
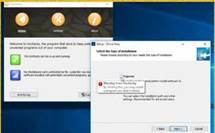
Java is well-known for installing unwanted bundleware. Choose the right settings.
source — see the ‘Block PUPs’ box on page 53 — but if you’ve not been particularly careful, you may find your browser sagging under the weight of multiple toolbars and competing search engines.
REMOVE THE PUPS
If you’ve already taken our advice and performed a scan using Malwarebytes Anti-Malware, then you’ve probably already removed the most insidious PUPs — unlike your regular security software, Malwarebytes is hot on detecting programs with dubious recommendations. They’ll be clearly

Retoring your PC to its factory settings can also cause unwanted bloatware to be reinstalled.
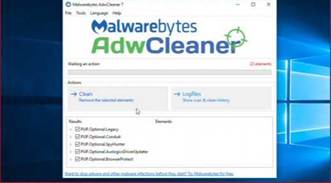
marked as PUPs in the scan results. Malwarebytes also offers AdwCleaner, which targets browser-related items — toolbars, add-ons, search hijackers, browser redirects and other unsavory items — in addition to adware and PUPs. It’s worth running if you’re struggling to reclaim control of your web browser. Get it from www.malwarebytes.com/adwcleaner — unlike Malwarebytes itself, you don’t need to install AdwCleaner before running it.
IT KEEPS ON COMING
Rogue program installers aren’t the only source of junk. If you bought a PC from one of the major manufacturers, chances are it came with a host of pre-loaded software. Some of it might be useful, but most it — including all those trials — is just junk. You could wade through it all manually following the tips on the following two pages, but why not employ the services of a third-party tool to root it all out for you?
PC Decrapifier (www.pcdecrapifier.com) is one such free tool, which we feature in the step-by-step guide opposite. It can uninstall multiple programs at once with minimal intervention, and we like the fact it filters its results into three categories: Recommended, Questionable and Everything Else. You get to see how many other users have removed the software and then choose exactly what you want to remove — remember, you’re under no obligation to remove anything, even recommended entries.
With these techniques, you should be able to remove all malicious and potentially unwanted software from your PC with the help of the step-bystep guide opposite. But what if you want to go even further? Turn the page to discover more ways to declutter your PC and reclaim both lost storage space and system resources.
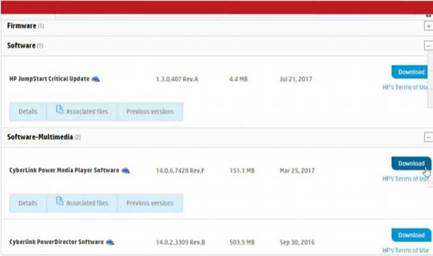
Banish bloatware for good
If your PC came with Windows pre-loaded, then all the bloatware that came with it is waiting to make a return the moment you restore Windows following your manufacturer’s instructions. If you prepare properly by creating a rescue disk with Macrium Reflect Free (www.macrium.com/reflectfree), you can craft your own streamlined Windows 10 installation, free from all those unnecessary programs and trials. If there are programs you will miss — say, a DVD Player — then visit the downloads section of your manufacturer’s website where you should be able to download those individual applications that you do use (along with all the hardware drivers you’ll need).
Remove undesirables from your PC
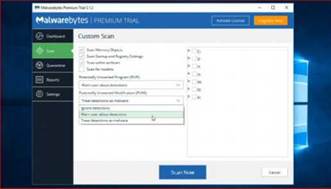
1 CHECK FOR PUPS
If you’ve not already done so, run Malwarebytes AntiMalware. The free version is all you need: select Scan and choose Threat Scan if you want all PUPs treated as malware, or select Custom Scan to be alerted, enabling you to choose whether or not to remove the detected programs.
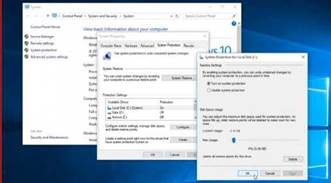
2 ENABLE SYSTEM RESTORE
Some of the following tools will offer to take a Restore point in case you mistakenly remove the wrong program. Press Win- Pause/Break, and click System Protection. If your system drive isn’t protected, select it and choose Configure to do so. Set it to around 5GB or 5% of available space.
3 GET RID OF ADWARE
Malwarebytes’ AdwCleaner tool targets other areas of your PC. It’ll detect software and browser add-ons you’ve freely installed, but which come with a bad reputation. It can also remove them for you — perfect in cases where the software has made it as tricky as possible to uninstall.
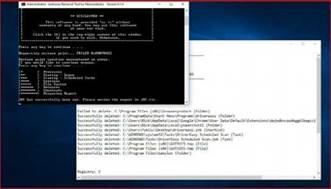
4 REMOVE MORE JUNK
Malwarebytes also produces the Junkware Removal Tool — if you’re still suspicious about what’s on your PC, download and run this from www.malwarebytes.com/junkwareremovaltool for an additional scan. Note that it’ll remove everything it finds — you can’t pick and choose.
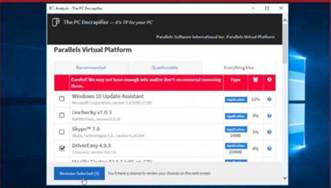
5 TARGET BLOATWARE
Next, open the PC Decrapifier utility and click Analyze to let it scan your system. Work your way through each of the three tabs ticking any programs that you no longer want — note that all of your installed programs are listed under Everything Else, so treat these with additional caution.
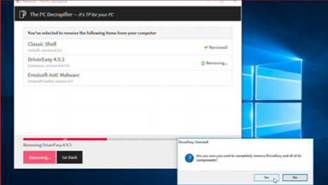
6 REMOVE UNWANTED SOFTWARE
Click ‘Complete Removal’ when you’ve selected the programs that you want to remove. Review the programs list — click Go Back to make changes, or Begin Removal Now to let PC Decrapifier remove each program in turn — follow any on-screen prompts to uninstall specific tools.
Remove more junk
You have freed your machine from the tyranny of malware and adware, now it’s time to perform an even deeper clean.
Your computer should now be free from infections and unwanted software, but there’s plenty more junk clogging up your PC, so in this section we’re going to perform a deep clean.
Let’s start by targeting leftover files by installing the latest version of CCleaner (www.piriform.com). Launch the program and then carefully go through the Cleaner section (split into two tabs: Windows and Applications) to see what’s pre-selected for cleaning. We’d recommend de-selecting everything under Windows Explorer to preserve previously opened file lists. Also, be careful on the Applications tab and think long and hard about deleting app settings you use frequently — if space is desperately low, then target your browser’s cache but leave other settings untouched.
Once you’re happy with your choices, click Analyze. CCleaner will scan your selected items and then provide you with a summary of how much space it’s going to free up. Before committing to anything, though, right-click each entry and choose ‘View detailed results’ to examine exactly which files are going to be deleted. You can exclude individual items by right-clicking them, but if you want to exclude an entire category, you’ll need to untick it in the left-hand pane and click Analyze. Check your choices again and then click
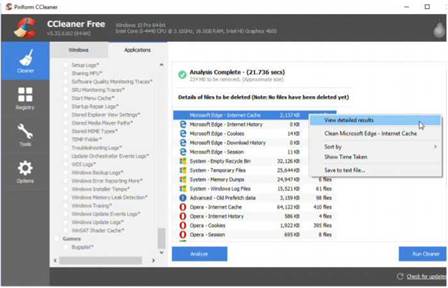
Dump gigabytes of unwanted data from your drive using CCleaner — but use it with care.
Run Cleaner, read the warning — the Recycle Bin is bypassed, so there’s no going back — and click Yes to free your drive space.
MORE CLEANING OPTIONS
CCleaner can help with other aspects of your cleaning too. Time to clear out some of those resource-hogging browser add-ons you don’t use. You can do this from within your browser, but CCleaner offers a convenient location for managing all the add-ons in all your installed browsers. Select ‘Tools >

AntiDupl can help you remove all those duplicate and similar photos you’ve been sitting on.
Visualise drive space
Locating where those space-hogging files are can be an art in itself, particularly if you’ve exhausted all the usual suspects, such as your Pictures, Documents and other user folders. You could, of course, laboriously go hunting inside every single folder manually, right-clicking and choosing Properties, then waiting while its contents are totted up and a folder size produced, but a better option is to employ the services of a third-party tool designed to provide a visual overview of your drive’s state.
CCleaner offers a Disk Analyzer under Tools that enables you to search by one or more file categories and storage drives, providing a useful graphical summary and a list of files in order of file size. Right-click a file to reveal various options, including that all-important delete option.
For a broader overview of what’s taking up space on your PC, try Treesize Free (www.jamsoftware.com/treesize_free), which also provides you with a tree map alongside a details view that offers a block-like visualisation of the selected drive. Simply double-click on a folder to drill down, and Treesize Free will display the information you need — such as the size of files.
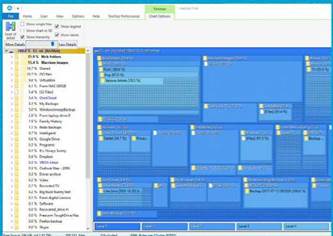
Treesize Free can help you track down where those space-hogging files and folders reside on your computer’s storage drives.
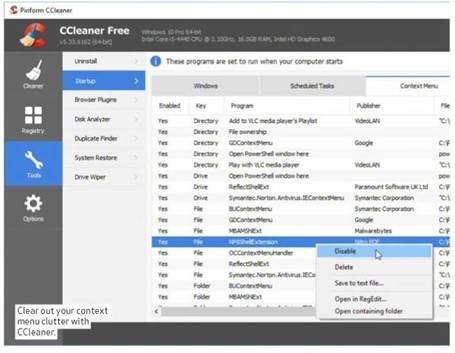
Browser Plugins’ and you can manage your extensions, helpers and toolbars from one spot, with each supported browser represented under its own tab. Disable first, then delete once you’ve verified you don’t need the extension. Next, select Startup — not only can you manage the apps that start with your PC, but you can also manage scheduled tasks, enabling you to see what programs are doing in the background. Switch to the Context Menu tab and you’ll also be able to streamline the menus that pop up when you right-click various items, such as folders or files, in File Explorer. Again, start by disabling items before deleting them, just in case. If you’re struggling to identify them, check the Publisher and File fields as well as the Program one.
REMOVE DUPLICATES
One of the biggest ways in which space is wasted on your PC’s main storage drive is through the proliferation of duplicate files. CCleaner possesses a duplicate finder, but it’s pretty basic.
If you’re looking to weed out duplicates of all types, the step-by-step guide below reveals how to use Duplicate Cleaner Free (www.digitalvolcano.co.uk/duplicatecleaner.html). It can be a slow and frustrating process, but don’t panic if it appears to be non-responsive. You can close the program at any time and when you next restart it, Duplicate Cleaner will pick up where it left off.
One obvious source of duplicate files are photos. In this digital age, we’re encouraged to take multiple snaps of the same shot to try and get the perfect one, but this results in a host of visually similar — if not quite identical — photos cluttering up your PC. This is where AntiDupl (sourceforge.net/projects/
antidupl) comes in, since it’s capable of identifying similar as well as exact copies of your photos.
Once installed, launch the app and start by choosing ‘Search > Options’.
Tick ‘Search rotated and mirror image dupls’. Click ‘OK’ and then select ‘Search > Paths’ to choose which folders and/or drives to search. Make sure the first folder you choose is your ‘master’ folder — the photos inside here will be considered the original, with duplicates from other folders being removed.
Then it’s a case of clicking the Play button and waiting while the search is performed — if it’s taking a long time, click Background Mode to minimise the app to the Taskbar notification area.
Analysing the results is a timeconsuming process — each duplicate or visually similar match is listed as a pair. Each pair is accompanied by a Hint, which indicates which copy will be deleted by default. You can review each match using the controls and change the default behaviour using the buttons next to each photo — roll your mouse over an option for an explanation of what does what. Click one and the action will be performed, with your unwanted file sent to the Recycle Bin (so you’ll need to empty this when you’re done).
Click Exit at any time for a break — when you relaunch the program later, you can pick up where you left off.
Remove duplicate files
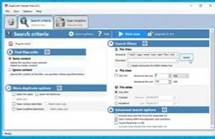
1 SET SEARCH CRITERIA
Open Duplicate Cleaner Free and click New Search. By default, the program will match files by content only, but you can make it match by other criteria, such as name, the date it was created or last modified and so on. Click ‘Select’ to choose a type of file to search for — documents or pictures, for example.

SCAN LOCATIONS
You can also limit your search to specific file sizes and dates. Once you’re happy with your selections, switch to the Scan Location tab so that you can select the drives or folders that you want to include in your scan. Click ‘Protected’ next to a folder to ensure its files aren’t removed by Duplicate Cleaner Free.
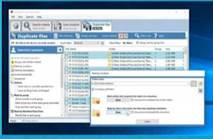
Click ‘Start scan’ — Duplicate Cleaner Free will begin searching and a progress box will keep you informed of what’s going on. Click ‘Close’ when done to choose which files to mark for deletion using the ‘Selection assistant’ tool to guide you.
Click ‘File removal…’ to remove the duplicates once and for all.
Stay infection – and clutter-free
You’ve disinfected your PC and cleared off a load of junk — now it’s time to strengthen your security and keep the clutter from your machine.
You’ve reclaimed control of your PC and banished malware along with unwanted software and other useless files. How can you protect yourself — and keep your PC clutter-free — going forward?
Let’s start with security. These days, threats to your computer come in many shapes and forms. In spite of the best efforts of security vendors, there’s no one-size-fits-all-approach to protecting your PC, so examine what threats are out there and — crucially — how to protect yourself against them.
THE THREATS
Malware is a constantly evolving beast, from its humble beginnings as a virus — a piece of code that replicated itself to spread havoc. The virus became a worm — a standalone program that can cause damage as well as spread, which in turn became a Trojan, which appears legit but in fact carries a nasty payload.
The payloads have changed too, from simply downloading more software to deleting files on your storage drive to now locking you out of your PC or your files through encryption in the form of ransomware. Then there’s spyware, backdoor infections, rootkits, zero-day exploits… Need we go on?
The key thing is to protect yourself against them. How you protect your PC is up to you, but if you’re serious about
security, don’t rely on Windows Defender and the built-in Windows Firewall. Either splash out on a feature- packed, but resource-friendly suite, such as Norton, or mix and match a selection of free anti-malware tools.
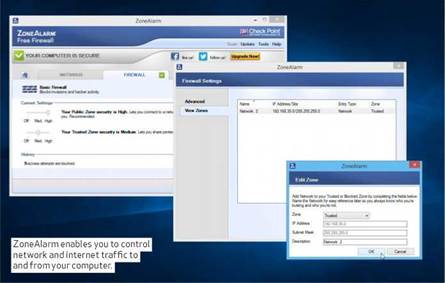
Start with Bitdefender Antivirus Free (www.bitdefender.co.uk/solutions/free.html) and ZoneAlarm Free Firewall (www.zonealarm.com/software/free-firewall). ZoneAlarm lets you block threats from communicating with the outside world — something the Windows Firewall doesn’t do by default. It’s pernickety about which antivirus apps it’ll work with, but Bitdefender is fine.
After installing ZoneAlarm, go into your firewall settings and select View Zones. You should see your home network has been added and placed in the Public zone, which restricts access to shared files and other resources.
If you trust your network, click Edit and switch its zone to Trusted.
Add Malwarebytes Anti-Malware (www.malwarebytes.com) — the free version will detect and remove threats missed by other tools, but if you can
Simplify Windows tweaks
One of the biggest causes of clutter are programs that leave traces of themselves — leftover files and Registry entries — behind when you remove them. Use a tool, such as IOBit Uninstaller (www.iobit.com/en/advanceduninstaller.php), to thoroughly scrub programs from your PC — it’ll also work with Windows Store apps too, including those that came pre-installed with Windows. The latest version of IOBit Uninstaller also drops the annoying prompts to install Advanced SystemCare too, but remember to skip the prompt at the download screen to add a new tab to your browser.
Think twice before installing any program — and get into the habit of using Macrium Reflect Free (www.macrium.com/reflectfree.aspx) to take an exact copy of your hard drive on a regular basis, using differential backups to keep the file size down. You can then roll back your PC to remove clutter as well as recover from major problems
Finally, try to source portable apps where you can — these are self-contained within their own folder, meaning you simply delete the folder to remove all traces of them when you’re done. For more details head to portableapps.com
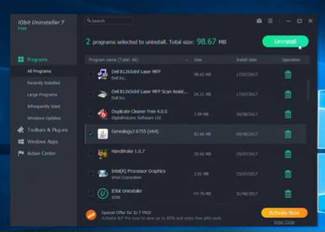
Use lObit Uninstaller to remove unwanted programs from your PC and you’ll prevent the build-up of left over files and other detritus.
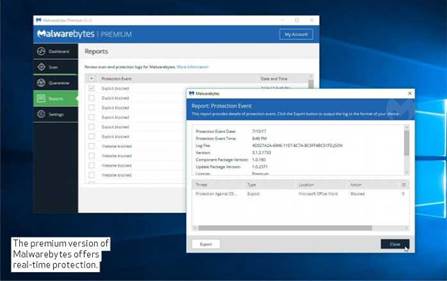
afford the premium version you’ll get real-time protection alongside your main tool as well, blocking a wider range of threats, including malicious websites and PUPs at source. We run MBAM Premium alongside Norton to cover all the threats mentioned above.
Ransomware is a nasty type of virus that locks your PC or encrypts your files, demanding a ransom to get the unlock key. Inoculate your PC against many of these threats by installing Bitdefender Anti-Ransomware (www.bitdefender.com/solutions/anti-ransomware-tool.html) if your anti-malware software doesn’t explicitly offer protection.
Many of these threats originate from dodgy websites — pop-up windows or misleading links. Most browsers now have built-in site-screening tools for the worst offenders, but arm yourself with some form of site vetting plugin, preferably one that rates websites for security and privacy. Sadly, a tool we used to recommend — Web of Trust — has seen its reputation bashed when it was discovered to be selling personal information about its users. The practice has allegedly been stopped, but consider an alternative, such as Norton Safe Web (safeweb.norton.com), if you want to vet both websites and search engine results.
Also add Unchecky (www.unchecky.com), a free tool that helps protect against inadvertently installing PUPs, and Bitdefender Traffic Light (www.bitdefender.co.uk/toolbox/freeapps/desktop). Traffic Light offers some protection against malicious websites.
Finally, strengthen protection against phishing websites and filter internet content for your children by applying security at a network level
using the OpenDNS Home service (www.opendns.com), which has the added benefit of delivering faster website loading as well.
BEHAVIOURAL THREATS
Most threats make their way on to your PC through trickery and deceit. It began with phishing — fake emails that tried to trick people into clicking a link to visit a facsimile of a genuine website in order to capture their login details. Potentially unwanted programs (PUPs) are bundled with genuine programs options to add these generally pop up during the installation process and they’re usually ticked by default.
Scareware is a kind of program that exaggerates or makes false claims — typically about security (“Your PC is infected!”, “10,000 Registry entries are slowing your computer down!”) — to con people into paying for the full version.
It can also be delivered by malware.
Long story short — be wary about clicking links on websites and in emails. Add a mail-screening tool, such as Mailwasher (www.mailwasher.net) or PopTrayU (poptrayu.sourceforge.net) to vet your mail before opening it in your email program, deleting suspicious emails. And perhaps dig out your copy of issue 446 for more tips and tricks on securing your PC and network (check out page 46).
Block PUPs
Install unchecky
Unchecky (www.unchecky.com)
works silently in the background — if it recognizes a dodgy program installer, it’ll quietly make sure any PUP options are unticked or deselected by default. If you subsequently roll your mouse over any dangerous options, a pop-up Warning window will appear.
buy malwarebytes
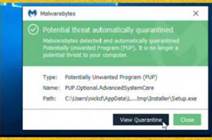
The paid-for Premium version of Malwarebytes also has built-in blocking tools. These will automatically quarantine programs that are deemed as potentially unwanted when they’re detected.
If another program is trying to install a PUP, it will be allowed to finish installing if Malwarebytes considers it clean.
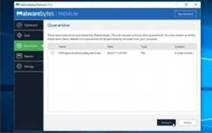
FIX FALSE POSITIVESIf you’re convinced an application is safe — IObit’s Advanced SystemCare, for example — then either ignore Unchecky’s warnings, or in the case of Malwarebytes, head to the Quarantine section using the menu option on the left and select the allegedly offending item, then click Restore to bring it back.
A full, destructive reinstall
If you’re looking to wipe the slate clean, or need to recover from major issues, then the nuclear option is always the best one.
Reinstalling Windows from scratch — namely, wiping your system drive completely clean to install a brand, spanking new (and fresh) version of Windows on to it — is the ultimate choice for anyone looking to revive a slow-running PC or resolve a major, non-hardware issue, such as those caused by malware or a clogged up computer, In this final section, we’ll step you through the entire process.
Ideally, you should have a recent and full backup of your PC, created using either File History or the Windows Backup and Restore tool before you begin, that way you’ll lose the minimum of content. A full reinstall really is destructive — nothing left on your C drive will exist once you’ve finished. You should ensure you have the latest installation media for your target version of Windows — head to www.microsoft.com/software-download/windows10 and click ‘Download tool now’. Once downloaded, open MediaCreationTool.exe. When prompted, select ‘Create installation media’ and follow the prompts. This will ensure a cleaner, more up-to-date installation from the off, thus saving you time bringing it fully up to date once the installation has completed.
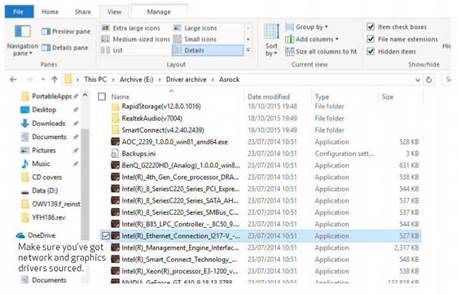
It’s also worth sourcing networking and graphics drivers now rather than relying on Windows to provide them for
Windows 10 users can launch a repair install directly from the Media Creation Tool.
Windows 7 and 8.1 users will find a large number of updates waiting to be installed after reinstalling.
you — in most cases, they should be built in, but not always. Consult your PC or motherboard manufacturer’s website for these, or visit your Wi-Fi adaptor or graphics card manufacturer’s site — download them to your backup drive.
Other things to consider: uninstall any products that require activation now — this should deactivate the licences and allow you to use them with your new install without any issues. Also, be sure to have product keys and program installers to hand.
Restore programs, settings and data
Once Windows is reinstalled, open Windows Update to bring Windows fully up to date — don’t be surprised if there are hundreds of updates. Once it’s fully up to date, consider reinstalling Macrium Reflect Free (www.macrium.com/reflectfree) and taking your first drive image — a vanilla backup you can restore in future instead of reinstalling Windows itself.
If you want to bring your installed apps along with you after a reinstall, consider using CloneApp (www.mirinsoft.com), which can backup app installs to a secondary data drive or external disk. After
you’ve reinstalled Windows, install CloneApp again and click the Restore button, then every program setting you backed up will be restored. If there are any backup settings you don’t want to restore, select Options to locate the backup folder, then open it and move any program folders you want to ignore out of the folder temporarily before clicking Restore. Now take your second Macrium Reflect Free backup. Finally, open File History or the Windows Backup and Restore tool and take steps to restore any data you backed up, then make sure the tool is configured to carry on backing up going forward.
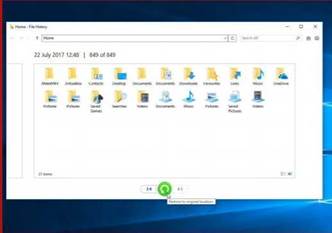
Open File History, link it to your previous backup and then you can restore all your data back to its original location with one click.
STARTING THE REINSTALL PROCESS
A full destructive reinstall should always be started by booting from your installation media, be it a DVD or USB flash drive. The actual reinstall process doesn’t differ much across Windows 7, 8.1 or 10. You’ll be asked to verify your language, location and keyboard are set correctly, then it’s a case of clicking Install Now. If prompted, enter your product key or click Skip if you’re running Windows 10 on a PC you upgraded during the free period.
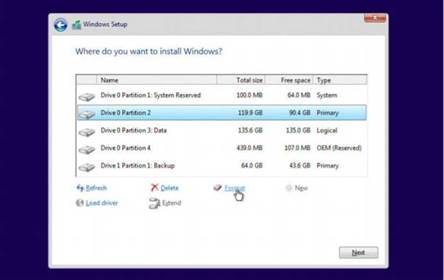
When asked what type of installation you wish to perform, choose Custom.
Next comes the potentially trickiest part of the process. A list of drives and partitions will appear — you need to select the one Windows is currently installed on. By default, it should be detected and selected, but verify it’s correct before clicking Format (click the advanced Drive Options button if it’s not visible). Click OK, then once formatted, verify the drive is still selected and click Next.
That’s the technical stuff pretty much done. You’ll see a checklist of tasks to be performed — just sit back and wait. One thing to note: when Windows reboots, you may see the ‘press any key’ prompt again to boot from CD or DVD. Don’t press anything if that happens, just let the installer continue.
SET UP POST-INSTALL
The post-setup prompt begins with Windows 7 users being prompted for their product key, then it’s a case of setting up a user account and you’re off and running. Windows 8.1 users will get an Express Settings prompt — be sure to click the option to customise these and go through them carefully. Post-Creators Update, Windows 10
“ideally, you should have a recent and full backup of your PC—that way, you’ll lose the minimum of content.”
no longer gives you an Express Settings option. For now, confirm your location and keyboard, set up your network if required and choose ‘personal use’ when prompted. You can either sign in with your Microsoft account or click ‘Offline account > Maybe later’ if you plan to stick with the old-style Windows 7 local user account.
If you opt for the Microsoft account option now is a good time to set up a PIN to speed up future logins (note: the PIN is tied, specifically, to this PC, and you can always bypass it using your regular account password should you forget it at any point). You’ll then be asked to set up Cortana — this is where Windows 10’s notorious privacy settings come into play, so review all of the options carefully, flicking the slider to Off for any you don’t need or use.
That’s the end of the setup process — Windows will now configure itself based on each of your choices and you’ll see a series of messages appear on-screen. Eventually, when all is ready, you’ll find yourself back at the familiar Windows desktop screen.
Start the install process

1 REBOOT FOR MEDIA
If you’re running Windows 7, or have Fast Boot disabled, insert your boot media and start your PC. Look for a ‘Press any key to boot from CD or DVD’ option — even if you have booted from a USB flash drive. Press any key on your keyboard and you should find that the Windows install process starts.

2 TWEAK BOOT OPTIONS
If you boot back into Windows, restart your PC again, but this time press a key, such as F11, when prompted to open a boot menu. Once you have done so, select your boot media — choosing UEFI if that option appears — to boot; otherwise, enter setup so that you can change the boot device order.
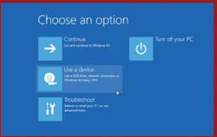
3 WINDOWS 8.1/10
If Fast Boot is enabled on your computer, open Settings in Windows and then navigate to ‘Update & recovery > Recovery’, then click ‘Restart now’ under ‘Advanced start-up’. When the boot options appear, choose ‘Use a device’ to select the USB flash drive or DVD you created from the list that appears.


