Lineage os review: Lineage to the rescue!
Lineage os review – LINEAGE TO THE RESCUE! – When Google leaves your smartphone without updates open source saves the day
THERE’S A JOKE that circulates security circles: Android smartphones are really expensive abandoned Linux distributions. It hurts, but it’s true. Android is based on the Linux kernel, making Android (more or less) a form of Linux operating system, aka a distribution. Android smartphone manufacturers tend to bash out a device, build whatever the latest version of Android is, support it for the shortest amount of time they can get away with, then abandon the owners—vulnerable to whatever zero-day attack next raises its ugly head—running for the hills, waving their wads of cash.
Take the OnePlus Two. A fine Android phone, but OnePlus dropped support two years after release, just as the Krack vulnerability struck. Tough luck, suckers! This is standard practice in the Android world. But when people are carrying their entire lives around with them on a security- hole-riddled device, perhaps it’s time to rethink the situation. So, what can you do?
While you could say a failing of Android — contrasted with Apple iOS—is its easy-to- build-and-forget open-source nature, it means any group can support any devices via the Android Open Source Program (AOSP). And people do. Most famously, there was Cyanogenmod, which blossomed into a huge project, creating builds of Android supporting hundreds of devices, with far more up-to-date releases. But the project closed in December 2016, when the corporate branch that had sprung up shut down the servers that hosted the images, source code, wiki, and so on. That’s where it’s spiritual and source code successor LineageOS rises phoenix-like from the server ashes to power your devices.
BY NEIL MOHR
Table of Contents
What is lineage os?
THAT’S THE POWER of open source—while one group might shut down development, another is free to pick things up and carry on where they left off. It took a few months through the start of 2017 for servers to be established, websites to spin up, and development to pick up, but as we start 2018, LineageOS officially supports almost 200 devices, with many more through unofficial development. See the box out opposite on how to find out what devices are supported, and what to consider when buying a device.
As with Cyanogenmod, LineageOS is built upon the AOSP; the devs take the latest release, which has all the Google software removed, add LineageOS’s own additions, create a build for specific devices, and roll out an image update. This means that when a zero-day is announced, such as the critical Krack and Blueborne vulnerabilities, LineageOS developers can roll out an update within days, rather than the weeks, months, or never-ever option big- name Android manufacturers can take, despite having weeks of embargoed warning.
So, who should consider flashing their phone with LineageOS? Probably not your grandmother. We don’t like being presumptuous, but it’s probably not for her. If your device is still under warranty, wait until it’s not. This type of activity voids any cover you might have, and that would be foolish. The process will likely have your phone out of action for at least half a day; if you’ve never done this type of thing before, more likely a full day—don’t forget, there’s an element of having to reinstall all your apps, tweak things, curse when something isn’t quite right, and start again. It all takes time.
If you’ve decided that flashing LineageOS on your phone is for you, first make sure your phone is supported; there’s not much use carrying on if it’s not! Head to https://wiki.lineageos.org/ devices, and see whether your device is on the official supported list. If it is, you’re golden; if it’s not, don’t give up hope just yet. Consider this list to be tier-one supported devices; because this is open source, less popular devices can often gain support via the https://forum.xda-developers.com community.
A Google search such as ”xda developers <phone model> lineageos” will garner results. Read any returned forum threads to determine how good the support is—hopefully, people will report common bugs or issues. Common issues are the phone, Wi-Fi, Bluetooth, or camera not working—these typically require proprietary binaries to work that may not have been merged into early builds. Other issues include locking up, poor battery life, and other quirks.
The former issues are likely to be deal- breakers, while you might decide you can live with the latter issues. Having used early builds on a number of devices, they usually work relatively well—as long as you have the basic cell phone radio operational. But you need to decide for yourself whether an “alpha” or “beta” build is going to be good enough.
Lineage os guide – How Do You Get LineageOS On Your Device?
The general overall process looks like this; we’ll go into tools and details shortly
[Step 1] Backup your device
If anything goes wrong, you’ll want an escape plan.
[Step 2] Get the tools and drivers
[Step 3] Unlock your device
This wipes everything.
[Step 4] Install a new recovery ROM
Typically, this is TWRP.
[Step 5] Copy Lineage OS and Gapps to the device
[Step 6] Wipe the cache, flash the device, reboot
[Step 7] Wait…
1 BACKUP YOUR DEVICE
If something goes wrong, and you’ve backed up your device, you can restore it back to its existing state, data, apps, and all.
>> For the lazy, you might just want to backup your data with an app. We recommend My Backup (https://play.google.com/store/apps/details?id=com.rerware.android.MyBackup), which has free and paid versions. If you know how to root your device, Titanium Backup (https://play.google.com/store/apps/details?id=com.keramidas.TitaniumBackup) is more comprehensive.
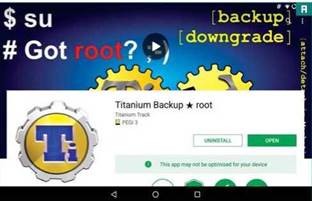
>> Do you use Two Factor Authentication (TFA) or Google Authenticator? Stop now. You’ll lose access and need to re-enable all your TFA-protected services. If you have rooted your device, you can use Titanium Backup [Image A] to save off the keys, then restore them afterward. Otherwise, list your TFA-protected services, and either save off the keys or turn TFA off until you’re back.
>> For the super-lazy, Google backs up your device to the cloud to a degree; when Lineage OS is installed, you’ll get the chance to log in to your Google Account and have it restore the apps and settings. Great in principle, a bit hit and miss in practice.
>> Do you want to backup your text messages and call history? Then use a dedicated backup tool. Another good one is SMS Backup & Restore (https://play.google.com/store/apps/details?id=com.riteshsahu.SMSBackupRestore).
>> Full system images are possible, but only via a suitable recovery ROM, such as TWRP (we’ll cover this shortly) or ClockworkMod. However, unless you already have one installed, installing one requires the device being wiped in the first place. Thanks Google!
2 GET THE TOOLS AND DRIVERS
With a suitable backup done, you’re ready to scoop out the brains of your device, and replace them with something altogether better. To perform such a delicate operation, you need the right tools. This tends to be easier on Linux, but we’ll use Windows here for simplicity.
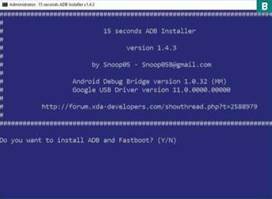
>> The two core command-line tools used to monkey with Android devices are Adb (Android Debug Bridge) [Image B] and Fastboot. You can download these from Google at https://developer.android.com/studio/releases/platform-tools.html. There’s a bunch of other junk in the ZIP that you can safely ignore. Adb is designed to interface and control the Android OS—in other words, Android needs to be running on the device to work. Fastboot is a low-level tool that controls the basic recovery mode access, known as fastboot, on powerup—like your PC’s BIOS.
>> The Android ADB driver for Windows is used to recognize the Android device in debug mode, so you need the correct driver. You can get a generic one from https://github.com/koush/support-wiki/wiki/Android-ADB-Drivers. If your device isn’t recognized, Google maintains a list of OEM-specific drivers you can try at https://developer.android.com/studio/run/oem-usb.html#Drivers.
>> XDA developers have created an all-in-one tool and driver installer (https://forum.xda-developers.com/showthread.php?t=2588979). You may want to opt for that to save your sanity!
DEVICE SUPPORT
We strongly suggest you keep Lineage OS support in mind next time you buy an Android device, so once the manufacturer feels it can drop your support like a ton of bricked phones, you have the option of flashing an alternative OS that continues to be supported. LineageOS support tends to go to popular devices. Take a look at the official list at https://wiki. Uneageos.org/devicesto get a feel for what is popular: Google devices, Samsung Galaxy S, Note, and Tab ranges, OnePlus, most Motorola Moto devices, LG, the HTC One and Sony Z ranges, among others.
Another consideration is can you flash your device? Almost all manufacturers now offer a (legally required) process to unlock the device, but it varies from one manufacturer to another, and even between devices. Remember, unlocking an Android device wipes everything, and causes a factory reset. You have been warned.
A few examples:
• Motorola has a dedicated site with clear instructions, which sends you a device unlock code: https://motorola-global-portal.custhelp.com/app/standalone/bootloader/unlock-your-device-a.
• HTC has its site here: www.htcdev.com/register.
• Sony is here https://developer.sonymobile.com/unlockbootloader.
• Samsung devices are best done via the XDA Odin tool from https://odindownload.com/download.
• OnePlus and Google devices are unlocked via the fastboot command, outlined in the main walkthrough.
2 UNLOCK YOUR DEVICE
Now we’re all primed, the first major step is to unlock your device. This wipes everything, resetting the device back to factory defaults. You have been warned. Annoyingly, it seems that every manufacturer provides a different unlock mechanism—see the “Device Support” box out on the previous page for more details. We’re going to follow the default Android system that is used by Google and OnePlus.
>> To begin, we need to activate Developer mode, and switch on USB Debugging. In Android, select “Settings > About,” and tap the build number seven times. A message announces that Developer mode is unlocked. Select “Settings > Developer option switch on USB debugging.” If there’s a OEM unlocking option available, select that as well.
>> Once USB debugging is on, you’ve installed the ADB drivers, and unzipped the tools, connect your Android device. A security message appears on the Android device—allow the connection.
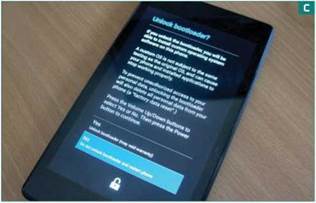
>> Select “Windows,” type “CMD,” and press Return. “CD” to where the tools were extracted. For simplicity, you can copy Adb and Fastboot to your desktop, and just work with “CD desktop.” To reboot into recovery, type “adb reboot bootloader.” To unlock, type “fastboot oem unlock.” A warning appears [ImageC]—read this, and accept the responsibility, or run screaming into the hills.
4 INSTALL A NEW RECOVERY ROM
You’ll want to reboot your Android device and log in—don’t worry about accounts, this is just so we can copy over recovery images, LineageOS, and so on. At this point, we’re concentrating on adding a custom recovery ROM. This is accessible when a device is first powered up via a key combination, such as Power and Volume Up or Down. You can also reboot into it via the Adb tool. Using the custom recovery ROM, we’re then able to flash a new OS and do complete system backups.
>> The most commonly used recovery ROM is TWRP (Team Win Recovery Project), so head to https://twrp.me/ Devices, and download the correct ROM for your device. If one isn’t listed, you should try searching for a Clockworkmod recovery image for your device. Copy the recovery image into the same folder as the Fastboot command.
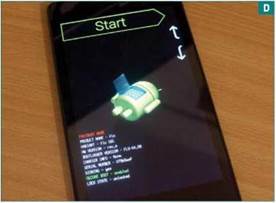
>> If you know how to reboot into fastboot recovery, do so. Otherwise, put the device back into USB Debugging mode, as explained in the previous step, and in a command prompt, type “adb reboot bootloader.” To flash the recovery image, type “fastboot flash recovery <image file name>.” Select to start recovery, and enter TWRP. At this point, you can boot back into “System,” aka Android [Image D].
Lineage os: MIND THE GAPPS
We’ve mentioned that AOSP can’t include proprietary Google code; the ramifications of that is that a default install of LineageOS doesn’t offer Google Play services or any associated Google Android apps you might be familiar with, such as Maps, Keep, Hangouts (oh no-Ed), Gmail, and so on. You do get open-source equivalents of some, such as Calendar and Contacts, but it’s not the same if you’re switching, and you’re going to want access to the Google Play Store.
That gaping gap is filled by the Open Gapps project at http://opengapps.org. This provides a suite of downloads, from a minimal 125MB Pico install that’s the base Google Play services, to a full-fat Super package at 860MB, which includes every app ever shipped to a Google device.
You need to choose the correct platform. ARM is 32-bit (similar to x86), which is most devices out there. ARM64 is for 64-bit devices. These devices and newer are 64-bit: OnePlus Two, Samsung S6/Note 8, Google Nexus 5X/6P, Pixel 1/2. If it offers 4GB of memory, it’s likely 64-bit. If it’s an Intel Atom, you need the x86 build.
Choose the correct Android version for the release of LineageOS you’re installing — probably Android 7.1—then the variant. We recommend Nano, because you can install just the Google apps you’d like once you’re up and running. Avoid Stock, unless you’re running a Google device, as the camera app (designed for the Pixel) can go a bit screwy. If you want everything, choose Super or Full.
We recommend you copy and install this alongside the OS image—you can stack up packages to install via TWRP. If you encounter any odd crashes after LineageOS starts, reboot to TWRP Recovery, and clear the ART Cache and Cache to clear this up.

You want Google Play and its privacy snooping services, right? You need to grab the Gapps package, then.
5 COPY LINEAGE OS AND GAPPS TO THE DEVICE
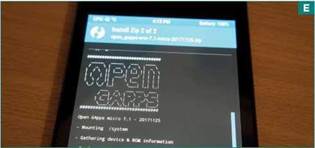
As discussed, download the LineageOS build (https://wiki.lineageos.org/devices) for your device. Currently (early 2018), we recommend v14.1, which aligns to Android 7.1. Android 8 Oreo is v15, and is likely somewhat experimental at this stage, but read the logs and any forums reports to make up your own mind. At this stage, you can also grab your faux Google Gapps package [Image E] from http://opengapps.org—see the box out below-left for more details on that. Copy both ZIPs to the device—into the “Download” folder, say— and no, you don’t need to unzip them.
6 WIPE CACHE, FLASH DEVICE, REBOOT
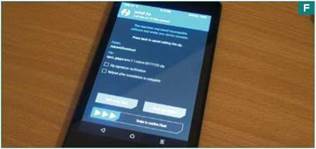
Reboot into TWRP Recovery. Type “adb reboot recovery” if you have a command prompt to hand, or power down, and use the Power and Volume combo. Wipe the Data, Cache, and Dalvik/ART Cache (this is the default), tap “Wipe,” and swipe to go. Not doing this can cause the install to return an error. Return to the main menu and choose “Install.” Select “Download” and the LineageOS ZIP. Choose “Add More Zips,” and do the same for Gapps [Image F]. Swipe to flash, and kiss goodbye to old Android. Once done, do a default wipe again, then reboot into Android. The first boot can take five minutes or so.
7 ENJOY YOUR NEW OS!
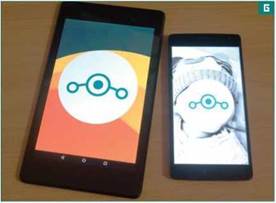
Welcome to LineageOS [Image G]. If you want to use the cloud restore linked to your Google Account, there’s an odd quirk at the time of writing. To log on to a wireless network, you need to first choose to not restore from another device/the cloud, set up a wireless connection, then step back, and restore. Otherwise it doesn’t set up a connection, making it tricky to download from the cloud.
>> Once LineageOS is working, you’ll have access to the Google Play Store. If your Google Account is up and running, apps are slowly restored with some settings in place. Check Security settings, tweak the Notification drawer, and perhaps get a new launcher; Nova Launcher is our favorite.
>> We’ve mentioned “root” access—this is administrator level access to the Android system. It’s generally not required, and considered a security risk, which is why it’s off by default, and hard to turn on. If you want root access for backup reasons, Lineage OS makes it reasonably easy.
>> Grab the Super User pack for your device’s architecture from https://download.lineageos.org/extras. Copy it to your LineageOS device, reboot into TWRP, and flash the su.zip. Back in LineageOS, enable Developer mode, if you haven’t already. You’ll see an option called “Root access”—select “Apps and ADB mode.” Now apps can be given root access.
Depending on your device, you could find you’re getting LineageOS updates once a week. Don’t feel you need to install them. You can follow the recent changes update log for your device at https://download.lineageos.org, along with any changes that will be merged into the next build.
Lineage os: THE OPEN-SOURCE WAY
Proprietary software is pure evil, so some people say.
It denies you ownership of something you’ve paid money for, hides the true nature of the software, and enables spying, backdoors, and security holes to propagate without the user’s knowledge. While some of that is still possible with open source, the chances of it happening are much reduced. To try to bring open source to Android, a system was created called
F-Droid, available from https://f-droid.org.
You can install this on standard Android and LineageOS, as long as you enable “Unknown Source” within the Security settings. Then download and install the APK from the website. F-Droid attempts to be an open-source repository, offering freed software to anyone willing to install it.
The quality and range of open- source software available has come on a long way in recent years, and if you’re looking for a system tool, or something a little more creative, it’s a good place to stop and look for software that at least respects your rights as a user. We’re not expecting you to dump the Google Play Store, but F-Droid offers an alternative source of Android software that you can trust.
A world of freed software is an install away with F-Droid.