Push Intel’s Skylake-X Processors to the Limit
YOU’LL NEED THIS UNLOCKED INTEL CPU
Any X299 CPU or K series chip. ASUS X299 MOBO – And don’t forget cooling.
SUITABLE PSU
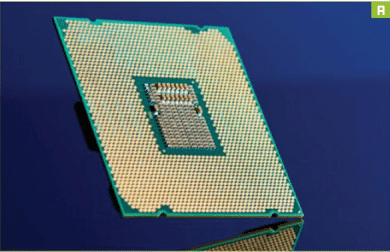
If you’ve read our review of the Core i9-7980XE [Image A], you’ll know it’s one monster of a processor. This thing is a beast: 18 cores and 36 threads of pure 14nm fury made manifest. Assuming you’re willing to invest the needed to home this heady chip, or eager to splash the cash on any of the prestigious Skylake-X processors, if you want to get the most out of your new CPU. the only option is to overclock it.
It’s fair to say that Intel hasn’t had the best of times when it comes to overclocking its last two generations of chips. Both the mainstream Z270 and HEDT X299 chipsets have been fraught with everything from temperature issues to VRM throttling, and more. There’s plenty of aftermarket solutions to these conundrums, though, from delidding and replacing the stock thermal paste on your sexy slither of silicon, to using a more substantial cooling solution to chill the VRMs.
Table of Contents
However, that’s not to say these chips can’t clock, because, boy, they really can. And with the Core i9-7980XE clocking a phenomenal 30 percent improvement in both single and multicore performance in render-heavy workloads, the temptation to amp up the voltages is arguably greater than ever. So, how do you get the most out of your chip? We re here to show you. -zak storey
1 POWER AND HEAT
When you overclock, applying more voltage and ramping up the multiplier inevitably does two things to your rig: it introduces more heat to your system, and draws more power from the wall. You need to make sure you have a power supply that has around 20 to 30 percent more headroom than you’re currently using, and ensure that your cooling solution is suitable for the task. We recommend that your chassis has. as the absolute minimum, two well-ventilated intake fans, one exhaust fan. and a suitably powerful CPU heatsink. You can achieve this with some of the chunkier air coolers, but you’ll get better results by investing in an AIO (all-in-one) liquid cooler. Any processor with fewer than six threads needs a 120mm AIO. while we recommend a 240mm AIO for 6 to 16 threads, and for anything higher than that, you need a 280mm AIO, or a full custom loop.
2 PRIME FOR PRELIMINARY BENCHMARKS
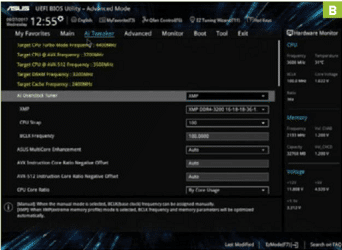
We need to run some preliminary benchmarks to find out how well our system handles at stock. To do this, we head to the BIOS and activate the Extreme Memory Profile (or XMP). Restart your system, mash the Delete key, and enter Asus’s UEFI BIOS. Then, hit F7 to go into Advanced Mode, and select the “Ai Tweaker” menu at the top [Image B]. Go down to “Ai Overclock Tuner” and select “XMP.” Hit F10, save, and go back to the desktop.
3 GRAB THE SOFTWARE
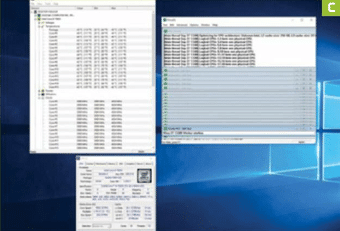
Download HWMonitor, CPU-Z (both available from www.cpuid.com), Prime95 (www.mersenne.org), and Cinebench R15 (www.maxon.net). In Prime 95, hit “Just Stress Testing.” then when the “Run a Torture Test” window opens, hit “OK” [Image C). This runs a stress test on your processor by forcing it to search for Mersenne prime numbers. Run this for around five minutes, then click the “Test” menu, and hit “Stop.” Bring up the HWMonitor window, and look for the subheading with your processor’s model name in it. Take note of the maximum temperature of the overall package, and the highest core clock achieved across all cores.
4 CHANGE THE MULTIPLIER
Now. open CPU-Z and Cinebench R15. In the latter, run the CPU test, and note down the score when it’s finished. While it’s running, take a quick look at the Core Voltage, displayed by CPU-Z. Head back into the BIOS, and straight back to the “Ai Tweaker” section. Find the drop-down menu that reads “CPU Core Ratio.” By default, this should be set to “Auto.” so change it to “Sync All Cores.” Now to calculate your multiplier – it’s the max turbo frequency across all cores in GHz multiplied by 1,000 (conversion to MHz), and divided by 100 (frequency of the base clock). Once you know this, you can then change the “All-Core Ratio Limit” from “Auto” to a suitable multiplier of your choice. We recommend going up by one or two at a time.
5 RETEST
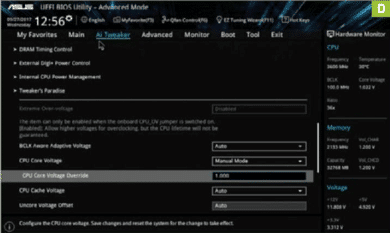
Once you’ve changed the multiplier, scroll down to “CPU Core Voltage.” change it to “Manual.” then set the override voltage to the one you noted down earlier from CPU-Z during your test. We re going to start out using 1.0V, with a multiplier of 36 (Image D], Then hit F10, save, and exit, log in to the desktop, and run the same tests we performed earlier to see whether your overclock, with the new multiplier, is stable.
6 KEEP GOING
Keep increasing the multiplier, until you reach instability and blue screen. At this point, you need to head back to the BIOS and increase the core voltage. It’s extremely important not to overload the chip with too much voltage—we suggest increasing the VCore by 0.05V at a time, especially on the higher end Skylake X chips. Then head back to the desktop to see whether your chip is stable in the benchmarks. You should start to see an increase in both power draw and temperature at this point. Then it’s simply a case of increasing the voltage and multiplier until you can no longer achieve a stable overclock, then dial back the multiplier by one or two. and you’re all set.
7 ADDITIONAL TWEAKS
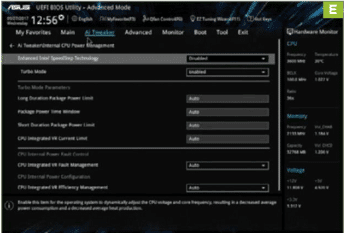
There are a few extra things we can do to improve stability and push our overclock further, the first of which is altering the VRM profile. Back in the “Ai Tweaker” menu, go into the “External Digi+ Power Control” section. Once there, find the setting labeled “VRM Spread Spectrum.” and disable it. Then, find the “CPU Power Phase Control” setting, and change that from “Auto” to “Extreme”—this should help balance the current across the VRMs, ensuring a higher overclock. Finally, if you want to go all-out. go back to “Ai Tweaker.” then to “Intel CPU Power Management.” and disable “Intel’s Speedstep technology” [Image E].
8 MEASURE YOUR GAINS
That ensures you get the absolute most out of your overclock attempts with Skylake-X. Then you can go back to desktop, and run Cinebench R15 again, to see just how much performance you’ve gained.
9 INTEL’S EXTREME TUNING UTILITY
You can actually do a fair amount of this from the desktop, using Intel’s Extreme Tuning Utility (XTU). It’s a neat piece of freeware developed by Intel, which enables you to adjust a variety of settings from the desktop. You can adjust the multiplier, base clock, and voltages, and apply these settings direct from the desktop. You still face similar instability issues once you push the multiplier higher, but it does save time, as you don’t need to restart your rig every time you apply new settings.
The only major downsides are to do with how you apply the core voltage. By default, Intel’s XTU sets it to “Adaptive” (think “Auto”)—to change this, you have to adjust the “Core Voltage” figure to the right (we recommend 1.0V for any Skylake-X chip), then change the “Core Voltage Mode” from “Adaptive” to “Static,” and adjust the “Core Voltage Offset” by the increments we mention in the main tutorial.
It even detects whether you’ve made any changes in BIOS and applies them directly to the same settings on desktop, and includes its own stress tests and integrated benchmarks, along with a plethora of monitoring tools.

Intel Core i7-8700K Review


Ryzen 9 7950X3D Review

INTEL CORE i5-13600K Review

AMD RYZEN 9 7900 Review