Fed up with Windows 10? Looking to switch to a more user-friendly variant of Linux that gives you the best of all worlds? Nick Peers has all the answers…
Table of Contents
[sc name=”ad 2″]
By the time you read this, Microsoft will have rolled out another major Windows 10 update on to its user base. These days you’ve barely had time to get used to one set of changes (whether it’s features being added, taken away or simply moved with no explanation) before more are incoming. There comes a point when you say enough is enough, but what’s the alternative? It’s Linux of course, but some would say that’s a complicated and difficult substitute in itself.
The answer is no, and as proof we offer up this article to show you how easy it is to get started with Linux. We’ve carefully picked a flavour – delicious Mint – that’s specifically designed to appeal to Windows switchers. Linux Mint is based on Ubuntu, which means it’s well-supported, but it’s also been customised to make Linux more accessible and easier to use, all wrapped up in a user interface that’s both familiar and welcoming.
Brilliant… but it’s not as simple as that. Ditching Windows for Linux in one go is a huge leap into the unknown. What happens to your data? Can you find replacement programs easily? What happens if you decide it’s not for you after all? Don’t worry – we’ve got all that covered. Over the next few pages we’ll show you how to both road-test Linux Mint without touching your Windows installation. Then, once you’ve realised how good it is, we’ll show how to install it alongside Windows, so you can transition between them as you desire without committing to anything permanent (for now).
We’ll step you through every part of the process: from taking that all-important backup and configuring your hard drive to accommodate Mint, to a step-by-step guide to the installation and getting everything set up. You’ll finish with a version of Linux that you’re immediately at home with using, one you’ve set up, customised and started to familiarise yourself with. It’s basically not so much a plunge into unknown waters, but a gentle splash into the shallow end of the computing pool. Let’s get those toes dipped.
Test driving Linux Mint
Discover how to road-test Linux Mint quickly, easily and without putting it anywhere near your hard drive and all your data – unless you ask it to.
One of the big pluses of any Linux distribution is its ability to be run directly from DVD or USB flash drive without installation. This so-called “live environment” enables you to preview different distros without having to commit to installing them first (as an aside, it also provides you with a familiar recovery environment should you ever need it). When running from DVD, any changes you make are lost when you restart, so you can experiment without worrying.
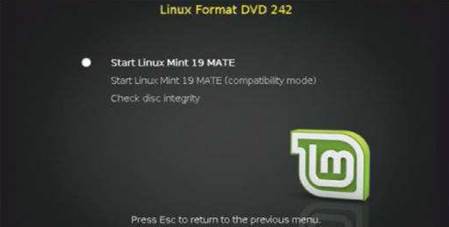
The live environment is a good place to start your tour of Linux Mint as a whole, because it’s virtually identical to what you’ll get when you install Mint proper. Place the Linux Format disc in your drive and boot from it (see www.linuxformat.com/dvdsupport if you need help booting your PC from CD or DVD), selecting the Linux Mint option followed by Start Linux Mint 19 MATE.
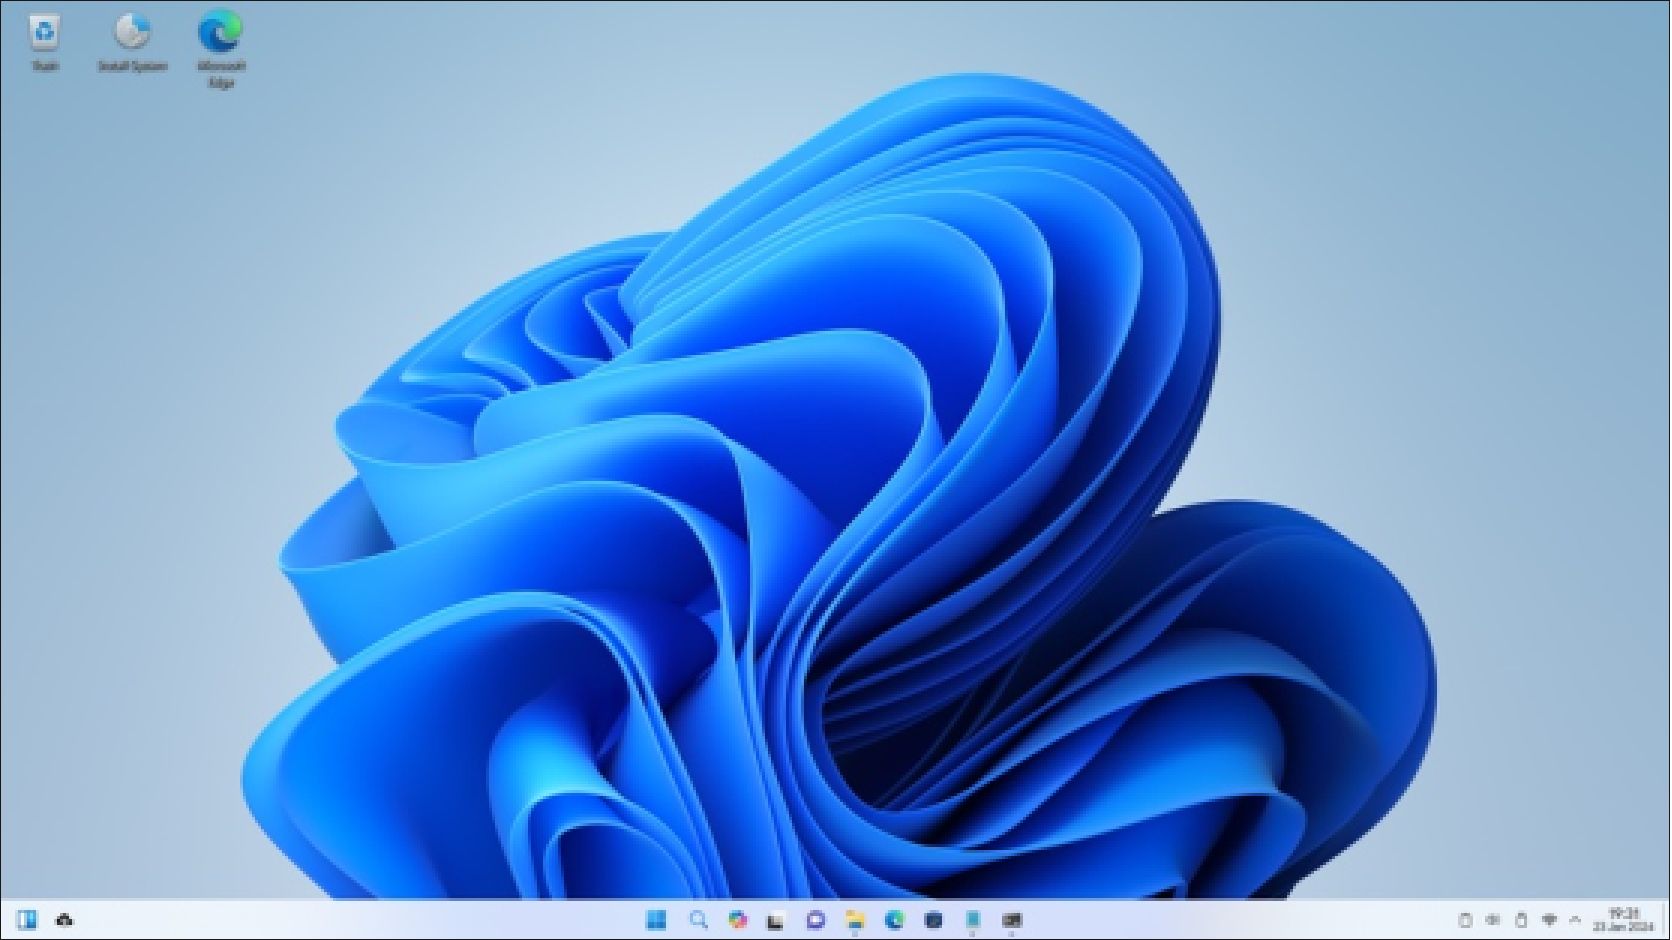
After a few minutes – remember this is booting from DVD, so much slower than running from your hard drive (or even a flash drive) – you should find yourself at Mint’s Cinnamon desktop. It should feel familiar to any Windows user following the classic layout of a desktop with just a taskbar (Mint refers to this as a panel) along the bottom, containing all the navigation tools and aids you need. The taskbar is identically laid out, too: the Menu button on the left opens Mint’s Start menu, while there are system notifications on the right, with pinned application shortcuts and tiles for switching between open windows displayed in-between.
Next to the Menu button is a button that minimises all open windows to leave the desktop beneath, followed by three shortcuts. These point to the Firefox web browser, Terminal (Linux’s command-line environment) and the Files tool, Mint’s equivalent of File Explorer. Click the latter to explore the file system. What you’ll find is that none of your hard drives have been ‘mounted’. This is deliberate, but if you want to access your files, then click the drive as it appears under Devices in Files. Proceed with caution. Not only can you browse and open your files, but you can make changes and delete them, too. To unmount a drive and put it beyond the reach of the Mint live environment, click the eject button next to its entry under Devices.
Mint’s Menu button provides shortcuts to all pre-installed applications as well as system preferences and Mint’s two “stores” for installing more programs: Software Manager and Synaptic Package Manager. You’re free to browse these and install additional apps in the live environment, but they’ll all be wiped when you shut down. There are plenty of pre-installed apps to try too, including LibreOffice, GIMP, Media Player and more.
If you’d like to be able to experiment with the Live environment in the longer term and preserve certain settings and installed programs between reboots, you’ll need a USB flash drive (8GB or larger) and the services of the box (opposite).
The Linux Mint live CD makes it possible for you to give the distribution a trial run without having to install anything to your PC’s hard drive.
When you run a distro in a live environment, all changes are lost when you reboot or shut down. This behaviour can’t be changed if you boot from a DVD, but suitably capable users can create a USB flash drive containing the Linux Mint live environment using an 8GB or larger flash drive with a ‘persistence’ mode.
This reserves a portion of the drive where limited changes can be saved that will survive the current session. When we say limited, we mean installed applications and various settings, but avoid trying to make bigger changes like installing major updates. It’s also recommended you reboot immediately after installing or updating programs. Don’t be tempted to use this as your new Mint installation – it’s only suitable for a more extended road-test of Linux.
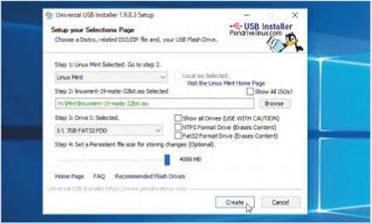
You need specialist software to create your USB flash drive. First, go to www.pendrivelinux.com and click the UUI link to download Universal USB Installer in Windows. Once downloaded, open the tool, select Linux Mint and click Browse to select the Linux Mint ISO file on the LinuxFormat DVD (in the Mint folder). Select your USB drive letter and if necessary tick the FAT32 format option. Finally, use the slider to set a persistent file size of around 2GB and click Create.
Add persistence to your live USB flash drive if you want to retain changes after rebooting.
Run Mint alongside Windows
The process for getting Linux Mint installed on your computer’s hard drive is pretty straightforward – when you know how.
You’ve had a play with Linux Mint and you’re ready to take your first steps proper into Linux. But there’s no need to ditch Windows just yet. We’re going to step you through the process of installing Mint alongside Windows, complete with a special boot menu that appears when you start your PC, enabling you to choose whether to load either Windows or Mint.
Back it up!
Now is the time to take a complete backup of your hard drive as it currently stands, before setting up Linux Mint.
Install Macrium Reflect Free (www.macrium.com/reflectfree.aspx) in Windows for the job. Once installed, launch the program and start by selecting Other Tasks> Create Rescue Media to create a recovery CD/DVD or USB flash drive (a 512MB drive is sufficient) – you’ll need this to boot from to recover your hard drive if things go awry.
Once created, click ‘Create an image of the partition(s) required to backup and restore Windows’. Select a suitable location on your backup drive and click Next. Ignore the backup plan screen – you’re taking a
Starting Mint Live
Place the Linux Format disc in your drive and boot from it (see www.linuxformat.com/dvdsupport if you need help), selecting the Linux Mint option followed by ‘Start Linux Mint 19′. When the live environment boots and the desktop appears, click the Menu button, type gparted into the Search box and click GParted to launch the partition editor.
Locate a drive to partition
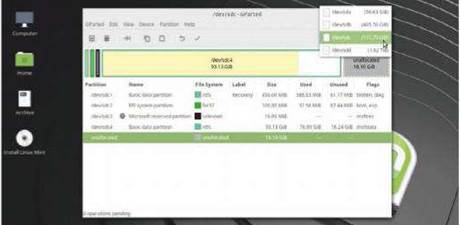
GParted will start by listing the contents of the first hard disk in your system – you should be able to tell if it’s the correct drive by its size and type (NTFS). If it’s not the correct drive, click /dev/sda in the top-right corner and select the correct drive (its size is displayed next to it, which should help you choose the right one) by clicking it, then verifying it’s the correct choice.
Resize the Windows partition
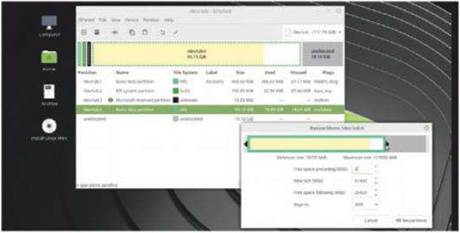
Your Windows partition is displayed as a block with the white area indicating how much free space is available. Right-click this block – or the drive’s entry beneath it – and choose Resize/ Move. Drag the right-hand slider to the left to free up space for Mint – we recommend 32GB as a comfortable minimum. Once done, click Resize/Move, click the tick button and choose Apply.

Launch the install process
Wait while the partition is resized. Once complete, the grey space marked ‘unallocated’ is where you’ll install Mint shortly. Close GParted, then double-click the Install Linux Mint icon. Verify English is selected, then click Continue. Select your keyboard layout – typically English (UK) followed by English (UK) unless you have a keyboard with special Windows keys. Click Continue.
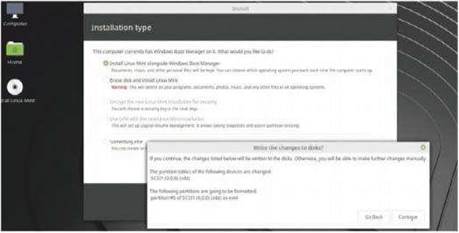
Choose an install type
For maximum functionality, tick the ‘Install third-party software for graphics and Wi-Fi hardware, Flash, MP3 and other media’ before clicking Continue again. You’ll then be prompted for the installation type – the installer should detect Windows Boot Manager and enable you to install Mint alongside it (see the main text if this isn’t the case). If so, click Install Now>Continue.
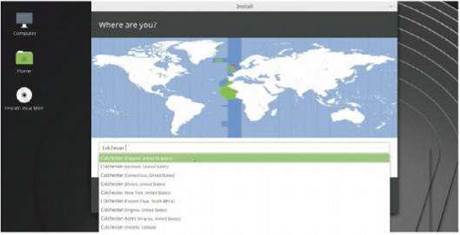
Set your location
Mint will attempt to guess your location – typically London. If this is correct, click Continue; if you’d like to try and get a more precise match, type the name of your village, town or city and press Space – a list of potential matches will appear. If yours is there, click it to select it followed by Continue; if not, try a location nearby to see if you have more luck.
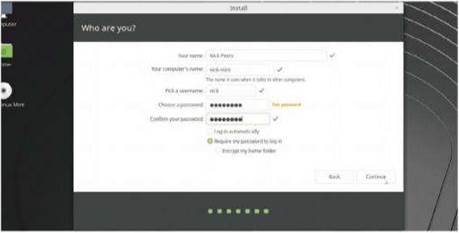
Configure your user account
Next, set up your user account. Type your name – you’ll see Mint suggests a computer name and a username based on this. Both can be amended, but Mint’s suggestions are usually perfect. Now type a strong password – alphanumeric, but one that’s memorable. Leave ‘Require my password to log in’ for security purposes and click Continue.
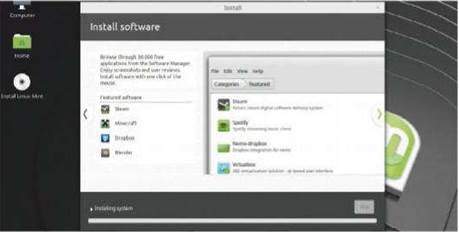
Sit back and wait
Mint will now install – a progress bar is accompanied by details of what the installer is doing. In addition, a slideshow reveals some highlights of what Mint can offer you, which is largely a list of pre-installed software including multimedia, the internet and office, followed by a quick tour of key features. Use the < and > keys to review these while installing takes place.
BOOT INTO MINT, CREATE A BACKUP AND CONFIGURE THE DISTRO
Resolving GRUB errors
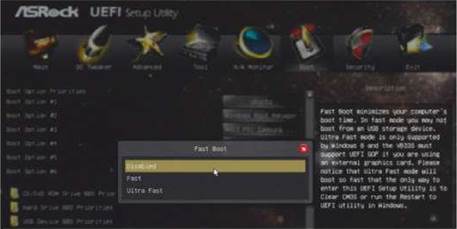
You may receive an error that GRUB has failed to install. This may happen if you’re attempting to install 32-bit Mint on a PC with a UEFI BIOS (switch to the 64-bit version instead). You may also need to enter the UEFI to verify Fast Boot is disabled and the CSM (Compatibility Support Module) has been enabled too. Once done, re-run the setup process again.
Time to reboot
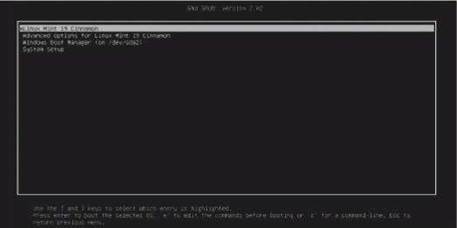
If successful, you’ll see an Installation Complete message. You can stay in the live environment (click Continue Testing) or click Restart Now to start using Mint proper. When prompted, unplug or eject your install media, then press Enter to reboot. If all is well, you should see the GRUB menu appear, with entries for both Linux Mint 19 Cinnamon and Windows Boot Manager.
First-time log in
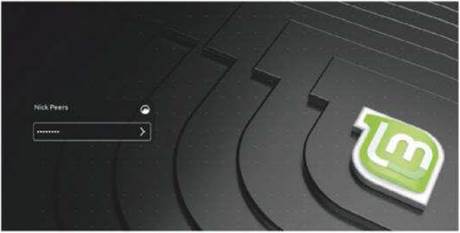
Test Windows works by selecting Windows Boot Manager – if all is well, Windows will boot as normal. Shut down your PC, then start from a cold boot. You’ll find yourself back at the GRUB menu, with Linux Mint 19 Cinnamon selected as the default. Press Enter to boot – when the log-in screen appears, your username should be selected. Type your password and hit Enter.
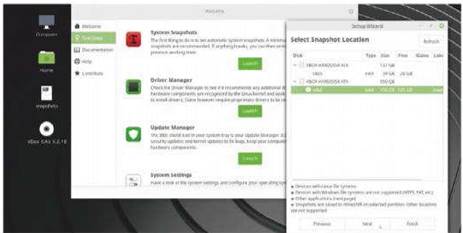
Welcome wizard
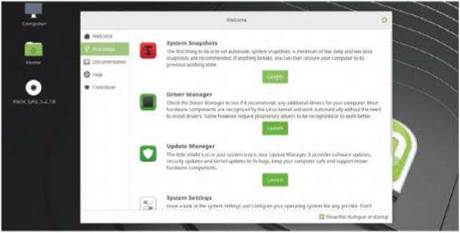
You’ll see a welcome screen appear. Start by clicking First Steps to set up some key settings. System Snapshots ensures that regular backups of Mint are taken, making it easy to roll back to a working state should you break anything. You’ll need to set up an Ext4 partition on a back-up device to do this – see the main copy. Once done, click Launch under System Snapshots.
Set up system snapshots
Leave RSYNC selected and click Next. You should see the Ext4 partition on your back-up drive is available for backing up to – select this and click Next again. Select which scheduled snapshots you wish to take – daily and boot are a good choice. Click Next to read what the tool does and doesn’t back up, then click Finish followed by Create to set up your first snapshot.
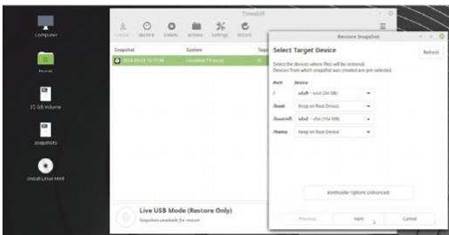
Restoring snapshots
The first snapshot takes a while – subsequent snapshots will be much quicker as only incremental changes are stored. In future, open Timeshift under Menu>Administration to roll your PC back by selecting the snapshot according to date and time and clicking Restore; if Mint won’t boot, launch Timeshift from the live CD and go to Settings>Location to select your backup drive.
Complete the setup wizard
Close Timeshift and click Launch under Driver Manager to see if any additional hardware drivers are available for your PC – if they are, select them and click Apply. Next, click Launch under Update Manager to configure how updates are delivered – after installing the first available update you should find additional updates are offered to bring Mint up to date (see main text).
Ready to go
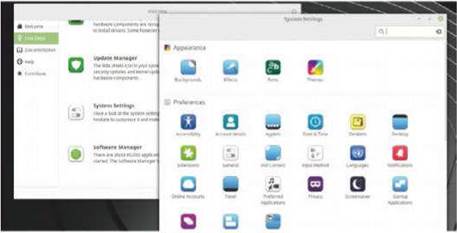
Once you’ve configured snapshots, checked your drivers and installed the latest updates, installation is effectively complete. Click Launch under System Settings to access Mint’s equivalent of the control panel – discussed in detail in the main copy, while we take a closer look at the Software Manager, your gateway to more great free programs and tools, over the page.
one-time backup – and click Next followed by Advanced Options. Select Auto Verify Image and tick the box to verify your backup once it’s been created. Click OK followed by Finish>OK. Once your fail-safe backup has been created and verified, you’re ready to install Mint. The walkthrough takes you through the process, but there are several points where it helps to have a bit more explanation, so keep reading to find out all you need to know to make sure your install is successful.
Partition your drive
Because you’ll be installing Mint alongside Windows, you’ll have to ask Windows to budge up a little and give Mint room. We do this by partitioning your hard drive. This involves resizing the Windows drive to make it smaller to give Mint enough space to run. As a bare minimum Mint needs around 20GB plus however much RAM is installed on your PC, but if you can spare it then consider 32GB as a comfortable minimum, and don’t forget to leave sufficient free space for Windows too – 5GB as an absolute minimum, preferably more.
The step-by-step guide reveals how to repartition your Windows drive using the GParted partition manager, which is preinstalled in the Mint live environment. It assumes you have a single hard drive on your PC and that there’s enough free space to squeeze Mint on next to Windows. If you’re short on free space, either embark on a proper clear-out of your Windows installation or consider either upgrading your existing drive to a larger model or – if there’s a second drive bay available in your PC – adding another hard drive exclusively for housing Mint. (May we suggest you go down the SSD route? Your PC will thank you.)
If you run into problems partitioning using GParted as outlined in the walkthrough, we recommend booting back into Windows and using a free partition-editing tool there to complete the task – try AOMEI Partition Standard Free (www.disk-partition.com) for example. It works in a similar way to GParted.
The other area that may cause problems during installation is when you come to choose your installation type. If you have a single hard drive with just
QUICK TIP
The LXFDVD has a 64-bit version of Linux Mint, older PCs that have a 32- bit processor will require a 32-bit distro – luckily we have Peppermint 9 and Slax 9.5 that both offer 32-bit builds.
Windows on it and free space, you should be fine, but if the option to install Mint alongside Windows Boot Manager doesn’t appear, make sure you select Something else and click Continue.
Now you’ll need to select the free space and create two partitions: the main partition on which Mint will be installed, and a swap partition, which Mint uses for virtual memory. Create the latter first: click the + button and set the swap file size to match your RAM (so 4,096 for 4GB, 8,192 for 8GB, and so on). Select Swap area under Use as and choose ‘End of this space’. Click OK.
Now select the remaining free space above the newly created swap partition, click + again. This time, verify all remaining space has been allocated, the file system is Ext4 journaling and then set the Mount point: dropdown menu to /. Click OK, check the device for the boot loader installation matches your Windows/Mint drive ( dev/sda on a PC with a single hard drive) and click Install Now.
Should you run into problems with any stage of the installation you can roll things back right to the beginning of the process – including undoing any botched partitioning – by restoring your Macrium Reflect backup. Simply boot from the Reflect rescue media you created earlier to be taken to the program’s main interface at the Image Restore screen. If your backup isn’t automatically listed, click ‘Browse for an image file’ to select it. Once done, verify the correct disk has been selected, then click Next followed by Finish and Continue. Once restored, go back to the beginning of this section to try again.
Create a backup partition
After installing Mint – see step 12 of the walkthrough – you’ll be invited to set up system snapshots, which is a great way of backing up your Mint installation in case of disaster (think of it like System Restore, only better). While you can store your snapshots on your Mint partition, it’ll quickly fill the disk and you’re not protected against drive failure. We recommend creating a dedicated partition on your back-up drive formatted to Linux’s Ext4 filesystem – this involves partitioning that drive in the same way you set up your main drive to accommodate Mint. A 100GB partition should be more than sufficient for your needs.
GParted isn’t installed in Mint itself by default. So you can either boot from the live disc and repartition from there, or install GParted from Software Manager (Menu> Administration). Type gparted into the Search box, then click it from the list followed by Install, entering your user password when prompted. You can now launch it from Menu> Administration. You need to enter your user password to run it; that’s because it requires admin privileges to make changes to your hard drive.
Once launched, select the back-up drive from the /dev/sda drop-down menu, then resize the NTFS partition. Once done, right-click the unallocated space and choose New. The default settings should be fine – verify the filesystem is Ext4 and give it a name if you wish. Click Add followed by the tick box to apply the changes.
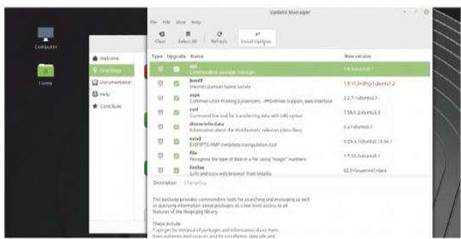
Configuring updates
Unlike Windows Update, Linux Mint’s update mechanism won’t force new updates on to your system, but it will take the trouble to alert you to their presence. When you first run Update Manager as part of the setup process, you’ll be prompted switch to local servers to speed up the delivery of updates: click OK and then click the US server name to select a UK alternative. Once selected, future updates to your system will be delivered that little bit quicker.
After you’ve used Update Manager you’ll be able to access it easily via its shield icon in the bottom right of the toolbar, which will alert you to new updates when it turns blue (if it turns red there’s a problem – click it to open and find out what it is. You can also right-click the icon for more options: Refresh performs a fresh check for updates; Information gives you a precis of recent changes; and Preferences makes it possible to tweak certain settings. As an aside, this is where you go if you decide you want Mint to apply updates automatically, via the Auto-upgrade tab.
Once you’ve finished, you’re now ready to start enjoying your new Mint installation. Turn the page to start using it.
First steps in Mint
You’re all set up and ready to start taking advantage of everything your new operating system has to offer. Without further ado, then…
One advantage of the Linux live DVD is that you’ve already experienced the desktop environment by the time you come to install Mint. As we’ve seen, Mint’s Cinnamon desktop should feel particularly familiar because it shares many common elements with the Windows environment, most notably the desktop with its shortcuts as well as the taskbar (Mint refers to this as the ‘panel’) with its menu button and system notification area.
Let’s take a quick tour of Mint’s handy menu button, which places the entire system at your disposal. Click it to reveal a two-paned menu with a series of buttons on the left (Favourites) and a two-level list of shortcuts on the right. Roll your mouse over each button in the Favourites and a title and brief description will appear at the bottom-right of the menu, revealing handy shortcuts to Firefox, Software Manager, System Settings, Terminal and Files, plus buttons for locking, logging out and power. They all do what you’d expect them to.
Mint comes with all the core tools you need, and the menu is the best place to find them. Type the first few letters of the program you’re looking for into the search box at the top to jump to it – that’ll be incredibly handy later, but right now you’re not aware of what these programs are called. Thankfully, they’re organised into logical sub-menus such as Accessories, Graphics and Office. You’ll also see sections entitled Administration – go here for system tools, Preferences – shortcuts to specific system settings, and Places – and key user folders such as Documents.
Clicking an item opens it, but right-click and you’ll discover options for pinning more accessible shortcuts elsewhere: on the desktop, the panel and in the menu’s Favourites. You can also add items to Favourites by clicking and dragging them into place from the right- hand pane, giving you control over where it appears in the list. You can also click and drag existing items the rearrange them too. The final option offered when you right-click enables you to uninstall the selected item.
Customise the panel
Unlike the Windows taskbar, Mint’s panel is infinitely customisable. It consists of ‘applets, of which the menu button is one, as are the system notification icons on the right. In fact, each icon is an individual applet, enabling you to pick and choose exactly what gets displayed here. To see what other applets are available, right-click the panel and choose ‘Add applets to the panel’ to view a list.
Each applet is given an icon and description – to add it to the panel, select the applet and click the + button at the bottom of the Applets window to add it immediately. Remove existing applets – clearly marked with a tick button – by selecting them and clicking the ‘-‘ button. Some applets have a settings button next to them, which makes it possible to configure the applet itself; the Calendar is one such example.
Other applets are available from the internet – switch to the Download tab and click Yes to refresh the cache if
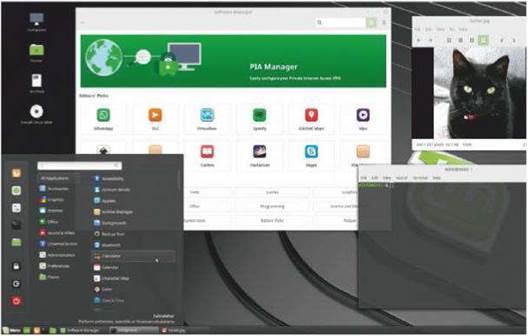
You’ve installed Mint to be productive. Therefore, you’ll be looking to replicate as many of your Windows programs as possible in Linux. The simplest way to obtain and install software in Mint is through the Software Manager. Programs are organised into repositories, and if your target program isn’t in the repositories supported by the Software Manager you’ll have to find alternative ways of getting them.
First, visit the program’s home page – here you may be offered a convenient downloadable installer in the form of a DEB package – choose the 32- or 64-bit download (if offered) to match the version of Mint you installed. Once downloaded, navigate to your Downloads folder, double-click the file and follow the prompts to install it.
Some programs can only be installed through the Terminal – Mint’s command-line interface (press Ctrl+Alt+T to open it). This usually involves first adding the program’s repository using this command:
$ sudo add-apt-repository ppa:user/ppa-name
Replace ppa:user/ppa-name with the PPA provided by the software producer. Once done, you can then install packages from that repository, either through Software Manager or – seeing as you’re already in the Terminal – with the following command:
$ sudo apt-get update && sudo apt-get install <program>
Replace <program> with the name of your target program and it’ll be downloaded and installed. Once added, you can view and manage all repositories via Software Sources in System Settings.
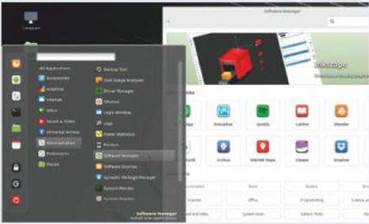
Mint’s Software Manager should be your first port of call when looking for suitable programs to install and run.
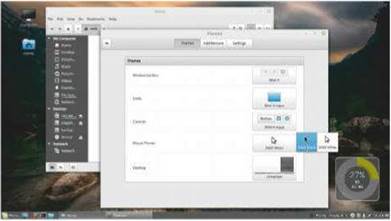
Take the time to set up the Mint desktop exactly as you want it – almost every aspect is easily customisable.
prompted. Simply click the button to download and install an applet, at which point it becomes available in the Manage list. These applets can also be uninstalled if you don’t like them. Note that applets with a padlock are system tools and off-limits.
If you’d like to rearrange the order of applets in the panel, right-click it and flick the ‘Panel edit mode’ switch to the on position. Then simply click and drag an item to its new position. Don’t forget to flick the switch off again when you’re done.
Mint supports multiple panels – up to four, each of which is attached to a different edge on the desktop.
You can also move your panel to the top or side of the screen – right-click the panel, expand the Modify panel section and choose Move panel to select which edge you want to move it to.
Browsing files and folders
Mint’s equivalent of File Explorer is the Files app, accessible from the panel via its own shortcut or by double-clicking any folder or drive shortcuts on the desktop. Again, the layout will be vaguely familiar to Windows users and largely self-explanatory, with a shortcut panel on the left offering common shortcuts. Drag folders from the right-hand panel into the Bookmarks section to pin them for easy access.
Mastering Linux’s file system is a separate topic, but the key concept is that each user has their own Home folder, which the Files tool will always default to. In here you’ll find familiar folders for housing pictures, documents, downloads and so on. Of course, your data is likely to be residing on your Windows partition, but Files can handle NTFS and FAT32-formatted partitions easily. Look for your main hard drive under Devices, and you should find your personal files and folders under Users\<Username>. You’ll have full read/write access privileges, so be careful.
Start tweaking
Let’s start giving Mint a more personal look. Right-click the desktop and choose Change Desktop Background. Select Tara from the left-hand menu to change it to a striking picture, or select Pictures to browse your Pictures folder. In all likelihood this is empty, so click + and choose Other Locations to browse your Windows partition for suitable images if required. Switch to the Settings tab to have a slideshow form your backdrop instead of a single image.
Customise which icons appear on the desktop by right-clicking the desktop again and choosing Desktop Settings. Options exist for Computer, Home, mounted volumes (all on by default – the latter you may wish to switch off to reduce desktop clutter), plus rubbish bin and network (both disabled by default).
To change the appearance of windows, mouse pointers and the panel, right-click the panel and choose Themes. You can modify individual aspects or Click Add/Remove to browse for integrated themes online. You can also change the font used via System Settings> Appearance>Fonts.
Remember Windows’ support for floating desktop gadgets? Mint brings that back – right-click the desktop and choose Add Desklets. Three are available from the get-go: a floating clock, digital photo frame and launcher desklet for opening programs, but again you can get more via the Download tab.
A complete setup
Open System Settings and scroll down to the Hardware section to make sure your hardware is configured properly. Use the Display applet to configure your screen resolution or configure multi-monitor support, for example. Select Keyboard to familiarise yourself with
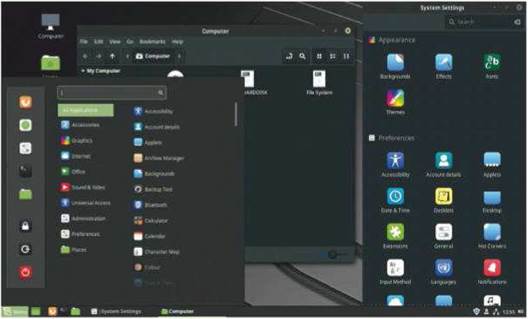
The Mint desktop sporting its sexy Dark Window and Desktop theme, just one of many.
LIVEN UP THE DESKTOP
“Remember Windows’ support for floating desktop gadgets? Mint brings that back – right-click the desktop and choose Add Desklets”
shortcuts. Use Network to set up your network if necessary – if you’re on Wifi, your adaptor should have been detected during setup; if not, you can set it up and get connected here. You can also verify your printer has been set up (Mint is smart enough to detect networked printers as well as locally connected ones).
If you plan to share your PC with others, create additional user accounts via the Users and Groups applets under System Settings > Administration. Like Windows you can create Standard or Administrator user accounts; the former is best for those who shouldn’t be allowed to access system settings or install their own apps, such as children – or your better half.
Let’s get Terminal
Not everything in Linux can be done through the point- and-click desktop, which is where the Terminal comes in. Don’t be scared by the thought of accessing the command line – over time you’ll discover many tasks are often quicker and more efficiently performed through the Terminal. There’s a brilliant guide at https://ryanstutorials.net/linuxtutorial and we’ve also run tutorials in these very pages – subscribers can visit www.linuxformat.com/archives and search for Terminal to access them as a series of PDFs.