Customize Your Windows 11 Desktop
ARE YOU BORED with your Windows desktop? Perhaps the new Windows 11 refresh doesn’t quite grab you, or maybe you’ve decided to cut loose after years of making do with various shades of gray. The good news is that your desktop doesn’t have to remain staid and stale, and we’ve got all the tips and techniques you need to not only make it more attractive but more functional, too.
YOU’LL NEED THIS
RAINMETER
Download this free tool from www.rainmeter.net. Read our Customize Your Windows 11 Desktop.
CAIRO
Visit https://cairoshell.com to download this handy app.
WINDYNAMIC DESKTOP
Grab this gratis tool from https://github.com/t1m0thyj/WinDynamicDesktop.
We open with a simple facelift using Windows’ own tools—a wallpaper change, a color scheme update, and a look at combining all your customizations into a single theme. Not radical enough? Check out the box on page 60 for a tool that can transform your desktop into something more dynamic, with a background image that magically updates as the sun rises, sets, and finally disappears behind the horizon.
If aesthetics aren’t your thing, we also introduce you to a desktop “skinning” tool called Rainmeter, which enables you to place a series of useful information tools—from clocks and to-do lists to system resource meters—on your desktop. And last, but by no means least, we introduce you to an even more radical tool, Cairo, which helps you change the way you use your desktop, transforming it into a tool that’s as practical as it’s pretty. –NICK PEERS
SIMPLE TWEAKS
If you’re just starting out in the world of desktop customization, you’ll find Windows offers many options within its own Settings app—right-click the desktop and choose “Personalize” to see what’s available. You’re shown a list of themes, which are a collection of wallpapers, color schemes, sounds, and cursors. More on that in step two.
>> For now, focus on the sections below these, starting with “Background”. Select this and you can set your wallpaper one of four ways using the drop-down: Picture, Solid color, Slideshow (choose a folder of images on your PC), or Windows spotlight, which displays a series of landscapes handpicked by Microsoft.
>> By default, when you select a new background, you should find your Taskbar and other desktop elements change color to match the wallpaper—to change this behavior, select “Colors” instead. You’ll see options to switch between dark and light mode (Windows enables you to specify different settings for Windows dialogs and apps). You’ll also see a “Transparency effects” switch—flick this on and when your dialogs pass over a strongly colored background (such as your wallpaper), you’ll see a hint of that color peeping through.
>> Beneath this is the “Accent colors” switch—if it’s set to “Automatic,” the basic colors of dialog boxes, the Taskbar, and other Windows elements are determined by the color scheme of your desktop wallpaper. If you’d rather set these yourself, set the drop-down menu to “Manual” and experiment with the various colors displayed beneath (if they don’t fit the bill, scroll further down, and click “View colors” to choose from the entire Windows palette).
>> One final tip: If you want to change the color of the Taskbar, you need to switch from Light mode to Dark or Custom. Once done, the “Show accent color on Start and Taskbar” switch becomes available, and it reflects the other dialogs.
WORK WITH THEMES
If you’re short of inspiration for your new-look desktop, let Windows take the strain by choosing a pre-set theme. You’ll see a small collection on the main “Personalization” page—click one and your wallpaper and color scheme should update automatically to reflect the new theme.
>> To access additional themes as well as controls for creating your own, click “Themes” followed by “Browse themes” to find other themes to try. These are installed through the Windows Store and you can find dozens of alternatives online. Click “Get,” wait for a theme to be downloaded and installed, and click “Open” to return to the “Themes” section of Settings, where the new theme should be available in the list.
>> If you’d like to go further, why not craft your own desktop theme from scratch? At the top of the “Themes” dialog, you’ll find four shortcuts to each component—click these in turn to make your choices, then return to this screen to click “Save,” and give your theme a name. It then appears in the list, ready for selection.

>> If you’re looking to apply more radical customizations to your desktop’s look and feel, you need a program such as WindowBlinds ($ after a 30-day trial, www.stardock.com/products/windowblinds/). This gives you more control over the appearance of elements such as the Start menu, Taskbar, dialog boxes, and more.
RAINMETER
Is your desktop working hard enough for you? If the answer is no, Rainmeter (www.rainmeter.net) could provide the answer. This popular and well-established opensource tool basically enables you to “skin” your desktop by overlaying customizable widgets on top of it. These widgets can display all kinds of useful information, and some are even interactive—for example, a widget enables you to search Google directly from your desktop. Somewhat confusingly, Rainmeter describes its widgets as “skins”, and collections of widgets as “suites”. For the purposes of clarity, we’re sticking with widgets and skins.
>> Download the program and run through the installer—for the most part, the defaults should be fine, but pay attention to the “Launch Rainmeter on startup” option if you’re not sure you’ll want to use Rainmeter all the time.
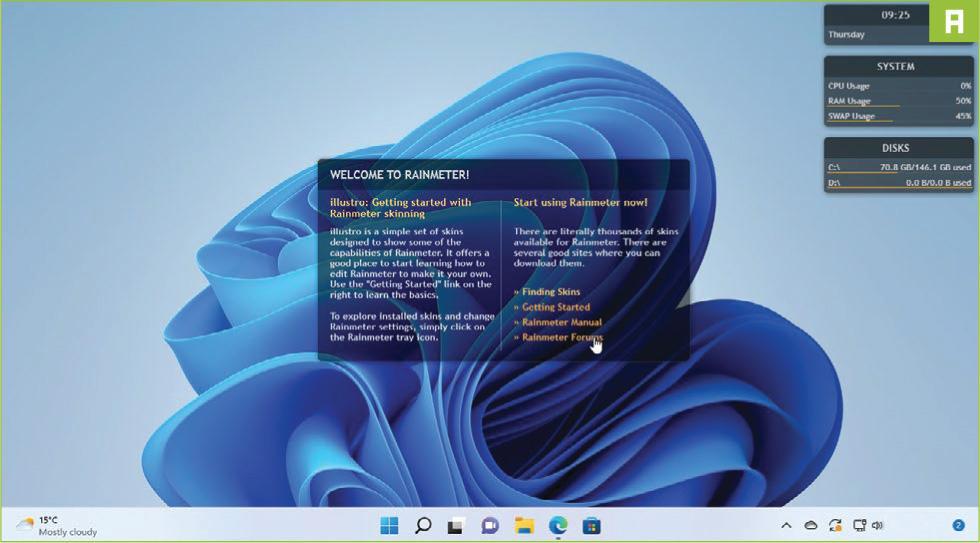
>> Once installation is complete, leave “Run Rainmeter” checked and click “Finish”. Rainmeter ships with a single skin—Illustro—and enables four of its seven available widgets by default. In the center of the screen, you’ll see a Welcome panel with some information and links to further information, while three further widgets—Clock, System, and Disks—appear in the desktop’s top-right corner [Image A].
MANAGE SKINS
These widgets are all floating, so can be moved by dragging and dropping. They are made up of two basic elements: Measures, which gather information from various sources, and meters, which determine what the widget displays and its basic structure (including frames, backgrounds, images, charts, buttons, and so on).
>> Each widget provides a mixture of information and links to other elements—for example, not only does System display your current CPU, RAM, and SWAP usage, but if you click its heading, it opens Task Manager. Similarly, Disks displays the C and D drives, and clicking either opens the relevant drive in File Explorer.
>> Widgets can be moved around the screen simply by dragging and dropping, or you can right-click them to bring up a pop-up menu offering additional options. Choose “Manage skin” to bring up the “Manage Rainmeter” dialog [Image B], which is also accessible via Rainmeter’s Taskbar notification area icon. Here you’ll see you can precisely position the widget using exact coordinates, choose a different display to show it on, set its transparency level, and even use the “Position” drop-down menu to “layer” it in relation to other widgets and desktop elements.
>> The dialog lists all available widgets for the current skin, including those not yet visible. In the case of Illustro, there are additional widgets to display the state of your Recycle Bin, provide network stats, and offer a quick and easy way to search Google without leaving your desktop. Simply expand the relevant folder, select the. ini file, and click “Load” to show the widget; click “Unload” to remove any unwanted ones from the screen (or just right-click the widget and choose “Unload skin”).

EDIT WIDGETS
You’ll notice an “Edit skin” option appears both on the pop-up menu and within the “Manage Rainmeter” dialog for each widget. Selecting this opens the widget’s underlying. ini file in your text editor—if nothing happens after clicking “Edit,” switch to the “Settings” tab, and verify the path to the Editor listed—change this to C:\Windows\System32\notepad.exe or click “…” to select your own text editor if necessary.
>> You’ll see the text file contains pretty much everything you need to know about the widget in question, and follows a logical format:
[Section]
Key=Value
>> Choose one of the default widgets and you’ll see plenty of descriptive information to help you understand what keys do what [Image C], although much of it is selfexplanatory—for example, X and Y refer to coordinates, while W and H determine an element’s size, and Text is what you see on screen.
>> After making changes, choose “File > Save,” then switch back to the “Manage Rainmeter” dialog and click “Refresh.” How much information is defined in the. ini file determines how configurable a widget is—some authors provide more options than others. You may find some widgets, such as Disk, come with more than one. ini file—this enables you to configure variations (in the case of Disk, the widget either shows the capacity of a single drive or two drives), but note that only one. ini file can be loaded for any individual widget at any one time.
>> For more on skins, visit https://docs.rainmeter.net/manual/skins/ to work your way through Rainmeter’s extensive documentation and reference guide.
GET MORE SKINS
There’s no need to design your own skins and widgets from scratch—there are literally hundreds of skins out there, sporting an almost infinite array of designs. These are organized into repositories, of which there are five major ones for Rainmeter—you’ll find links to them all at www.rainmeter.net/discover/ but the biggest one by far is DeviantArt’s—click the “Skins” link under “Gallery Folders” to browse by category. When reviewing results, scroll down to look for a link to the suite or skin’s own page, often hosted at GitHub.
>> You’ll notice many of these skins have their own unique look and feel. For example, the Monterey Rainmeter suite (see https://github.com/creewick/MontereyRainmeter) has a series of widgets in the style of macOS [Image D].
>> Skins are packaged as. rmskin files—simply download these to your hard drive, double-click the file, and follow the prompts to install the skin and any widgets it comes with—use the “Load included skins” box if present if you wish to display all the widgets on screen after installation.
>> Once installed, all available skins are accessible under the “Skins” tab under “Manage Rainmeter.” You can load widgets from multiple skins at once, although their different styles may clash—if this is the case, see whether the new skin offers the equivalent widgets to replace those from another skin.
>> Some skins, such as Monterey, offer a global Settings.ini file within the main folder—select this and click “Load” to bring up a dialog enabling you to further customize the skin or access its widgets without having to use the “Manage Rainmeter” dialog.
TRANSFORM YOUR WINDOWS DESKTOP
While Rainmeter gives your desktop a new purpose, it still relies on existing elements, such as your Start menu and Taskbar. If you’re looking to reinvent the way you interact with the desktop, take a look at Cairo instead (https://cairoshell.com), which is both free and open-source.
>> Once downloaded, just run through the installer—note, if you run Cairo in place of Windows Explorer (rather than overlay it), you lose access to UWP/Windows Store apps and features, which is why this option is disabled by default. Once finished, leave “Start Cairo Desktop Environment” checked and click “Finish”. The Windows Taskbar slides out of sight, then Cairo’s desktop pop-ups, and you’re taken through a welcome wizard.
GET ORGANIZED
After the wizard, Cairo scans your computer for installed programs (including Windows Store apps if you’ve not replaced Windows Explorer). Drag apps from the right-hand pane to the left to add them to the “Programs” menu, or drag them right to remove them. Once done, click “Continue.” Next, you’re prompted to organize your programs into categories—Cairo makes an initial attempt, but you’re free to make changes as required [Image E]. Just drag and drop between categories or click “+” to create a new category. Use the down and up buttons to switch the order of categories. Click “Finish” when done.


>> You now find yourself at the desktop proper. Use the annotation on page 59 to familiarize yourself with its layout, then click the folder button on the navigation toolbar to select which folder you’d like to view on the new dynamic desktop. Its contents fill the screen—if there are too many folders and files to fit, use the scrollbars at the bottom to move around the folder, or click the Cairo menu button and choose “Cairo Settings > Desktop tab” to switch to small icons. While there, you can toggle the dynamic desktop feature on and off, plus set a new home folder for Cairo to default to.
KEEP TWEAKING
Cairo’s Settings dialog enables you to further customize aspects of the program—for example, the Taskbar notification area hides most icons by default, but by switching to the “Menu Bar” tab, you can drag and drop those icons you’d like to be permanently visible. You’ll also find most aspects of Cairo can be enabled or disabled as required, so if there are parts of it you don’t like, just uncheck the relevant box and they vanish.
>> Should you wish to rearrange your programs and categories, open the Cairo menu and choose “App Grabber” to bring up the wizard you used earlier. The Cairo menu also provides you with power options, shortcuts to the Run command and Task Manager, plus—if you want to return to your regular desktop—the magic “Exit Cairo…” command.
CAIRO IN ACTION

1. CAIRO MENU
Click here to open Cairo’s main menu, where you can configure Cairo, access system settings, and shut down Cairo (or your PC).
2. STACKS
Contains shortcuts to Programs (separated into customizable categories), Places (shortcuts to key user folders such as “This PC”), and Folder Stacks, frequently accessed folders you add by dragging to the bar.
3. NOTIFICATION AREA
Cairo moves the Taskbar notification area to the menu bar, where it resides with a handy Search tool that can be used to search files, folders, system settings, and more.
4. DYNAMIC DESKTOP
Your desktop becomes—in Cairo’s words—an “interactive file browser.” Simply double-click a folder to view its contents directly on the desktop itself.
5. NAVIGATION TOOLBAR
This floating toolbar enables you to move between folders, jump to a new folder, and return to your designated home folder.
6. CAIRO TASKBAR
Cairo’s Taskbar is a more focused version of Windows’ own. Next to the Quick Launch area, open windows are sorted by category. Click the Task List button for a categorized list and access to Windows’ own Task View.
GET A DYNAMIC DESKTOP

Are you jealous of macOS’s dynamic desktop? It works by updating the background wallpaper periodically depending on the time, offering different variations on the same image to reflect sunrise, daytime, sunset, and finally night.
You can emulate this feature on your Windows desktop with the free and open-source WinDynamicDesktop (https://github.com/t1m0thyj/WinDynamicDesktop). Download the portable app to have a play, then use the installer to make it a permanent part of your system if you like what you see.
After launching for the first time, enter your location so the desktop updates dynamically with your time zone and seasons. Click “OK.” From here you’re shown a selection of wallpapers with dynamic previews—most will be familiar to macOS users.
Click “Download” then “Apply” to switch your wallpaper to one of those included with the program, or click “Get more themes online” to access over 200 themes online, most of which are free (others typically cost $ each). Once downloaded, extract the. ddw file and click “Import from file” in WinDynamicDesktop to add it.
You’ll find more options by right-clicking the WinDynamicDesktop Taskbar notification area—including the ability to change the lockscreen image and shuffle your theme randomly on a daily basis.
RAINMETER TIPS & TRICKS
Once you’ve chosen which widgets to display and arranged them, switch to the “Layouts” tab on the “Manage Rainmeter” dialog. Give your layout a name and click “Save”—you can restore this from the same dialog if required.
If you find Rainmeter’s monitoring tools interfere with your full-screen gaming, you can manually disable them when running D3D full-screen games via the “Game mode” menu on Rainmeter’s Taskbar notification area icon. To configure what happens—and have Game mode run automatically—switch to the “Game mode” tab and check “Full-screen games.” Additional programs can be added by checking “Additional process list” and typing the app’s executable (program.exe) into the list. Use the “On start” button to determine whether all or selected skins are unloaded, and “On stop” to either restore the current layout or load a specific one.
Finally, to offload some of Rainmeter’s processing, drawing, and memory demands to the GPU, check “Use hardware acceleration” under “Settings.” You can also configure logging here if troubleshooting.
For more tips, see Rainmeter’s dedicated Tips & Tricks documentation (https://docs.rainmeter.net/tips).


