What you need: Windows 10; USB stick (minimum 4GB) Time required: 40 minutes
If, when you power up your PC, Windows 10 fails to start, your PC should automatically boot to a menu of troubleshooting tools for fixing start-up errors, returning to earlier system restore points and more. The trouble is, this menu doesn’t always appear when it’s supposed to. Here, we explain how to create a USB rescue drive that will let you boot to these tools and even reinstall Windows 10 if you need to. This method won’t delete any files stored on your USB stick.
Step 1 First, right-click the Start menu and click System. Make a note of the Windows edition (Professional or Home), as well as the ‘System type’ (32bit or 64bit). Now download a free tool called Belarc Advisor from http://bit.ly/2g1JwnJ. Run the tool and let it gather information about your system. If you’re asked ‘How do you want to open this file?’, select your web browser and click OK. Scroll down to Software Licenses and note down the 25-character Window’s 10 product key (listed after ‘Key:’ 1). Keep this safe, as you may need to enter it if you ever have to reinstall Window’s from scratch.
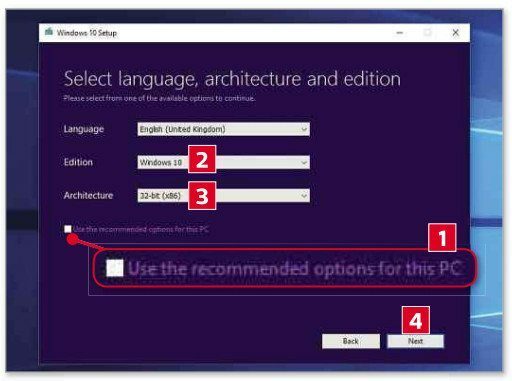
Step 2: Now, go to Microsoft’s Windows 10 download page (http://bit.ly/2gfBpap) and click ‘Download tool now’. Run the MediaCreationTool.exe file, accept the licence terms, select ‘Create installation media for another PC’ then click Next. On the ‘Select language, architecture and edition’ screen, make sure the details shown match those you noted down in Step 1. If you’re running the tool on a different PC to the one you’re creating the rescue drive for, you may need to untick the ‘Use recommended options for this PC’ box 1, then select the correct Edition 2 and Architecture (32bit or 64bit) from the dropdown menus. Click Next 3.
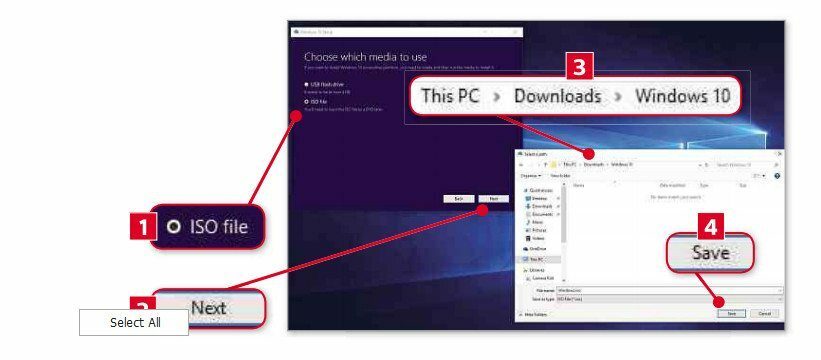
Step 3: On the following screen, you’ll be asked whether you want to create a ‘USB flash drive’ or an ‘ISO file’. The first option formats your USB stick but erases any files that are already stored on it. For that reason, we’ll use a separate tool that won’t erase the USB stick. So, click the ‘ISO file’ option 1, Next 2, browse to where you want to save the file 3 and click Save 4.
Step 4: The ISO file will be at least 4GB, so it could take some time to download. When it’s finished, the Media Creation Tool will prompt you to burn your ISO to a DVD. Ignore this and click Finish. Now go to http://bit.ly/2g1NDQO and click Download 1 to get a free tool called WinUSB. Next, plug your USB stick into your PC.
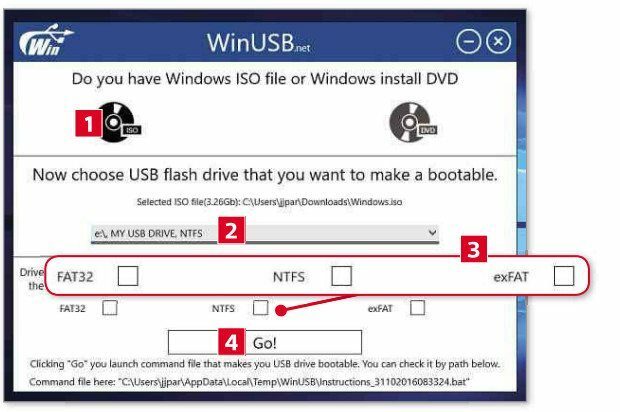
Step 5: Double-click the WinUSB.exe file you downloaded to run it. You won’t need to install anything. WinUSB will ask whether you have a Windows ISO file or an install DVD. Click the ISO icon 1, then browse to the folder where you saved the Windows 10 ISO file to in Step 3. Click the ISO file, then Open. In the dropdown menu that appears, choose the USB stick you inserted 2. Leave the three file system boxes below untickcd 3 (otherwise it will formal your USB stick). Instead, click Go 4. Once it has finished, click Close, then OK.
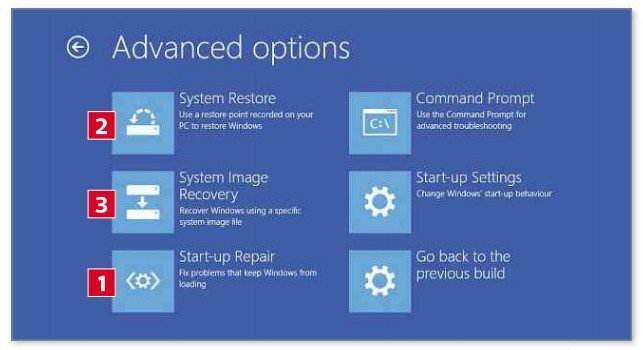
Step 6: If your PC fails to start up, insert the USB stick into your computer and press your PC’s power button. Now select your language, time and keyboard formats when prompted, then click Next. Click ‘Repair your computer’, then Troubleshoot to bring up the ‘Advanced options screen’. Try’ Start-up Repair 1 first or System Restore 2. If you have a system backup you can restore it using System Image Recovery 3. If none of these options work, you can reinstall Windows from scratch by booting to the USB stick again and choosing ‘Install now’.
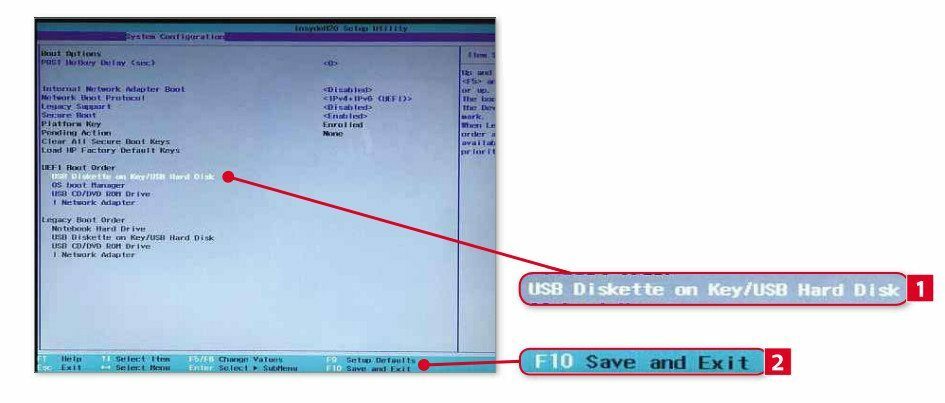
Step 7: If your PC doesn’t boot to the USB stick, you may need to alter your BIOS settings. How you do this depends on the PC you’re using. In most cases, it involves repeatedly pressing a key (usually F2 or Del) during the boot up until a screen of options appears. Use the arrow keys to access the section called Boot Options, Boot Priority, or Bool Order. Now select the USB stick 1 and use the arrow keys to move it to the top of the list. Once you’ve done this, press the key (F10 on our PC) to save and exit 2, then restart your PC.