Build a Water-Cooled ThreadRipper PC
BUILD A WATER-COOLED THRDEADRIPPER PC – TEMPTED TO BUILD A NEW MULTITHREADED MONSTER BASED ON AMD’S NEW THREADRIPPER PLATFORM, BUT DON’T KNOW WHERE TO START? ANTONY LEATHER SHOWS YOU HOW IT’S DONE
If you want to build a PC with some serious grunt for content creation or rendering, but that can also handle 4K gaming, then there’s some fantastic hardware out there at the moment. Intel has just launched its fastest ever desktop CPU, the Core i9-7980XE, a beast of a CPU that sports 18 cores, but it’s also hugely expensive. In fact, it costs more than twice the price of AMD’s Threadripper 1950X, which sports 16 cores and still packs a massive multi-threaded performance punch.
Threadripper offers much better value for money, especially as you’re getting not just the most cores of any AMD CPU, but also the fastest clock frequencies, as all Threadripper CPUs can boost to 4.2GHz courtesy of their XFR feature. In our feature build this month, we’ll be building a Threadripper system with all the latest hardware, and we’ll also be water-cooling the graphics card and processor to make a truly awesome PC. Whether you want to know how to build a Threadripper system, or if you just get some ideas for water-cooling your hardware, you’ll want to read through the next few pages.
THREADRIPPER vs CORE i9
While Intel has claimed back its performance crown, AMD’s Threadripper CPUs still offer remarkable value. The Threadripper 1950X is particularly nifty, retailing for just a little more than Intel’s Core i9-7900X, but trouncing it in many multi-threaded tests thanks to its 6-core advantage. Intel still has a lead in some games, but Threadripper offers enough PCI-E lanes for multi-GPU systems and next-gen storage, as well as fantastic multi-threaded performance. There are some important factors to consider, such as cooling, which we’ll discuss later, but generally, plumping for a Threadripper system will enable you to slough more money into your graphics card or cooling system, while getting performance similar to Intel’s pricier 14 and 16-core CPUs.
THREADRIPPER 1950X vs 1920X
While Intel looks set to offer nearly ten CPUs for its 299 platform,AND has just three Threadripper chips, only two of which are really worth considering for a PC with lots of
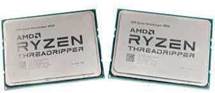
multi-threaded grunt. The low-end 1900X only has eight cores, which you can also get from AMD’s Ryzen 7 1700X for under It does offer the full 64 PCI-E lanes of the Threadripper platform, but the 12-core and 16-core models are where Threadripper really shines.
That leaves us with the Threadripper 1950X and 1920X and, as we saw in our Threadripper coverage last month, the 12-core CPU is fast, but is outdone in some areas by the Intel Core i9-7900X, which is barely more expensive. As a result, the Threadripper 1950X represents the Threadripper sweet spot, offering a clear-cut win over Intel in a like-for-like price battle.
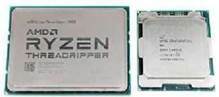
AMD Ryzen Threadripper 1950X
MOTHERBOARDS
Unlike AMD’s mainstream Ryzen CPUs, there’s only one chipset that supports Threadripper, and TR4 motherboards so far appear to be much more mature than their mainstream counterparts were at launch. Having tested models from all four of the major motherboard manufacturers, we can confidently recommend any of them, but two stick out from last month’s group test as being especially worthy of your cash.
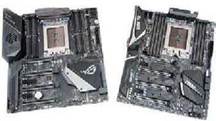
If your wallet is happy to oblige, Asus’ ROG Zenith Extreme is one of the best and most feature-packed motherboards we’ve tested on any platform. It’s dripping with features, such as 10Gb/sec LAN, a nifty ninth DIMM slot that can house two M.2 PCI-E SSDs and loads of other drool worthy features and accessories. However, with a price tag over incVAT, it isn’t cheap. For around less cash, you can get MSI’s excellent X399 Gaming Pro Carbon AC, which still sports a trio of heat sink-cooled M.2 ports, RGB lighting and some mean-looking aesthetics.
It’s our pick if you want to save a bit of money, but still want a PC that will be the envy of your friends.
MSI X399 Gaming Pro Carbon AC
MEMORY
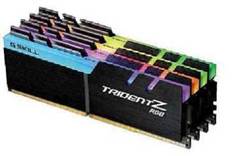
You’ll want a quad-channel memory kit with four DIMMs to maximise bandwidth for your Threadripper system. Offering epic lighting as well as good Ryzen and Threadripper compatibility, G.Skill’s Trident Z RGB kit is the obvious choice at the moment, specifically at 3200MHz. Amazingly, at incVAT, our 32GB kit with 16-18-18-18-38 timings is only around more expensive than many more basic kits, making it great value for a superb-looking addition to your PC. Opting for higher speed can be a gamble on an AMD system at the moment, but this kit worked fine at 3200MHz with the MSI X399 Gaming Pro Carbon AC.
G.Skill F4-3200C16Q- 32GTZR Trident RGB
GRAPHICS CARD
Nvidia’s GeForce GTX 1080 Ti is the only single-GPU option that offers comfortable frame rates at maximum settings in current games at, making it an easy choice for our PC. We’ve only opted for a single card for our build, but there’s clearly scope for adding a second one. Asus’ monstrous Strix Gaming GTX 1080 Ti offers wide compatibility with water block manufacturers,
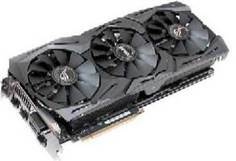
as well as sporting decent cooling out of the box if you want to forgo water cooling and stick with an air-cooled GPU.
Asus GeForce GTX1080 Ti ROG Strix Gaming

PSU
AMD X399 systems can be quite power- hungry, especially when they’re overclocked, and you’ll be looking at a power draw in excess of 600W if you put both the CPU and GPU under combined heavy loads. An 850W PSU will provide plenty of headroom, even if you add another GPU into the mix. For most content creation tasks and games, you’ll likely see lower power consumption than our numbers anyway. We’ve also opted for a custom black and white custom cable kit from https:// cablemod.com
Corsair RM850
STORAGE
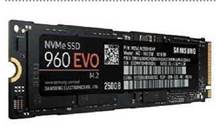
While a solid state drive is an essential part of a modern enthusiast-orientated PC, at least to house your OS and games, it’s also worth stepping up a notch to include an M.2 PCI-E NVMe SSD rather than your average SATA- based device. Samsung’s 960 Evo is capable of speeds over 3,000MB/sec – nearly six times the speed of the fastest SATA SSDs, plus it eliminates the need for any drive bays and unsightly cables, connecting straight to the motherboard. Get as big a capacity as you can afford – we suggest 500GB as a starting point for a high-end system, providing plenty of space for software, games and content.
500GB Samsung 960 Evo
CASE
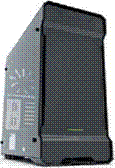
The winner of our recent premium case group test, the Enthoo Evolv ATX Glass looks fantastic, and has everything you need you build a water-cooled PC.
We’ll be using a triple 120mm-fan radiator, but there’s space for two radiators in the case, as well as a dedicated mount for pumps and reservoirs. It can house ATX and E-ATX motherboards, but only up to 264mm wide, which means that a large board such as the Asus’ ROG Zenith Extreme, will overhang the cable-routing holes. If you want to use a larger motherboard, we recommend using the slightly larger Enthoo Primo case instead, to make sure you’re not left with a cramped PC.
Phanteks Enthoo Evolv ATX Glass
XSPC RayStorm Neo
GPU WATERBLOCK WATER COOLING
Threadripper responds well to water-cooling hardware, and we’ve found it makes pushing the monstrous 1950X to 4GHz just that much more comfortable for use as an everyday overclock. We’ve picked XSPC’s new RayStorm NeoThreadripper-specific TR4 waterblock, which is enormous, but covers the entire Threadripper heat spreader and also offers RGB lighting.
We’ve also chosen Phanteks’ Glacier waterblock for our Asus ROG Strix GeForce GTX1080 Ti graphics card – it looks awesome and sports RGB lighting to match the XSPC waterblock. You can buy waterblocks for most GTX 1080 Ti cards, either made by Phanteks or other water-cooling hardware manufacturers, such as EK.
We’ve also used Phanteks 13/10mm fittings and tubing, along with EKWB’s EK-XRES140 Revo D5 PWM combined pump and reservoir. This unit can also tap into your motherboard’s PWM fan signal to alter its speed for quieter operation at low loads. For cooling, we’ve used a single Black Ice Nemesis GTS 360 radiator, along with a single row of Corsair SP120 RGB fans.
Finally, to really allow all the RGB lighting to shine, we’ve used clear Mayhems’ Ultra Pure H20 coolant.
CPU WATERBLOCK
Phanteks Glacier Glacier G1080 Ti Asus Strix
FITTINGS
Phanteks 8 x black 13/10mm compression fittings and tubing pack
ANGLED ADAPTORS
Phanteks 2×45 and 2x 90-degree angled adaptors
Alphacool 2 x Eiszapfen double 45-degree rotatable adaptor
PUMP AND RESERVOIR
EK Water Blocks EK- XRES 140 Revo D5 PWM
RADIATOR
Black Ice Nemesis GTS 360
FANS
CorsairSP 120 RGB three fan kit
COOLANT
Mayhems Ultra Pure H201L
BUILDING THE PC
INSTALL CPU
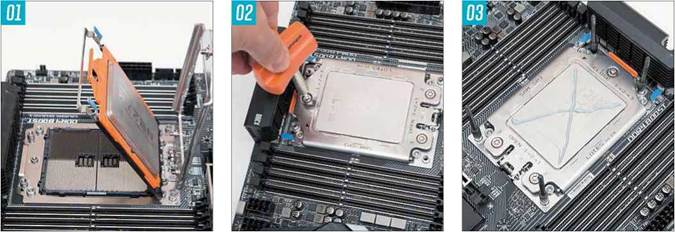
Installing a Threadripper CPU is quite an involved process, but you only have to do it once, and there are safety features to prevent you from damaging the CPU socket pins; the TR4 socket is AMD’s first land grid array package, where the CPU lacks the familiar pins of AMD’s previous CPUs. Each Threadripper CPU is clipped into an orange tray, which allows it to slide into a hinged tray on the CPU socket. Once you’ve inserted it, you can remove the usual black socket cap that protects the pins, then lower the CPU into them and click the tray into place 01.
Finally, a second tray or latch that’s similar to the usual hold-down latches you find on Intel motherboards, needs to be screwed into place 02. It’s important to tighten and also unscrew the socket latch screws in a specific order. When installing the CPU, secure screw 1 first, before tightening screws 2 and 3 loosely, and then fully tighten each screw in turn in that same order. AMD includes a limited torque tool that starts to slip once the required torque is applied so make sure you use it. When opening the latch, unscrew the screws in reverse order, so screw 3, then 2, then 1. There’s a lot of tension and not following these steps will see the latch fly open.
APPLY THERMAL PASTE
The huge heat spreader on a Threadripper CPU poses questions, not just of coolers, but also thermal paste, specifically in the way you apply it. You’ll clearly need a lot more than usual, but does the usual cross method work, or do you need to try another method? To find out, we used XSPC’s RayStorm Neo Threadripper-specific water block, along with some ARCTIC MX4 thermal paste.
We applied the usual cross shape from corner to comer 03. After clamping down the waterblock, we removed it to see how well the thermal paste had spread, and it appears that this method works fine on socket TR4, achieving a fairly even spread over the whole heatspreader 04. The only downside is that this method requires around three times the amount of paste as other CPUs.
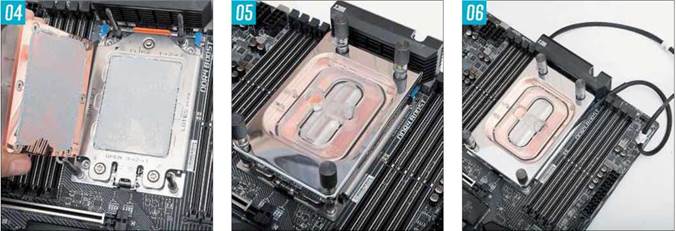
INSTALL WATER BLOCK
After applying your thermal paste (XSPC includes some paste with the waterblock), attach the four socket pins, before placing the waterblock onto the pins and securing it with the included thumbscrews and springs 05. XSPC includes two RGB LEDs that slot into the sides of the water block. They aren’t essential, but they do Look fantastic, and they’re easy to route out of sight, up past the top heatsink on our MSI X399 Gaming Pro Carbon AC motherboards 06. The LEDs include a color and Lighting mode controller, and can be powered by a standard 4-pin RGB LED header.
INSTALL MEMORY
The memory installs in much the same way as with an Intel X299 system, with slot numbers 1,3,6 and 8 being occupied if you have four DIMMS to install 07. If you have a
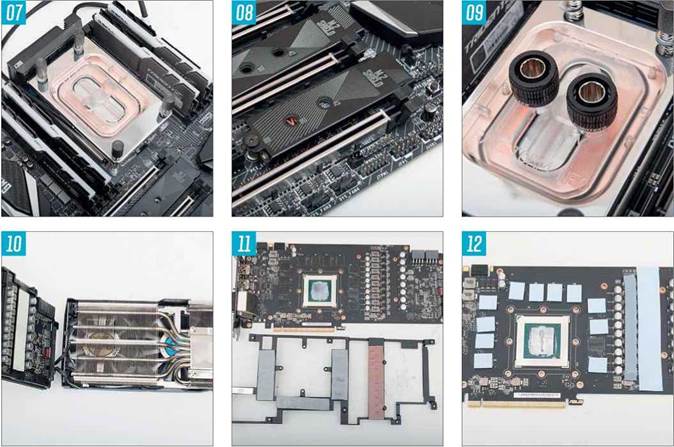
larger budget, we highly recommend opting for a second kit of the G.Skill Trident Z RGB memory. Not only will you get loads of memory, but filling all the slots sees the DIMMS sit snugly together for a more seamless lighting display
INSTALL SSD
The next job on the motherboard is fitting the M.2 SSD under one of the heatsinks. There are three slots available, but we’ve opted for the lowest one, so access to it won’t be blocked by close proximity to the graphics card. Remove the heatsink and the layer of plastic protecting its thermal pad, install the SSD and then use the included screw to secure the heatsink into place, clamping down onto the SSD 08.
ATTACH FITTINGS
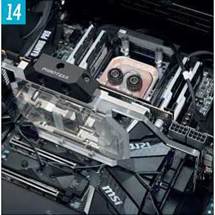
It’s best to install the CPU waterblock fittings before you install the motherboard in your case, as it’s then easier to get your fingers around them properly and apply enough force to tighten them. Work out if you need to use any angled adaptors first, and use them if necessary – we just used normal fittings 09
FIT GPU WATER BLOCK
It’s time to move onto the graphics card.
Start by removing all the screws on the rear
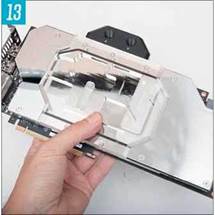
of the PCB, so that you’re able to remove the cooler 10. Depending on your card, you may also need to remove screws on the rear bracket plate.
The thermal paste on the core can sometimes make the cooler tricky to remove, so use a hairdryer for a minute or so to warm up the rear of the card and loosen the paste.
The Asus LOG Strip GeForce GTX 1080 ATI has a very elaborate cooler, and once you’ve removed the heatsink, you’ll need to remove a second contraption that mounts on the memory and VRMs 11.
Make sure you put all the screws in the original graphics card box or waterblock box,
so you can reattach the original cooler later if need be, perhaps if you want to sell your card. The Phanteks block installation process allows you to replace the original backplate of the graphics card though.
The Phanteks waterblock includes replacement thermal pads for the RAM modules and power circuitry, so clean the core and these areas of any residual thermal paste or pads. Then cut the new pads to size as needed and apply them to the card’s modules according to the instructions 12.
You can now secure the backplate if you had to remove it, before securing the waterblock to the PCB. Place the block face down on a soft surface, such as a kitchen
towel, then lay the PCB over it to line up with the mounting holes. InstaLL aLL the screws, tightening them lightly at first before using a moderate amount of force to fully tighten them 13.
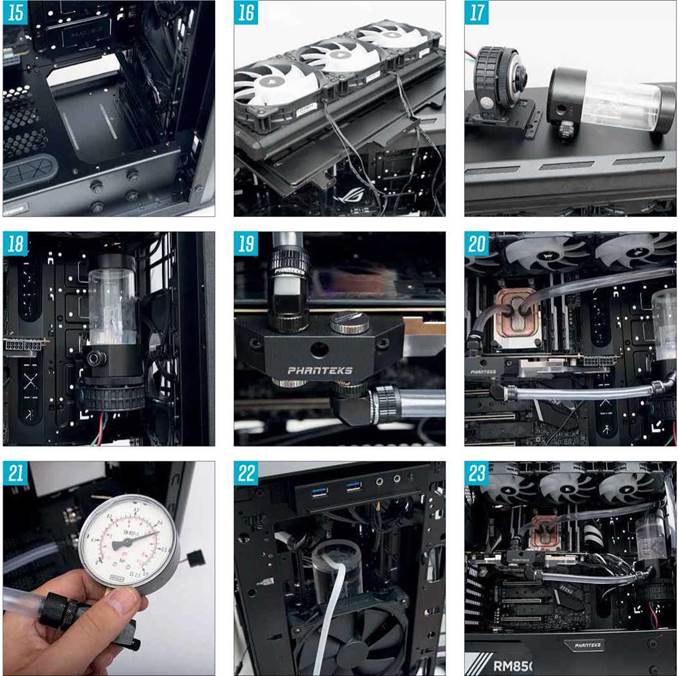
PUT COMPONENTS IN CASE
Now go ahead and install the motherboard and graphics card in the case The graphics card also has RGB lighting, and we recommend routing these cables first before securing the graphics card. We found that they slide neatly between components on the motherboard and out to one of the case’s cable-routing holes. The graphics card may sag a little due to the weight of the waterblock too. If this sagging annoys you, www.mncptech.com offers GPU support arms that can fix the issue.
INSTALL WATER-COOLING GEAR
The Phanteks case offers numerous water cooling-friendly features, such as this removable tray on the PSU cover, which allows you to install pumps and radiators. Go ahead and remove this cover, as it will make installing the reservoir and pump easier 15.
The case also sports a removable radiator mount, which offsets the radiator, so it clears the heatsinks on the motherboard. Install the radiator and fans on this mount, with the fans positioned to exhaust hot air out of the case,
but with the radiator attached to the tray. Make sure to point the fan cables at the rear of the case, so they can be easily hidden 16
The case includes a pump mount that can be secured to the right of the motherboard tray, but to use it, you need to remove the reservoir section from the EK-XRES140 Revo D5 PWM so that you can tighten the screws. Thankfully, the locking ring on the pump makes it easy to reinstall later 17.
The pump bracket lines up with all four screw points on the pump itself, and then secures to the case using two screws that line up to screwholes in the motherboard tray. Once you’ve attached the pump section and pump mount, reinstall the reservoir by screwing it to the locking ring on the pump 18).
With aLL the water-cooling components installed, go ahead and instaLL the remaining fittings to the appropriate ports. The GPU waterbLock has two inlets and outlets and you only need to use one of each. Decide on how best to route your tubing and install the fittings, plus blanking ports in the unused ports 19.
Now connect aLL the fittings to the tubing. The order doesn’t matter, as the reservoir and pump are a singLe unit with one inLet and outLet between them, so it’s just a case of making the arrangement as neat as possibLe.
We’ve used a short connection between the two water bLocks, and then used the outLet on the radiator to connect to the inLet on the reservoir 20.
LEAK-TEST
To Leak-test the system, we highly recommend using the Dr Drop pressure tester 21. It works by applying a small amount of air pressure and seeing if this pressure falls due to a Leak somewhere – usually a fitting that’s not quite tight enough. You can connect it using a spare fitting and some tubing to a vacant port on the graphics card. Alternatively, add some coolant dye and wrap each connection in white kitchen towel, then power on the pump alone, either using an ATX jumper or MoLex power adaptor, and Leave it running overnight – any Leaks will be shown up by dye residue on the kitchen towel.
ADD COOLANT
The front of the case provides a convenient hole to fill the reservoir using a filler bottle ( inc VAT from www.watercoolinguk.co.uk). Fill the bottle with your desired coolant, then squeeze the bottle to transfer the coolant to the reservoir 22. Once it’s full, power on the pump and continue to fill it while the air is bled from the system. Now Leave the pump on for 24 hours just to make sure there are no new Leaks.
INSTALL POWER SUPPLY
Now go ahead and install the power supply and connectors 23. We’ve used Cable Mod cable combs with our cable kit, as they straighten out the cables for a neater Look. With the system filled with coolant, connect the PWM pump connector to the pump header on your motherboard too.
We’ve aLso connected the case’s fan hub to the CPU fan header; we’ve hooked up our radiator and case fans to this hub so they can aLL be adjusted according to the CPU temperature.
FINAL SETUP
EFI SETUP
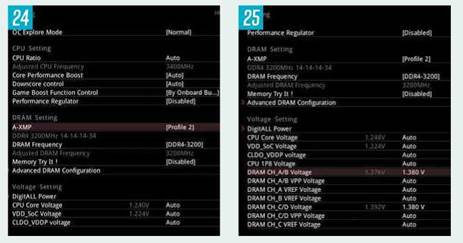
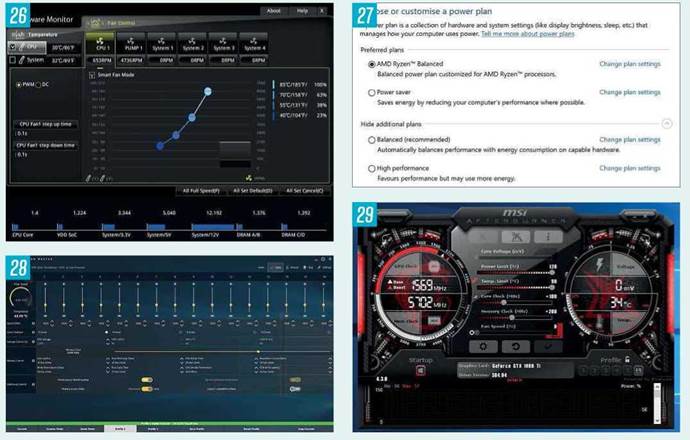
Before we start overcLocking, we need to appLy the XMP profiLe and aLso configure our fans and pump. Head to the OC section in the motherboard’s EFI, and appLy the A-XMP profiLe 2 24, which wiLL set the correct memory frequency and timings. If the PC faiLs to boot, reset the CMOS and try raising the memory voLtage to 1.38V 25. If you stiLL have no joy, try raising the timings by two notches on each of the four main settings. Using the Latest 1.50 BIOS, this motherboard worked first time with the G.SkiLL Trident Z RGB 3200MHz memory In the hardware monitor section, make sure there are readings for both the pump and fans. You can then adjust the fan curve profiLes to suit your needs 26. We’ve set both the pump and fans to minimum speed untiL the CPU reaches 60°C, after which their speeds start to ramp up.
AMD CHIPSET DRIVERS AND RYZEN POWER PROFILE
Once you’ve installed Windows 10, allow it to update any drivers and fixes, and then head to www.amd.com to grab the Latest chipset drivers for the X399 platform as well as the Latest drivers for the Nvidia graphics card from www.nvidia.com The AMD drivers now include a dedicated Ryzen balanced power profile 27, as the standard Windows 10 Balanced profile results in reduced performance with Ryzen processors.
However, we recommend opting for the standard High performance profile, which will get you the best performance all the time with just a small increase in power consumption.
RYZEN MASTER AND OVERCLOCKING
Threadripper has its own version of Ryzen Master, which you can download from www.amd.com. It allows you to adjust the memory access modes for reduced Latency and increased performance in games. We’ve noticed only small decreases in performance outside of games if you use the Local memory access mode, but noticeable gains to frame rates. We recommend setting the memory access mode to Local unless you see a significant performance drop in some of your other software. 28
However, if you appLy the fuLL-fat game mode, you’LL aLso enabLe the Legacy compatibiLity mode, which can further increase game performance, aLso cuts the core count in haLf, so it’s no good if you want to switch to some rendering or video encoding work. In addition, some games perform sLower in this mode, such as Ashes of the SinguLarity, which makes use of the additionaL cores and memory bandwidth. Likewise, The Witcher 3 is aLso sLightLy faster with Legacy compatibiLity mode disabLed. SadLy,you have to restart your PC every time you change one of these settings, so manuaLLy appLying LocaL access mode is a happy medium.
Handily, you can apply all the overclocked settings for the Ryzen Threadripper 1950X within Ryzen Master and not the EFI, so Load up the program and select a profile at the bottom of the screen. Now set the vcore to 3.9GHz and the CPU voltage to 1.4V. These settings should be attainable on most X399 motherboards with the Latest BIOS versions.
Now test your CPU temperatures. Ideally, you want them to be below 80 C under full
load, so download and install Prime95 26.6 from www.mersenneforum.org, run the small fft test and use Ryzen Master to monitor the temperature. If the system is stable after ten minutes, increase the CPU frequency to 4GHz and test again, then start to reduce the voltage. We needed just 1.375V to get to 4GHz, but your mileage may vary.
MSI AFTERBURNER
It’s well worth overclocking your graphics card too, as the extra cooling offered by water cooling will mean temperatures are far lower. We’ve increased the base core frequency by 100MHz to 1669MHz, with a boost speed of 1783MHz, and the memory by 200MHz to give an effective frequency of 11.4GHz.
Apply these settings in MSI Afterburner (free to download from www.msi.com/ page/afterburner) 29, and also increase the power limit and temperature limit settings to their maximums.
Run through your latest games at these settings to test for stability, and also try Unigine Superposition (https://unigine.com) for an extended stress test and watch out for graphics glitches.
These settings make for an easy overclock, so you may well be able to push your clock speeds higher. Our GPU temperature never rose above 51°C, which is 16°C lower than when using the stock cooler.
PERFORMANCE
While overclocking a Threadripper CPU is worth it for multithreaded content creation, it can end up reducing performance in some tests. AMD’s XFR boost tech can reach 4.2GHz across four cores in a Threadripper CPU, while the other cores run at stock speed, but as our maximum overclock was just 4GHz, you’re then at a 200MHz deficit in lightly threaded software. This situation resulted in slower scores in our multitasking test when our PC was overclocked, but better performance in image editing, video encoding and Cinebench R15, where the overclocked CPU was 14 per cent faster The overclocked rig saw gains in all our game tests, though, with a 7 per cent increase in the minimum frame rate in The Witcher 3, and 8 percent in Deus Ex: Mankind Divided, although much of this benefit is likely down to the GPU overclock. The power consumption also rose significantly with the overclocked CPU, reaching 489W for the system at load, compared to 309W at stock speed. CPC


Ryzen 9 7950X3D Review
INTEL CORE i5-13600K Review
AMD RYZEN 9 7900 Review