Take it virtual
Alex Cox and Jonni Bidwell strap on the goggles and enter a world where even hardware goes soft running AN operating system on real hardware is so passé. All those hours ensuring your hardware is set up and behaving correctly? Pah. Then so many more hours installing and configuring all the software, so everything’s just right, while risking what’s on the machine already? Ugh.
It can seem like an awful lot of effort just to, say, try out a Linux distribution, or create a clean Windows install. And, what’s worse, it can present you with a whole lot of extra work if something goes wrong. Killing your day-to-day Windows installation, that one you’ve spent so long lovingly streamlining and customizing, the one you need for work, play, and everything else? It doesn’t bear thinking about.
If you’re running a mission-critical system, you also need to figure out a backup strategy, because mistakes and hardware failure both happen. In fact, if you’re serious about these things, you’ll really want to have something that’s as close as possible to a mirror image of that machine, ready to spring into action at the first hint of failure. Even if you’re lucky enough to have an identical machine, maintaining such a thing—updates, drivers, software, and all—is monumentally tricky.
Contrast this with a virtual machine (VM). With a VM, you don’t have to worry about setting up hardware any hypervisor worth its salt translates whatever machine it’s running on into virtual hardware that your OS can easily understand. You still have to set up the software side of things, but once done, you can replicate the machine at the press of a button, keeping a safe, clean copy for when you need it. You can test out changes by taking a snapshot of the machine and doing your changes there. If the copied VM survives, its parent will, too, as they’re identical. However you use your PC, the chances are there’s something to be gained from visualization.
LET’S START AT THE BEGINNING:
The easiest way to get into visualization is with Oracle’s VirtualBox. It’s free, open source (barring some extensions that provide USB pass-through), and has a friendly and simple GUI that enables you to set up a virtual machine in just a few clicks. Whether you want to set up a Windows XP VM to practice your hacking skills, fancy trying out a new Linux distro, or even if you want to install something far more weird and wonderful, it’s easy and intuitive with VirtualBox. Head to www.virtualbox.org to download the latest version for Windows hosts, and install it on your PC. We’re using the latest release of Ubuntu Desktop (download it from www.ubuntu.com/download) to create an example VM, but feel free to download or use any other ISO you may have lying around.
Table of Contents
[sc name=”ad 1″]
GENESIS OF A VM
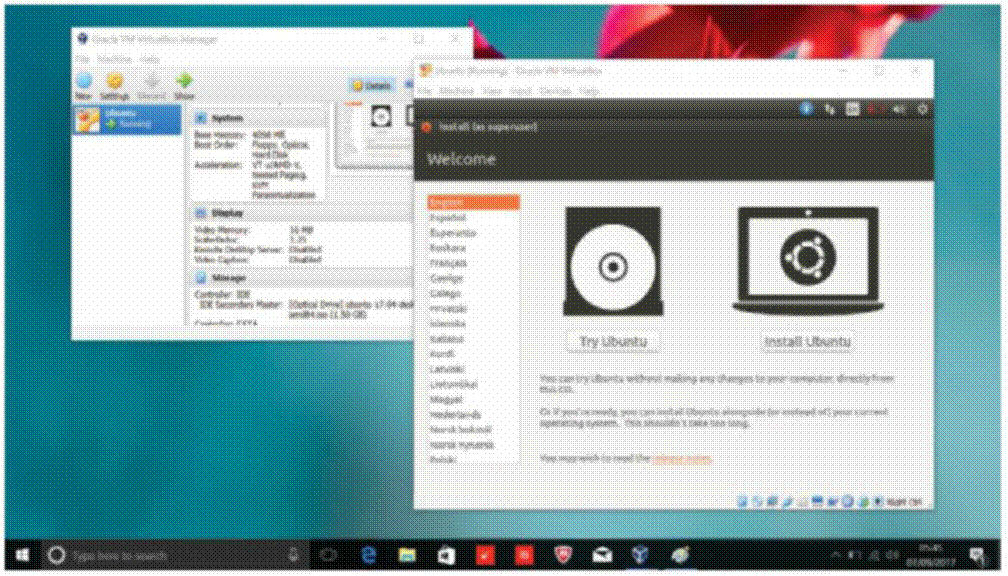
Start VirtualBox and click the “New” button at the left of the toolbar. Give your nascent VM a helpful or affectionate name if you name it something like “Ubuntu-VM,” the software even automatically adjusts the “Type” and “Version” settings below, as well as allocating your VM what it considers a reasonable amount of memory on the next page. You can adjust this yourself, but don’t go crazy; the more RAM you give over to your guest system, the less the host has to work with.
The next step is to create a virtual hard disk, which is a file that will house our VM’s data. Choose “Create,” and select the default VDI image. In the next step, choose to make it “Dynamically Allocated.” This means the file grows as the virtual disk fills, rather than being a big, mostly empty file from the get- go. There’s a small performance penalty for this luxury, so you may wish to opt for the more inflexible fixed size option if speed is a big concern; a plain desktop Ubuntu install, for example, occupies less
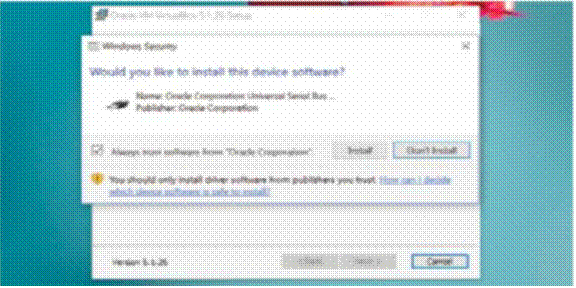
VirtualBox installs several translation drivers on your host system, including virtual USB and networking.
than 4GB, but OSes have a habit of growing over time, and a Windows 10 install would take a lot more space. Make sure you set the top limit of your virtual drive to at least 16GB, or more if you can spare the bytes.
GET UP AND RUNNING
That’s it – machine built. You have a VM. But try booting it, and you won’t get far, since its drive is currently completely blank. Let’s insert a virtual disc and get something installed. Select the machine and click “Settings” on the toolbar. Go to “Storage” on the left, and you’ll see that a virtual optical drive (attached to a virtual IDE controller) has been set up as well as our virtual hard disk. Click this, then press the disc
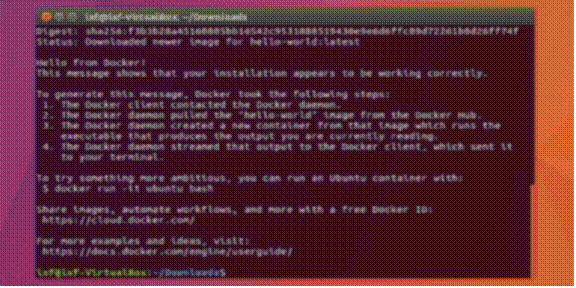
If Docker offers a “hello world” message, you’re all set.
PCI PASS-THROUGH PROBLEMS
TRY TO RUN GAMES or anything else that places any heavy graphical demands on a VirtualBox VM, and you won’t have much luck. VirtualBox’s 3D acceleration doesn’t really do anything for DirectX 10, 11, or 12 titles. There is a solution, but it’s one with some pretty heavy requirements. You need to run a Linux distribution as your host OS, and have two graphics cards in your physical machine, one of which you’ll use for your host—integrated graphics will do—and the other you’ll dedicate entirely to your VM. You also need to have a motherboard with an IOMMU unit, a CPU that supports it, and IOMMU enabled in the BIOS or UEFI. IOMMU is essentially a translation methodology, which maps physical memory addresses between guests and hosts—on AMD machines, you need to look for AMD- Vi, and on Intel, it’s Intel Virtualization Technology for Directed I/O, or VT-d. These aren’t unusual features for modern boards, but we recommend you check compatibility before you kill off your everyday OS in favor of a Linux host.
From there, it’s a not-so-simple process of installing VirtualBox on your host OS (after ensuring it’s running a kernel that’s IOMMU-compatible), adding in the PCI pass-through extension through the catch-all extension pack, which can be downloaded from www.virtualbox.org, enabling IOMMU in your Linux distro’s boot loader (add something such as intel_iommu=on to grub.cfg), then using the lspci command to check which PCI devices you have attached to your host hardware.
The first column lists the PCI address of each device; you can then run a terminal command along the lines of VBoxManage modifyvm ”VM name” –pciattach 02:00.0@01:05.0 to pass, in this case, the device at host address 02:00.0 to the guest address 01:05.0. Complex stuff, but entirely possible if you’re determined.
Want to use your GPU to its full effect with a VM? Pass it through…. icon on the right-hand side, and select “Choose Virtual Optical Disk File” from the drop-down menu. Select your downloaded Ubuntu ISO.
Now let’s offer up some additional resources. In the “Settings > Display” section of the “Screen” tab, boost the Video Memory to 128MB. Click “OK,” and launch your VM by selecting it and clicking “Start.” You’re now free to install, or play in the Ubuntu live environment, whatever you like, in complete safety-there’s no way of doing damage to your main PC, as you’re operating in a completely isolated environment. Don’t worry about installation specifics—if you decide you want something done differently, it’s easy to delete the VM and start over. When the install finishes, the virtual disc is automatically ejected.
One final step to getting things working well: Use the “Devices” menu to insert VirtualBox’s guest additions disc into your virtual optical drive, and install the software within. Obviously, this only works for supported guest platforms, but once it’s installed, you gain access to neat features such as a shared clipboard and custom dynamic resizing options. You can also, once you head to the “Display” section of your VM’s settings, switch on 3D acceleration. It isn’t the best—see “PCI PassThrough Problems” to find out why—but it’s a much more pleasant experience than running without it.
SAFETY iN SNAPSHOTS
As we’ve mentioned, the greatest part about running a VM is the control it gives you over the OS—specifically, the fact that once you’ve done the hard work of setting one up, you’ll never have to do it again. You’ll want to use two techniques: wholesale copying of a VM, and snapshotting. The former is reasonably easy. Just right-click a powered-down VM, and select “Clone.” VirtualBox creates an exact copy of that VM, which you’re free to monkey around with to your heart’s content, or set aside for later recovery. A snapshot is slightly different and arguably slightly more useful. It’s an exact copy of a running VM, memory state and all, giving you the chance to revert back to a known good configuration if you’re about to do something drastic, or to power down your virtual machine and return to the exact point you were at before you quit.
VirtualBox can even handle snapshots in a tree, so you can create several snapshots, fork off in different directions, and keep the same core configuration. You can
Installing a guest OS installs it entirely to your virtual hard drive, with no risk to your host PC.

If VirtualBox only shows options for 32-bit OS installations, make sure virtualization is switched on in your machine’s BIOS or UEFI.
take a new snapshot at any time by hitting Host-T (your Host key is usually right-Alt), and you’re given the option of creating one when you power down a VM as well. These do tend to swallow up hard drive space after a while, so be prepared for a bit of periodic cleanup.
GO SELF-CONTAINED
Let’s take a step back now. For all the benefits they offer, every new VM spun up means a new copy of an operating system. This means lots of duplication of data and effort. A virtual OS still takes time to install, and even though this can be automated to some extent, most VMs still take some configuring before they’re useful. And if you’re using a VM for a single task, this is, frankly, a bit of a waste of time and system resources. But there’s a more streamlined way of isolating applications and services, without installing a whole new OS, enabled by the idea of containers. These give some access to the host OS, but drastically restrict access to anything that might break it, and enable applications to be deployed in a uniform way on any OS. Any sysadmin who’s had to migrate an old webapp to new infrastructure will know the special sort of pain this can avoid.
The de facto king of container management, widely used and therefore widely supported, is Docker. Thanks to the Docker Hub, it’s possible to download a community-generated image of an email server, a NextCloud instance, a NAS appliance, or an MPD server, say, and have it running in a matter of seconds. Docker’s Community Edition (the one we’re using here) is freely downloadable, and available for Windows 10 Pro and just about every Linux distro—but bear in mind that this means it’s not compatible with Windows 10 Home, the version most people are running. With this in mind, we’ll show you how to use its Linux flavor through Ubuntu—simply download and install the Community Edition from www.docker.com/get-docker, then replicate the commands here, cutting out the “sudo” parts, in a Windows PowerShell window, and you shouldn’t run into too many problems.
DOCKING FOR BEGINNERS
Let’s start by installing Docker on Ubuntu. While it’s possible to install through a command-line package manager, setting up the requisite repositories is a little long-winded. Instead, head to https://download.docker.com/linux/ubuntu/dists/and grab the latest stable version for your system—you’ll find a .deb package within the requisite /pool/ folder. Download it, rather than open it in Ubuntu’s software installer. Open a Terminal window, and head to the directory where you downloaded the package (typically ~/Downloads). Type sudo dpkg -i docker then, before hitting Return, hit Tab to complete the name of the package you just downloaded. Hit Return, and the installation should happen. Let’s check that it did: Fire up the Docker daemon with sudo systemctl start docker, then run sudo docker run hello-world . All being well, this pulls in a sample script and executes it—if you see a cheery message, you’re good to go.
Time to install something that does more than just display a message. Run sudo docker pull nextcloud to grab a container encapsulating everything required to run a NextCloud file server. At 700MB, it’s fairly large, but bear in mind the NextCloud app is 100MB, plus we’ve got Apache, PHP 7, and a bunch of extensions, along with the SQLite database packaged in with it, all ready to go. Run the container
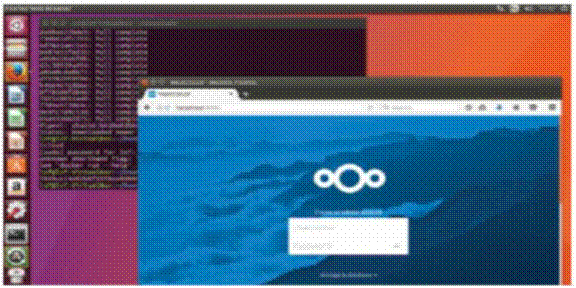
With only a couple of commands, you can install and run an entire preconfigured Docker VM appliance.
with sudo docker run -d -name maxcloud -p 8080:80 nextcloud.
The “-d” option tells Docker to run in the background (detached), and the “-p” part forwards port 80 on the container to port 8080 on our host. The “-name” part is optional; a random one is assigned if you don’t specify one here.
Assuming that command didn’t give you any error messages, fire up your web browser, and browse to http:// localhost:8080. Behold! A fully functioning NextCloud installation—no messing with Apache configuration files or directory permissions, it just works. All you need to do is enter some admin credentials and click “Finish Setup.” When you stop the container
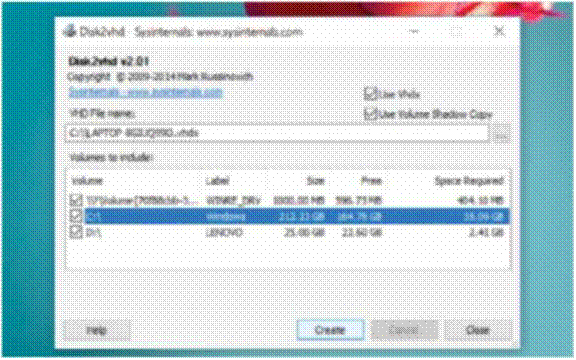
Fortunately, cloning a drive with Disk2vhd is a relatively straightforward process.
GOING_BEYOND VIRTUALBOX
WE’VE COVERED VIRTUALBOX in detail, primarily because it’s free to use and pretty comprehensive in its abilities. For most tasks, you’re unlikely to need anything more complex. If you want to take virtualization further, though, there are a few commercial tools that can make the process easier and (generally) run VMs more efficiently. VMWare Workstation Player, free with a limited set of features, is a solid option, and one that’s compatible with the same VHDs, though you need to pay a license fee if you want to use it commercially. its level of support and development is, naturally, very good, it’s arguably more capable than virtualBox, and it’s due a major version upgrade soon, which should add a little spice. Check it out at www.vmware.com.
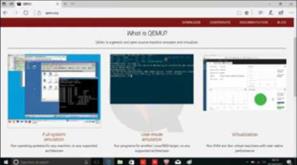
If you’re willing to create a dedicated host, it’s also worth considering Linux-based solutions. QEMu (www.qemu.org) is available for just about every linux distribution, and it’s super-efficient, executing as much of the guest code as it can directly on the host machine, through a process known as dynamic binary translation. It’s also able to run without admin privileges, meaning you can tuck your QEMU VMs away on a flash drive, carry them around with you, and return to a familiar environment no matter which host machine you’re running on. There’s a version compiled
for Windows, if you’re feeling adventurous—see http://qemu.weilnetz.de for the downloads.
While we’re in the linux world, picking a distro based on the Xen hypervisor is a good choice for experimentation. Check out Qubes OS (www.qubes-os.org), which dubs itself “a reasonably secure operating system” with a typical lack of hubris. All of its apps run in one of a number of vMs, completely isolating them from the others for security and efficiency reasons, and you can add your own VMs—including those based on a number of different linux architectures and, naturally, virtual machines based on Windows.
with sudo docker stop maxcloud, any changes are saved, unless the underlying image is upgraded, so you can resume it as it was with sudo docker start maxcloud in future. Note: We use our container name, rather than the image name (nextcloud), because the latter would fire off a new, unconfigured NextCloud instance.
PHYSICAL TO VIRTUAL
As you’ve got this far, you’re probably starting to appreciate the value there is in virtualization. But there’s one more thing we haven’t touched upon, and that’s consolidation. One machine with a number of virtualized instances running on it can do the job of several physical units without the need for any extra hardware. If you’re in the mood to replace that old file server and trash that Win XP box that really should have been recycled 10 years back, there’s good news: You don’t need to completely rebuild those systems in a virtual environment. You can convert their hard drives to virtual drives, and fire them up in VirtualBox as though they were newly created VMs.
Note that this does come with a couple of downsides, namely that Windows may need a little poking before it accepts your new virtual hardware, and that you’ll almost certainly invoke a new activation of your Windows key when you fire up its virtual version-major hardware changes tend to do that, so you need to erase the old hardware, and perhaps contact Microsoft to arrange reactivation. Note also that transferring an OEM installation of Windows to a virtual instance is a violation of the terms and conditions of installation, so you’re unlikely to get much assistance in this case.
To convert an existing installation, we recommend using Disk2VHD, a tool from Microsoft’s Sysinternals team. The process is really pretty simple. Download Disk2VHD from http://bit.ly/2wILzb4 and run it. Define the file name you want to
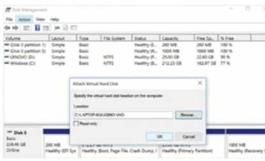
Try attaching a VHD using Disk Management—you can also create VHDs with this tool.
Use Expert mode to quickly attach a cloned drive to a new VM in VirtualBox.
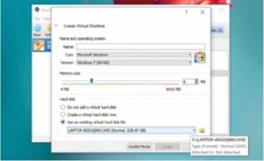
give to your virtual drive, and pick the volumes you want to clone. Disk2VHD leaves your partition tables intact, but you can exclude the data of certain partitions if you want to keep the size down. Switch off VHDX, hit “Create,” and Disk2VHD uses Windows’ own Volume Snapshot tools to create a byte- by-byte copy of your chosen drive. When it’s done, fire up VirtualBox, make yourself a new VM with the appropriate parameters for your cloned OS, then enter Expert mode, and select your .vhd file in the bottom box. Boot, and you’ll be away-don’t forget to install the Guest Additions for the best experience. Oh, and one more thing: Did you know you can mount VHD files natively in Windows using the Disk Management tool? There’s something to try….
IF YOU BEGIN TO RELY on virtual machines to a serious extent, enterprise-grade solutions are probably worth a look. The industry standard for virtualized servers is VMWare’s ESXi tech—available free in a package called vSphere Hypervisor—and Microsoft also offers up its Hyper-V Server 2016 without charge. Both solutions run a similar model: a complete hypervisor running at the OS level, and nothing else. In the terms we’ve used in this feature, they’re your host operating systems, but they do nothing more than host, giving their guests unprecedented access to system hardware, and giving you high-level access to the administrative tools you need to maintain a server full of temperamental yet critical systems. Typically, home users boot the likes of eSXi from a small local drive, such as a USB stick or an SD card, with VMs stored on mass storage devices elsewhere.
As you might expect, running server-class software generally requires running server-class hardware to match. Of course, you’re free to install vSphere Hypervisor on a USB stick and attempt to run it on hardware you may have on hand, and we’ve certainly heard tales of it working, though this isn’t incredibly likely, unfortunately.
Luckily, the unstoppable march of progress means that businesses are constantly
upgrading their equipment, meaning you can often grab suitable rack-mount hardware for a fraction of its original cost if you shop around on eBay. Naturally, your power bill will rise, they’re noisy and hot as all hell, and you’ll need somewhere to put it, but a dual- CPU Xeon system, packed with RAM, could cost as little as if you’re lucky enough to find one locally. Check the compatibility list at www.vmware.com/resources/compatibility to see whether you’re likely to be able to easily fire up a set of VMs—and then check your wallet, because playing home sysadmin can be an expensive hobby.


