Alex Cox shows you how to cut out everything you don’t need, and create a custom Windows install for next time
Bloat IS the curse of operating systems, because they need to appeal to the masses, rather than cater for individuals. You can’t have a Microsoft engineer sit there and craft you your own custom version of Windows (we know, we’ve asked), so you need to scrape off that additional chaff yourself.
Table of Contents
We’re not just talking about shaving away the contents of a couple of megabytes of hard drive space, or cleaning up the Start menu. Windows comes with stacks of software that can reduce your machine’s performance or boot time. It comes with stuff that can see what you’re doing. It includes features that are potentially monumentally annoying. So we’ll do away with all of them, plus explain what’s safe to chop, and what isn’t.
Doing all this work every time you get a new PC would be very frustrating, so we’re also going to look at creating an already-mostly-trimmed Windows installer, which you can use to start from a much more advanced point than usual, and even integrate apps that make up for some of Windows 10’s shortfalls. A better Windows for your PC of tomorrow. And before you write in to say that you can do the picking, choosing, scrubbing, building thing
with Linux, rest assured: we know. Building your own Linux installation is a completely different kettle of fish, it’s more common, and better supported, and it’s a topic for another feature. Windows doesn’t seem to encourage trimming, but a little knowledge goes a long way. Our sacrificial OS for this guide is the latest official ISO of Windows 10 Home, updated for the Creators Update, because (presumably) that’s the version most people are using; if you’re taking a hammer to the Pro version, you might have to tease out a few more services, but the changes won’t be too extreme.
UI OVERHAUL
Although Windows 10’s interface is already a highly streamlined affair compared to its predecessor, it could stand to be slicker. Let’s begin, with our clean Windows install, by making it snappier, removing unnecessary elements, and making that experience all the better. What better place to start than, well, Start itself? In our minds, there’s nothing more pointless than Windows 10’s Start menu tiles. Windows 10 Pro includes tools such as the Group Policy Editor, which can help you do away with them quickly, but in Home you’re stuck with the tedious process of right-clicking each tile, and selecting “Unpin from start.” Do this enough times, click off the Start menu, and relaunch it, and that pesky right side panel disappears altogether. Clearing out the main bulk of the menu itself, apart from a certain selection of Windows’ default apps, is again a case of wading in with right- clicks, and uninstalling. Those apps that simply won’t uninstall—the monsters—can usually be excised using Powershell. See the “Ultimate Removal” box (pg. 31) to find out how to remove and, if you’re desperate, reinstate them.
There is a host of surface personalization tweaks that you can apply to the Start menu and Taskbar through the “Settings > Personalization” menu. You can change the color by first selecting an accent color in “Colors,” then checking the box to apply it to the Start menu, Action Center, and Taskbar. While you’re on the same screen, switch off transparency effects for a microscopic performance boost, then head to the “Start” tab. Because we’re old school, we favor switching off everything here to make the Start menu a straight alphabetized list
of apps, but we’re not going to say you’re wrong if you like having recently used or installed apps pushed to the top. Suggested apps, though? That can definitely go. At the bottom of the page, click “Choose which folders appear on Start” to get quick links to a bunch of useful features on there. Quite why File Explorer and its ilk aren’t included by default is baffling.
Basic stuff done, let’s do some more intricate tweaking. Open up “Control Panel > System and Security > System > Advanced system settings,” then click the “Advanced” tab. Jump into the performance settings, and switch off everything you can’t stand to lose. Since we’re currently here for efficiency, not looks, we recommend disabling animations, fades, shadows— basically, everything bar font smoothing. Save your changes, then open up the Registry editor for a quick deeper hack. Navigate to the “HKEY_CURRENT_USER\ Control Panel\Desktop” key, open up the “MenuShowDelay” entry, and change its value. A flat zero tends to make things a little over crisp (read: impossible to use),
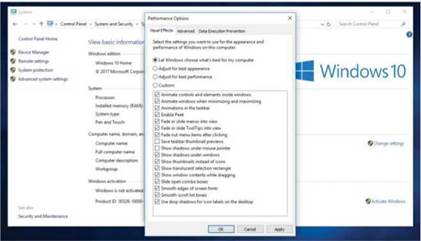
Who needs fancy visual effects, really? Disable everything you can live without.
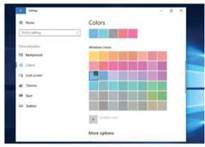
Tweaking colors is only aesthetic, but can help Windows feel more streamlined.
but halving the number can really make Windows feel a lot more responsive.
BACK TO BASICS
Now head back to the control panel, because it’s time to do a little old-school scrubbing. Head to “Programs > Programs and Features,” and select “Turn Windows features on or off.” The list isn’t over-extensive, and there’s not much you can remove that’ll leave you with a faster PC, but it can prevent some annoyances. Drop, for example, Internet Explorer 11, because you don’t use it, and there’s no sense keeping it around. You can also kill off Windows Media Player, if that’s not your jam. And if you’re feeling adventurous, you could switch on Windows Subsystem for Linux, and head to the “Streamline Your Shell” box (pg. 30) to see why you should be using it.
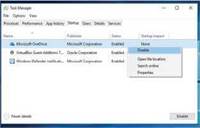
Next, let’s improve our boot speed by preventing a few things from running at startup. Launch the Task Manager with Ctrl-Shift-Esc, and head to the “Startup” tab. Each program that’s launched automatically is listed with a broad rating of its start time impact. If there are
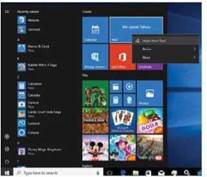
Removing those pesky live tiles is as simple as a right-click.
components here that you use very little, it’s a good idea to stop them; to squash OneDrive’s system-grinding initial launch time, for example, right-click it, and set its status to “Disabled.” For more intricate control, Microsoft’s Sysinternals team has long published Autoruns, a free (and portable) add-on that offers access to the same management tools as Task Manager, plus a whole lot more.
More classic cleaning can be done within Windows 10’s Settings screen. Microsoft’s love for its Universal apps means it presumes you’ll want to use them, and are going to want them ready at a moment’s notice, running in the background at all times. Which may be true, but it’s more likely that disabling those background apps is preferable. In “Privacy > Background Apps,” you can switch off anything you’re happy to just fire off manually, which will likely include, well, just about everything.
One more quick optimization, whether you’re running a small drive or not, would be to clean up temporary files, and wash away old versions of Windows. This will gain a fraction more speed in certain apps if they’re forced to grind through cache directories before running, but you’re not doing this just for speed; you’re doing it for cleanliness. Find the drive you want to optimize in File Explorer, right-click it, select “Properties,” then seek out “Disk Cleanup” in the “General” tab. Select the categories you want to kill, and use “Clean up system files” to expunge the lot.
SAFE SERVICES
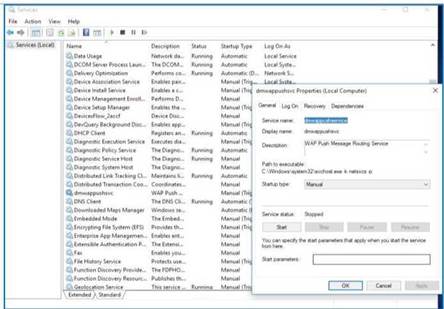
There’s a laundry list of services that can safely be switched from automatic to manual for a boost at boot time; disabling them altogether is a question of your preferences, or Windows’ ability to hold up. Cut Connected User Services and Telemetry, dmwappushsvc, and Diagnostic Tracking Service to remove Windows’ spying—er, telemetry- tendencies, then Diagnostic Policy Service, Windows Error Reporting Service, and Program Compatibility Assistance Service to do away with a few services that you won’t want bothering you once you’ve started tearing Windows to shreds. Disable Remote Registry just to be a little secure, and Windows Defender Service (and possibly Security Center) if you’re confident in your own malware-fighting methods.
A lot of the other possibilities will depend on the specific makeup of your machine. Shut down IP Helper if you’re not using IPv6, TCP/IP NetBIOS Helper if you’re not part of a workgroup, or Distributed Link Tracking Client if your PC is not on a network at all. Kill Print Spooler if you don’t have a printer, Windows Image Acquisition (WIA) if you’re scannerless, Touch Keyboard and Handwriting Panel Service if you don’t have a touchscreen, Bluetooth Support if you haven’t already got the idea here, and Downloaded Maps Manager if you never use Windows’ built-in maps app.
You may also wish to make a few other services manual, without disabling them. The three remote desktop services are optional, and your graphics card (or possibly sound driver) has likely slipped a few in. Dropping these to manual will improve boot time, but probably slow the launch of your graphics-intensive apps. That’s a common theme with services: Unless you completely disable them, you simply delay the, er, delay, and disabling is rarely the best idea. But do experiment, and see what works for you.
SLASHING SERVICES
■ We are, of course, working on a clean Windows install, but you probably aren’t. Disabling the core Windows services—those programs that run quietly in the background, supplying your PC with essential (and inessential) functions that don’t require a UI —isn’t necessarily recommended; Microsoft’s own suite has been honed over the years to be as efficient as possible, its contents sitting in the pagefile, barely ever touching system RAM. You could chop out most Windows services and never feel a difference on a modern PC, apart from the whole operating system crumbling around your ears. Third- party services, though, are a different story, and cutting them out means you’re likely to see a real change, which (usually) will only impact that app’s time to initial launch.
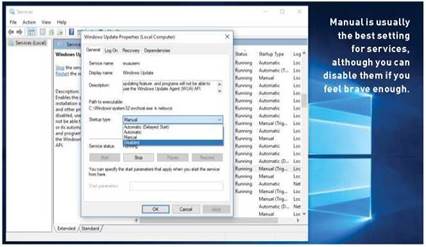
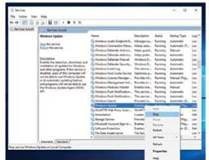
First up, finding out what’s running. The Task Manager is a good place to start. Switch to the Advanced view, and scroll down to see the entries prefixed with the words “service host.” These are all fired off via svchost.exe, so they’re categorized together. Some might contain more than one service, which you can discover by clicking the expand arrow on the left; and most, while not essential, are there to improve your Windows experience. A quick glance through the list in our clean install reveals Superfetch as the main culprit for RAM hogging—as it should be, given that it’s the service that puts commonly accessed data into RAM, rather than spending ages reading it from the hard drive. Our biggest CPU sapper is the usefully named “Local System,” which basically deals with Windows updates. But that’s the perfect target for now: We know there are no updates pending, so we can stop it.
Clumsily ending the task in Task Manager won’t do. Instead, type “services” into the search bar to open the services section of Windows’ Management Console. You won’t find “Local System” in the list, but you should find the two components we’re looking for: Windows Update, and the Update Orchestrator service. Right-click them, select “Stop,” and they’ll go away until your next boot. Those sanctions not harsh enough? Right-click, select “Properties,” and poke around the “General” tab. Change the “Startup type” to “Disabled,” and they won’t come back until you dig through the list and switch them back on again. Be warned, though: Unless Windows is happy to do without, this a stupid thing to do. Even more stupid (but similarly possible) would be to remove a Windows service altogether,
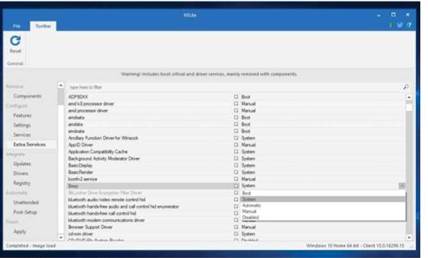
NTLite enables you to drop integrated services before Windows is even installed.
although cutting out a third-party service (maybe even a piece of malware) is unlikely to sting too much. Run the Registry editor by typing “regedit” into the search bar, then dig down to “HKEY_LOCAL_MACHINE/ SYSTEM/CurrentControlSet/Services.” Finding the particular service you want to kill can be tricky, but click around until you find it, then rename (or, ulp, delete) its key to get rid.
BACK IN TIME
If you’re installing on a new machine, there’s no reason you have to use Microsoft’s stock ISO. Installation customization tool NTLite actually makes generating a stripped-down Windows easier, and it means you can arguably do a lot more in a lot less time. It’s also a chance to save a bunch of time post-install, as you can integrate all the drivers, updates, and software you need into your custom installer, so it’s there straight away. What’s more, it’s a fantastic way of cutting down an existing Windows installation, as long as you pay for a license—although
You can use “Stop” to temporarily kill a service and see what effect it has.
STREAMLINE YOUR SHELL
Windows’ recent softening on the Linux shell wasn’t so much controversial as it was surprising; it’s a subtle acknowledgement that many power users prefer the efficiency and depth of the likes of Bash over the sometimes clumsy world of the creaking DOS-derived Windows shell. And it almost happened by accident. Microsoft was working on technology to allow Android apps to run on Windows, and the Linux Subsystem—not an emulator, but a native interpreter—is what resulted.
To get yourself up and running, first go to “Settings > Update & Security > For Developers,” and switch on Developer mode. Then enable the appropriate subsystem in the “Programs and Features” section of Control Panel. Once you’ve rebooted your machine, open up a command prompt as administrator, and type lxrun /install /y to automatically install the Ubuntu flavor of the Bash shell. Once it’s all gone in, you’ll be able to open up the Linux shell by typing bash into the search box.
So, why would you want to use the Linux shell? First, there’s the simplicity of navigation. You can use 1s to list a directory, rm to remove files or folders, and mv to move or rename files. Once you’re used to it, the shell can be a faster and more efficient way to shift files around than even the stock Windows File Explorer. Then there’s access to the core Bash apps, often packed with much more detail and usage options than their Windows counterparts. And you’re not just stuck with the base shell—by using Ubuntu’s apt-get package manager, which comes as part and parcel of the installation, you can add new applications and functions with a single command.
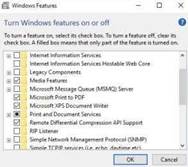
Disabling Windows features Is a good Idea If you’re never going to use them.
you’ll only be able to create your own install image if you’re chipping away at an ISO, rather than a running system.
Let’s concentrate on trimming a new ISO—the live process is no different, just a little more narrow. Download the software from www.ntlite.com via the three-line hamburger menu, and run through its installer—you can also create a portable version of NT Lite at this point by checking the appropriate box, so you can drop it on a USB drive, and take it from machine to machine if necessary. Before you run it, mount your Windows ISO (you can download one from the Microsoft website, if you don’t have one handy) by right-clicking the file, and selecting “Mount,” then copy over the files to a writable folder to prepare them before unmounting again. Open NT Lite, click the “Add” button on the ribbon, and point it at the folder where you dropped your installer files. Pick the version of Windows you’re looking to hack, wait for it to mount (it may take a couple of minutes), then select “Components” below “Remove” in the left column, and accept the dire warning of potential doom that appears.
The full list of features available for removal is going to be pretty daunting, and unless you’re generating a kiosk Windows that’s designed to be impervious to interference by certain means, there’s probably little reason to go too crazy here— you can cut out some of the same services that you might have disabled previously, and really trim the size of your ISO by excluding support for every piece of hardware you know you don’t have. You’ll see a bunch of stuff in blue—these are components that you can’t remove unless you cough up €40 (about ) for a full license.
Check out the “Settings,” “Services,” and “Extra Services” panels, too. The former enables you to preconfigure your ISO to look and act just as you’d expect, again saving you time poking around the Settings screen and Control Panel later on, while the latter pair gives you full control over services,
Dropping little-used startup apps can lead to a much faster boot.
as discussed previously. “Extra Services,” in particular, enables you to manipulate a bunch of services that would usually be pretty inaccessible through Windows itself; switching some of these from “Boot” to “Manual” can boost your boot time, although you won’t know until you install your image, so this may be a false economy. The “Integrate” and “Automate” categories are where you include the software and drivers you want to integrate into your new ISO—anything third-party needs to go in the “Post-setup” section.
When you’re done, use the “Apply” section at the bottom of the list to finish everything off. We recommend opting for the “Save and trim” option, which cuts out everything but the specific version of Windows 10 you’ve been working on. As most ISOs contain multiple editions, and few people have any use for Windows 10 S, N, and the like, this is a good way to cut down the size of the install image.
Ultimate Removal
Doing Windows your way means only including the applications you absolutely want, using Windows as a base for your operations, and often completely ignoring those apps that Microsoft doggedly protects unwitting users from deleting. We’re not suggesting they’re useless, and sometimes a core Windows app might be the best choice, but that’s for you to decide.
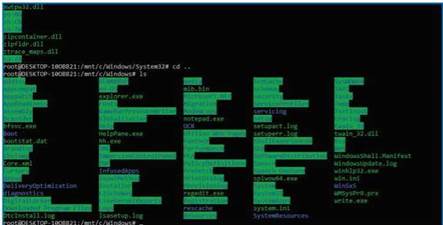
While the surface parts of Windows deny their removal, the deeper toolbox doesn’t. Fire up Powershell by right clicking the “Start” button, and selecting “Windows Powershell (Admin).” Now run the command Get-AppxPackage (capitalization is important in Powershell) to list every core app that Windows has installed. Scroll through—it’s probably quite a long list—until you find the application you’re looking for, and seek out its full name, which is a longer string, including version numbers. Then just type “Remove-AppxPackage <full name>” to strike it from your drive.
One bit of caution here: Don’t, whatever you do, remove the Windows Store app. While most of these apps can be reinstalled relatively simply if you realize you’ve made a mistake, removing the Windows Store removes it permanently, and also does away with your ability to reinstall other core apps. Whatever you may think of the Windows app pool, the Store itself is getting at least a bit better these days, and you don’t have to use it. Just work around the fact that it’s still there. This may not be an entirely permanent exercise, either. Future updates are likely to reinstall packages that you’ve previously removed, and add a few stubborn newcomers to the mix along with them. But now you know how to remove them, you can just go through the process afresh when major new versions of Windows appear.


