Make your PC more secure
Your guide Matt Hanson says…
“Ensure every part of Windows 10 is as secure as can be with this ultimate guide”
At a glance
Skill level…
Anyone can do it – Straightforward
Tricky in parts
Suitable for… Windows 10 Windows 8.1, Windows 7
Windows 10 is the safest and most secure version Microsoft has ever made, thanks in part to the inclusion of the built-in antivirus software Windows Defender, which does an excellent job of keeping your Windows 10 device protected right out of the box. However, there are still a number of things you can do to ensure your PC is completely safe, and that’s where this guide comes in.
Windows 10 is becoming the most popular operating system in the world, and that means that virus makers are increasingly looking to target the software. We’ll show you how to browse the web safely and securely using Windows 10’s tools. We’ll also help you set up a virtual private network (VPN), which will give you an even greater level of privacy and security when browsing the Internet, and we’ll help you correctly set Windows 10’s default settings.
Step-by-step Master Windows’ security settings
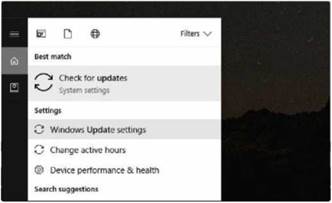
Make sure you’re up-to-date
One of the most important ways of keeping Windows 10 secure is by ensuring that you have the latest updates installed. These updates often contain important protection against any new threats. Type ‘updates’ into the search box in Windows’ Taskbar, then click ‘Windows Update settings’. Click ‘Check for updates’ to make sure that Windows 10 is fully updated.

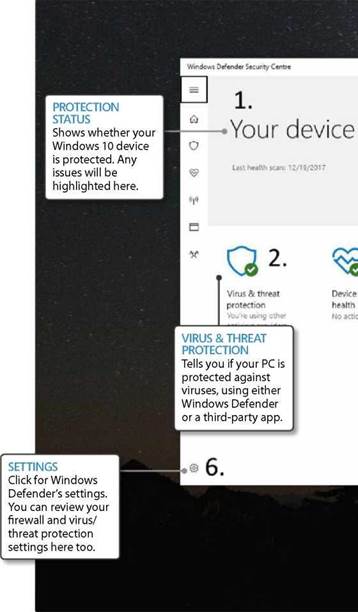
Configure Windows Defender
Windows Defender is Windows 10’s built-in antivirus software. It should be on by default, but to check type ‘Windows Defender’ into the search box in the Taskbar, and select ‘Windows Defender Security Centre. You’ll see an overview of the security status of your device. You should see a green tick next to each section. If not, click the icon to find out what you need to do.

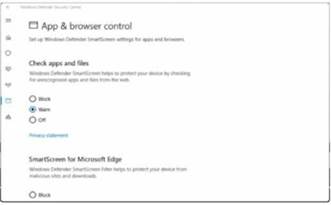
Make use of SmartScreen
SmartScreen is a tool that protects you against harmful files and websites. From the Windows Defender Security Centre app, click ‘App & browser control’. You can set SmartScreen to warn you if you download a suspicious app or file, or visit a compromised website or, to be completely secure, select Block to automatically prevent potentially dangerous files or websites from opening.
Using third party antivirus software
Windows Defender will help keep your Windows 10 device secure, although it is a little basic. For anti-virus apps with more advanced security features, check out our pick of the best free solutions at http://bit.ly/2CD1F7t. For even more security a paid-for solution – which offers even more tools – may be best. Go to http://bit.ly/2Cc1GhF for our recommendations.
Jargon buster!
► VPN
VPN stands for Virtual Private Network. By connecting to a private network, users can send and receive data securely, and because it’s ‘virtual’ it means it doesn’t need a physical network – it can just use your existing network or Internet connection.
– Biometrics
Biometrics is a way of securing your Windows 10 device using either your fingerprint or by scanning your face. It’s an incredibly convenient – and secure – way of logging into Windows 10, as long as you have the right hardware. Many modern laptops come with fingerprint scanners or Windows Hello approved webcams.
– Taskbar
The Taskbar in Windows 10 runs along the bottom of your screen and houses the Start button, the Cortana search box, time and date information, network information and much more.
Bolster your sign-in
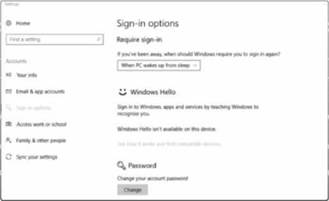
Using a strong password to log into Windows 10 will help keep you secure. If you haven’t already set one, type ‘sign-in’ into the search box, then select ‘Sign-in options’ From the window that appears you can change your password or add a PIN. If you have a webcam or fingerprint scanner, you can set up Windows Hello, which uses biometrics for logging into Windows 10.
Check your privacy settings
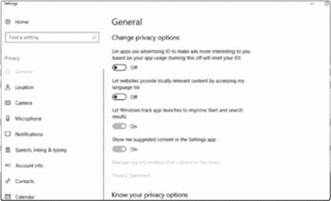
When it was first released, Windows 10 got some flack for its default privacy settings. Since then Microsoft has implemented better privacy controls, but they’re still worth investigating. Type ‘privacy’ into the search box, and click ‘Privacy settings’ from the results that appear. From there go through each option on the left-hand menu and set what you want to share accordingly.
Secure your Microsoft account
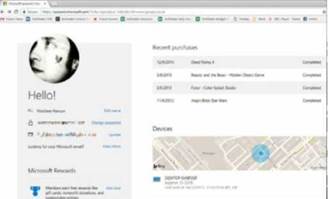
For the best Windows 10 experience you’ll want to use a Microsoft account to sign into Windows 10. if you have one, go to https://account.microsoft.com to check your account. From here you can change your password, review purchases and change your payment methods. You can also see which devices are logged into your Microsoft account, and where they are.
Protect your files with BitLocker
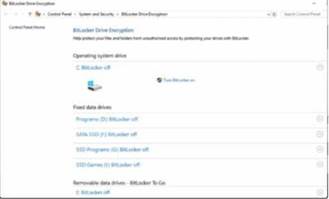
BitLocker is a Windows 10 Pro feature that enables you to encrypt your hard drive. To activate it, type ‘bitlocker’ into the search box and press [Enter]. Choose the drives you want to encrypt, then click ‘Turn BitLocker on’ Follow the instructions to create a password and/or USB key – you will need to use these to access Windows and your files once BitLocker’s been set up.
Use a VPN – Part one
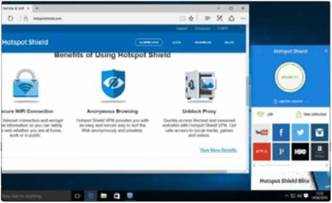
For the ultimate in PC security, you can use a Virtual Private Network (VPN), which encrypts all your web traffic. To begin with you’ll want to choose a VPN service to subscribe to. If you want to try a VPN, or only use it occasionally, a free version should be fine – see http://bit.ly/2CFXfwR. For a faster VPN experience head to http://bit.ly/2CFVuzL for a rundown of the best VPN services.
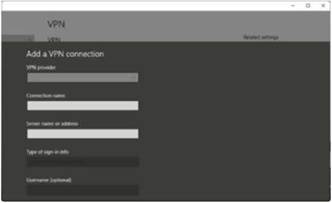
Use a VPN – Part two
Once you’ve signed up to a VPN service, head to Start > Settings. Select ‘Network & Internet’ then VPN and click ‘Add a VPN connection’ Select ‘Windows (built-in)’ as the VPN provider, then fill in the rest of the boxes. Use the information you received when you signed up for the VPN. Once done, you can switch to the VPN by clicking on the network icon on the Taskbar.


