SSD Optimisation
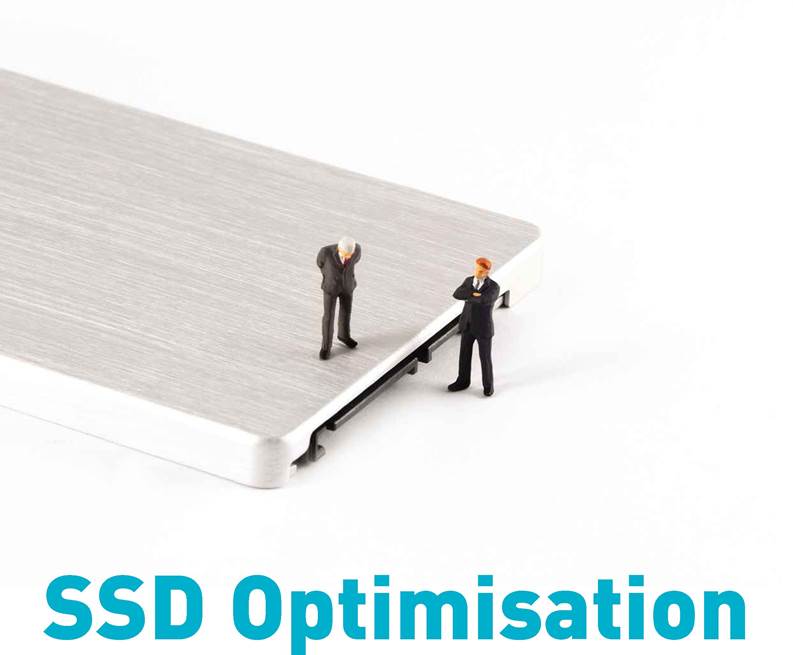

SSD volumes are fast and efficient, but how do you ensure you’re getting the most from them? Aaron investigates
Solid State Drives have been around for some time now and, while the tech is still very expensive compared to traditional (mechanical) drives, more and more people are living with the smaller capacities they offer in order to enjoy their advantages. SSDs are much faster, more efficient and silent. They use less power too. SSDs are still a more specialist item than a mechanical volume, though, and not everyone knows how to get the most out of one.
Table of Contents
SSDs, for example, are limited in terms of rewrites. That, combined with the generally lower capacities, means that they need to be used with care if you want to get the most for your money. SSDs shouldn’t be used selectively, at least not until the technology drops in price to something comparable to a mechanical drive.
At the moment, you’re best tailoring your system to maximise your SSDs capabilities and usefulness, and this is what we’re going to look at over the next few pages. We’ll cover the best ways to utilise the power of your SSD, how to increase its speed and lessen the wear and tear. So, let’s begin.
Keep In TRIM
We’ll start with the big one and that’s TRIM. This is a very important feature of SSD technology; without it, SSD disks can quickly become much slower than they should be. The reason for this is down to how solid state storage chips handle the deletion and overwriting of data.
A ‘traditional’ mechanical drive handles this in a simple manner: when files are deleted, Windows (or your chosen OS) goes to what is effectively it’s contents list, removes references to the data and marks the space as not in use. The data actually remains in situ, but the markers that point to it are gone. When the space is needed, the drive simply overwrites the data. Easy.
SSDs are different. Like mechanical drives, the OS will remove directions to the deleted data and mark the space not in use. However, SSDs cannot simply overwrite the existing data when the space is needed. First, the data must be physically deleted and then the new data written. This adds time to the whole data handling process, slowing the drive down considerably – which is where TRIM comes in.
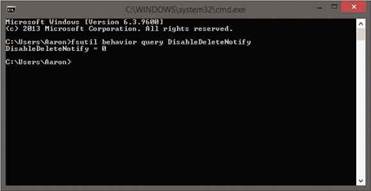
Activating TRIM in Windows 7 and up is easy
TRIM is a special command that runs alongside the deletion command. When you delete a file from an SSD, the TRIM command is also triggered. This automatically goes and deletes the data you’ve just deleted, instead of leaving it to be removed when the space is needed to be written on. When you come to write to this space, TRIM has already deleted the data, so the SSD can write to it as if it was never used, thus keeping the speedy performance. Nice, eh?
SSDs cannot overwrite existing data when the space is needed. First, the data must be physically deleted
‘Why doesn’t everyone use this all the time?’, you may ask. Well, there are limitations to TRIM, and for various reasons, it isn’t always activated by default. The main limitations here lie with the currently installed OS and the SSD’s firmware. Support for it is only included as default in Windows 7 and upwards, older editions of Windows can only provide TRIM via the use of third party software and drivers. These have to be manually added by the user, and many don’t know how to do this, or even know what they’re missing.
The SSD’s firmware also needs to support TRIM. This probably won’t be a problem for newer models, but some older units may lack this functionality. It’s always worth check that a model you’re interested in buying supports TRIM. It’s a definite deal breaker. If it’s an older model, always ensure you’re running the latest firmware.
If you’re using Windows 7 and above, TRIM is easy to use, but first you should check to see if it’s already in operation. To do this, open up an administrator command prompt and then type ‘fsutil behavior query DisableDeleteNotify’ and press Return. This command will return one of two answers, either 0 or 1. If the result is 0, TRIM is enabled, so you don’t need to worry. On the other hand, if 1 is the answer, you’ll need to enable it. To do so, in the command prompt, type:
fsutil behavior set DisableDeleteNotify 0
And press Return. That’s it. TRIM should now be running.
The best way to use TRIM is to upgrade Windows to at least Windows 7. Third party programs will be useful, but having an OS that natively supports TRIM is far better, so if you’re on the fence about upgrading, now may be a good time to jump over to greener pastures.
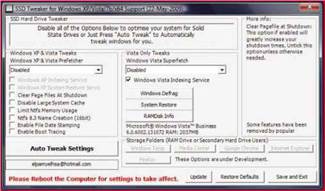
SSD Tweaker can be used to enable TRIM on older operating systems
If you’re still running a Windows version older than 7, such as XP, you’ll need to see if your drive manufacturer has a utility for TRIM support. Intel has one (intel.ly/1UZyqSt), so does Crucial (www.crucial.com/usa/en/support). If you can’t find an official upgrade to enable TRIM, you may have to use third party software, such as SSD Tweaker (www.elpamsoft.com). This is a specialised tool that has a host of SSD functions, including TRIM support for older operating systems. However, avoid some functions, such as defrag (we’ll go into this later). If you’re using a Mac, you can also get TRIM software to help, such as Trim Enabler from Cindori (www.cindori.org).
Organise Your PC
Alongside TRIM, organising your PC and data is paramount to the optimum performance of an SSD. This includes a selection of tasks which begin with the setup of your PC and the configuration of your Windows install and drives. By far the most popular and successful method of getting the most from an SSD in this regard is using the SSD volume to host Windows and moving other programs and data to a mechanical drive. This is almost universally appreciated as a great way to ensure you have a fast PC and that you’re making the most of your SSD.
The reason for this is simple. The most active and used files on your PC will always be those of your OS. It’s always running and working away the background. As these are always needed, it’s best to have this data on the faster drive so that your OS is fast too and can do what it needs with speed. Other programs, such as office suites, browsers, games, creativity suites and so on aren’t as essential and rarely contribute to the speed of your PC. You’ll also rarely need access to these programs and files to be as quick, so they’re best installed and housed on the mechanical drive.
Reusable?
In the early days of SSDs, before people were more familiar with them, it was a big fear that drives were very limited in terms of rewrites. This is an actual fact; SSDs do have a limited amount of rewrites, after which the drives start to fail. The technology has come a long way, though, and today’s volumes are unlikely to show failures for a very long time. In fact, most SSDs will easily match mechanical drives in terms of lifespan, if not outlive them.
Don’t panic about this if you’re considering buying an SSD. Even without the steps we advise, a drive will last a very long time. It can’t hurt to take precautions, though, to extend the life of the drive even more.
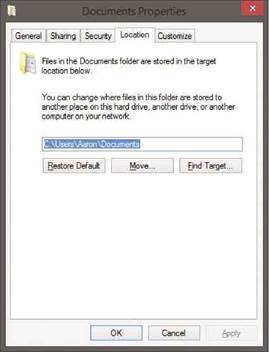
You can move some user folders to another drive with ease
You could argue that more important programs, such as antivirus, firewall, and other system-level utilities would benefit from SSD location, and this may be true, so it’s really up to the user on this. The more activity there is activity on the SSD, the slower it will run; it’s about balance.
In fact, some believe that the SSD should hold all of your installed programs and games, leaving the mechanical drive(s) for data only. Again, it depends on what applications you want to run quickly, and how much you value entire system speed over application speed, it also comes down to your uses.
Symbolic links trick Windows into thinking a program is installed at a certain location
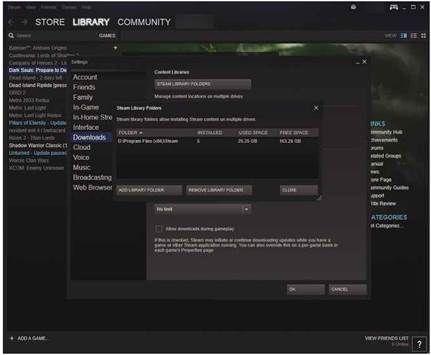
Don’t forget to change default download locations of apps like Steam so they don’t spam your SSD
For example, a gamer will obviously benefit from using an SSD for game installs, as games will run faster and perform better thanks to the faster data access speeds. An artist would value this speed with greedy apps like Photoshop, while a casual user wouldn’t really notice much difference from running a browser on an SSD. It all comes down to weighing the pros and cons against your PC use. Whichever way you go, though, always ensure your OS is on your SSD, that’s a given.
Although we recommend you run Windows from an SSD, using mechanical drives for other things, this doesn’t mean all of Windows. There are aspects of Windows you can – and, if you want a speedy PC, should – move off the SSD. This includes the standard document and data files associated with your account. These folders, such as Documents, Videos, Pictures and so on, can be easily moved and relocated away from the system drive. You can do this by simply right-clicking on the folder in Explorer and going into Properties. Click Location and use the Move option to relocate the folder(s) to a separate drive. This will change the path within Windows, keeping this data away from the SSD.
When installing programs and games, always use the custom option and change the install location from the default, which will almost always be the OS volume, to another drive. If programs use the Windows folder, Program Files, a new one will be created, along with the full path.
With services like Steam, you’ll need to go into the application options and change the default location for games. You’ll be able to do this via the Setting menu, in the Downloads\ Steam Library Folders section.
It goes without saying that you should also manually move and save future data to another drive. So, don’t use your SSD for collections like music or videos, and this takes up a lot of space. For SSDs to run at optimum, they need space to work. If they get too full, they’ll begin to slow down, just like any other drive. As you’re running your OS on this volume, you want to avoid this.
Symbolism
If you’re reading this and already have an SSD and you’ve got a lot of installs already, you may be wondering how to change this quickly. The most straightforward option is to uninstall and reinstall programs onto another drive, but there’s another route you can take. You can use symbolic links.
Symbolic links are specially created links that trick Windows into thinking a program is installed at a certain location, even after it’s been moved. Usually, simply cutting and pasting a program’s directory to another location will cause the program to stop working, as Windows and its Registry will be looking for the old location, meaning you have to ‘trick’ it.
These symbolic links are created using the command prompt (admin). The command we need is ‘mklink.’ This is used to make a new link for an existing program, redirecting Windows in the process. So, let’s say you have a program installed in ‘C:\Program
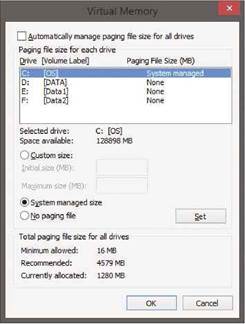
Move your page file to another drive and keep your OS SSD speedy
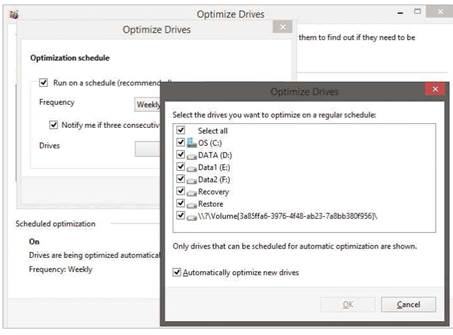
Don’t defrag SSD volumes and ensure you disable auto optimise in Windows
Files\TESTAPP’ and want to move it to the E: drive, you use this method. First, copy and paste the folder in question to the new location, then open up an admin command prompt. Once it’s open, use the mklink command to redirect Windows as follows:
mklink /d C:\Program Files\TESTAPP E:\Program Files\TESTAPP
You’ll need to change the source and destination paths to your own, of course, but once done Windows will now look for the program in the new location, not realising you’ve simply moved the folder. The old one can be deleted.
Flipping The Page
The Windows page file is another system feature that’s essential for the speedy operation of a PC, but it’s also a problem for SSDs as it not only takes up space, but also speed and resources. For these reasons it’s best to move this off the SSD and place it on a mechanical drive, or another SSD volume that doesn’t have the OS on it as well.
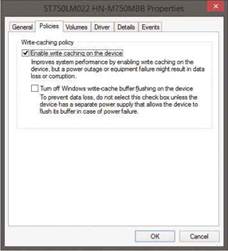
Disabling write cache can help some SSD users
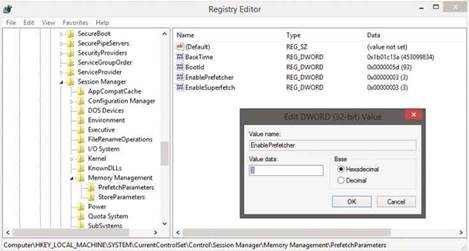
Disable Superfetch and prefetch if you’re using an SSD
Moving the Windows page file is easy. To do this, open up Explorer and right-click My Computer/Computer and select Properties. Go to Advanced Properties and then into Advanced and Performance Settings. Click Advanced again, and under Virtual Memory click Change.
The page file management screen will open. If everything is greyed out, untick the first option ‘Automatically manage paging file size for all drives.’ This will activate the other options, and you can use these to move the page file and change the amount of space allocated to it.
To move the file, highlight the SSD volume (probably C if it’s your OS volume) and select the option for no paging file. Now, highlight another drive, such as your mechanical storage drive, and select either a system-managed file or choose a custom file and specify the amount of space to use. Once you’re done, click OK. This will remove the page file on the OS drive, and instead use another drive for the function. This way, you keep the essential features of the page file, but aren’t taxing the SSD at the same time.
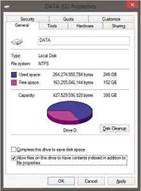
Indexing is not really needed, so disable it
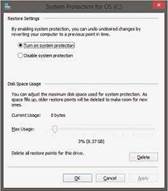
System Restore takes up a lot of space – a problem for smaller SSDs
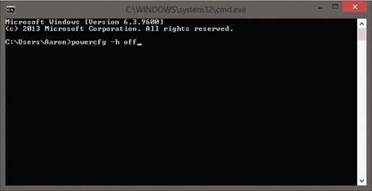
You may not need to use sleep or hibernate with an SSD, so can disable it
Defrag Is Bad
Defragmenting a hard disk is one of those tasks people always recommend. It’s been a staple tip for making PCs faster for years. These days it’s less of a problem, as later versions of Windows are better at handling data, and defrag is often run automatically by default, meaning we really don’t have to worry about it. At least, you don’t if you have a mechanical drive. With an SSD, you have to train yourself to ignore advice from the past.
SSDs should never be defragmented as this will have little effect on them, as they operate differently. They’re not mechanical platters that need to move data around to make access faster, they have solid state memory chips, which isn’t affected in the same way. More importantly, defragging a solid state drive simply uses a lot of writes and re-writes. As we mention in the box outs, this isn’t the major worry most feel it is, but it’s always best to limit writes as much as you can to ensure a longer life for the drive. For this reason, you should turn off defrag for your SSD drive.
To do this, right-click the drive in question and go to Properties > Tools > Optimize. The defrag tool will open and shows your various drives. Highlight the SSD volume and click Change Settings. Now, you can remove the tick next to the option ‘Run on a schedule (recommended)’, but this will deactivate defrag for all drives, and you may still want to defrag mechanical volumes. So, instead click the button to choose drives. Untick the SSD drive, but leave the others and click OK. This will stop Windows from trying to optimise and defrag the SSD.
SSD Tweaks
As well as the procedures we’ve covered, there are some tweaks you can make to your system that can further optimise your SSD. These tweaks are varied, but all should help you get the most out of your SSD drive.
Disable Write Caching
Some would argue that this feature should actually be enabled, and doing this will boost an SSD’s performance. This may be so in some cases, but write caching is actually more for mechanical drives, helping cache the data written to them. With SSDs, write speeds are already so fast, it’s a feature that doesn’t actually help all that much, and disabling it can take some stress off the unit.
To do this, go to Control Panel > Device Manager. Expand Disk Drives and right-click on your SSD volume. Click the Policies tab and you’ll see the write caching entry, which is probably ticked. Untick this and click OK.
Disable Superfetch And Prefetch
Superfetch and prefetch are functions that tell Windows to load soon-to-be-needed data into memory in order to speed up proceedings. This is a very useful feature for slower, mechanical drives, but SSDs are so fast in practical terms it’s just not needed. In fact, it can actually have a negative effect on performance, as it unnecessarily takes up memory and resources. So, we’d recommend you take a moment to make sure it’s disabled. To do this you’ll need to enter the Registry Editor and tinker with it a little.
Open Regedit by typing ‘regedit’ in the search or run bar. When in the editor, navigate to HKEY_LOCAL_MACHINE\ SYSTEM\CurrentControlSet\Control\Session Manager\Memory Management\PrefetchParameters.
When you’re there, double-click the EnablePrefetcher and EnableSuperfetch entries on the right, and set their respective values to 0.
The SATA interface used to connect disk drives to a PC can affect the speed of a drive, especially SSDs, although depending on your setup, this effect will vary in intensity. Most modern PCs and motherboards will have support for 6Gbps SATA (SATA-3), while older models will still be using SATA 3Gbps (SATA-2). Even new motherboards may not be entirely 6Gbps and may mix in 3Gbps ports.
Going by the numbers alone, you can see that the difference is twice the speed for 6Gbps SATA connections, so you’d expect the difference in speed to be vast. In truth, this is usually not the case.
Older, mechanical drive performance hasn’t changed much over the years, and most models simply cannot make full use of the 6Gbps speed due to physical limitations (limited I/O requests and simultaneous streams). SSD, on the other hand, can make use of the higher speeds, as these drives are far faster and able to access more data at any one time.
That said, don’t expect enormous boosts moving from 3Gbps to 6Gbps. There is often a speed increase, that’s true, but in many cases it’s not all that much, and an SSD on 3Gbps is still very fast and perfect for most users.
If you have spare 6Gbps SATA ports, though, always connect your SSD drives to these and use the older 3Gbps ports for mechanical volumes.
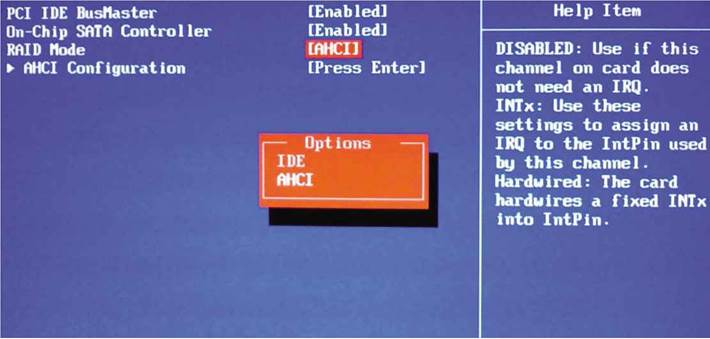
Ensure you use AHCI SATA for your SSD drive(s)
Disable Indexing
Like prefetch and superfetch, indexing is another feature designed to speed up Windows’ data access. It does this by telling Windows to store the most commonly used files in memory for faster access. With SSD, this isn’t such a problem, and it’ll take up system resources you don’t really need to use. Disabling it frees up these resources, giving your whole PC a speed boost.
To disable it right-click your SSD drive in Explorer and go to Properties. Click the General tab and untick the option ‘Allow files on this drive to have contents indexed’ and click OK. Simple.
Disable System Restore For SSD Drives
System Restore isn’t a big bad monster, it’s actually very useful, and you’ll be glad you have it in a pinch. It can be a problem with SSD drives, though, as they are generally much smaller in terms of capacity compared to normal Mechanical drives. System Restore images can take up precious space, so disabling the feature for SSD volumes can be a help. Just make sure you appreciate the risks of doing so.
To disable System Restore on an SSD right-click Computer and go into Properties. Go into System Protection and highlight your SSD. Click the Configure button and select the option to disable System Restore and click OK.
Hibernate Instead Of Sleeping
Using sleep on a system saves the current state to RAM before it goes to sleep, making for a speedy reboot back to where you were. Hibernate is similar, but instead saves the current state to your hard disk. Given the speed of SSD drives, there’s no need for sleep, as hibernate is now very fast. So, if you’re still using sleep mode and you have an SSD, switch to hibernate instead.
It could also be argued that there’s actually no need for either sleep or hibernate with an SSD, as systems can boot up much faster from cold anyway with an SSD. This being the case, if your PC boots rapidly from an off state, consider disabling sleep and hibernate.
A quick way to turn off hibernation is to use the command prompt. Open up an admin prompt and type ‘powercfg -h off’ and press Return.
Configure SATA Ports To Use AHCI In The BIOS
This particular tip is one that many SSD users swear by and for good reason. Ensuring your computer uses AHCI SATA (Advanced Host Controller Interface) for your SSD drives can lead to a much improved performance of the unit and is often much better than using IDE SATA. So, make sure you check this, and change it if needed.
The drawback here is that this is a tweak that really needs to be done before you install Windows on the drive and therefore could be a problem of you’re already running your OS. While it’s easily usually found in the BIOS, the specific steps to enable AHCI will vary from motherboard to motherboard, so consult your documentation. You kept the motherboard documentation, didn’t you?
If you don’t want to reinstall Windows, there is a way around it and – again – it involves the Registry. Open it up and navigate to HKEY_LOCAL_MACHINE\System\CurrentControlSet\Services\ Msahci. Change the value of ‘Start’ in the right-hand pane to 0 and reboot. Before you load back into Windows, make sure you set up SATA AHCI in the BIOS.
Create A Ramdisk And Move Caches To It
Using some special software, you can create a ramdisk, which is a way of utilising system memory as a drive, a very fast drive. You can get the software for free from bit.ly/14LA9CU and, once installed, use it to can create your ramdisk. You’ll need at least 3GB of RAM to do this, and the free version of the program lets you create ramdisks of up to 4GB in size. A great use for your new ramdisk is to move various Windows’ temporary folders and caches to it. This will provide lightning fast access to these often used files, and you’ll notice a definite speed boost.
That just about ends our guide. Using that selection of tips, you should find you get even more performance out of your SSD, not to mention a longer lifespan for your money. Couple these up with general housekeeping and system maintenance, and you’ll have a very fast and responsive system, which is always nice.


