Deep into storage space

At the edge of the final storage frontier, the universe’s greatest storage system is about to unfold
Table of Contents
WE ALL KNOW SSDS are coming to kill old spinning storage, but for many of us, a bank of HDDs still offers the capacity we need—8K footage, a mass of multi-megabyte photos, and who knows what other encyclopedic-level storage demands the discerning Maximum PC reader has?—without totally breaking the bank.
There’s no doubt SSDs are catching up with their clunky spinning brethren on capacities, but the cost of a 4TB cutting-edge SSD drive would buy you nearly 30TB of spinning storage. If only there were a way to combine the storage space of old spinning drives with super-fast solid storage…. Well, say hello to Microsoft Storage Spaces. A modern solution for an ancient problem: Where to store all your old junk without enraging the other half. Storage Spaces are the
Microsoft implementation of what the rest of the computing world generally calls storage pools.
It’s an attempt to abstract away the messy workings of RAID, mirrors, and JBODs, and present to the user a simple unified pool of storage, with the option of adding caching drives, the ability to mix and match drives of varying capacities, the bonus of device redundancy, and an easy way to manage your spaces.
It seems like the perfect solution, so why isn’t everyone using storage spaces? Well, Microsoft being Microsoft, it went and had to try to hobble a useful system for standard Windows 10 users. So, we’re here not only to explain how to get the most from your storage spaces, but also put back the missing functionality, no matter what Microsoft might want. Let’s get exploring..
ANTHONY HOWES
Everyone’s Looking for ways to make their busy Lives easier and simpler. Because laziness is the true mother of invention, and the world is full of sysadmins who don’t want to be hassled by failing drives, there came a solution: Storage Spaces. These are a way of creating virtual drives from a storage pool of real hardware storage, no matter what form that hardware takes.
No longer do you need to have a mess of multiple drives. No longer do you have to mess with RAID systems. With Windows 10, you can just pile together a bunch of storage, and have it appear as a single storage space that comes with a bunch of additional friends with benefits.
Storage Spaces is included with the consumer release of Windows 10; the server product Storage Space Direct has a few additional features, but is only available on Windows Server 2012/16/19. By and large, the extra features are aimed at enterprise and data center type usage. One feature, however, is support for SSD tiered storage and write-back cache— essentially, it enables you to provision a dedicated SSD drive(s) to cache a larger Storage Space. It appears that Microsoft removed GUI-based support in the consumer version of Windows 10, but it is possible to use PowerShell to manually specify a drive. So, we’ll look at this once we’ve covered the basics.
We’re going to look at your options for configuring Storage Spaces; part of that examines how the different options work for combining physical drives together into what Microsoft calls a storage pool. The combinations can get pretty varied, especially when you factor in expanding pools, and how virtual Storage Spaces can be “provisioned” across them. We want to manage pools, replacing drives, rebuilding them, and optimizing when needed, while we also look at using an SSD to enhance write performance. And, of course, we can throw a few benchmarks at our pool to see how it performs.
THE SCIENCE STUFF
Before we get stuck in with provisioning a few drives, we have to do some theory on how pools are created and why they exist, because it’ll save some head scratching, and having to rebuild your Spaces when you realize you’ve not done an optimal job. If you’re hot to trot on RAID and the like, you might want to skip ahead. As we’ve alluded to, Storage Spaces came about from admin demand for simplifying—aka abstracting away complexity—storage management. It’s not hard to imagine. You have a data center full of server racks, packed with spinning drives that are continually failing. You not only want a system that can prevent data loss when drives fail, but also a system that simplifies managing all this storage as a single block, or at least a series of blocks.
Taking the first part of that problem, one of preventing data loss, you want to add redundancy to your storage: If one drive fails, you don’t lose data, and everything can continue as if nothing bad happened. Storage Spaces, and traditional computing, offers two options: drive mirroring and parity storage, aka RAID.
Mirroring is the easiest to understand. The basic configuration is when you have two identical drives, and the same data is written to both — if one drive fails, you have a spare copy on the other. Simple? Well, mirroring can get more complex: Imagine
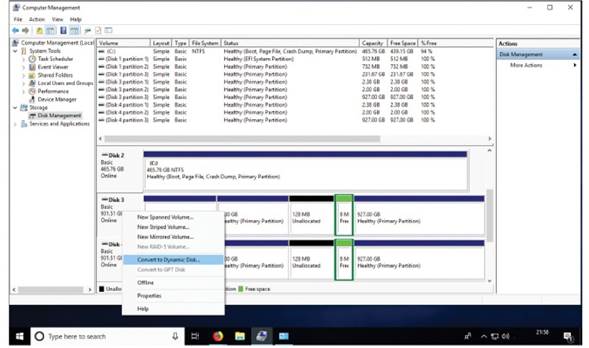
Ensure you clear any drives before you try to add them to a storage pool.
SAME SIZE, BUT DIFFERENT
Can you use drives of different sizes? Yes, but no. Clear as mud—just how we like it. The short and basic answer is that in any parity or mirrored pool, you can use any size of drives you like, but the maximum capacity of the pool is determined by the smallest drive.
Take a mirror consisting of a 1TB and 2TB drive—the maximum mirrored capacity is 1TB; the 2TB drive is limited to 1TB of storage. For a parity array, take a 4TB, 4TB, and a 6TB pool of drives. The overall capacity would be 12TB, because the 6TB is limited to the 4TB of the two smaller drives, though space available for storage would be 8TB, as a third is reserved for parity data, as we’ve explained.
If the occasion arises, you can more cleverly match your different-sized drives in mirrors to maximize your space.
For example, if you had two 4TB and two 6TB drives, you’d match up one 4TB and one 6TB to create one side of a 10TB mirror, and the remaining two drives on the other.
You can assign multiple Storage Spaces, even if they’re bigger than the physical storage.
each side of the mirror as a storage “column.” Storage Spaces enable you to combine multiple drives together in each storage column. One column mirrors the other, but with multiple drives, which is handy when you want to expand an existing mirror with more drives. Storage Spaces have also extended the idea of the basic mirror to a three-way mirror, so rather than just two mirror storage columns, you have three. The theory being the window of failure on a complex two-way mirror is big enough to warrant additional redundancy in the system.
The issue here is that a standard mirror wastes space—50 percent of your total storage is lost as redundancy. A threeway mirror is even worse, with 66 percent “lost” to redundancy. Isn’t there a more efficient option?
Enter parity storage, also known as RAID (Redundant Array of Inexpensive/ Independent Drives). Avoiding going
We found Microsoft parity-based Storage Spaces to be hot garbage, performance-wise.
into the actual math, parity uses a logic trick—it’s used in error checking, too — that means that by comparing two bits being stored, you generate a third parity bit. These are stored over your base three “parity” drives—the minimum number required. Bit one is written to drive one, bit two to the second drive, and the parity bit to the third drive. If any one drive now fails, you can get your data back by reversing the parity creation process, called rebuilding.
From this basic system, you should hopefully see how you can build it up to writing two bytes of data and then a parity byte—the actual amount of data is variable and typically called a “stripe,” as data blocks and parity blocks are striped across the array of parity drives. Four, five, or more drives can be added, and the data and parity data is simply spread across the drives. In this case, 33 percent of your total storage is used as redundancy, so it’s
SOLID STATES
Windows offers two features to accelerate Storage Space performance: write-back cache and SSD tiers. On the consumer release of Windows 10, these can only be implemented through PowerShell when the Space is originally created. We failed to add an SSD tier to a parity array of HDDs, but did have success with a single SSD and a simple array, plus a mirrored SSD and HDD array. We’ll look at how to create both.
We’re starting the process from a blank slate, so first remove your Spaces and pools. We’ll be using PowerShell (the fifth Ninja Turtle), so search for that, and run it in Administrator mode. Step one is to create a variable that stores the available blank drives; run this command without $disks = to see the output. We can then create our pool from that list.
Next, we create two more variables that store the details for what will be our SSD tier and HDD tier for drives.
Finally, we create a Storage Space with the New-VirtualDisk command—you’ll need to change the -StorageTierSizes values to suit your devices.
Open the Manage Spaces control panel and you’ll see a new unformatted space. You can format and manage it within the GUI from here. If you have two SSDs, you’re in luck, because you can create a cached mirror space. Repeat the last set of commands, but this time around, simply enable the ResiliencySettingName as Mirror. We assume that if you had three SSDs, you’d be able to enable parity.
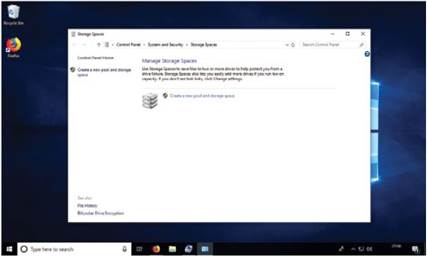
The main Storage Spaces control panel before anything is created.
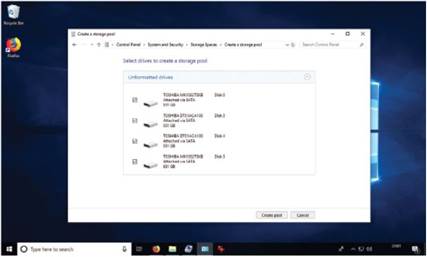
A storage pool isn’t much use without a few drives to play with.
more efficient than a mirror, especially for a larger number of drives.
In the old parlance, this would have been called a RAID 5 system—striped parity—and it can deal with a single drive failing in the array. A dual-parity option provides parity redundancy, which means two drives can fail with no loss of data; that would have been called RAID 6. Why would you need parity redundancy? Technically, the rebuild time of an array using drives larger than 1TB is so long that another drive could fail, so RAID 6 was recommended in these cases.
A final type of array is just referred to as “simple.” This offers no redundancy— it’s simply pooling drives for storage.
A feature of pooling hard drives that shouldn’t be overlooked is the performance through parallel access. Typically, this only improves reads, but it can enhance writes, because the drive controller can queue up parallel reads across the array for both mirrored and parity spaces without additional cache.
The main takeaway here is that drives can be added and removed relatively safely without losing your data, though there is always a “rebuild” time that impacts performance while the parity data is recreated. Windows provides a “optimize” option that should be run when a Space is expanded or reduced. We’ll delve into handling Storage Spaces now.
GIVE ME SPACE!
Now we know the basics of what goes on behind the scenes with Storage Spaces, let’s move on to how you can set one up within Windows 10 Pro. As we’ve hinted at, a Storage Space is a “virtual drive,” made up of many other drives grouped in
As it’s a virtual storage system, you can over-allocate the physical space, the expectation being that you will add more storage when it’s required.
a storage pool. This means that Windows can build a Space from different types of drives running over ATA, SATA, SAS, USB, or NVMe. It just requires the minimum number of drives for the type of Space you request. You don’t even need the full physical capacity available that you request, although Windows throws up warnings as the Space fills up.
For our example, we’re going to use four 1TB HDDs in various configurations, and we’ll attempt to attach an SSD as a write-back cache via the PowerShell. To kick off, you need to hook up your drives. Once back in Windows, check the drives have been recognized and are blank— ours had a mix of GPT, Dynamic, and previous mirrored arrays on them.
In the search tool, type “diskmgmt” and hit Enter to open the Disk Management console. You have to use your own common sense here to identify your new drives—these need to be cleared before they can be added to a storage pool. Right- click any partitions and select “Delete Volume”—check the contents with “Open” before destroying your data.
With cleared drives, we can move to creating a pool. In search, type “Storage” and select “Manage Storage Spaces.” As none exist, click the link to “Create a new pool and Storage Space.” It presents you with a list of suitable drives that can be added to a storage pool, which should be your blank drives. Select the drives you want to add, and click the “Create pool” button. If you get an error about not being able to complete the operation, try rebooting Windows—we had this issue a couple of times.
Here’s where you select the options for your new Space: name, drive letter, and filesystem. For filesystem, you should only have NTFS available; Microsoft is developing REFS (REsilient File System), but it’s aimed at data center/enterprise applications with checksumming features over mirrored arrays and rapid block reallocation for virtualization. It appears Microsoft isn’t rolling this out to consumer Windows users—yet.
“Resiliency” refers to the simple, mirror, and parity types we covered earlier. Depending on the type you choose, it alters the overall storage capacities below. As it’s a virtual storage system, you can over-allocate the physical space, the expectation being that you’ll add more storage when it’s required. Once you’re happy, click “Create storage space.”
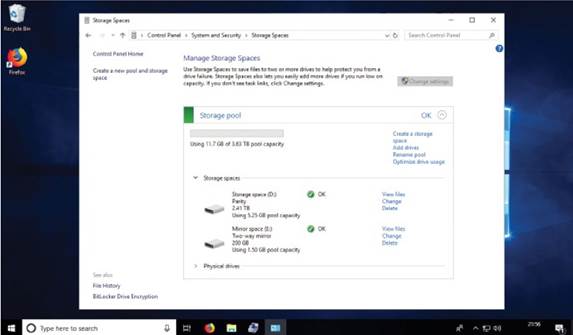
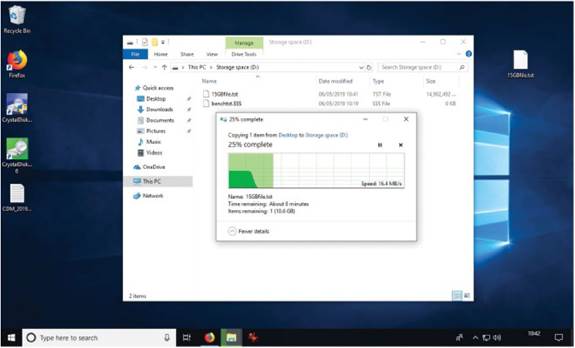
At this point, we’re done. Yay! Stop reading, go home. The new Space appears under “This PC”—or whatever Microsoft is calling your PC this year—as a new monolithic drive. You can benchmark, install to, copy from it, and so on, like any normal drive. But it’s not a normal drive. Re-open the Storage Space, and you’ll see a host of new options, and the status of the overall pool and individual drives.
Because this is all virtualized, you can create additional Storage Spaces within the same pool. Even if the total space exceeds that physically available, Windows doesn’t care—it’s like that these days. To make any changes, you need to click the Administrator “Change settings” button. As you should see, you’re able to create additional Spaces, which takes you through the previous procedure.
You’re able to change an existing Storage Space in terms of its name, drive letter, and overall capacity—its resiliency is fixed. Notice how you don’t add drives to
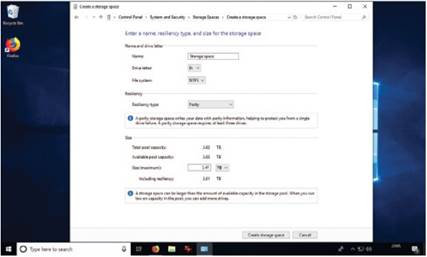
Specify a Storage Space’s resiliency and capacity in the control panel.
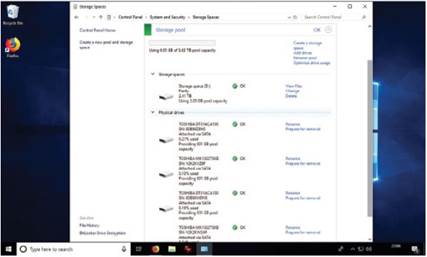
Once a pool and Space have been created, monitor them here.
a Storage Space; this is restricted to the storage pool. So, if you were expanding your capacity, you’d add a drive to the pool, and increase the available capacity to any Storage Spaces that deserve it. After adding to the capacity of a Storage Space, you should run the “Optimize drive usage” feature—this reallocates data and parity stripes for efficiency over the drives; though be aware that this reduces performance while it’s being run.
The “Physical drives” section lists the status and options for all the attached drives. If a drive should fail, or you’re planning to upgrade a drive, or for whatever reason need to remove a drive from the storage pool, you need to click “Prepare for removal.” Make a note of the “Model” and “SN” (serial number), so you remove the correct physical drive. Data is moved off the drive, and when finished, a “Remove drive” button appears. The drive won’t appear back in Explorer, because it’s still formatted as a storage pool device; you need to wipe it through Drive Manager, as we did to prepare the drives at the beginning.
Finally, if you decide Storage Spaces aren’t for you, removing them is no harder than clicking the “Delete” button—just make sure you remove all Storage Spaces before trying to delete the pool. In fact, you can’t even see the “Delete” option if there’s a Storage Space in use. To reclaim your drives, remove all the Storage Spaces, then you can remove the pool.
That’s the easy way to build a straight Storage Space from a storage pool via the GUI, but it doesn’t take full advantage of any SSDs, or enable you to increase the writeback cache from the default 1GB. For this, you need to shift to the PowerShell—see the “Solid States” boxout for exactly how that works. Our benchmarks show that it has a dramatic increase to a simple array, boosts mirror performance, and certainly helps the garbage performance that Storage Space parity arrays offer.
PERFORMANCE RESULTS
For our testing, we used a bank of four 1TB Toshiba 7,200rpm SATA hard drives in a number of Storage Space configurations: Simple, Mirrored, and Parity. Alongside this we ran two mismatched 480GB SSD SATA drives. We’re only
interested in an overview of performance, so we relied on CrystalDiskMark 6 for our results. We even created a couple of Spaces through the Spaces GUI to see what it would make of them, and if the PowerShell route was actually superior.
| CONFIGURATIONS | BENCHMARK RESULTS (MB/s) | |||||
| Space Type | HDD Tier | SSD Tier | Seq R/W | 4K Q8T8 | 4K Q32T1 | 4K Q1T1 |
| None | 1x 1TB HDD | None | 156.9/156.8 | 1.39/1.11 | 1.44/1.12 | 0.59/1.16 |
| Simple | 4x 1TB HDD | None | 164/170 | 1.70/1.43 | 1.71/1.54 | 0.65/1.57 |
| Simple | 4x 1TB HDD | 2x SSD | 1,115/1026 | 587/627 | 244/195 | 34/98 |
| Mirror | 4x 1TB HDD | None | 176/164 | 2.38/1.34 | 2.38/1.24 | 0.65/1.37 |
| Mirror | 4x 1TB HDD | 2x SSD* | 216/284 | 10.7/73.9 | 10.5/46.7 | 1.23/42.9 |
| Mirror | 4x 1TB HDD | 2x SSD | 565/514 | 462/314 | 249/99.9 | 35.7/72.5 |
| Parity | 4x 1TB HDD | None | 313/65.1 | 3.97/0.48 | 3.98/0.38 | 0.65/0.46 |
| Parity | 4x 1TB HDD | 2x SSD* | 307/238 | 4.07/0.29 | 4.16/1.77 | 0.90/33.5 |
*GUI-created Storage Space

WD Blue SN500 NVMe 500GB Review


There’s a number of broken sentences and at least one sentence that makes no sense.
Search article for:
more complex: Imagine…
Avoiding going…
redundancy, so it’s…
…each side of the mirror
“Step one is to create a variable that stores the available blank drives; run this command without $disks = to see the output.” What?
Help.