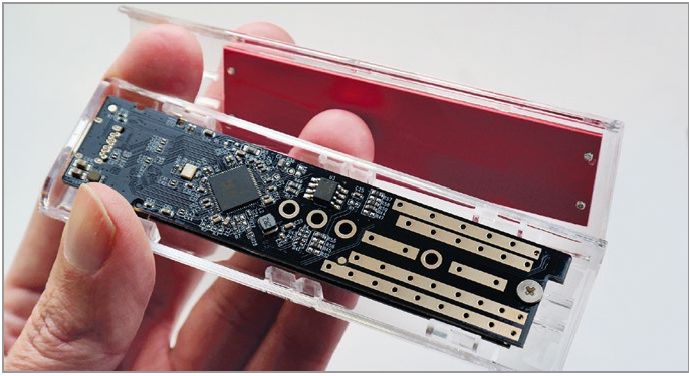
How to reuse an old SSD in a drive caddy
by Nik Rawlinson
What you need: An old drive; a drive caddy; toolkit. Time required: One hour.
The component you should care most about when disposing of an old computer is the hard drive.
That’s not because it’s necessarily the most environmentally hazardous, but because it’s typically packed with personal information that could be used and abused by a scammer.
Even formatting it isn’t guaranteed to wipe all your data. This simply wipes the index that Windows uses to find your content but leaves the actual files in place. Anyone with the right tools could pick up your computer from the tip, take it home, and recover your data within a few minutes. The same goes for anyone who buys it second-hand.
One solution is to physically destroy your drive. Or you could remove it from your old computer and insert it into a caddy to use as an external drive. This will not only prevent your data from falling into the wrong hands but also give you the benefit of additional storage at a minimal cost. Here we’ll explain how to do this using an old SSD.
As we always advise, make sure you back up your drive before you get started. Although there’s a good chance your data will still be intact at the end of the operation, there’s no guarantee. Nor is it a certainty that it will be readable once you connect it to a different operating system.
Also, take any additional precautions when handling your drive, like attaching an anti-static strap and working in a room without carpet to avoid static build-up, and making sure you switch off your computer before removing it.
Remove your old drive
The exact process of removing a drive differs between computers, so if possible flick through your original manual for any section that specifically deals with hardware upgrades. This should explain how to gain access to your PC’s interior. If you don’t have the manual, you may find it at www.manualslib.com.
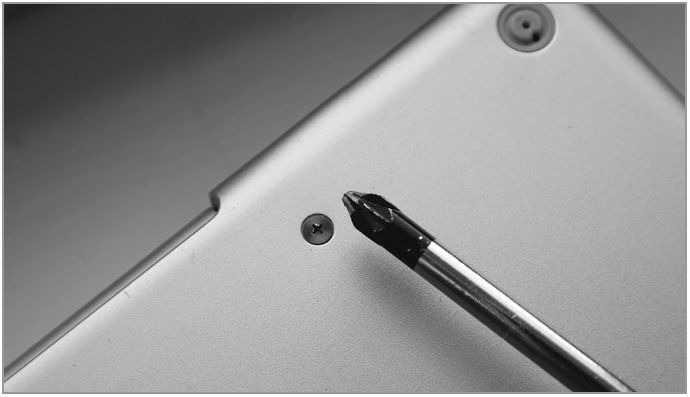
If you’re working with a laptop, you’ll probably have to remove several screws from the base and lift off the cover. These screws are often very small and, as you can see from the photo right, are sometimes too miniscule to accommodate the tip of a regular screwdriver. They may also be an unusual shape, with three, five, or six points, or have an opening that’s shaped like a triangle or hexagon. In this instance, you’ll need to identify and buy an appropriate screwdriver set.
The screws securing your computer case may be too small for a regular screwdriver
We use a precision screwdriver set for this kind of job. The set we use is no longer available, but you can pick up similar multi-part toolsets for less than £ (such as these from www.snipca.com/44680). We’re also currently offering a set as a free subscription gift -see box on page 37. Make sure the head of the screwdriver you choose matches the screws in your device.
It’s not uncommon to gain access via the keyboard rather than the underside of the case. This may be held in place by a couple of latches, so take a good look at your laptop before removing any screws. The fewer you remove the better as some may be holding important components in place. Also take care of any connections inside the case, and particularly any ribbon cables, which can easily be folded or creased, potentially causing damage.
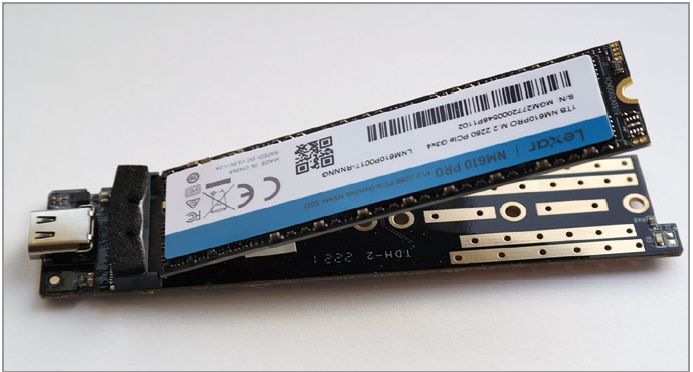
Your drive will usually be one of two types: a 2.5in SSD or an M.2 drive. The former is roughly the length and width of a pack of cards, but around half the depth. The latter looks like a stick of regular computer memory -you can distinguish it by examining the connection. Computer memory is attached to the motherboard via copper teeth running along the edge, whereas an M.2 drive is connected by teeth on one of the narrow ends.
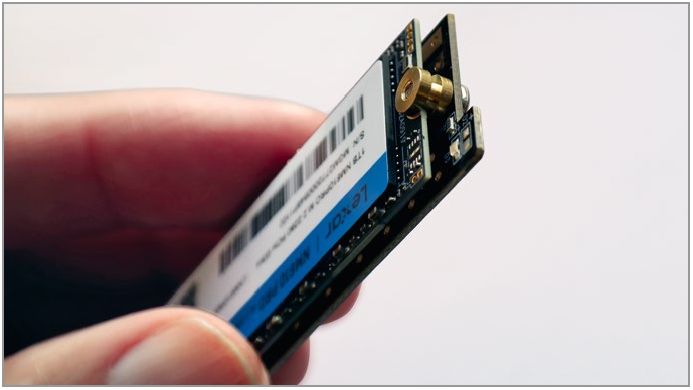
As you can see in our photo below, an M.2 drive will be secured at one end by a screw. Again, this may be too small for a regular screwdriver, and you should avoid any temptation to try and force a bulky screwdriver into the notch as you may end up rounding off the head. This would make it more difficult – and perhaps impossible – to remove the drive at all.
Once you’ve removed any screws, gently pull the SSD or M.2 from the motherboard, being as careful as you can not to touch any of its contacts.
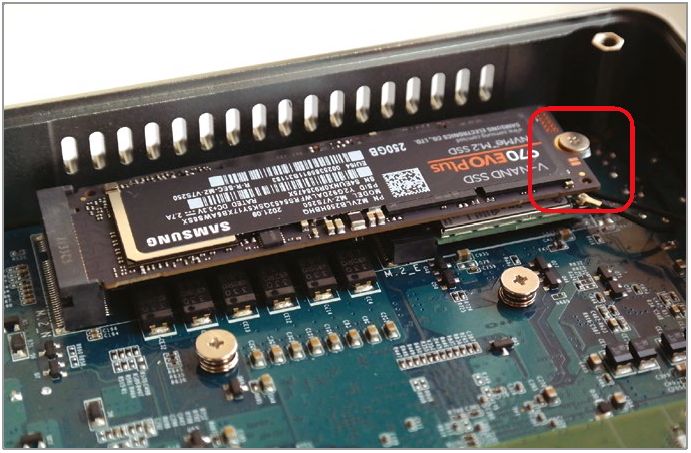
This M.2 drive is attached to the motherboard by a cross-head screw
———————–
How I use external drives
I use several ‘home-made’ external devices, which are just internal drives housed in cheap caddies. If they’re fairly old, I tend not to use them for storing important data, because I don’t want to risk losing it. But I do find them very handy if I need to transport or share large files that won’t fit on a USB stick.
Nik Rawlinson
————————-
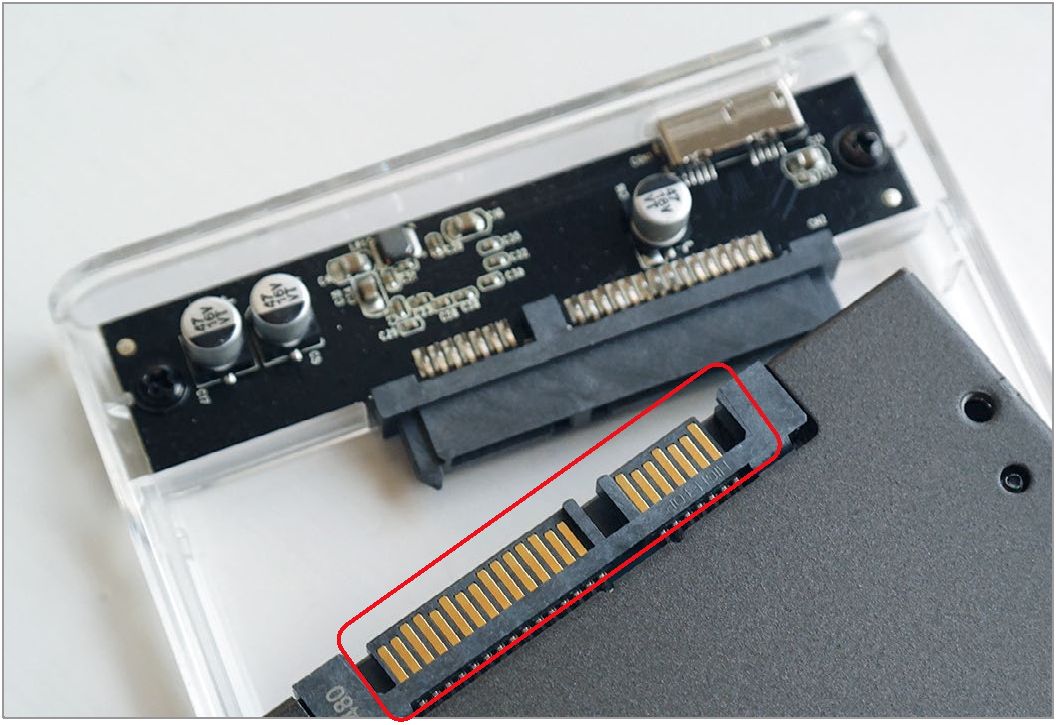
SSDs have a two-part SATA connector
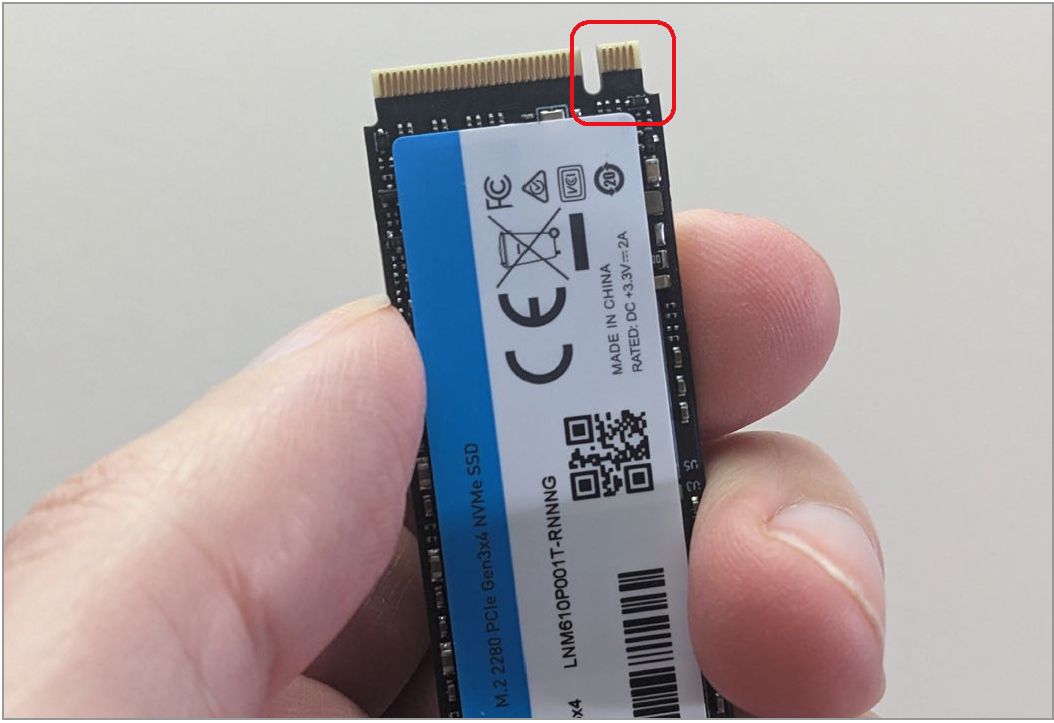
Our SSD has an M key – five connectors from the right
Identify your connector
Although your drive will have one of two types of connectors, things get more complicated when you consider the data connection. It’s vital that you correctly identify your drive’s connector before you buy an external caddy to house it.
SSDs use what’s known as a Serial ATA, or SATA, connector. This is split into two parts, as you can see in our photo below left, where we’ve turned a drive over so you can see its connectors. They have matching connectors that in this instance are hidden by the shield protruding from the narrow black motherboard.
However, the size and interface of M.2 drives vary greatly, which means you’ll need to look more carefully before buying a caddy. The drives are 22mm wide, but can be 30mm, 42mm, 60mm, 80mm or 110mm long. These sizes are described as M2 2230, M2 2242, and so on, all the way up to M2 22110.
You’ll need to buy a caddy designed for your specific drive dimensions. Our drive is 80mm long, so we need an M2 2280 caddy. If you struggle to find a caddy for your specific size, keep looking, because it needs to be fixed to the integrated motherboard at both ends. That means that buying an M2 2280 caddy with the intention of housing a shorter M2 2260 drive might be technically feasible but, in practice, may not work, and could put unnecessary stress on the connectors, as we’ll explain.
As well as considering its dimensions, take a look at the data connectors attached to your drive, and pay particular attention to the position of the notch or notches within them. This notch is known as its key position, and it’s used to prevent incompatible drives and connectors from being plugged into one another.
To identify your drive’s key or keys, hold the drive so its body is facing you. A notch six connectors in from the left is a B key, and one five connectors in from the right is an M key. Some drives will have only one or the other, while others will have both. As you can see from the photo below, ours has only an M key.
We, therefore, searched for a caddy designed for M.2 2280 M key NVMe drives. In the end, we bought a £ Orico enclosure that works with M-key drives and has screw mounts for drives of between 30mm and 80mm (www.snipca. com/44681), as pictured above.
The motherboard in our caddy has mounting points for drives between 30mm and 80mm
Fit your drive into the caddy
When your caddy arrives, you should have everything you need to fit your drive. If you’re working with a 2.5in SSD, line up the connectors and carefully press the drive into the plug mounted within the caddy.
One of the caddies we frequently use has two protrusions close to the connectors that keep the drive in position, but against which it’s easy to get stuck. So, if you find the drive isn’t mounting as easily as you’d expect, make sure there’s no obstruction. At the same time, try not to bend any connectors, as doing so can cause serious damage to the drive, the caddy, or both.
Once the drive is in place, attach the cover, then connect it to your PC using the included cable or, if no cable came with it, one that you already own.
The cuff securing the M.2 drive to the motherboard keeps it level
The connector on the caddy’s motherboard may angle the M.2 drive upwards
The process is slightly different with an M.2 drive. If possible, remove the motherboard from the caddy and insert the drive into the connector. Because the connector pinches the drive, it may be pointing upwards at this point – as pictured above – and will need to be screwed into position to secure it.
This is why it’s important to choose a caddy designed for your drive dimensions. Because the connectors will probably be raised from the motherboard and the drive needs to be kept level within the chassis to avoid putting stress on them, you’ll probably need to use an additional cuff around the screw, which will be cupped by the notch at the end of the drive. This should come with your drive, and you can see ours in the photo below the left. In the photo, we’re screwing not the drive itself, but the cuff, to the motherboard, and using the ridge cut into the cuff to hold the drive in place.
When you’ve secured your drive, rebuild the case, then connect the drive to your computer.
Format your drive to use as file storage
Turn on your computer and wait for it to boot into Windows. Because your drive was already formatted for use in your old computer, Windows should be able to read it and you should be able to access it in File Explorer.
However, even though it may contain a working copy of Windows, don’t count on being able to use it to run your computer. That version of Windows will have been registered to your old computer, and its built-in anti-piracy features would likely spot that it’s been moved to a different machine if you tried to boot from it. The same may be true of some of your programs.
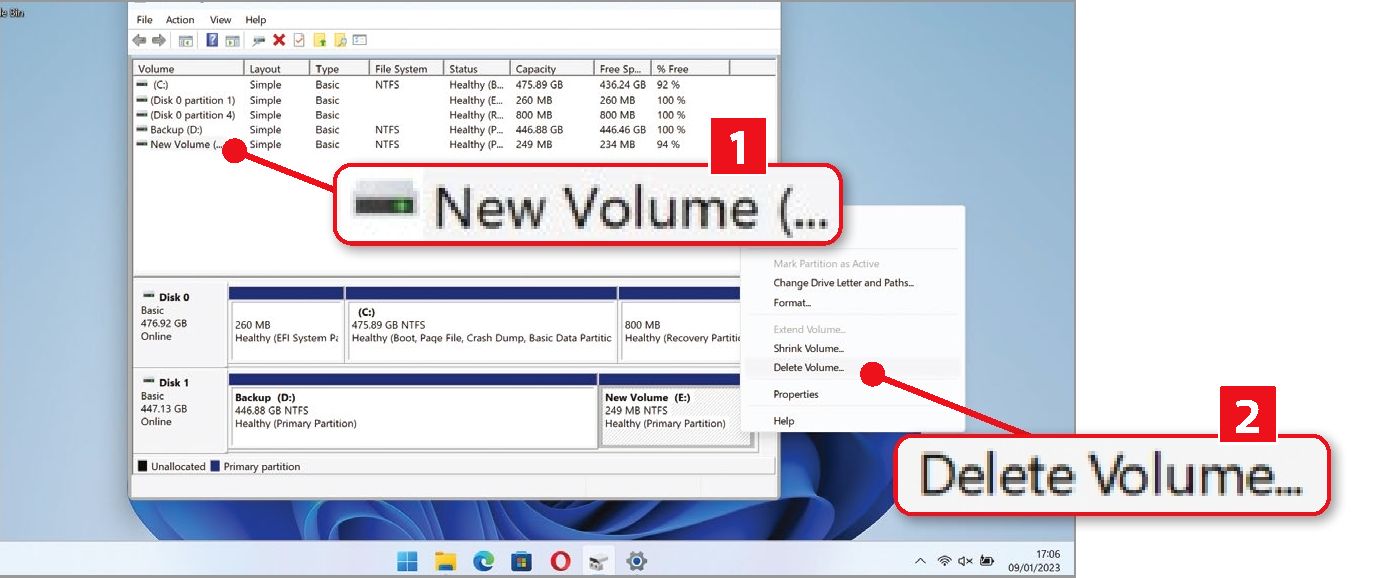
Deleting existing volumes can help you recover the maximum possible space from your recycled drive
What this means is that a large chunk of your recycled drive is being occupied by software and an operating system that you may no longer use, which is a shame when you could recover it and put it to good use. If possible, therefore, transfer any useful data, like your documents, photos, videos, and music, and format the drive for use as regular storage.
You can do this by right-clicking the drive in the File Explorer sidebar and choosing ‘Format.’ in the menu. However, as the drive may contain several partitions or volumes to accommodate both your live working environment and any recovery tools, you might want to go one step further and remove all your files. Bear in mind that doing so will wipe data from the drive to the extent that it may be possible to recover.
To do so, open the Start menu, type partition, and click ‘Create and format hard disk partitions’. Select your external drive in the Disk Management window (1) in our screenshot below left), then right-click each of its partitions in turn and click ‘Delete Volume.’ on the menu. You’ll be asked to confirm that you want to continue even though it will result in all of its data being deleted. Click ‘Yes’, but not before double-checking that you are definitely working with the correct drive.
When you’ve deleted all the volumes, click the blank space they’ve left behind and select ‘New Simple Volume.’. Now follow the instructions, leaving all of the options in their default state. This will set up your drive for reuse. You can now copy your backed-up data onto the drive and use it as external storage.