Recover deleted files for free

When you realise you’ve accidentally deleted an important file from your PC, it’s worth trying a file-recovery program to restore it. But many ‘free’ tools put a limit on the amount of data or recently deleted files you can recover without upgrading to their paid-for versions – essentially charging you to get back your own content. WinfrGUI has no such restrictions and lets you recover unlimited photos, videos, documents and other files from both built-in and removable drives without paying a penny. It’s based on Microsoft’s Windows File Recovery app, but provides a simpler interface for that tool’s confusing command-line terminal. WinfrGUI finds and restores deleted files more quickly than Piriform’s Recuva and gives you the time-saving option of scanning only specific folders for certain file types. Read our Recover deleted files for free.
What you need: WinfrGUI, Windows 10 or 11
Time required: 20 minutes

STEP 1
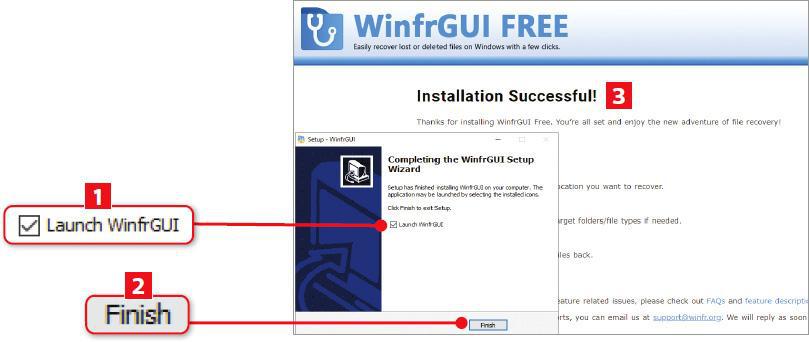
Download WinfrGUI from https://www.winfr.org/ – there’s only one version, so just click the big green Download Free WinfrGUI button on the homepage – and install it. Tick the box at the end of the setup process to ‘Launch WinfrGUI’ 1 then click Finish 2. A page will open in your browser to confirm that the installation was successful 3.
STEP 2
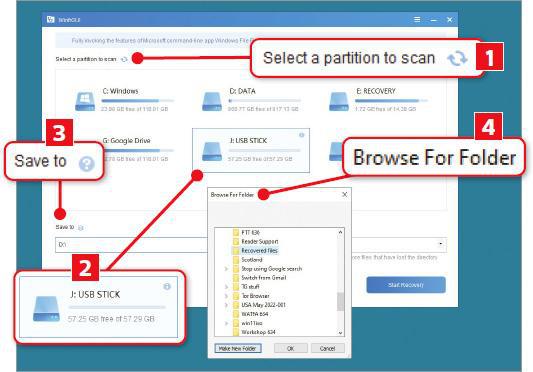
When WinfriGUI opens, select the drive or partition that you want to scan for deleted files 1. This can be a hard drive, SSD, memory card or removable drive-we’ve opted for a USB stick, with the drive letter ‘J:’ 2. Click the ‘Save to:’ box 3, browse to the folder you want to restore files to 4 then click OK. Ideally, this should be on a different partition or drive to avoid overwriting deleted data.
STEP 3
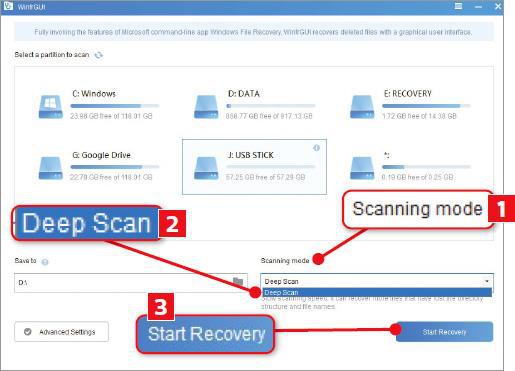
Click the ‘Scanning mode’ menu 1 to choose the type of scan you want WinfrGUI to carry out. For drives formatted using NTFS you can choose from a Quick Scan, which is faster but finds and recovers fewer deleted files, and a Deep Scan 2, which is slower but more thorough – other drives just offer Deep Scans. Click the Start Recovery button 3 to scan the selected partition or drive for lost files.
STEP 4
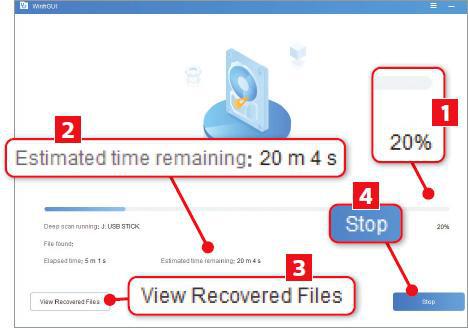
WinfrGUI’s progress bar will indicate the percentage of the scan completed so far 1, along with the time elapsed and the estimated time remaining 2. It will also display the names of the deleted files it finds (if any). If you’re feeling impatient, you can click View Recovered Files 3 to see details of the items the program has been able to restore, or click Stop 4 to finish the scan early.
STEP 5
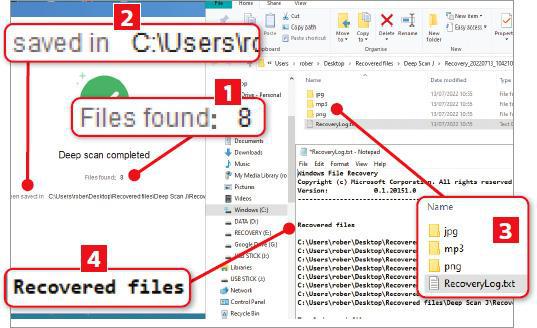
Once the scan is complete, WinfrGUI will tell you the number of files it has recovered 1 and the location of the folder it’s saved them to 2. Click the View Recovered Files button to open this folder. The files will be organised into sub-folders according to their format – in our case JPEG, MP3 and PNG 3. WinfrGUI also displays a log of all restored files 4.
STEP 6
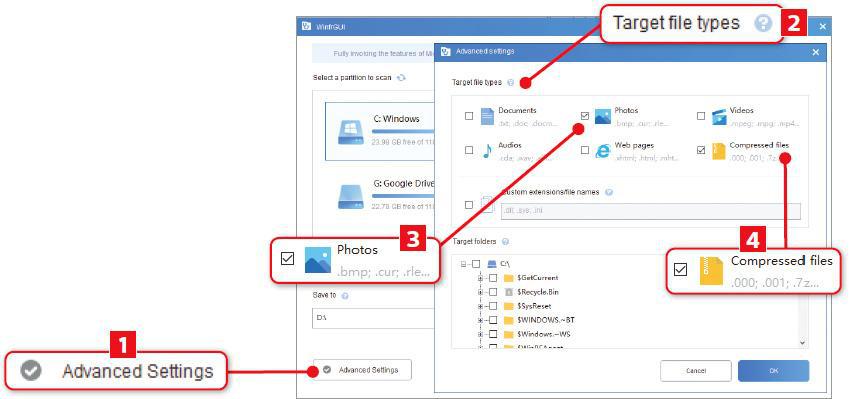
Click ‘Back to Homepage’ to select another partition or drive to scan. To save time when scanning large drives, such as your ‘C:’ drive, click the Advanced Settings button 1 in the bottom-left corner of the home screen. Here you can specify which file types WinfrGUI should scan for 2, including documents, photos 3, videos, audio files and compressed archives such as ZIP files 4.
STEP 7
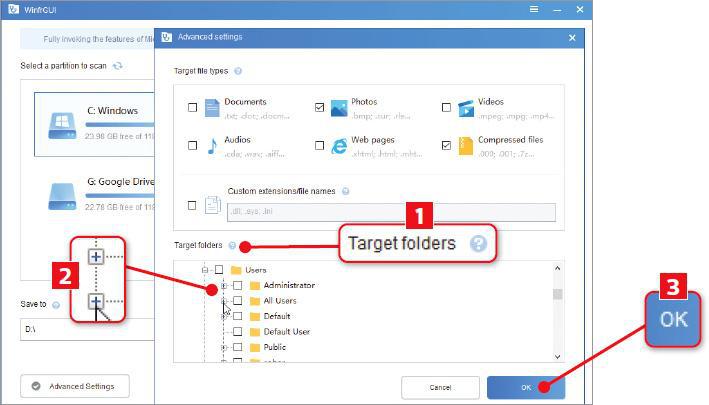
You can also specify which folders to scan for deleted files 1, so that WinfrGUI doesn’t waste time scouring your whole drive unnecessarily. Click the plus sign next to a folder name 2 to narrow your search further to specific subfolders. Click OK 3 to save your chosen filters and return to the home screen. Select a scanning mode, click Start Recovery and your scan will now find relevant files much faster.
