Reclaim ownership of your pc
Discover how to take back control of Windows, with help from Nick Peers
Ever felt you’re losing control of your PC? If you share it with other users—family members or friends, for example—it can be a frustrating experience. First, there’s the need to keep your own data private from other people, then there’s the worry about what they might be doing behind your back. Windows has tools for managing children’s use, but what happens to a PC that’s shared between a group of consenting adults— even those who should know better? In this feature, we’re going to examine two principal ways in which you can regain control of your PC. The first is through user accounts. We’ll reveal a technique whereby everyone—including yourself —gets their level of access reduced on a day-to-day level, tightening security, and preventing the haphazard installation of software and injudicious tweaking of system settings. The secret to this tip is to create a master Admin account— password-protected, of course—which is required whenever any elevated access (including the installation of many programs) is required.
We’ll also look at a tool those running Windows 10 Professional can employ in conjunction with user accounts—namely the Local Group Policy Editor—to tighten things further, giving you complete control over restrictions on a user-by-user basis.
We’ll show you how to restore the Guest account that Microsoft has mysteriously dropped in Windows 10, too.
Then we’ll examine how you can control access to individual files and folders through permissions—after reminding you to take precautions, we’ll delve into how you can make people’s folders private, while blocking their access to other parts of your system (including individual programs, if required). There’s even time for troubleshooting file permissions issues (both those caused by your fiddling and those created by Windows itself), finding out the best way to transfer to a new PC, and integrating your OneDrive storage better into your user folders. The end result? A PC that may be shared with others, but which remains your own, is under more control and better secured.
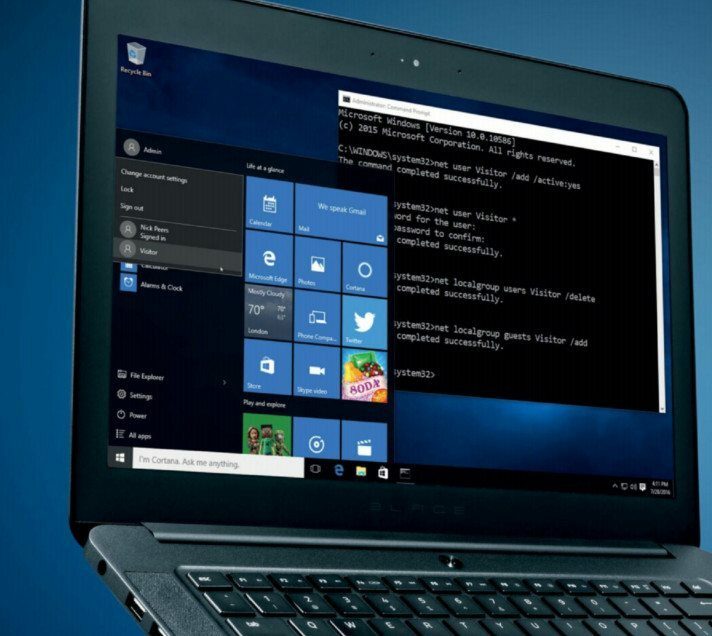
If you frequently have fleeting visitors in your home, you may wish to provide a limited user experience for basic tasks such as browsing the web. For reasons unknown to us, Microsoft has disabled the Guest account, but it’s relatively straightforward to get back, and the quickest way is via the Command Prompt. To create a guest account named Visitor, and assign it to the Guest account group, first right-click the “Start” button, choose “Command Prompt (Admin),” then type the following:
$ net user Visitor /add /active:yes
$ net user Visitor *
Press [Enter] twice when prompted to add a password, so it stays blank. Now type:
$ net localgroup users Visitor /delete
$ net localgroup guests Visitor /ad
The first command removes the Visitor account group (all new accounts are allocated their own group of the same name), while the second then assigns it to the Guest group. Yes, despite the fact that Microsoft has removed the Guest account, it has kept the Guest group alive, which basically offers exactly the same level of limited accessibility as the Guest account provided in earlier versions of Windows.
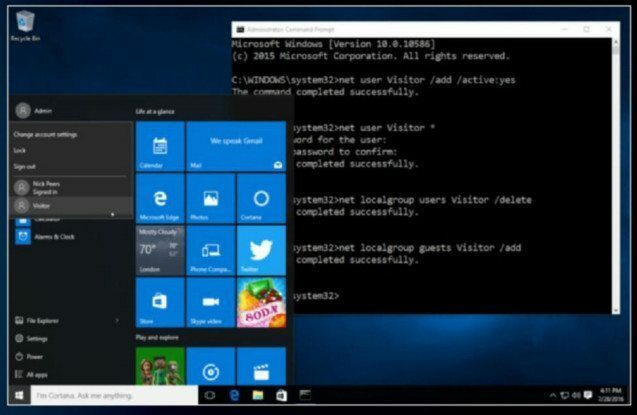
Once complete, your guests can be directed to the Visitor account. They can use a limited set of apps, but will be denied access to other parts of your system, such as Settings and the Microsoft Store. You can still install desktop programs, however— with the requisite Admin password and/or PIN, of course.
Let’s open with something that might seem counter-intuitive: Step one to reclaiming ownership of your PC is to reduce your level of access to it. Yes, you heard right—one of the most effective ways in which you can secure control of your PC is to downgrade your user account to that of a Standard User.
Why would you do this? First, it reduces your PC’s exposure to potential harm—now, instead of simply waving through requests for elevated access with a simple click of the mouse, you need to invoke a separate Administrator account (and password) instead. The inconvenience of doing so is outweighed by the fact that it forces you to pause and confirm what the dialog is there for—no more lazily waving through something malicious by mistake.
It’s also essential if you share your PC with others—by downgrading everyone, they’re forced to either use the Admin password (if you’ve shared it with them), or ask your permission before cluttering up your PC with more unwanted software.
The first step of this process involves creating a new Administrator account— click “Start > Settings > Accounts > Family & other users,” then click “Add someone else to this PC” under “Other users.” Choose “I don’t have this person’s sign-in information,” followed by “Add a user without a Microsoft account.” Name the account “Admin,” then enter a secure password, before clicking “Next.” With the account set up, you next need to make it an Administrator account—select the account under “Other users,” and click “Change account type” to convert it to Administrator. You’re now ready to log off your own account and change it. Before doing so, consider switching yourself to a Microsoft Account, if you haven’t already done so. It makes installing apps from the Microsoft Store easier, for starters—they’re sandboxed to your local account folder, so don’t require elevated privileges.
Sign out of your account, and log in as Admin (wait while the account is first set up). Return to the “Family & other users” screen, where you’ll see your own account listed. Select this, click “Change account type,” then reduce it to Standard user.
Repeat for all other users of your PC.
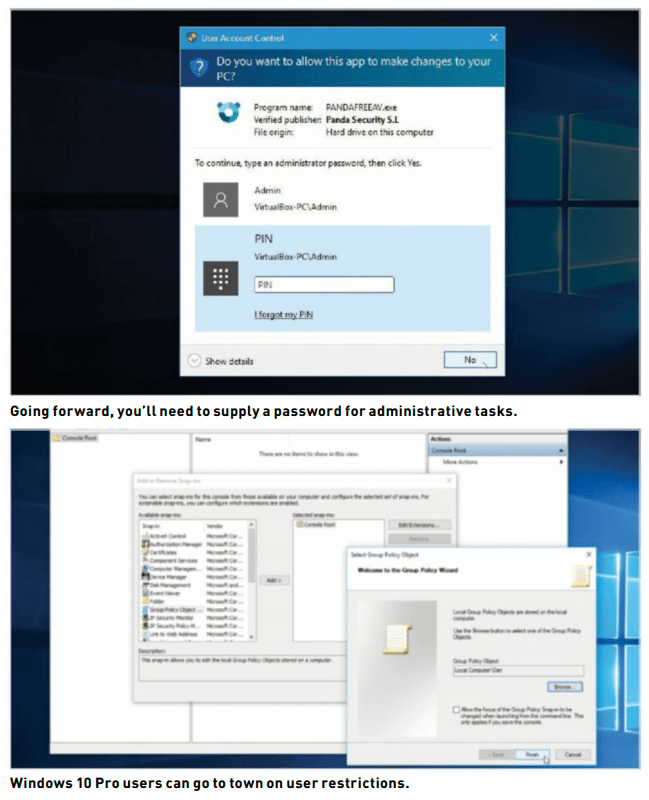
Now, when you have to perform any administrative tasks, you’re prompted to select an Administrator account (“Admin” should be pre-selected by default), and enter its password to proceed. You can make this step a bit easier by assigning a more memorable PIN number, and entering that instead—do this now via the “Sign-in options” screen (click “Add” under “PIN”).
Once done, sign out of Admin, and log back into your own account. For additional security, type “UAC” into the Search box, and click “Change User Account Control Settings”—you’ll see your first security prompt, requiring you to enter your Admin password or PIN. Verify the slider has been set to the top level.
One of the most visible ways in which your access has been downgraded is seen when you open the Settings app—it’s now less functional than it was before, because all system-wide settings are now off limits.
To get at them requires logging into the Admin account directly (do this quickly via the Start menu—click your user picture at the top of the menu, and select “Admin” to switch user without logging out). Or does it? In fact, most system-wide settings remain accessible via the classic Control Panel— just enter your Admin password to access them when prompted.
Use Group Policy settings
If you’re running Windows 10 Professional, you can set further restrictions on a user-by-user basis using the Local Group Policy Editor—launch gpedit.msc to take a tour.
It’s a little baffling for first-time users, so take the time to explore its settings, and make sure you take a drive image before you begin—it’s very easy to lock yourself out of your system. Most Group Policy settings are basically Registry edits, and if you’re running Windows 10 Home Edition, you can emulate most of these with the correct setting. Thankfully, Microsoft has provided a handy reference guide containing each policy’s setting and its equivalent Registry entry—go to www.microsoft.com/en-us/download/details.aspx?id=25250, and select “Windows 10 ADMX spreadsheet.xlsx” when prompted.
By default, gpedit.msc shows the Local Computer Policy settings, which means the settings are applied across your entire PC.
For a more granular approach, involving a single user or group, you need to apply a customized Local Group Policy instead.
Press Win-R, type “mmc,” and hit Enter.
Choose “File > Add/Remove Snap-in.” Select “Group Policy Object Editor” from the left-hand pane, and hit “Add.” Click the “Browse” button, and select the “Users” tab. Choose your target user (yourself, say) or group (“Non-Administrators,” for example), and then click “OK > Finish > OK.” Now choose “File > Save” to save a copy somewhere accessible (going forward, you would double-click this file to view and edit it).
With the template in place, you can now start to customize settings or restrict access. The Administrative Templates section is a good first port of call. Select a section, then click on a setting in the right-hand pane to read a description of what it does. Double-click it to make a change— this usually means enabling or disabling the policy, but sometimes you also get other options based on your settings, too. Make a note of the initial setting (typically “Not configured”), in case you ever need to reset your policies.
If you want to block access to a specific program that’s been installed, expand “Windows Settings > Security Settings > Software Restriction Policies,” and choose “Action > New Software Restrictions Policy.” Select “Additional Rules,” then “Action > New Path Rule.” Click “Browse” to select the parent folder of a program you wish to block, leave “Security level” set to “Disallowed,” and provide a description to help identify the rule going forward. Click “OK.” Select “File > Save,” then close the window, and reboot your PC. Test the rule by logging into the user account in question, then try launching the program—you should see a message telling you it’s blocked.
Sadly, this granular level of control is restricted to Windows 10 Professional users only. However, you don’t need to try to enforce Family Safety on your 30-something room-mate in order to restrict their access to programs—you can achieve much the same thing through the use of permissions.
File and folder permissions
Windows’ NTFS filesystem applies permissions to files, folders, and other objects (even individual Registry entries).
This gives you control over your PC by specifying which users and groups have access to which files and folders, and what level of access they have.
By way of explanation, open the C: Users folder to view each individual user’s personal folder. Inside here are their personal directories (Documents, Downloads, and so on), and various other account-specific files and settings. Try to open a folder other than your own user directory, and you get an “Access Denied” error. All well and good—except that if you’re running as an administrator, you’re prompted to click “Continue” to be granted access to the folder. Not exactly secure.
Paranoid users wishing to keep specific files and folders private should investigate a third-party encryption app, such as the open-source Veracrypt (https://veracrypt.codeplex.com), where you create a password-protected “file container,” which acts like a virtual drive, inside which you store your most sensitive files.
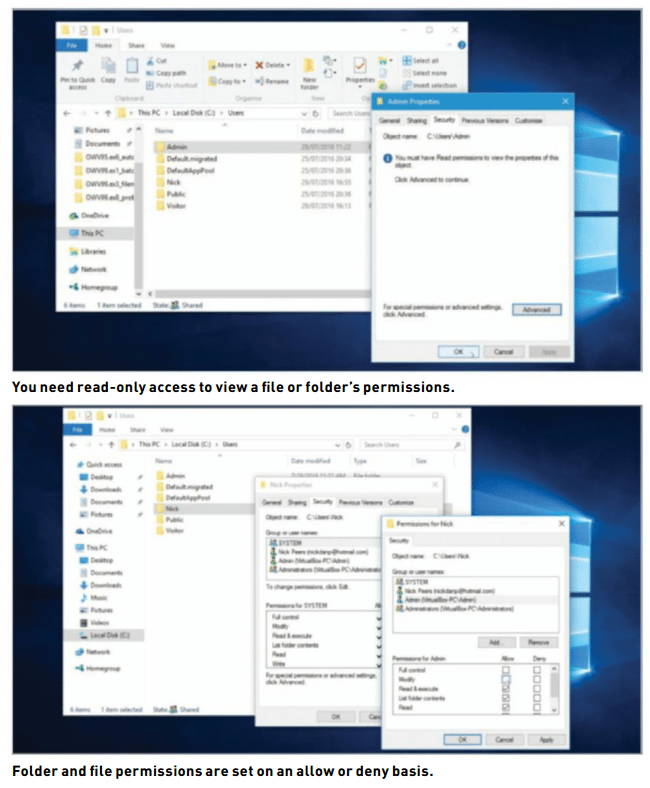
However, if you’re the only one with access to the Admin account on your PC, and you trust yourself not to abuse that power, then Windows’ NTFS permissions are adequate for basic privacy. To view a folder or file’s permissions, right-click it, choose “Properties,” and switch to the “Security” tab. You need read-only access to the item in order to view its permissions; if this is the case, you’ll see a list of “Group or user names,” plus permissions for the selected group or user.
Groups are basically collections of users, and include the following: Administrators, Users, SYSTEM, and Everyone. Anyone who is a standard user is part of the Users group, for example, while Everyone is a group designed to allow you to set universal permissions for every single person who uses your PC.
That’s all well and good, but what if you want to move across key user settings, and maybe even programs, too? If you use the same Microsoft Account on both old and new PC to log into Windows, then some tweaks will come across, but if you’re looking to simply replicate your old setup on your new PC —including desktop programs and carefully crafted settings— you’ll need to get out your wallet and employ the services of a third-party program.
The best tool is PCmover. The Express edition ($19.95) can move files, settings, and user profiles, but if you want to move apps, you need PCmover Professional ($39.95). Transfer via the supplied Ethernet cable, or use an external drive as an intermediary—but this greatly lengthens the process.
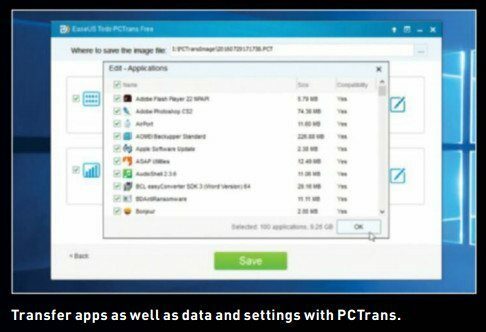
An alternative is EASEUS PCTrans, which comes in Free and Pro ($29.97) versions (www.easeus.com/free-pc-transfer-software). The former enables you to transfer data, plus two apps (the Pro has no limitation).
![]()
If you want to transfer software that’s been activated, you need to find out how to deactivate it on your old PC, before reactivating it on your new one. Also, don’t rush to dispose of your old PC once you’ve transferred everything across. Make sure it all appears to be in order, and consider taking one last fail-safe drive image of your old PC using Macrium Reflect Free, ensuring that you can browse the image’s contents to grab anything that might have been left behind.
Permissions consist of various types: Read, Write, Read & Execute, List Folder Contents (folders only), Modify, and Full Control. Some permissions are a combination of others—for example, Modify allows you to read, write, and delete, so both Read and Write permissions are set to “Allow” if Modify is. Read & Execute provides you with both read access to a file, plus the ability to execute it—vital for program and script files, for example— and it’s this attribute you can tweak to block individual users’ access to specific programs, as we’ll see shortly. Finally, Full Control basically gives you carte blanche— read, write, execute, delete, and so on.
Changepermissions File permissions are a dangerous subject— it’s all too easy to lock yourself out of a file, or even mess up your entire Windows installation, if you screw around with no real thought for the consequences. So, before you begin, consult our backup feature from the June issue for advice on taking a full Windows drive image, which you can roll back to should the worst happen.
Second, limit yourself to tweaking permissions for non-system files and folders. That means making any of the root folders on drive C off limits—even with programs, you’ll want to limit yourself to a specific sub-folder inside Program Files and Program Files (x86). Instead, focus on individual user folders, or folders and files you’ve got stored on a data partition or drive.
Third, you don’t necessarily need to be logged on as an administrator to make changes to a file or folder’s permissions.
Two types of user can modify permissions— any member of the Administrators group (so your Admin user, for example), and the “owner” of the item in question. Who’s the owner? Typically, this is the user account that created the file—for example, when you set up and save a new document, the file is assigned to you as owner. Note you can edit permissions using your Admin credentials, without logging on to the account itself.
You’ve reviewed the permissions for your target file and folder, and now you’d like to change them. Click the “Edit” button. You can now select a user or group to view their permissions, plus make changes using the checkboxes underneath “Allow” and “Deny.” If you select certain permissions (say, Read & Execute), then other permissions (Read in our example) may be checked, too. If you choose to explicitly set a permission type to “Deny,” Windows throws up a warning about group permissions, and how this overrides them. What this means is that even if the group a user belongs to has access to that folder or file, choosing “Deny” (rather than leaving both “Allow” and “Deny” boxes unchecked) explicitly tells Windows to ignore the group permission settings for that user.
You’ll also see “Add” and “Remove” buttons—these enable you to select additional users or groups, plus remove existing ones, so they either have no access, or rely on their group permissions to have access. Click “Add,” and you need to type the name of your user, then click “Check Names” to select them before clicking “OK” to set their permissions.
Once done, click “Apply,” and Windows starts to set permissions for that item; if you’ve selected a folder, then all the items inside it are set the same permissions, too.
Don’t panic if you get an “Access denied” error applying security—it means access is restricted to that folder, so the settings remain unchanged. Click “Continue” to carry on.
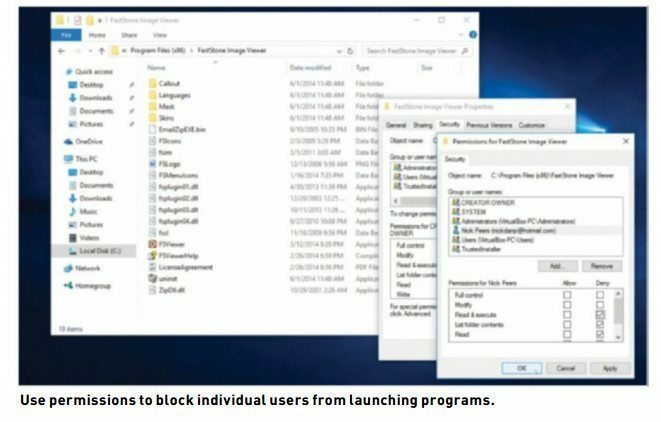
Block access to programs So, how can you use permissions to restrict access to a certain program? Note that the following doesn’t work with certain system-installed programs, such as Internet Explorer, but should work with any applications that you have installed yourself. First, browse to the program’s executable file (typically inside the Program Files or Program Files (x86) folders). Right-click the file, and choose “Properties > Security tab.” Click “Edit,” then click “Add” to select the user you wish to block. Once added, check the “Deny” box next to “Read & Execute,” and click “OK.” Note the warning, and click “OK” again.
Now when that user attempts to open the program in question, they’re shown a dialog telling them they can’t access it due to permissions issues. They won’t be able to change the file’s permissions (or view them) unless they have administrator access. It’s a crude method, but it works.
Interestingly, you can merge OneDrive’s folders with those in your user account, making things simpler to manage, but it’s a one-way process—unmerging the two later isn’t an option. If that doesn’t put you off, browse to your user folder, right-click your Documents folder, and choose “Properties > Location tab.” Click “Move,” then browse to the corresponding directory inside your OneDrive folder, and click “Apply.” Click “Yes” to move existing files into the new location, then read the warning before clicking “Yes.” Repeat for any other system folders you wish to integrate.
One thing to consider—the size of your OneDrive storage. You only get 5GB for free, so unless you’ve paid for additional storage, or have subscribed to Office 365, this may prove to be a non-starter. In that event, make use of Libraries instead. Windows 10 may have hidden them, but Libraries are still very much a part of it. Open a File Explorer window, switch to the View tab, and click the “Navigation pane” button—check “Show libraries” to put them back in the navigation pane. From here, select the Libraries view, right-click each Library in turn, and choose “Properties.” Click “Add…” to add the corresponding OneDrive folder to that Library, and click “Include folder” followed by “OK.” The folders remain separate, but they’re easier to switch between.
Take ownership
You’ll notice an “Advanced” button on the Security tab of a file’s properties.
Click this, and you gain the ability to view more information about the permissions assigned to individual users, complete with an “Inherited from” field that shows which folder the permissions were assigned from.
Look out for a button marked “Disable inheritance”—click this to unlink the item from its parent folder. What this means is that any permission changes you apply to the parent won’t automatically apply to this file or sub-folder going forward. When prompted, choose the “Convert” option to apply the parent’s settings to the item before removing the link, or “Remove” to clear them all. The latter option scrubs all existing permissions, blocking all access to the file or folder until new permissions are set by the item’s owner. Note, however, that nothing actually happens until you click the “Apply” button—click “Cancel” to make no changes.
You’ll also see a line listing the “owner” of the item in question. From here, you can change ownership to another user or group.
You might do this to prevent the original owner—assuming they’re a standard user—from undoing any permission changes you implement. You might also do this to take back ownership of a file or folder after you’ve either switched to a new user account (perhaps your old account corrupted), or reinstalled Windows in certain circumstances.
Taking the latter as an example, you might reinstall Windows from scratch using a different username and/or password, leaving your data folders on a separate drive or partition. You then find you’re locked out of these folders because they’re assigned to the old user account (even though it no longer exists). You can regain access to the folder via the “Continue” button while logged on as an administrator, then transfer ownership to your new account.
What you’ll see when you view the item’s permissions is an “Account Unknown” entry with a name like “S-1-5-25-12345.” This refers to your previous, redundant account.
Click “Advanced,” and you see it’s the owner of the folder, so click “Change” to transfer ownership to your new account, allowing you to set the permissions you need.
And there you have it—everything you need to know about locking down your PC that little bit tighter. Of course, things can— and do—go horribly wrong when messing about with permissions. Before reaching for your backed-up image of Windows, though, check out the box below, which contains information about some handy tools that can help resolve problems with permissions-related issues, both self-inflicted and otherwise.
Another handy tool that can help resolve—albeit in a rather crude way—permissions-based issues is the Windows Repair Tool. Download the tool (a portable version is available should you not wish to install it) from www.tweaking.com, then switch to the “Repairs” tab.
Click “Open Repairs,” uncheck “All Repairs,” then examine the first two repairs: one fixes issues with the Registry, while “Reset File Permissions” allows you to attempt fixes on selected drives. The tool sets things back to their defaults, so your PC remains secure and hopefully fully functional after the repair completes. It can take some time to complete, so be prepared to wait a while.
One final tool to look at is NTFS Permissions Tools (www.dbcstudio.net). This provides an alternative means of browsing and editing permissions. You’re provided with a File Explorer-like view of your drives, with your access rights and the folder or file’s owner marked. There are buttons for changing access levels and the owner, plus an Advanced section similar to that found in Windows. Also check out the options available when you right-click a folder, including one that lets you copy and paste permissions settings between items.


