Master Your WiFi Router
It’s the backbone of your home network, but how well do you actually know your Wi-Fi router? Will Stapley lifts the lid on your network’s nerve centre, and explains how to access its many hidden features
Not so long ago, your Wi-Fi router was used for little more than connecting your desktop PC and maybe a laptop – both to each other and to the internet. Fast forward a few years and the once humble router is now used to provide internet access to everything from phones and tablets to TVs, smart speakers, and maybe even your central heating.
Table of Contents
Despite our increasingly heavy reliance on routers, many of us never bother reviewing its settings so that we get the most out of it. It can all seem a little daunting. What if we tweak something that brings down our entire home network?
However, as we’ll explain in this feature, optimising your router is not as complicated as you might think. As well as providing a better understanding of how your network works, we’ll show you how to diagnose and hx problems quicker, improve performance and make your network more secure. We’ve split the tips into Easy, Moderate and Advanced categories, but you shouldn’t feel any are beyond you because we give clear instructions for each.
It’s worth highlighting that no two routers are exactly the same, ^e process for changing a specific setting can therefore depend on which make and model of router you have. To keep things simple, and because BT occupies the biggest slice of the UK market, most of our tips here will be based on its popular Home Hub router (we’ve used the Home Hub 5 and Virgin Smart Hubs also, but most of our advice will apply to any new Smart Hub models and older Home Hub versions).
Don’t worry if you don’t have a BT router – most of our tips will work with or can be adapted to any router. When we think you may need a little extra help, we’ve provided links where you’ll hnd specific advice relating to your router.
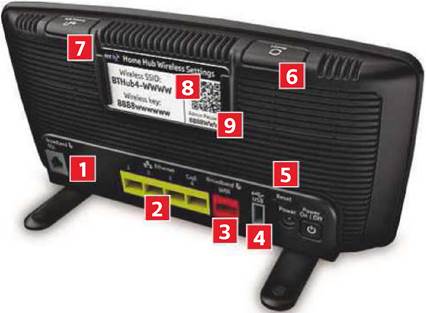
Anatomy of a router
1 DSL socket Routers with built-in modems have this port. You can connect your phone line direct to this.
2 LAN ports Most routers have at least four LAN ports. You can use them to cable devices directly to your home network. Wired connections won’t suffer as much interference as Wi-Fi so are typically faster.
3 WAN port If you have a separate modem, connect it here rather than using the DSL socket.
4 USB port Can be used to connect a USB device, such as a USB stick (see Tip 2)
5 Hard reset ^is small recessed button can be used to reset your router to its factory settings (see box below)
6 Soft reset Most routers have a button to perform a quick reboot. Turning it off at the wall has the same effect.
7 WPS button Wifi Protect Setup (WPS) lets you connect a device to your network without having to enter your wireless key.
8 SSID ^e default SSID (wireless network name) is often printed on the router, along with the wireless key required to access it.
9 Admin password Like the SSID, the default password to access your router’s settings page is also usually found on the device or in your instruction manual.
Where to find help for your router
Exactly how you access the features described in this feature will vary depending on the make and model of your router. Most ISPs provide online help for their routers, while detailed manuals are usually available from router manufacturers. We’ve listed links to support pages for some of the most popular (see box).
Can’t log in?
If you can’t remember the login details for your router, it’s worth trying the default username and password. This is often printed on the router’s casing – if not, go to Router Passwords (www.routerpasswords.com), where defaults for all major routers are listed. If this still doesn’t work, it could be because you changed the default login details, which means a factory reset is probably your only option. This is usually done by holding down the router’s reset button (see item 5 on Anatomy of a Router, above) for 10-15 seconds.
Contacts
- BT www.snipca.com/29589
- Sky www.snipca.com/29590
- Talk Talk www.snipca.com/29591
- Virgin Media www.snipca.com/29592
- Asus www.asus.com/uk/support
- D-Link www.snipca.com/29648
- Linksys www.linksys.com/gb/support
- Netgear www.netgear.com/support
- TP-Link www.tp-link.com/uk/support
UNDERSTANDING YOUR ROUTER
Don’t worry if you’ve never considered tweaking your network – it’s easy to start tinkering with your router knowing just a few of the basics.
Your first step is to identify the private IP address of your router. Unlike public IP addresses, which identify devices on the web, private IP addresses are used to identify devices on a local network, such as the one in your home, ^e easiest way to hnd your router’s IP address is to click Windows Key+R, type cmd.exe, then press Enter.
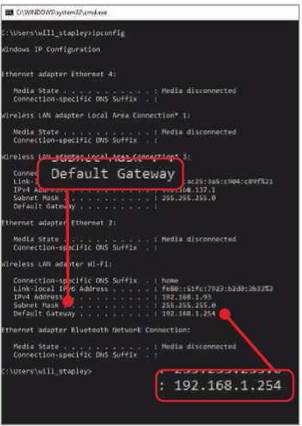
Your router’s IP address will be listed next to Default Gateway in Command Prompt
In the Command Prompt window that opens, type ipconfig then press Enter, ^e precise information listed will depend on the PC you’re using, but look for an entry called Default Gateway that’s followed by a series of numbers, usually starting 192.168.x.xxx (on our computer, the Default Gateway is 192.168.1.254, see screenshot above).
Next, type your router’s IP address into the address bar of your browser then press Enter. You should see your router’s login screen. If not, double check you’re connected to your network and that you typed the IP address accurately. Enter your router’s username and password (see box below if you’ve forgotten these) and its main menu should appear.
EASY TASKS
1 Back up your router settings
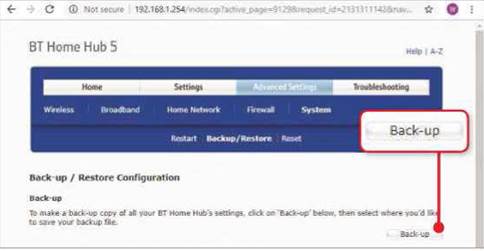
If something goes wrong with your router, it can bring down your entire home network. It’s therefore a good idea to create a backup of its settings. Doing so gives you the freedom to experiment with settings, safe in the knowledge you can quickly revert to the old settings with minimum hassle.
On BT’s Home Hub, go to Advanced Settings, System, Backup/Restore, then click ‘Back-up’ (see screenshot right). To restore a backup, click ‘Choose hie’ at the bottom, then select your chosen backup.
If your router doesn’t have a backup feature and it stops working, you’ll probably need to perform a factory reset. Ws is usually done pressing a small, recessed reset button at the back of your router. On Virgin Smart Hubs, for example, you hold this down for 20 seconds (you may need a paperclip or similar to access the button – it’s designed so you don’t accidentally activate it).
2 Add network storage instantly
Take a look at the rear of your router. If you see a USB port, you can insert a USB stick and use this for network storage. Once set up, all computers on your network will be able to access it, just as they would any other network drive.
With most routers, you don’t need to tweak any settings to use this port – simply insert your USB stick into the slot and your router will do the rest. To access the USB stick, press Windows+R, then type \\ followed by the IP address of your router (this is the same IP address that you use to log into your router’s settings) – for example, V192.168.1.254.
Unless your router specifically supports it, it’s unlikely you’ll be able to use the USB port to share devices, such as a printer, over your network. When we tried connecting a printer to our Home Hub 5, it wasn’t recognised.
3 Switch off wireless
Switching off the most useful feature of your router might seem counterproductive, but it can be useful in certain circumstances. For example, you may want to reduce the risk of someone hacking into your wireless network while you’re away on holiday, but leave a set-top TV box and security camera wired to your router. Alternatively, if you have a second router in your home that’s only
Back up your router’s settings and you’ll be able to restore them should anything go wrong
used for wired network connections, disabling wireless will reduce interference with your main router.
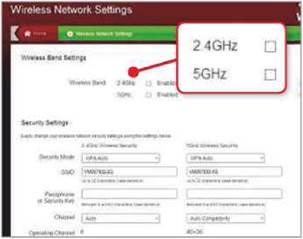
To turn off wireless on a BT Home Hub, click Advanced Settings, Wireless, then set ‘Wireless network enable’ to No. Next, click the ‘5GHz Wireless’ menu option and repeat the process. On a Virgin Super Hub 3, go to Wireless Settings, then in the Wireless Band Settings section, untick both the 2.4GHz and 5GHz bands (see screenshot below). Don’t forget, if you disable wireless you’ll need to use a computer or laptop with a wired connection to switch this back on again.
4 Create a secure guest network
If you have devices such as a NAS and would prefer not to share these with visitors who request to use your Wifi, you can usually set up a restricted guest network, which allows access to the internet only.
On a Virgin Super Hub, for example, click Advanced Settings, 2.4GHz First Guest Wireless Network, then tick the Enable option and follow the steps. An SSID for the guest network will be created, but you can change this if necessary. You can also create a guest network on the 5GHz band. Instructions for other Virgin routers can be found at
Switch off wireless while you’re away to reduce the risk of being hacked
BT routers don’t let you set up a guest network. Instead BT offers its Fon service, which creates a public Wifi hotspot using your router and broadband connection. If your visitors are registered to use BT Fon (it’s free to all BT broadband customers – hnd out more at www.snipca.com/29602), they’ll automatically connect to this network, which is separate from your home network.
5 Access your router remotely
You may be able to access your router when away from home using a phone and tablet app – useful if you need to diagnose problems from afar or quickly change settings when at home.
Remote-access apps are available from the following manufacturers:
Asus (www.snipca.com/29581), Linksys (www.snipca.com/29582), Netgear (www.snipca.com/29583) and TP-Link (www.snipca.com/29584), allowing you to not only check the status of your network, but adjust settings too.
The Asus app (see screenshot below), for example, lets you restrict bandwidth to certain devices on your network, as well as apply quality of service (QoS) settings to prioritise activities such as streaming over downloading. In comparison, the My BT app (www.snipca.com/29585) is limited, simply letting you run a speed test or restart your router.
The Asus Router App lets you access settings via your phone or tablet
MODERATE TAS KS
6 Improve signal strength with new antennae
If your router has antennae, take a closer look at them. If they appear to screw in, gently twist them anti-clockwise to unscrew them. Removable antennae let you upgrade to more versatile antennae that spread your wireless signal and improve coverage, such as TP-Link’s TL-ANT2409A (£18 from Amazon www. snipca.com/29664, see image below).
Ws comes with a long cable, allowing you to position it for better results, such as high up on a wall.
If your router doesn’t have visible or removable antenna, you can still boost your wireless signal by locating it in the best location. Ideally, a router should sit in the centre of your home, away from other electrical kit such as microwaves and not hidden behind a TV or similar large objects. If it has moveable antennae, try to point these in different directions.
Antennae such as TP-Link’s TL-ANT2409A let you better direct your wireless signal
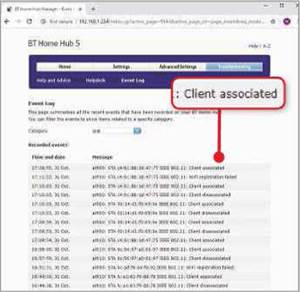
The event log will show you when devices connected (or ‘associated’), then disconnected
7 Find out what your router’s been doing
Your router can also generate an event log, which can tell you all sorts of useful information. Depending on your model, this may include a record of every time your router rebooted (and why), when firmware upgrades took place, and even when a specific button on the router was pressed.
See also: Netgear R9000 Nighthawk X10 Review
To see this on BT’s Home Hub, click the Troubleshooting menu, then Event Log. You can now biter the log to show specific information. The Wifi biter shows you when devices connected to/disconnected from your network (or, as the log calls it, ‘associated’ and ‘dissociated’ – see screenshot).
Frustratingly, it lists only the MAC address of each device, not the display name, so it takes a little investigative work to identify which device each log entry relates to (see Tip 11 for more help).
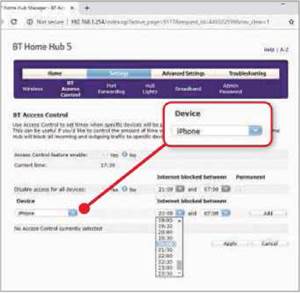
BT’s Home Hub lets you restrict internet access for any device to specific times
On a Virgin Super Hub, click Advanced Settings, Tools, ‘Network status’, then ‘Network log’ to access the event log.
8 Control internet access on specific devices
Most routers let you set rules for specific devices on your network, This means you can, for example, restrict when a tablet can go online or only allow a smart speaker to access the internet during daylight hours.
On a BT Home Hub 5, you’ll find this feature in Settings, then BT Access Control. Here you need to switch on ‘Access Control feature enable’. You can then set internet-access restrictions for all devices or, using the Device box at the bottom, choose specific devices (see screenshot above).
On a Virgin Super Hub, you can access a similar feature by going to Advanced Settings, Security, then MAC Filtering.
9 Use faster DNS servers
DNS servers are like a phone book for the internet. When you type a web address – such as www.microsoft.com (also known as a hostname) – a DNS server will use it to look up the actual IP address of the website. By default, you’ll probably use your ISP’s default DNS server in this process.
Changing this to an alternative such as OpenDNS (which has DNS servers of ‘208.67.222.222’ and ‘208.67.220.220’) or Google Public DNS (‘8.8.8.8’ and ‘8.8.4.4’) can not only reduce errors (pages failing to load when you type the web address, for example), but also speed up your browsing. You can
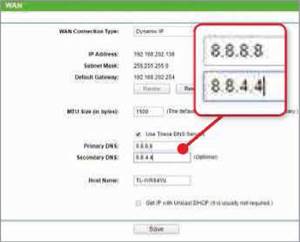
If your router supports it, you can change your DNS servers to Google Open DNS
change your DNS server on each of your devices, but changing it on your router means all devices on your home network use the new DNS server.
BT Home Hub and Smart Hub users are stuck with BT’s default servers. It’s a similar story with Virgin Super Hub routers. However, most other routers provide this option.
On TP-Link routers, for example, click Network, WAN, tick ‘Use these DNS servers’, then enter the new DNS servers (such as those for Google Public DNS – see screenshot).
OpenDNS provides detailed setup instructions for a wide range of supported routers – visit www.opendns.com/setupguide to find out more.
ADVANCED TASKS
Check for firmware updates
Like many devices, routers receive regular firmware updates. However, if you realise you’re not running the latest firmware, you shouldn’t necessarily rush to install it. First, see if the firmware is available from your router manufacturer’s website, then check whether it provides anything you actually want.
Improvements to security and new features you think you’ll use are good reasons to upgrade. For example, a firmware update earlier this year for TP-Link’s Archer C7 made it work with Amazon Alexa, allowing you to control the router using your voice.
See also: Linksys EA9500 Max-Stream Review
But if the firmware simply fixes a few bugs (and you’re not experiencing any problems) it might be best to stick with the version you’re using. Most firmware upgrades won’t cause you any problems, but if the update is interrupted (for example, by the power cable getting pulled out), it could render your router irreparable.
If your router was provided by your ISP, there’s a good chance you won’t actually be able to update the firmware yourself. Instead, it will be updated automatically by your ISP as and when it becomes available. However, if you bought your router, go into its menus and look for a setting called Upgrade (or similar).
On most Linksys models, for example, you’ll find a Firmware Update option in the Administration menu. Netgear, meanwhile, has produced a useful video explaining how to upgrade your router’s firmware – watch it at www.snipca.com/29575.
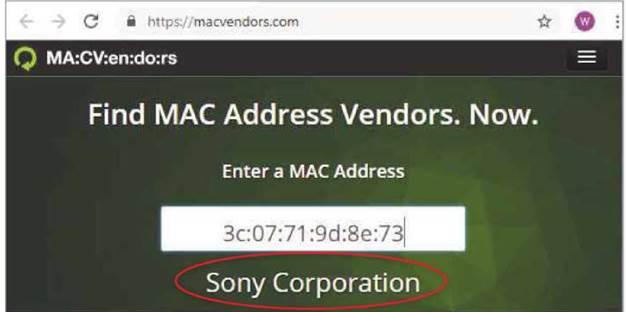
Not sure which device a MAC address relates to? The Mac Vendors website can help
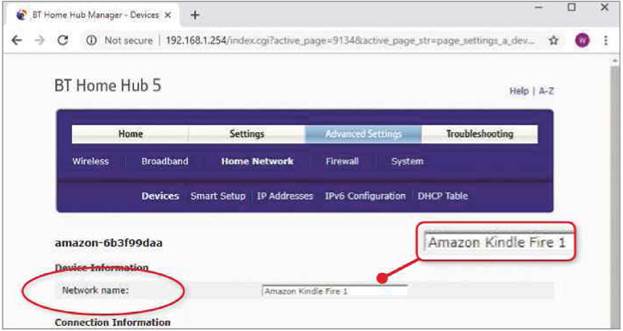
Make devices easier to identify by giving them recognisable names
11 Identify devices connected to your router
It’s worth keeping an eye on what’s connected to your network as this can help you diagnose any problems (such as finding out whether all your devices have been assigned IP addresses) and detect any devices that shouldn’t be on it (that sneaky neighbour piggybacking on your network to stream Netflix, for example). To view a list of connected devices on a BT router, click Advanced Settings, then Home Network. On Virgin routers, click Connected Devices in the main menu.
While your router will give some devices recognisable names (such as ‘My iPad’), other entries may simply be gobbledygook. If you have only a small number of devices connected to your router, work out what each one is by trial and error (such as by turning each one off individually and seeing which entry disappears from your list).
If you have many devices connected a better way to identify each one is to find out its MAC address – a unique identifier assigned to all computer hardware. The MAC address of each connected device will be displayed in your router’s settings.
While some devices will have their MAC address and serial number printed on an attached label, others are harder to identity. If you’re struggling to work out what a specific entry is, try copying (Ctrl+C) the MAC address that’s displayed in your router’s device list, then pasting (Ctrl+P) it on the Mac Vendors website (https://macvendors.com). This won’t tell you the name of the device, but it should reveal its manufacturer and help you identify it by process of elimination.
For example, we have a device whose MAC address is ‘3c:07:71:9d:8e:73’. Using Mac Vendors, we identified it as a Sony device (see screenshot below left), and therefore knew it was our Sony TV.
Once you’ve identified a device, it’s a good idea to rename it so you don’t have to go through this identification process again. Having recognisable names also makes other tasks easier, such as setting up access control for specific kit (see Tip 8).
To change a device’s name on a BT Home Hub, go to Advanced Settings, then Home Network. Click any device’s name, then change the ‘Network name’ field to whatever you want (see screenshot above). Other routers will follow a similar process.
If you own a Virgin router, you may find that a bug affects your attempts to rename devices. We’ve seen online forums where users complain about names being randomly assigned to the wrong device (www.snipca.com/29576). At the time of writing, Virgin hadn’t released a fix for this anomaly.
Considerations when buying new router
Cable or broadband
If you have an old ADSL broadband connection, you’ll normally need a router with an ADSL2+ modem built in. Newer (and faster) fibre broadband requires a router with VDSL2 support.
If you’re a Virgin Media cable customer, you should be able to switch the router to ‘modem’ mode and connect a new router that has a WAN port.
Tri-band
Most modern routers are dual-band, meaning they can broadcast on the 2.4GHz and 5GHz bands. Tri-band routers add an additional 5GHz band, meaning you can connect more devices and have them operate at high speed.
If you have a lot of wireless devices, opt for a tri-band model.
Mesh routers
Comprising a main router and one or more wireless satellite units placed around your home, mesh Wi-Fi increases the range of your wireless network. All units share the same network ID, so as you move between rooms your devices will automatically connect to the one with the strongest signal.
Ethernet ports
Wireless is great for phones and tablets, but anything located near to your router (such as a Freeview box or smart TV) is best connected to your router via an Ethernet cable, key’ll benefit from a faster, more stable connection and won’t slow your wireless devices. We recommend routers that have at least four Gigabit Ethernet ports (see below).
External antennae
Although routers with built-in antennae look neater, you’ll find it harder to direct the signal where you need it. External antennae can also usually be removed, allowing you to replace them with more powerful antennae (see Tip 6).
USB port
A router with a USB port lets you quickly use a USB stick as network-attached storage (see Tip 2).
Use static IP addresses
Using technology called Dynamic Host Configuration Protocol (DHCP), your router automatically assigns IP addresses to all devices on your home network.
These ‘dynamic’ IP addresses are allocated on a temporary basis, ensuring they aren’t shared by several devices – a clash that would stop them working properly. It means over a couple of days your laptop may use several addresses.
Although dynamic IP addresses work well for most devices (including laptops, phones and tablets), they can can create problems. For example, most home-security cameras and network storage devices can only be accessed by entering their IP address into a browser. If they have a dynamic IP address, you’ll need to hrst log into your router to hnd out what it’s current address is, which is a hassle.
The solution is to give these devices a ‘static’ address – one that doesn’t change (see our Mini Workshop below). Take care not to assign the same static IP addresses to two devices (your router should warn you if it detects this).
MINI WORKSHOP
Set up dynamic and static IP addresses
1 First, change the DHCP range on your Home Hub so that it only assigns dynamic IP addresses ending in ‘.100’ and above.
Click Advanced Settings, Home Network, then IP Addresses.
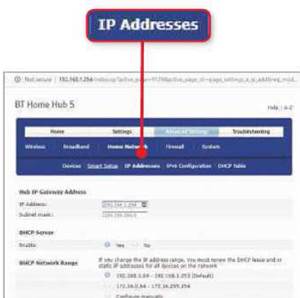
2 In the DHCP Network Range section, select ‘Configure manually’. Enter 192.168.1.100 in the ‘Start address’ field, and 192.168.1.253 in ‘End address’ (the first three sets of numbers in each may vary depending on your network). Click Apply to save your changes.

3 You can now start assigning static IP addresses. Click Devices to see everything that’s currently connected to your network, then click the device you want to assign a static IP address. In this example, we’re going to assign our Dell laptop a static IP address.
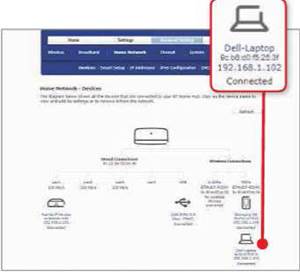
4 At the bottom of the window, you’ll see the device’s current dynamic IP address. Click Yes next to ‘Always use this IP address’, then change it to your chosen static IP address. We’re going to assign priority devices with IP addresses starting at ‘.10’, so change this to 192.168.1.10.
MINI WORKSHOP
Set up a VPN on your router
1 Use a VPN on your router
VPNs let you browse anonymously and unblock geographically restricted websites, and are usually installed on individual devices. However, by setting up your VPN on your router, you will have a VPN that covers all devices connected to your home network.
There are, however, important caveats. First, only certain routers let you set up VPNs in this way – those supplied by major ISPs won’t. Second, switching the VPN on and off isn’t as easy as when you have one installed on your computer, say – you’ 11 need to log into your router settings to control it.
In our Mini Workshop (right), we show how you can use NordVPN (vww.nordvpn.com) with an Asus RT-AC51U router. Once you’ve got the VPN set up on your router, it’s a good idea to make sure it’s working correctly by visiting a site such as DNS Leak Test (www.dnsleaktest.com).
Get more wired ports with a spare router
If you have a spare router, you can use it to give your network more wired network ports (useful if you’ve run out of ports on your existing router).
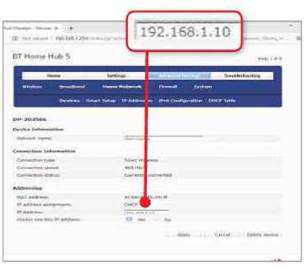
In this example, we’re using an old Netgear DG834N router. First, reset the router to its factory settings, then connect to its wireless network and login by typing its default IP address (see page 51 if you can’t reset or log in). Next, disable DHCP on the spare router to prevent it competing with your existing router when assigning IP addresses. On our Netgear router, we selected the LAN IP Setup menu, then unticked ‘Use Router as DHCP Server’.
You now give the spare router an IP address that’s the same as your existing router, except for changing the last three digits. Our existing router’s IP address is 192.168.1.254, so we typed 192.168.1.200 into the IP Address section (see screenshot right). It’s worth setting this as a static IP address on your existing router (see Tip 12).
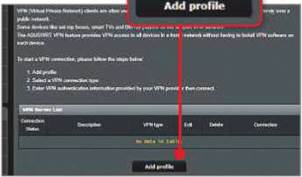
1 We are using an Asus RT-AC51U router for this Workshop. Log into your router, then click VPN in the menu on the left (depending on your firmware, this may read VPN Settings). Next, click the VPN Client (or VPN Details) tab at the top of the window, then click the ‘Add profile’ button at the bottom.
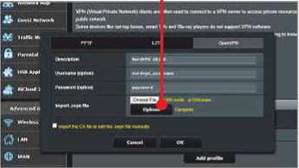
3 Return to the router settings window and click the Choose File button, then locate and select the ‘Config’ downloaded in the previous step. Next, click the Upload button, wait for the upload to complete, then click OK to save the changes.
Upload
Click Apply, then connect the routers by plugging an Ethernet cable into a spare LAN port on each, then reconnect to your existing wireless network. You should now be able to access the spare router by typing its IP address into a web browser. Finally, disable Wifi on the spare router to prevent it conflicting with your existing wireless network (see Tip 3).
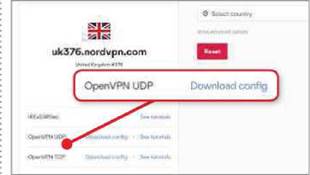
2 A window will open. Click the OpenVPN tab to adjust the VPN settings, ffle easiest way to set up the VPN is to download a configuration file. To do this, go to https://nordvpn.eom/servers/uk. Click ‘Show available protocols’, then click the ‘Download config’ button for the OpenVPN UDP option.
4 You now need to change your
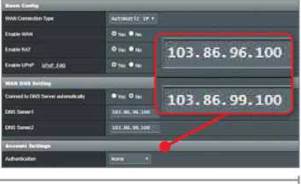
router’s DNS servers to use those of NordVPN (at the time of writing, these were 103.86.96.100 and 103.86.99.100 – see www.snipca.com/29578 for up-to-date servers). In the left-hand menu, select WAN. Under WAN DNS Setting, set ‘Connect to DNS Server automatically’ to No, then enter NordVPN’s DNS servers in the two fields below. Finally, click Apply.
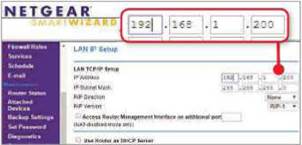
Give your spare router an IP address that matches your existing network