Keep Your PC Healthy

Discover how to resolve some of the most annoying PC-related niggles and glitches known to man. Nick Peers is your guide
You could say that if there’s one thing Windows is guaranteed to be good at, it’s annoying people. With each new release comes a host of new features, while existing features get dropped or moved somewhere obscure. Then there’s the frustrating problems caused by glitchy hardware or misbehaving apps, never mind the shortcomings of the Internet and the questions of security and privacy.
Table of Contents
We’ve rounded up over 40 of the biggest annoyances we’ve come across – with your help through the pages of Support Squad – in the years we’ve been running Windows. We’ve dug out workarounds and fixes, and found ways to restore missing features. We’ve focused on those niggles that have most universal appeal, and made sure our solutions are easy to follow.
We cover everything from fixing sound-related problems to playing DVDs and Blu-rays in Windows for free. Discover how to put Cortana back in her place and get rid of unwanted built-in Windows apps (while restoring useful features, such as Windows Photo Viewer). It’s all here – and more.
And the next time a particularly annoying feature or problem raises its head? Don’t keep it to yourself, email Support Squad at [email protected] and, if we select your question for publication, we’ll be in touch to discuss possible solutions with you.
Fix Windows problems
The following tips and tricks will help you restore missing features, as well as curb some of Windows 10’s more annoying habits
Let’s start by checking that System Restore is enabled (it’s switched off every time Windows 10 performs a major update). Type system restore into Cortana’s search box and then choose ‘Create a restore point’. Check your system drive – if it’s off, select it and click Configure… Choose ‘Turn on system protection’, then set the slider to 5GB or five percent of available space before clicking OK.
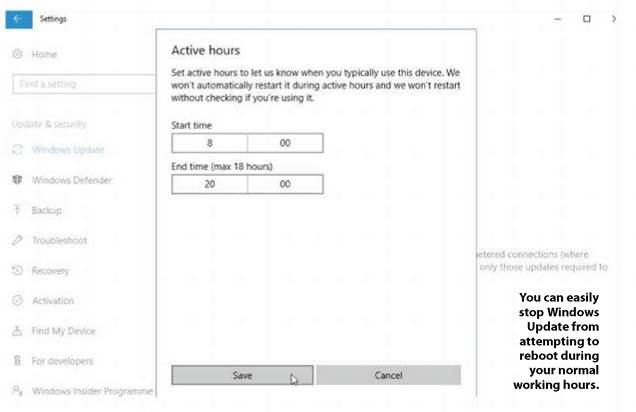
Worried that Windows Update might suddenly attempt to reboot without warning while you’re using your PC? Click Settings > ‘Update & security’ and choose ‘Change active hours’ under Windows Update. Set your start and end times – and Windows Update won’t automatically restart during these hours. While you’re here, select Advanced Options > ‘Choose how updates are delivered’, then select ‘PCs on my local network’ or flick the switch off to stop your PC being used to deliver updates to other computers over the Internet.
Microsoft is doing its best to reduce reliance on the System Control Panel by replacing it with Settings, and from the Creators Update onwards, it’s harder to find. If you’re a Control Panel fan, you can still jump straight to it by pressing [Win] + [Pause/Break]. You can also press [Win] + [R], type sysdm.cpl and then press [Enter] to go to its Advanced, System Protection and Remote tabs.
choose Edit > New > DWORD (32-bit) Value to create it. Once created, double-click the AllowCortana value and change its value to 1. Click ‘OK’.
Disable Cortana
Microsoft makes it harder to disable its Cortana search tool with every release – if you didn’t click ‘No’ when setting up the October 2018 Update, you can disable Cortana and convert the search box into a regular search tool.
Press [Win] + [R], type regedit and press [Enter] to open the Registry Editor. Browse to HKEY_LOCAL_MACHINE\ SOFTWARE\Policies\Microsoft\ Windows\WindowsSearch. With ‘WindowsSearch’ highlighted, look for a value marked ‘AllowCortana’ in the right-hand pane. If it’s not present,
Remove Cortana and turn the search box into a tool for exclusively searching your computer.
See also: Speed up windows
Highlights include shortcuts to several Windows tools on the main screen, while the Customisation section contains no less than four tabs packed with settings, such as restoring the classic battery and volume control pop-ups in the Taskbar notification area. Look under the ‘This PC’ tab to restore classic system tools hidden away in Windows 10.
Another favourite of ours: switch to the Additional section and then click Enable Windows Photo Viewer to bring back the classic Windows 7 photo-viewing tool. You then navigate to Settings > Apps > ‘Default apps’ where you can restore it as your default photo viewer by clicking ‘Choose a default’ and selecting it from the list.
You can find out more about individual tweaks in the Ultimate Windows Tweaker 4 tool by rolling your mouse over them, and click Restore Defaults to undo all your tweaks if necessary.
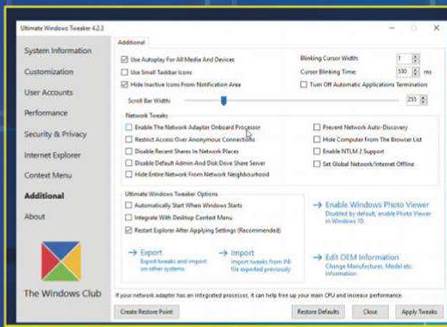
Ultimate Windows Tweaker 4 enables you to tweak many hidden settings in Windows 10 without having to get your hands dirty.
Finally, either reboot or right-click the Taskbar and choose Task Manager. Choose ‘More Details’ to bring up the Processes tab, scroll down, select File Explorer and click Restart. The search box should now simply say ‘Search Windows’ – use it to search for files, folders, programs and settings.
More tweaks
If you have resisted logging in with a Microsoft account when you upgraded to Windows 10, you may now want to switch for convenience’s sake. To do this, go to Settings > Accounts > ‘Your info’. You’ll see an option to sign in with your Microsoft account instead – select it and follow the prompts.
If you want to go back, you can do that to from the same dialog box – this time, choose ‘Sign in with a local account instead’. Enter your Microsoft account password, then choose a local username, password and password hint. Click ‘Next’ to sign out and back in – you’ll need to sign into the Microsoft
One new feature in Windows 10 is that you can now scroll inactive windows without selecting them
Store to access apps you’ve previously installed from there as well as other cloud services if you use them, but the underlying account will be a local one.
One new feature in Windows 10 is that you can now scroll inactive windows without selecting them – move the mouse over the window and scrolling affects that window, not your currently selected one. If the behaviour doesn’t suit, go to Settings > Devices > Mouse and toggle the ‘Scroll inactive windows when I hover over them’ switch to Off.

If you upgraded to Windows 10 from a previous version of Windows, you may wonder what product key you’ll need should you ever reinstall it on your PC. The answer is: none. If you’re ever prompted to enter a product key during setup, just click Skip and Windows will activate itself with no problem.
Finally, some programs continue to use the old Windows XP Help system, which was retired a while back. It used to be offered as an optional download, but no more. Don’t let that stop you: go to www.komeil.com/download/1230 to download winhlp32-windows-7-x86- x64-komeil.cab to your PC. Save it to your hard drive, then double-click the CAB file and drag the three files into a new folder to extract them. Right-click the extracted Install.cmd file and choose Edit. Add the following two lines to the ‘:: Settings’ section: set WindowsVersion=7 goto :BypassVersionError Save the file and exit Notepad. Now right-click Install.cmd again, but this time choose ‘Run as administrator’. Click ‘Yes’ when prompted. A command window should appear, indicating files copied and Registry entries updated successfully. Close the command prompt window and reopen your program. Press [F1] and you should find that Help works properly again.

Access owner
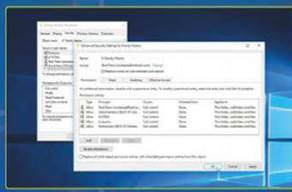
Open File Explorer and browse to the folder in question. Right-click it and choose Properties, then switch to the Security tab. Click ‘Advanced’ and then click Change next to the current owner’s name. You’ll need administrator level privileges to be able to do this.
Locate user
Type part of your username into the ‘Enter object name to select’ box and click Check Names – if nothing is found, click ‘Advanced…’ and simply click ‘Find Now’ to view all of the available users. Finally, scroll down to select your name, then click OK twice.
Final tweaks
As things stand, you will only be made the owner of the folder itself, not its contents. To rectify this, tick the ‘Replace owner on subcontainers and objects’ box before clicking OK. Wait while the owner is updated on all the selected files and folders. It shouldn’t take long.
Fix hardware problems
Discover some easy fixes for troublesome computer components with our guide to solving your Windows hardware woes
One of the annoying things about upgrading Windows is when you suddenly discover that your older hardware is no longer supported.
You plug it in, and either nothing happens, Windows tells you drivers aren’t available or – in the case of AMD graphics – it installs a basic display adapter that’s stuck at a low resolution.
Before you throw out the baby with the bathwater, press [Win] + [Pause/ Break] to open the System Control Panel and confirm your operating system type (32-bit or 64-bit). Now visit your hardware manufacturer’s website and seek out the latest version of its driver, making sure it matches your system type – Windows 8, 7 and even Vista drivers should work.
If you own two or more printers, it can be a hassle switching between them. One workaround is to switch default printer to whichever one you printed to last – click Start > Settings > Devices > ‘Printers & scanners’ and flick the ‘Let Windows manage my default printer’ switch to On.
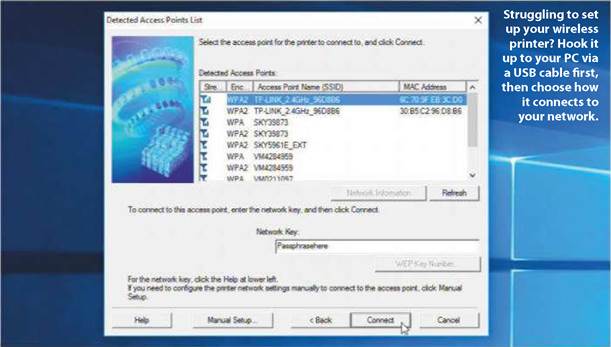
Struggling to get your network printer working? If your wireless printer doesn’t have a WPS switch for easy connection to the network, connect it to your PC with a USB cable after
Plug your laptop back into your main monitor if you can’t get the display working to troubleshoot.
downloading and running the latest printer software – be sure to select Wireless during setup to enable the installer to help you connect the printer to your wireless network.
Common laptop issues
Problems with your laptop screen? If the screen flickers or the resolution is too cramped, open Device Manager (press [Win] + [R], type devmgmt.msc and press [Enter]). If a yellow exclamation mark is present next to either the Display Adapter or Monitor then double-click the entry to find out what the problem is; look for an updated driver from your laptop manufacturer or take a closer look at any error codes or troubleshooting options offered.
If the screen appears to be dead and you recently plugged it into a monitor, it may still be set to output to the HDMI port – check for special keys that enable
To do that, right-click the Start button and choose ‘Command Prompt (admin)’, then type the following line:
$ chkdisk c: /f /r
Press [Y] when prompted, then reboot your PC to run the disk check, which will attempt to fix any errors it finds. If the disk check keeps appearing on startup, click Start > Settings > ‘Update & security’ > Recovery and click ‘Restart now’ under ‘Advanced start-up’. At the Recovery menu, choose Troubleshoot > Advanced Options > Command Prompt. Your PC will reboot and you’ll need to select your username and enter your password. When the prompt appears, type the following, substituting c: for whatever drive letter you’re scanning:
$ chkdsk c: /f /r /x
This should fix the problem.

Speccy enables you to view each hard drive’s S.M.A.R.T. attributes in detail, highlighting any potential issues that may shorten its life.
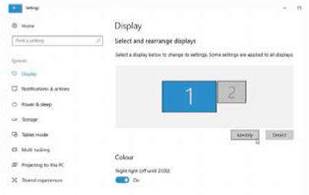
you to cycle through available displays – typically something like [Fn] + [F3] – to see if the screen comes back, or re-connect it to a monitor and go to Start > Settings > System > Display.
Look under ‘Multiple displays’ to set the default screen back to the laptop.
If the problem persists, then it may be a physical problem. You could source a service manual online and open your laptop to check for a loose connection, or try an online service such as www. hplaptoprepair.co.uk, which offers a parts-only or fully-fitted repair service.
Other common driver issues may be linked to your laptop’s trackpad not working as it should – it’s worth looking on your manufacturer’s website for a dedicated driver. If one exists, go to Start > Settings > Devices > ‘Mouse &
Most sound-related problems come down to the incorrect playback or recording devices being selected
touchpad’ and click ‘Additional mouse options’. Look for a Device Settings tab where you may find some configurable tweaks to make it more useful.
Finally, head to Windows 10’s battery saving feature via Start > Settings > System > Battery, where you can tweak your laptop’s battery saver settings to come on earlier and so prolong the time it lasts between recharges. Also look at switching your web browser to Opera (www.opera.com), which comes with its own built-in battery saver to extend browsing time, too.
More tips
Sleep-related computer problems can usually be fixed once you know which component is refusing to play nicely. Right-click the Start button and choose ‘Command Prompt (admin)’. Type powercfg -energy and press [Enter]. When complete, browse to C:\Windows\ System32 and double-click the energy- report.html file to review in your browser. Make a note of errors and then identify suspect devices in Device Manager. Double-click each in turn and look under the Power Management tab (if it exists) for settings to prevent that device from bringing your computer prematurely out of standby.
Most sound-related problems come down to the incorrect playback (speakers) or recording (microphone) devices being selected. Click the ‘A’ button in the Taskbar notification area and look for a white speaker icon. Right-click this and choose either Playback or Recording devices to see a list of available devices, including which one is currently the default. Select the correct device and click Set Default – you can click the down arrow next to it to choose different default devices for regular sound and communication through applications such as Skype.
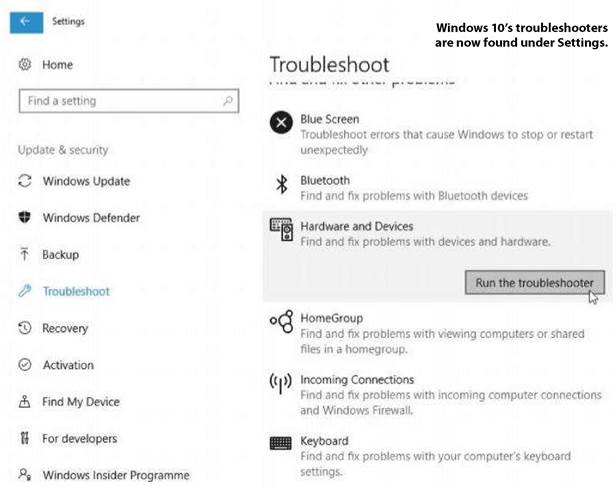
Finally, go to Start > Settings > ‘Update & security’ > Troubleshoot where you will now be able to access all the available Windows troubleshooters. Start with the ‘Hardware and Devices’ option to see whether this can help resolve the issue for you.

Problems with your CD or DVD drive? There’s no longer a dedicated troubleshooter for this problem, so you’ll need to search for a solution at http://support.microsoft.com/kb/314060 – here you’ll find a handy step-by-step guide that covers most of the steps you’ll need to follow to resolve the issue, such as making sure the drive is visible in Windows, and that third-party burning software – particularly if it was installed prior to you upgrading to Windows 10 isn’t responsible for the problem.
If you’re struggling to burn DVDs or CDs, eliminate all software problems before assuming the drive itself is faulty (remember, some drives use different lasers for CD and DVD, so the drive may appear to work when in fact it needs replacing if you’re able to burn or read one type of disc, but not the other). If all else fails, buy a low-cost external model – around £15-£20 – and plug it into your PC. If that works okay, then the original drive may have failed and can be replaced by your new one.
Internet and security
Reduce spam, improve your privacy and fix all kinds of network and Internet-related problems with these useful tips
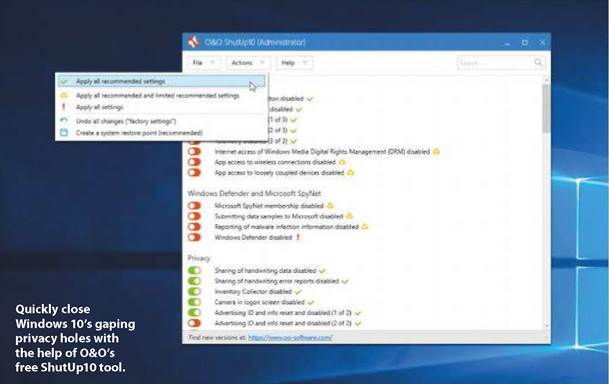
Let’s start by tightening Windows 10’s privacy controls. Even if you diligently went through the setup wizard when you installed the current October 2018 Update, it can be confusing knowing which settings to pick – and even then, you’ll find that there are other privacy tweaks you should consider applying.
Windows 10 thoughtfully scatters these settings far and wide throughout your PC, but by downloading the latest version of the free O&O Shutup10 tool from www.oo-software.com/en/shutup10 you can view and manage them easily. Once downloaded, double-click OOSU10.exe and give it administrator access when required.
If you’ve previously run the tool, it’ll detect previous settings; otherwise, you’ll see a list of switches you can click on for an explanation. Either toggle switches manually, or go with O&O Shutup10’s recommendations via the Actions menu. All changes can be undone, and a System Restore point is taken, just in case.
Shutup10 can be used to stop Windows 10 from displaying app ‘suggestions’ (otherwise known as ads) appearing in the Start menu via its Miscellaneous section. Windows will also nag you to set up or install OneDrive if you don’t already use it in File Explorer – to switch this ‘nagging’
off open File Explorer and click Options under the ribbon’s View tab. Switch to the View tab of Folder Options and untick ‘Show sync provider notifications’ under ‘Advanced settings’.
Fix connection problems
Are you struggling with your Internet connection? If you’ve tried the Network Connection Troubleshooter (access it from the network icon in the Taskbar notification area) with no success, take a System Restore point. Now download and run the Complete Internet Repair tool from http://www.rizonesoft.com/downloads/complete-internet-repair/ – click the ‘i’ next to each repair to find out more about it. We recommend trying repairs one at a time, but verify
There’s no foolproof way to completely stop yourself from receiving spam – if your email address falls into the hands of a spammer, all you can do is find effective ways of filtering it out. Consider installing a third- party tool such as Mailwasher (www.mailwasher.net) that you can use to screen your emails. Once installed, take the time to ‘train’ the app so it recognises the kind of spam emails you receive and then configure it so it deletes them automatically before they reach your inbox. You can also minimise spam by switching to plain text view by default and never opening a spam message – it’ll almost certainly contain some form of tracking device to alert the spammer to the fact your address is active and in use. If you do open a message, don’t click any links – instead, simply mark the message as spam so your email provider knows what to do with it in future.
Finally, take the time to check your junk mail settings to fish out legitimate emails – if you recognise a marketing email as genuine, take the time to unsubscribe rather than marking it as spam.
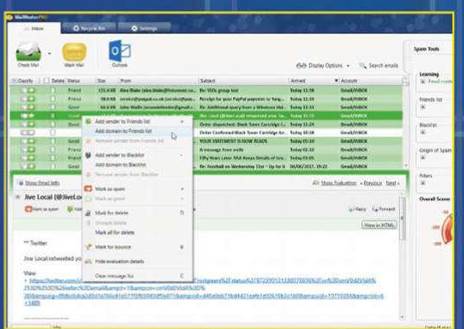
Use Mailwasher to build up a list of trusted contacts as well as known spammers – it’ll help filter unwanted mail out of your mailbox.
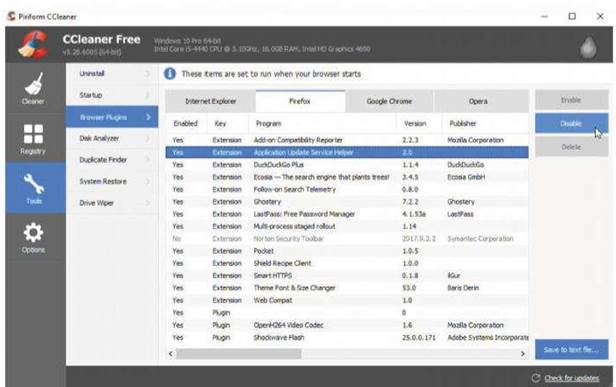
Clear out dodgy add-ons and their files with CCleaner’s help.
the problem is with your PC and not your wider network before running it.
If your Internet connection works, but is periodically sluggish, check that your cloud storage provider isn’t hogging all the available bandwidth and, if it is, restrict its upload speeds. OneDrive users should right-click the OneDrive Taskbar notification area icon and choose Settings > Network. Make sure ‘Adjust automatically’ is selected; other cloud providers should offer a similar setting (you can choose 80 percent if no automatic setting is provided).
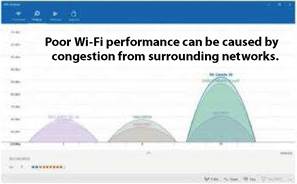
Problems with your Wi-Fi connection could be down to interference from another network – search for WiFi
Analyzer in the Microsoft Store and use that to locate a channel (typically 1 or 11) where congestion is lowest. Change the channel setting itself through your router’s configuration utility in your web browser – see your router’s instruction manual for how to do this.
Having problem connecting to your Homegroup? That feature’s been deprecated now by Microsoft so consider dropping it entirely and use regular file sharing instead; otherwise, if the Homegroup troubleshooter fails to yield a solution, start from scratch. First, leave the current homegroup on all your PCs. Then switch them all off except for one. Create a new homegroup on this
Having trouble connecting to your Homegroup? Consider dropping it entirely and use file sharing instead
PC, then connect the others to the new homegroup one at a time – this should get things working again.
Tighten security
If you’re in the process of switching to a new security product, make sure all traces of the old tool are removed first. Most security providers offer a manual removal tool that should purge all traces of it from your system – visit http://support.eset.com/kb146/ for a list if you’re struggling to track one down. Try running the tool even if you’ve already removed the program and it’s interfering with your new software.
If you have not yet done so, switch on two-step verification to offer additional protection for accounts that use them (at the very least protect core services such as LastPass or your webmail provider). Not all programs support two-step verification, but any online service worth its salt will enable you to generate one-time app passwords that you use to connect the program to your service without compromising security. Look in its Security settings for the app password generator.
Malwarebytes Anti-Malware (www.malwarebytes.com) is an essential tool for any user – it can remove infections, like potentially unwanted software that other tools miss. But if those infections keep coming back, you need to identify the source. Check where the files originate – if they’re inside your web browser’s cache, you should check to see what add-ons are installed as one of these could be responsible. Use a tool like CCleaner (www.piriform.com) to clear your browser cache and disable or even remove suspicious add-ons. Or consider buying the Professional version of Malwarebytes to provide real-time protection against these and other threats (such as malicious websites).
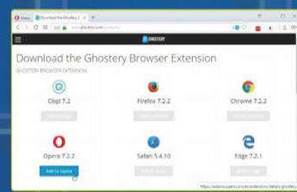
Get Ghostery
Browse to www.ghostery.com and click the Install button, then follow the prompts to install Ghostery via your browser’s add-on repository. Choose whether to share anonymised data, then create a user account to access Ghostery across multiple browsers or computers.

2 Basic functionality
Keep an eye on Ghostery’s icon in your browser’s toolbar when you visit websites. It’ll list the number of tracking cookies – click for a summary. Be sure to pay attention to specific warnings – click ‘Restrict site’ to apply site-wide restrictions or review and manage individual cookies.

Block trackers
Right-click the Ghostery icon and choose Settings to manage your account through your browser. You can review current settings, plus go to Blocking Options to automatically block known trackers based on their type to quickly benefit from Ghostery’s tools.
Fix software problems
We’ve tamed Windows 10, your hardware and the Internet – now it’s time to tackle your applications with these handy tips
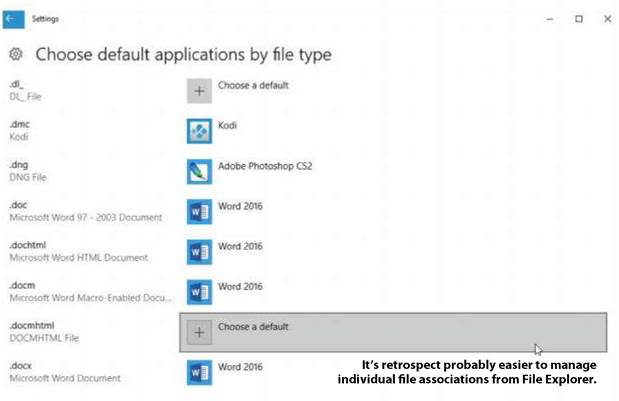
When a program controls a file association, it will always open when you double-click that file type. Windows 10 makes it harder for third-party programs to seize control of file associations, but it’s still possible, and every time a new Windows update is released, you can easily be tricked into handing back associations to Microsoft’s choice of app, not yours.
See also: The missing manual: Windows update
Start fixing problems by clicking Start > Settings > Apps > ‘Default apps’. From here you can quickly switch or set defaults for email, maps, music, photos, video and web browser – just click the appropriate button and choose your desired app. Other universal changes can be made, too – start by clicking ‘Set defaults by app’ to access a list of all your programs. Click one to find out what defaults it has and to either allocate it all the defaults it wants or to select which ones it can have.
You can also choose individual applications for specific file types – either by clicking ‘Choose default applications by file type’ from this Settings dialog, or by right-clicking one of the files in question in File Explorer and choosing ‘Open with > Choose program’.
Manage apps better
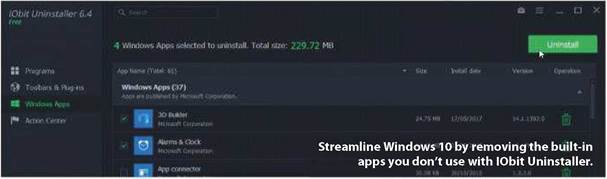
Have you noticed how there are no entries for some of Microsoft’s default
apps under ‘Apps & features’? You can remove these apps via the PowerShell command prompt, but it’s fiddly. IObit Uninstaller (www.iobit.com/en/advanceduninstaller.php) enables you to remove default Microsoft apps as well as other Microsoft Store-installed apps: skip prompts to add a tab before downloading the program, and untick ‘Install Advanced SystemCare…’ before clicking Run Now to install it.
Once IObit Uninstaller has launched, navigate to Windows Apps and extend the Windows Apps section to remove the apps you don’t want – you can always reinstall them through the Microsoft Store later. While you’re here, use IOBit Uninstaller to more thoroughly
From here you can quickly switch or set defaults for email, maps, music, photos, video and web browser
Blu-ray discs are trickier – the following free add-ons should enable you to play most older AACS-encrypted discs along with a handful of BD+ discs. Point your browser at https://vlc-bluray.whoknowsmy.name/, then download the Keys database and place it in C:\ProgramData\aacs. Next download the relevant AACS dynamic library for your PC (either 32-bit or 64-bit), then place the downloaded DLL file inside your VLC program folder. on your PC.
Launch VLC (a portable version is also available from https://portableapps.com/apps/music_video/vlc_portable) and pop your Blu-ray into a compatible drive. In the VLC app, choose Media > Open Disc. Select Blu-ray, choose your starting title (there’s no menu support) and click Play. After a delay – and if you’re lucky – you’ll be able to watch your Blu-ray!

Armed with the right downloads you can play a decent number of Blu-ray movies for free with VLC Media Player.
uninstall programs as well as apps from your PC, and click its toolbox icon to access a Forced Uninstall button that can help you get rid of programs that have ‘lost’ their uninstaller.
Speaking of the Microsoft Store, if you run into problems getting it to work, try a pair of Microsoft fix-it tools – browse to http://aka.ms/diag_apps10 and http://aka.ms/diag_cssemerg7008 respectively to download and run them.
If you navigate to Start > Settings > Apps > ‘Apps & features’ you’ll see it’s possible to move apps installed through the Microsoft Store to another drive or partition – handy if your main drive is an SSD and is running low on space. You can move regular desktop apps, too – for this you’ll need a program called Steam Mover, which you can download from www.traynier.com – check out tips 4 and 5 on page 58 of issue 136 for a guide to using it.
If this sounds like too big a step – or you want to cut back on the number of installed apps altogether – then look at PortableApps (www.portableapps.com). This handy platform enables you to build, run and manage a collection of programs from a single folder, which you can store anywhere, even on a USB flash drive. No Registry entries mean these apps travel with you. Visit your favourite program websites and look for portable builds in the download section. Then download the ZIP file, extract the contents to a folder inside the PortableApps folder and open the PortableApps platform – your new app should be added to the list under Other (right-click the shortcut to move it to a different category).
See also: Best New Portable Software
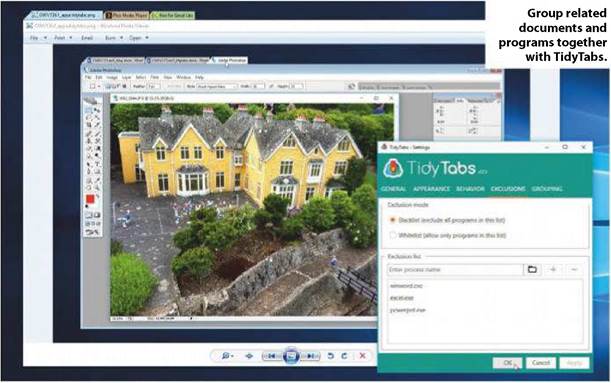
Tidy your desktop
If you frequently have loads of program or document windows open, save time moving between them by organising them into tabs instead, just like your web browser. TidyTabs (www.nurgo-software.com/products/tidytabs)

enables you to group related windows from different programs together – upgrade for $9 (£6.90) to group more than three windows together at once as well as other enhancements. TidyTabs works with Office, but it can be glitchy – instead, try Office Tab ($29/£22.21 after free trial, www.extendoffice.com/product/office-tab.html), which offers similar functionality, but only works with Word, PowerPoint and Excel.
Finally, struggling to get older apps to run in Windows 10? If you can’t source a newer version or an update (use http://alternativeto.net/), try right-clicking the program shortcut or installer file and choosing ‘Troubleshoot compatibility’ to see if Windows can apply compatibility settings. If all else fails, and you have an older copy of Windows lying around, you can create a virtual machine using VirtualBox (www.virtualbox.org). Choose 32-bit for maximum compatibility, and run your old app inside that instead. It works surprisingly well.

Microsoft’s OneDrive tries to force Office 365 to save directly to the cloud, which slows things down. Make it default to your hard drive instead.
Microsoft is incredibly keen for you to use Office 365, which is why Windows 10 will regularly prompt you to download and install it. But if you get fed up with its nagging, click Start and locate the ‘Get Office’ shortcut. Right-click this and choose Uninstall to remove it.
If you’re an Office 365 user you may be frustrated by the way it works with OneDrive, saving directly to the cloud rather than to your local OneDrive folder. To stop this behaviour, you need to open each Office app in turn, then choose Options from the File tab on the Ribbon. Select ‘Save’ and tick ‘Save to Computer by default’. You’re not done yet – next, click ‘^’ in the Taskbar notification area, right-click the OneDrive cloud icon and then choose Settings. Now switch to the Office tab and untick both sync boxes before clicking OK.
Here’s another tip to save you time switching between controls on the Ribbon in Office. Right-click a favourite tool and choose ‘Add to Quick Access Toolbar’. If you run out of space, click the ‘v’ arrow next to your existing shortcuts and choose ‘Show Below the Ribbon’ to locate it there instead.


