HOW TO Find And Remove Duplicate Files For Free
Duplicate files aren’t only a waste of space: they’re a waste of time too. The more files you have to search through when looking for a particular photo or document, the longer the process will take. Then, when you’ve edited, saved and closed a file, how do you know it was the right one? If there are two very similar versions in different locations on your drive you could end up making every edit twice over. Or, worse, where entire folders of files have been replicated, you might edit some files in one, different files in the other, and end up thoroughly confused. Read our HOW TO Find And Remove Duplicate Files For Free.
What you need: Windows; Excel or other spreadsheet program
Time required: One hour
Removing duplicates should be easy, especially given so many products promise to do it for you. The trouble is, some also charge for the privilege. Thankfully, there are some tricks you can try before you spend any money. As we reveal, Windows already has many of the tools you need built in. Here, we’ll also explore advanced Windows searches and explain how to save your searches, create batch files and analyse data using a spreadsheet.
Search for a specific phrase in your file name
It can be useful to make a copy of files before making significant changes. The easiest way to do this is to select a file in File Explorer, press Ctrl+C to copy it (as you can with text in a document) then Ctrl+V to create a copy in the same folder.
Because the two would have the same file name, resulting in the original being overwritten, Windows adds ‘-Copy’ immediately before the file extension. Unless you’ve subsequently changed the file name, you can search for this term to reveal copies still sitting on your drive.
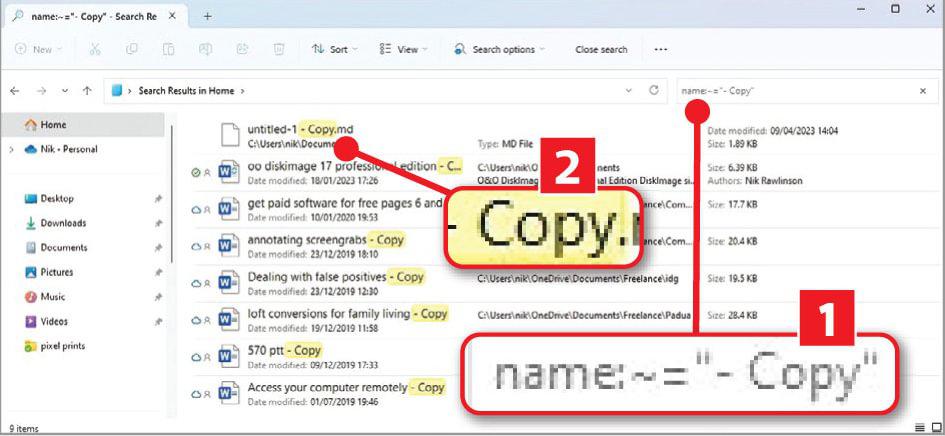
Open a new File Explorer window, and make sure Home is selected in the sidebar. Click in the Search Home box and type name:~=”-Copy” (make sure you put a space between the dash and Copy – 1 in our screenshot) then press Enter. Windows will search your whole system for file names containing the specified string, highlighting them in yellow 2.
It’s worth examining this search term a little closer. We start by restricting the search to only look for the specified phrase (ie, – Copy) in file names, using the name keyword. If we excluded this, Windows would also search inside the files, and include documents, spreadsheets, and more that include “-Copy” in the body text. That would increase the number of files listed and include several irrelevant results.
Typing ~= after the colon means “must include this exact phrase but not only this exact phrase”. If we excluded the tilde (~), so the search string was name:=”-Copy”, it would show file names with exactly (and only) “-Copy”. On our PC, that would return no results.
We therefore need the tilde to add a degree of uncertainty to include files that contain “-Copy”, no matter what other words are in the file name.

If we had instead typed name:~< Copy” we’d be telling Windows that the file must start with the search term. If we typed name:~>”-Copy” we’d be telling Windows that it must end with it.
As you can see in our screenshot above, one of our files is called ‘annotating screengrabs – Copy’ 1. This file would still appear if we searched for name:~<“annotating” as ‘annotating’ appears at the start of the file name. Another is called ‘untitled-1 – Copy. md’ 2, which would still show up if we searched for name:~>”-Copy.md”. However, neither would show up if we only searched for name:=”-Copy” since their names aren’t exactly “-Copy”.
Once you’ve isolated these files, check their locations, which appear either in the next column or on the line below, and check those folders for the originals to work out which you want to keep.
If you want to perform this operation frequently to keep on top of unintended duplicates, right-click the list of files and click ‘Save search’ 3. When the Save As box appears, type Copies and click Save.
Notice how the contents of the File Explorer address box changes to ‘[your name] > Searches > Copies’. Click ‘Searches’, then drag the new Copies file you just created into the Explorer sidebar so you can find it easily in future. Clicking it in the sidebar will immediately compile an updated list of files on your system containing the term “-Copy”.
If you’re using Windows 11, you can also add the search to the Start menu by right clicking the new Copies file (1 in our screenshot below left) and clicking ‘Pin to Start’ 2. Clicking it on the Start menu again runs the search without you having to remember the search term.

Build a batch file
Not all duplicate files will be so easy to find – particularly if they don’t have similar names. In that case, your best option is to compare file sizes rather than names. With a few exceptions, it’s unlikely that two files of exactly the same size will have different contents. So, if we can compile a list of file names and sizes, then compare the sizes of each, it will highlight the ones we need to examine more closely. We’ll do this by building a batch file.
Helpfully, a contributor called ‘user6811411’ has already worked out how to do part of this on the question-and-answer website Stack Overflow (www.snipca.com/46452). We can adapt their contribution for our own needs.
Open Windows Notepad and type the following: (@For /F “Delims=” %%A in (‘dir /B/S/A-D’) Do @Echo %%~fA, %%~zA) >files.csv. You can copy and paste this from our Pastebin account: www.snipca.com/46463.

Next, press Ctrl+S, then save the file in your Documents folder as ‘duplicates.bat’. Open a File Explorer window, navigate to the Documents folder, select the duplicates file (see screenshot below) and press Ctrl+C to copy it. Now click C: in the sidebar and press Ctrl+V to paste it into the new location. Windows will warn you that you need administrator permission to save it. Click Continue. It’s because of this need for administrator permission that we couldn’t save it in the C: directory from Notepad, hence going via the Documents folder. You can delete the copy in Documents now.
Before we run the code, we’ll explain how it works. The @symbol at the start tells the batch file not to fill the screen with the text it generates while it’s running. It then uses the For command to start a loop of code that keeps running until it runs out of things to work on.
But what exactly is it working on? That comes in the next set of brackets. The command dir /B/S/A-D tells the computer to make a directory (dir) of all of the files in the current folder. Because that dir command is followed by three options it does a little extra work, as follows:
/B tells the computer to only take a note of file names, not any other details it encounters.
/S tells it to also look inside any sub-folders it finds.
/A-D tells it not to include the names of folders in the list of results.
So, our ‘loop’ is a piece of code that looks in the current folder and takes a note of the first file it finds. It then runs again and if it finds another file, it takes a note of that file’s name, too. This continues until it runs out of files. Every time it finds a file, it moves on to the second half of the string of code, which is:
Do @Echo %%~fA, %%~zA
Here, Do tells the computer that what follows is something it must do, which is to write (Echo in batch-file terminology) the file name and the file size to a file. These are represented by %%~fA and %%~zA respectively. But write them where? The answer to that comes at the very end: files.csv.
The arrow means ‘send the output to’, and because it’s pointing to files. csv, that’s the destination: a file called files.csv (where csv stands for ‘comma separated values’, which is a format for saving data in a table, such as in Excel).
Run your batch file
To run your batch file, you first have to install Windows Terminal from the Microsoft Store. Visit www.snipca.com/46553 and click ‘Get in Store app’. It’s a tool for running multiple command-line tools like Command Prompt and PowerShell. Next, open File Explorer, then navigate to the folder you want to check for duplicates. Right-click in any blank space and click ‘Open in Terminal’ (in Windows 10 you’ll have to press Ctrl when right-clicking; in Windows 11 you’ll have to select ‘Show more options’ after right-clicking).
At the command prompt, type c:\ duplicates.bat and press Enter. This runs the batch file you saved at C: earlier. The reason we saved it there is that it’s easy to reference, meaning you can type that command from inside any other folder and know it will work.
Your computer will appear to be doing nothing, but in the background it will be going through every file in the current folder, plus any subfolders, and writing their name and file size to a file called files.csv.

When it’s finished, the cursor will move down to the next line. Look in the File Explorer window again, where you’ll see that the ‘files.csv’ file has been added to the list. Right-click it, then hover over ‘Open with’ (1 in our screenshot at the top of the page) and click your preferred spreadsheet 2.
The data won’t be easy to interpret until you do a little work on it. Click the A at the top of the first column (which contains the file names), then hold Ctrl while clicking the top of column B (which contains file sizes). Now organise them by file size. In Excel, click Home, followed by ‘Filter & Sort’, then click ‘Custom Sort…’. In the box that appears, select Column B in the first dropdown menu (1 in our screenshot below) and ‘Smallest to Largest’ in the third 2.
In LibreOffice Calc, click the Sort Ascending button on the main toolbar. Because you selected column B second, the data will be sorted by file size.
Now, click in cell C2 and type =SUM(B2-B1) and press Enter. This subtracts the size of the file on that row from the size of the file on the row above. Select cell C2 again and press Ctrl+C to copy it, then select all the cells in column C, from C3 down to the last row with a file name. So, if the last file name appears on row 100 of column A, select from C3 down to C100, then press Ctrl+V to copy the same formula into each cell.


Next, simply look through the numbers in column C for any instances of zero. This is easy to spot, and you don’t need to manually compare an ever-changing list of file sizes. As you can see from the screenshot above, seven of the 93 files in our list have exactly the same file size (because the difference is zero).
However, despite having suspiciously similar file names, they wouldn’t have shown up in the Windows search we performed in Steps 1 and 2. We therefore know that we need to check them out, as there’s a good chance they’re duplicates.


