HDDScan 4.0 review
What you need: Windows Vista, 7, 8.1 or 10
Of all the problems that could affect your PC, hard-drive failure is one of the most terrifying. Your hard drive is where everything is stored – your programs, files and even Windows itself – so if its health is starting to deteriorate, you may need to replace it with a new drive before it dies altogether, taking all your precious data with it.
It can be hard to diagnose hard-drive problems using only Windows’ built-in tools. All drives are capable of providing real-time information about their health (known as SMART – self-monitoring, analysis and report technology) and internal sensors can reveal temperature spikes. But Windows only offers a basic drive-checking tool and doesn’t provide an easy way to view SMART information. That’s where a dedicated hard-drive diagnostic tool like HDDScan comes in.
HDDScan supports a wide array of drive types, including internal SATA and SSDs as well as most external USB storage devices. It can read the SMART data provided by your drives and let you check it for potential problems. HDDScan also provides a temperature monitor and a battery of tests to check your drive’s health. Bear in mind that some of the tests can take a while to complete.
While many other hard-drive diagnostic tools tend to be designed with tech experts in mind, HDDScan is easy to use. This is more evident in version 4.0, which has a fresh new look and lets you change the size of the interface. HDDScan can’t fix hard-drive errors itself, but you can use the information it provides to diagnose potential problems. You can save or print any of your tests results or reports, so that you can send them to technician if necessary
HDDScan is a portable tool, meaning you don’t have to install it. Just download and extract the ZIP file from the URL above, then double-click HDDScan.exe to launch it.
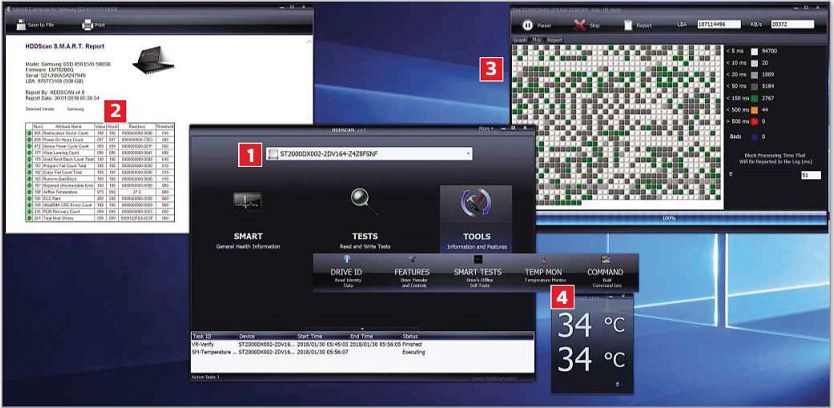
1 If you have more than one drive in your PC, make sure you select the correct one in the dropdown menu at the top of HDDScan’s main window before running any tests.
2 Start by clicking the Smart button on the left – this will open a window with general information about the status of your drive. Green icons represent good health; red or yellow icons signify a problem.
3 Click Tests, then Verify. Click the blue forward button, then click the tab at the bottom of the main window, right-click the task, then select Show Details to view the test’s progress.
4 To see your drive’s temperature, click Tools, then select Temp Mon. Right-click the task at the bottom of the main window, then select Show Details to open the temperature window.


downloaded but wont connect to the net!!