WiFi Scanner 4.0 Review
WiFi Scanner 4.0 Review
What you need: Windows 7, 8/8.1 or 10
If you’re suffering poor Wi-Fi speeds or just curious about network activity and potential problems in your neighbourhood, Wi-Fi Scanner tells you everything you need to know.
Installation is simple and, thankfully, no unwanted junk will be foisted on you. Once up and running, Wi-Fi Scanner immediately starts capturing and logging data from all nearby networks. It takes a little while to get your head around the wealth of data provided, but the key information is all there. For each network you’ll see the network name, its signal strength, channel, maximum speed and more.
This latest version has a raft of new features, including the ability to filter the view to show how many channels your neighbourhood networks are taking up (known as channel width). The more channels being used, the greater the chance of interference with other networks, reducing speeds as a result. Most modern routers select your channel settings automatically, but they don’t always get it right. If you’re not afraid to tinker with your router settings, this kind of information will help you choose a less congested channel.
The new version also reduces on-screen clutter by hiding networks that are no longer active. And unlike previously, your own home network now sits at the the top of the list, regardless of its performance. You could spend hours pouring over this data, but it also works as a quick and easy guide to what’s going on in your local wireless environment and, more importantly, why you might be experiencing slow speeds.
Wi-Fi Scanner is free for personal use, although you have to register with your email address once the 10-day trial runs out. Our only gripe is that the interface hasn’t changed much over the years. We’d like to see a slimmed-down version for less advanced users.
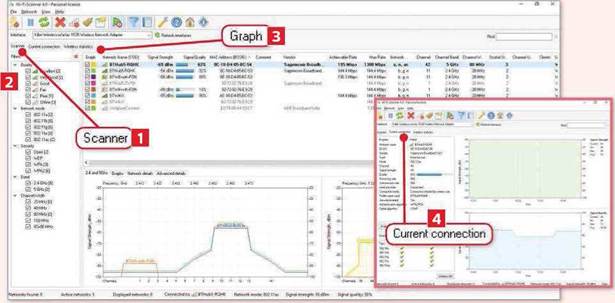
1 In the Scanner tab, you’ll see all active networks, including any that have temporarily dropped out (in grey). All data is automatically refreshed and the wireless network you’re connected to is pinned to the top.
2 These filters let you narrow the information displayed. For example, you can choose to only see unencrypted networks by clearing all Security options apart from ‘Open’, or only those on the 5GHz band.
3 Click the Graphs tab for graphs showing how each network has performed over the previous five minutes in terms of signal strength, signal quality, maximum achievable speed and more.
4 If you only want to monitor your own network’s performance, click the ‘Current connection’ tab for a full overview of the network you’re connected to.


