TAKE CONTROL OF YOUR EMAIL
Disguise your email address to stop spam
Sending an email is one of the first digital skills most of us learn, but protecting your email address from junk messages requires expert know-how. In the past, the easiest option was to use a disposable email service, but this made it difficult to retrieve messages containing important information and to reply to emails.
A much smarter way to avoid spam, scams and data leaks due to security breaches is to use DuckDuckGo’s Email Protection service. Launched last August, this gives you an alternative ‘@duck.com’ email address that you can share with websites. The service then forwards messages to your usual inbox without revealing your real address. Unlike rival services, it lets you create an unlimited number of fake addresses for free, so if one of them starts forwarding junk to your inbox, you can simply switch to a new one. It also lets you reply to messages sent to your Duck (@duck.com) address.
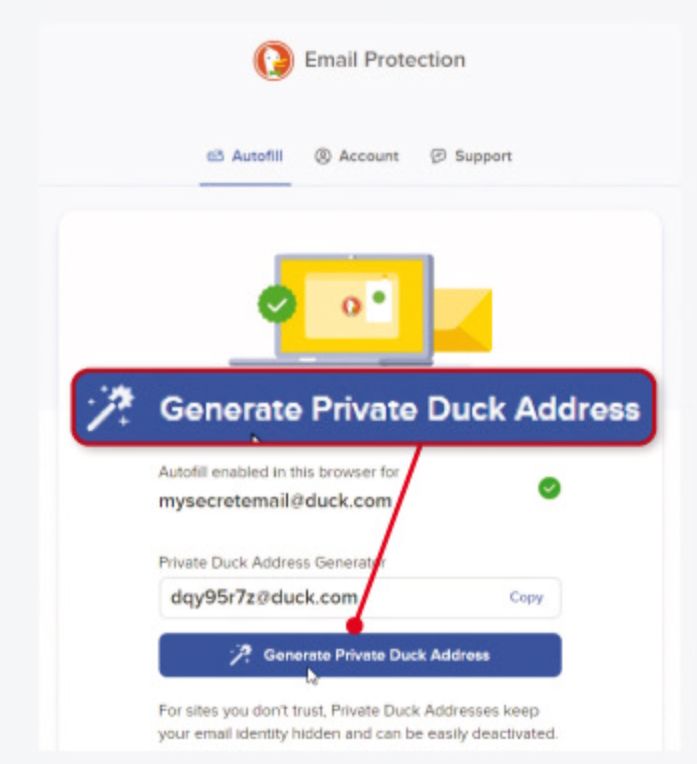
To use DuckDuckGo Email Protection on your PC, install the DuckDuckGo Privacy Essentials extension for Chromium browsers (www.snipca.com/44608) and Firefox (www.snipca.com/44607) – note that this changes your default search engine to DuckDuckGo. Visit the DuckDuckGo Email website (duckduckgo.com/email), click Get Started and follow the instructions to set up your first Duck address. You can create subsequent addresses either by clicking the extension’s toolbar button and choosing Generate Private Duck Address or clicking that option on your account page (see screenshot below).
Disguise your email address by creating a Duck address to share with websites.
Encrypt your private emails
One of the best features in Mozilla Thunderbird (www.thunderbird.net/en-US) is the ability to secure your emails using end-to-end encryption, so that only you and the recipient can read them. The latest version of the email program (102) makes this even easier to do.
To enable the option, click the three-line menu button in the top-right corner of the main Thunderbird window and choose Account Settings, then select End-to-End Encryption. You now need to create an encryption key for your emails using the secure OpenPGP standard. Click ‘Add Key’ (see screenshot below), select ‘Create a new OpenPGP key’ and click Continue. Choose your email address in the Identity menu, specify how many years your key should work for – or select ‘Key does not expire’ – and click ‘Generate key’. Click ‘Confirm’ and Thunderbird will generate your OpenPGP key, which consists of a public and a personal part and will appear in the OpenPGP Key Manager.
To send someone an encrypted message, you first need them to email you their public encryption key. Open the email containing this key and double-click the attachment that ends in ‘.asc’. Click ‘Import’ to save the key in Thunderbird. Once this is done, click the Write button or press Ctrl-N to compose a new message to that person. Click the Encrypt button if it isn’t already selected, then type and send your email. Your own public encryption key will be automatically attached to the email, so the recipient – and nobody else – can decrypt it and read its contents.
You can share your public key with people you haven’t securely messaged before by clicking the arrow next to Attach and selecting My Open PGP Public Key. They will then receive an email attachment containing the encryption key, so they can reply with their key and send you encrypted messages. It’s simpler than it sounds and is an important skill to master if you value your privacy.
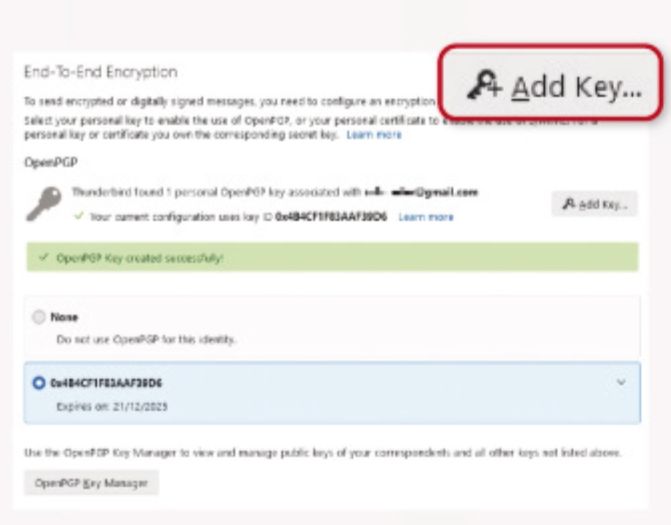
Create an OpenPGP key in Thunderbird to secure your emails using encryption.
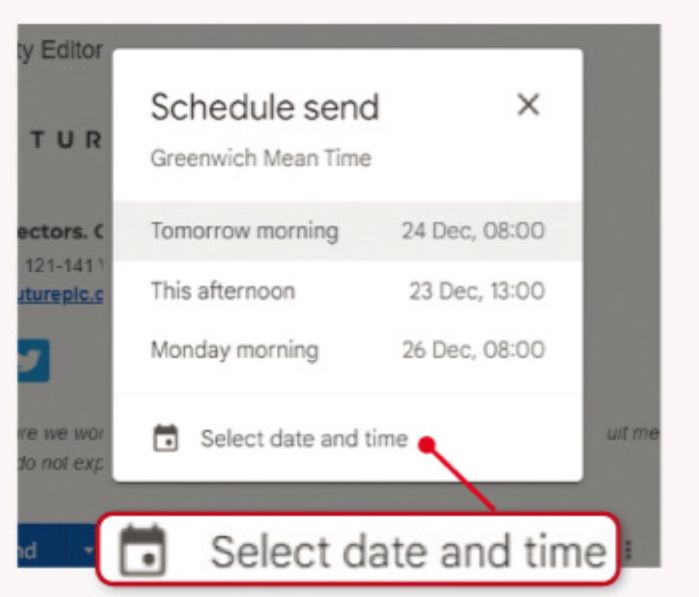
You can schedule emails for Gmail to send later at a more appropriate time.
Schedule emails to send later
Unlike in France, where employees can legally ignore work-related emails outside office hours, we in Australia send and receive messages throughout the day and night. But it’s useful to know how to schedule emails to be sent at times when they have the best chance of being read and responded to. Hammering out a message at 3am may help you get something off your chest, but can also appear strange to the recipient several hours later.
To delay sending an email in Gmail, click the down arrow next to the Send button and select ‘Schedule send’. Either choose one of the three suggested times or click ‘Select date and time’ (see screenshot above) to specify precisely when to send the email, then click ‘Schedule send’.
In the Outlook desktop program, click the Options tab then the Delay Delivery button. Tick the ‘Do not deliver before’ box and select a date and time to send the email. On the Outlook website, click the arrow next to the Send button, choose ‘Schedule send’ and click ‘Customised time’ to specify the details.
Thunderbird still doesn’t offer an email-scheduling option, but you can get the feature by installing an add-on. Click the three-line menu button, select ‘Add-ons and Themes’ and search for send later. Click ‘Add to Thunderbird’ next to the matching add-on and click Add. When you compose a message, click the new Send Later button on the toolbar to schedule a date and time.


