Cut your power consumption using Windows settings
Microsoft included a new energysaving section in its ‘Moment 2’ update for Windows 11, released in March. It lets you apply quick fixes to cut your power consumption and, as a result, reduce your electricity bill.
What you need: Windows 10 or 11 Time required: 30 minutes
We’ll explain how to use these new options, and also reveal how to make similar energy-saving changes in Windows 10. And because we all do so much online these days, we’ll also show you how two popular browsers can help you use less power, and extend the time between each laptop charge.
Save energy using Windows 11’s new settings
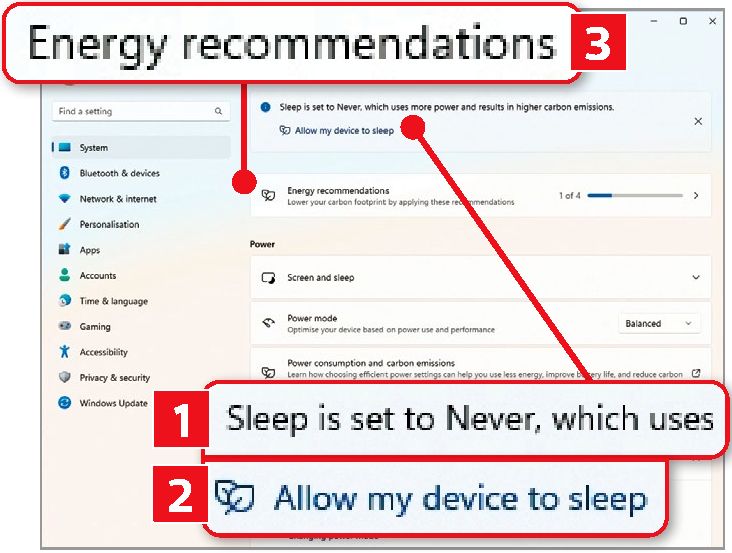
You can access the new energysaving options by pressing Windows key+I to open Settings, then clicking System in the sidebar. Next, click Power in the main section of the window.
Check the top of the next screen for any important messages from Windows. In our case, we’re warned that ‘Sleep is set to Never, which uses more power and results in higher carbon emissions’ (1 in our screenshot right). We can quickly fix this by clicking ‘Allow my device to sleep’ 2. After applying these fixes, click the ‘Energy recommendations’ box 3 to access the new controls.
Exactly which energy-saving features you’ll see depends on the hardware you’re using. Because some settings deal with batteries and built-in screens, they may not be applicable on a desktop PC running solely on mains power and sending pictures to an external monitor. We’ll therefore explore both setups here, starting with a desktop PC that shows options applicable to both desktop PCs and laptops.
As you can see from our screenshot below right, Windows recommends that we make three changes to our setup. Specifically, we need to adjust the power mode, set the computer to go to sleep after 10 minutes (as recommended on the previous screen) and turn off the screen after three minutes. You can click ‘Apply all’ 1 or just Apply 2 beside each step you want to take.
Take note of quick fixes Windows suggests, such as changing Sleep if it’s set to Never
One reason you might want to avoid putting your computer to sleep after 10 minutes is if you’re sharing a printer across a home network. Likewise, if you were running background processes, you may not want to set the power mode for best energy efficiency as this could reduce the resources being used.
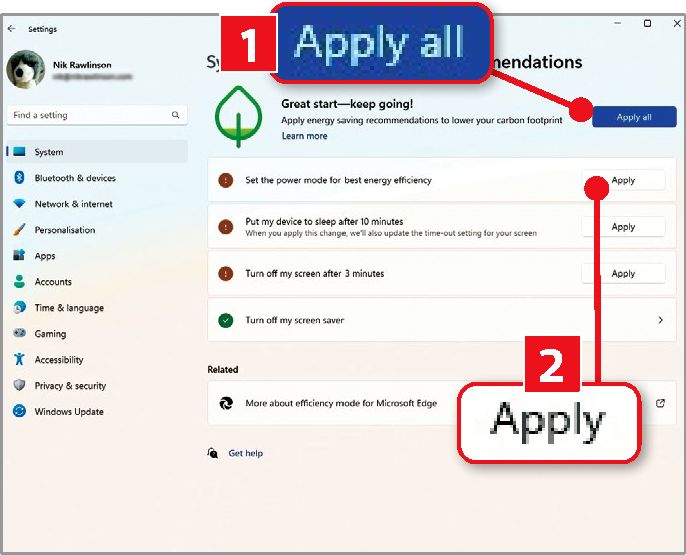
You can apply all the changes Windows recommends or just specific ones
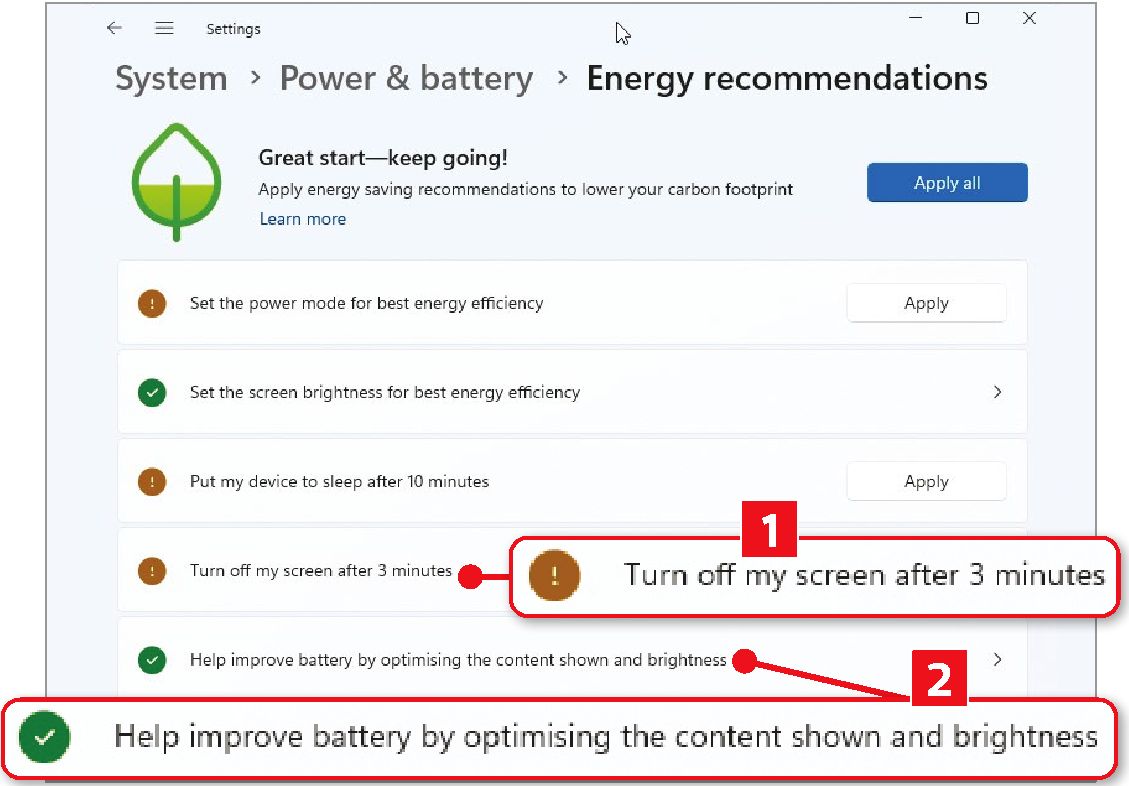
When you click each Apply button, it disappears, to be replaced by an arrow. Click the arrow for more precise control over the energy setting to which it relates. For example, once you’ve clicked the button to switch off your screen after three minutes, clicking that box on the panel opens more screen and sleep settings where – using dropdown menus – you can specify how long the screen stays active when on mains and (if applicable) on battery power.
So, if you did want to reduce the amount of time the screen was illuminated for, but for more than three minutes, you could select five minutes for each, or 10 for when you’re using battery power, and 20 when running on mains.
We understand why you might not want to do this: it can be frustrating if you’re reading a lengthy web page and the screen blanks out. However, you should also bear in mind that every time you dial down the settings this way, you could be costing yourself money in the long run. A little inconvenience now and then can deliver savings and help reduce your carbon emissions.
Our screenshot below shows more options, because it was captured on a laptop that has a broader range of components than a desktop PC, including the battery and integral display we mentioned earlier. So, this time Windows includes the option not only to turn off your screen after a specified period (1 in screenshot), but also to automatically optimise its brightness depending on what it’s showing 2.
On a laptop you may see more options, such as optimising brightness depending on what it’s showing
This feature is officially known as content-adaptive brightness, and is a Windows 11 feature that works with some computers. It continually analyses what you’re viewing and reduces its settings as appropriate. As Microsoft explains on the associated help pages, “if you’re watching a video that has a dark scene, followed by a brighter scene (for example, one that shows a bright sunny day), the brightness and contrast may change”, assuring you that “this is normal”.
It would be impossible to measure exactly what kind of a saving you would make by using this feature – it will be different for everyone. If you spent your whole time working with spreadsheets, for instance, it’s unlikely brightness would change much.
However, where an option is available and it has the potential to save you a few pennies, we think it’s worth implementing, at least until you decide it’s definitely not for you. More importantly, because this option is available only on our laptop (not our PC), we’ll switch it on in the hope it helps our battery last a little longer. After years of faithful service, it’s no longer as good at holding its charge.
Save energy using Windows 10’s settings
Windows 10 has fewer energy-saving settings, and it doesn’t recommend changes like its successor does, but they’re still worth using. Open ‘Settings’, then click System followed by ‘Power & sleep’. Here, you’ll find dropdown menus controlling how long the screen remains active when connected to the mains or running on battery power.
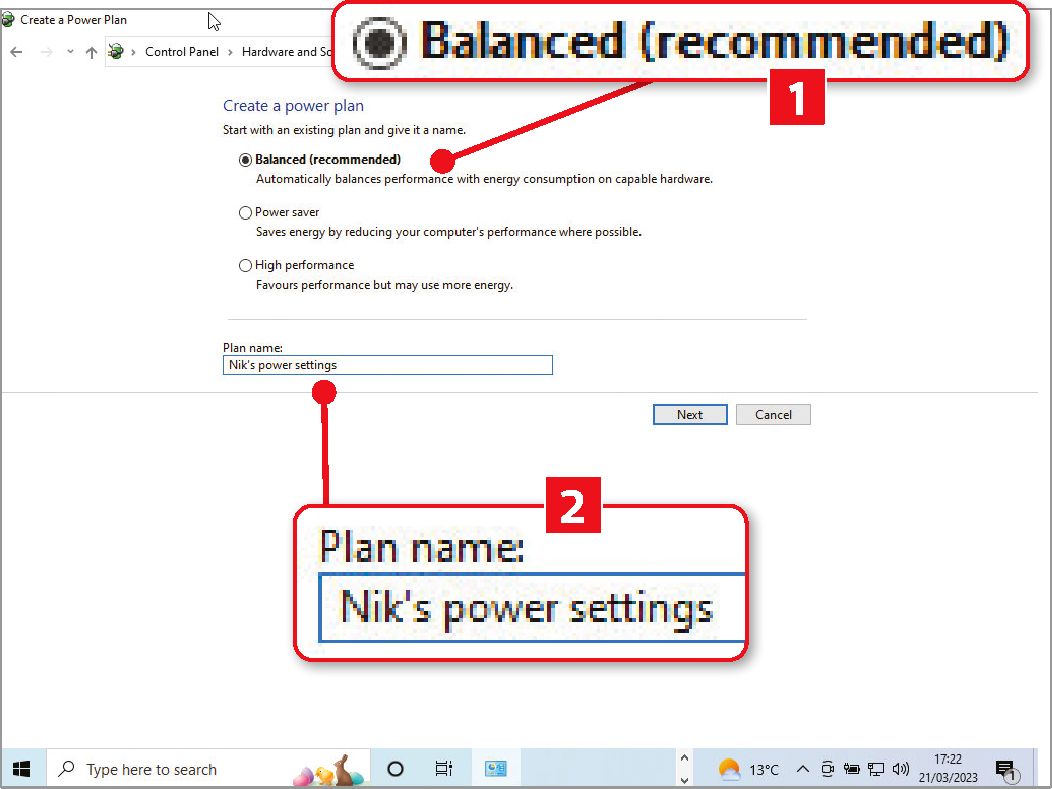
To access Windows 10’s other power settings, you’ll need to switch to Control Panel by clicking the Additional power settings’ link in the ‘Additional settings’ section. Click ‘Create a power plan’, then select the ‘Balanced (recommended)’ power plan (1 in our screenshot below) as your starting point and type a name for the new power plan you want to create in the ‘Plan name’ box 2. Click Next.
Initially, you can’t do much more than you’ve already done – that is, set how long the screen remains active before going blank. So, set this, then save the power plan to return to the overall settings. You’ll now see your plan has been added (1 in our screenshot above) and, beside its name, there’s a link to ‘Change plan settings’. Click this, then click ‘Change advanced power settings’ 2 to open a second level of options.
Use one of Windows 10’s existing power plans as a starting point, then give it a name
———————————-
How I save energy
Whenever there’s an option to save energy, I’ll take it – at least in the short term. If I find that it’s interfering with my work, I may roll it back, but if it’s only sending my computer to sleep shortly after I walk away from it, I’d consider that a bonus. It doesn’t only save energy: it can also be a good security measure, as anyone who might try and wake my machine will need to enter a PIN before they can access my data. If it had still been awake, it would have been much easier for them to get their hands on my private files.
Nik Rawlinson
—————————————
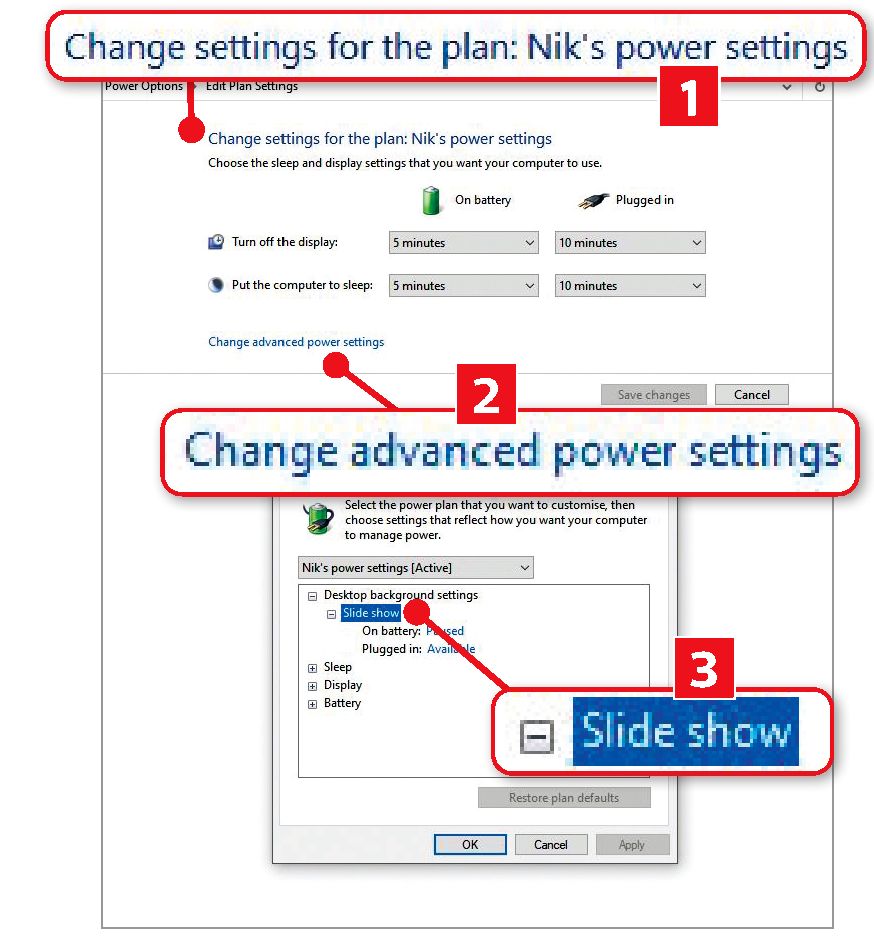
In Windows 10’s advanced power-saving options you can pause background services like slideshows
Here, you’ll find wider-ranging settings, including the ability to switch off the hard drive, put your wireless adapter into power-saving mode, pause background services like the desktop slideshow 3, suspend USB ports, and optimise the quality of videos to extend battery life.
The exact options on offer may vary depending on your hardware, so work your way through them, and implement any that are likely to extend your battery life or reduce energy consumption.
If you make any changes that you later discover have a negative effect on your computer’s performance, you can always change them back – but a quicker and safer option would be to return to one of the preset power plans and delete the one you’ve just created (you can always create it again using different settings). To revert to an existing power plan, open Control Panel and click ‘Hardware and Sound’, followed by Power Options. Click the arrow to the right of ‘Show additional plans’, then select ‘Balanced (recommended)’.
Now click the ‘Change plan settings’ link to the right of the new power plan you just created and, on the following screen, click ‘Delete this plan’. Click OK when Windows asks if you’re sure you want to delete the plan.
Edge’s Efficiency mode reduces power consumption by suspending background tabs
Use energy-saving modes in Opera and Edge
The Opera web browser (www.opera.com) has a built-in battery saver, which it claims lets you carry on browsing for up to 50-per-cent longer by pausing plug-ins and animations on background tabs, rescheduling code that runs automatically and reconfiguring how it handles video. That means, if you’re running on battery power, you should be able to resort to the mains less frequently.
This feature will offer to launch the first time you unplug your power cable by dropping down a box from the toolbar. If it doesn’t, turn it on by clicking the three horizontal lines at the far right (1 in our screenshot below), followed by ‘Go to full browser settings’ at the bottom. Now search for battery in the ‘Search settings’ box 2, then click the slider beside ‘Enable battery saver’ so it turns blue 3.
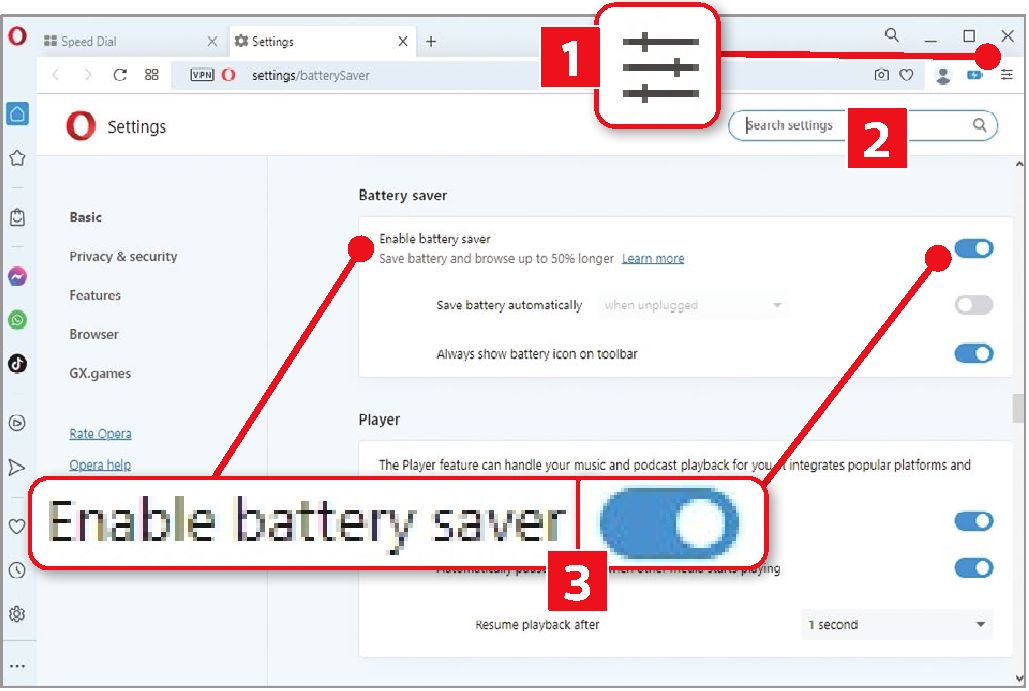
Opera’s battery-saver feature claims to extend your browsing time by up to 50 per cent
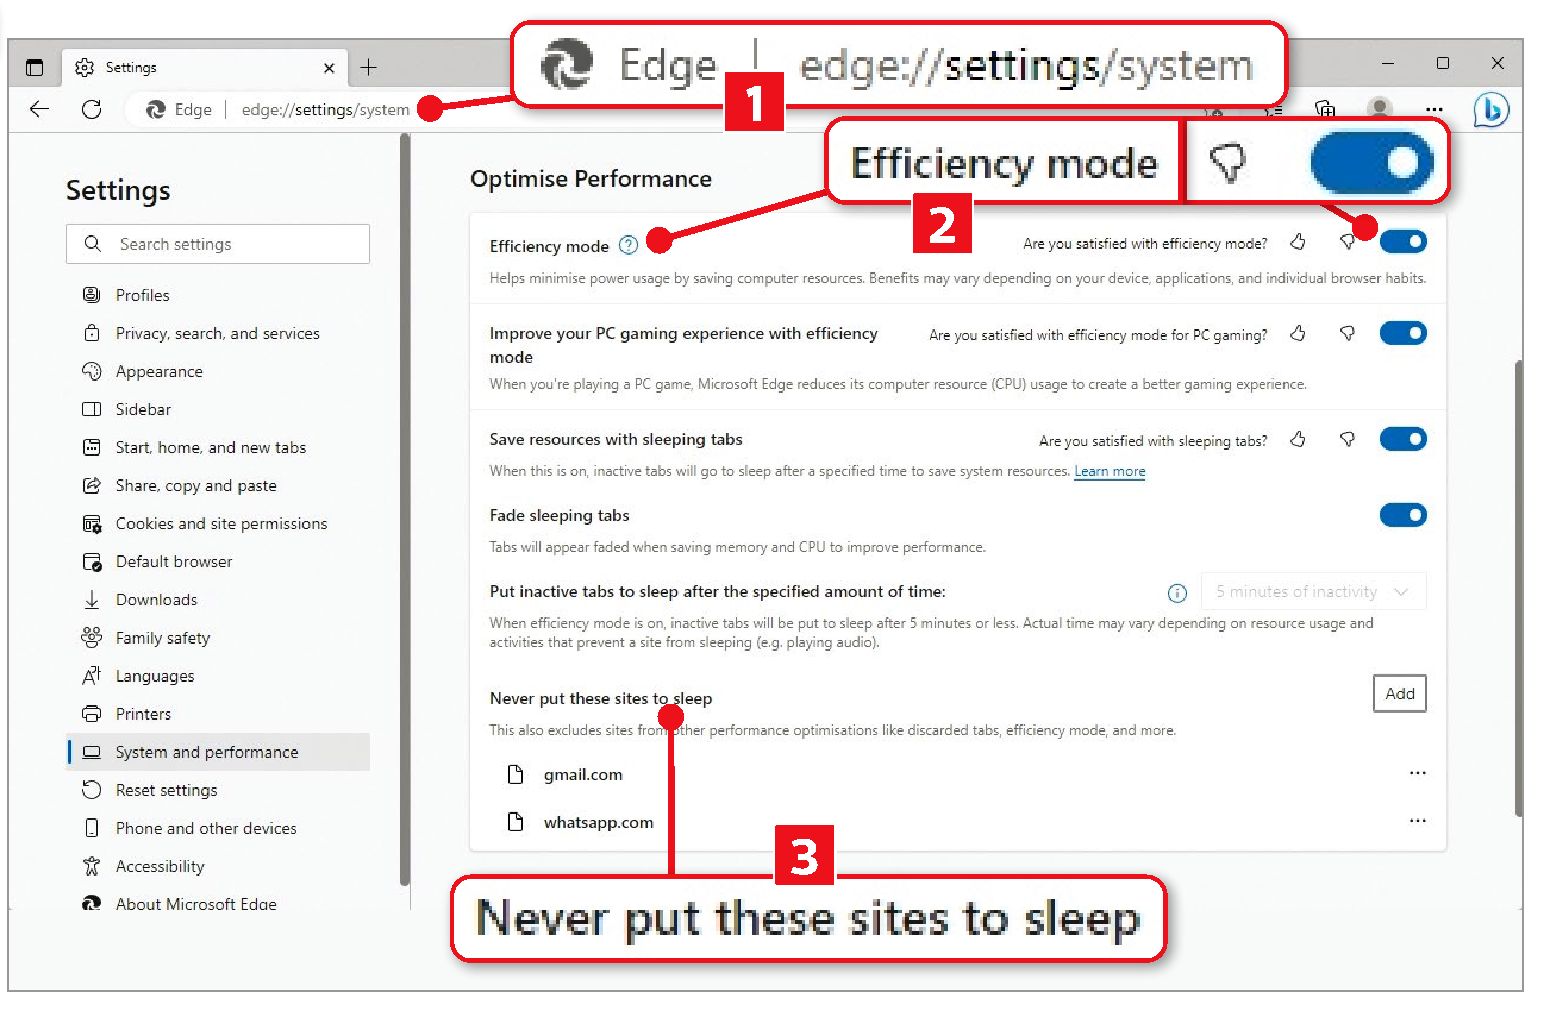
Edge has a similar feature called ‘efficiency mode’, which minimises power usage by modifying background activity. It also puts background tabs to sleep if they’ve not been used for 30 minutes. This is good news if, like us, you open multiple pages at once and don’t return to them for some time.
It automatically kicks in when you disconnect a laptop from the mains, but you can also set it to apply when connected to the power, which could help to reduce your energy bill.
Open Edge’s system settings by typing edge://settings/system into the address bar (1 in our screenshot above) and pressing Enter. Now click the slider beside ‘Efficiency mode’ so it turns blue 2.
Notice that further down this page there’s an option to ‘Never put these sites to sleep’ 3, where you can exclude specific pages from being suspended if they’ve been left running in the background for more than 30 minutes.
Obvious candidates include any webmail services you might use or web-based messengers like WhatsApp (https://web.whatsapp.com) for which you’d want notifications or tab-based status updates to still appear.
To add a site to the exclusion list, click Add, then type the web address and click Add.


