Streamline and speed up your PC
Nick Peers will help you bring your PC back to life. Read our Streamline and speed up your PC.
YOU’LL NEED: BootRacer and Autoruns Wise Game Booster (for on-the-fly optimisation), Process Lasso (to rein in resource hogs)
Does your PC take longer to boot than it used to? In most cases, you can trace this to the growing number of apps on your system, thanks to their tendency to insert themselves into the start-up process even when they’re not essential. What about other parts of your system? Does your PC suddenly struggle to play certain games, or have you started to notice things grinding to a temporary halt every now and then for no obvious reason?
If the answer to any of these frustrations is yes, it sounds as though Windows needs streamlining to eliminate the resource hogs and divert precious system resources to where they’re most needed. In this issue, we’ll focus on eliminating those bottlenecks and reveal ways in which you can keep unruly processes from disrupting your computing life.
We’ll benchmark your current start-up times and reveal how to cut back on the programs that load with Windows (spoiler – only a few should start with your OS), then reveal the various ways in which you can keep your PC running smoothly, from freeing up system resources when you need an extra bit of oomph to ensuring errant processes are kept in check.
Understand Windows startup
No, you’re not imagining things – your PC really does take longer to start than it used to. As you install new apps, a surprisingly large number attach themselves to Windows’ start-up routine, which is fine for essential software like your security package, but not so great when all the app is doing is shaving a few seconds from its own start-up time by reserving a section of RAM for itself. And there’s the rub: not only do start-up apps extend your boot time but they also eat into your precious system resources, creating a drag on your PC’s day-to-day performance.
Sometimes, though, a slow boot time is indicative of something else, particularly if your PC takes an age to reach the login screen. The box reveals the various phases of the start-up routine, and what to do if you experience delays even before reaching the login screen.
In most cases, however, your slow startup can be traced to too many apps loading with Windows. Step one to addressing the problem lies in benchmarking your startup. Using a stopwatch is fiddly, but the good news is that there are apps out there that can do the job for you.
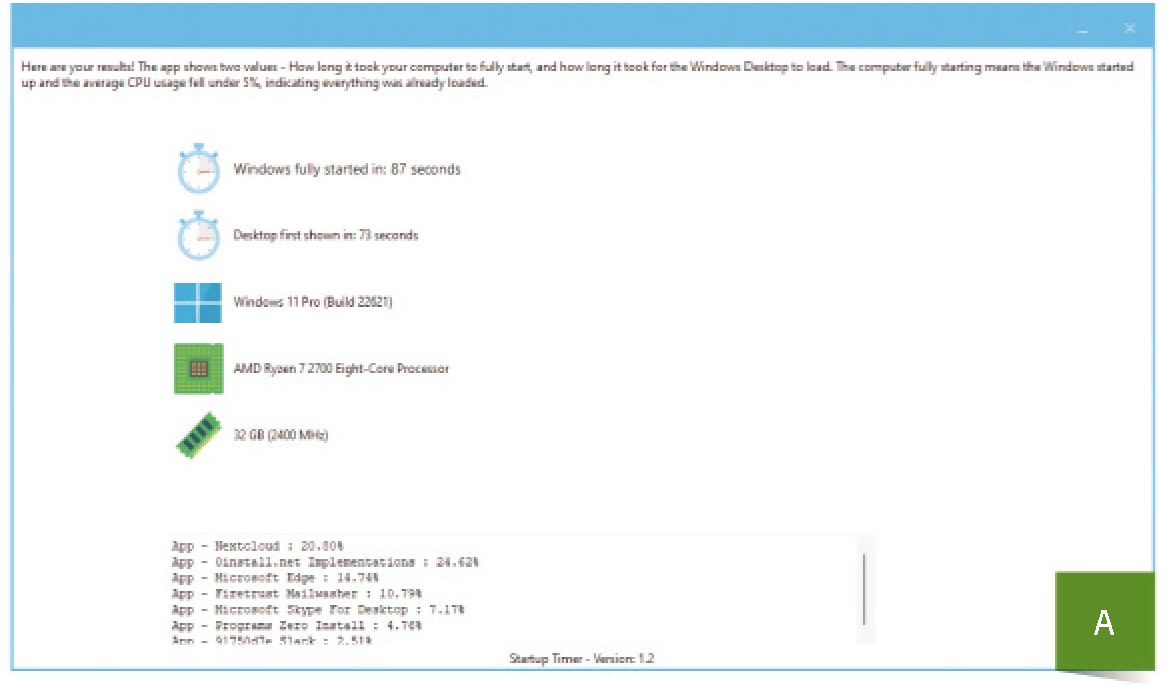
For a quick and dirty benchmark of how long Windows take to load, followed by how long for all those apps to load themselves, try the portable version of Startup Timer (https://startuptimer.com/). You’ll get two figures: ‘a fully started’, plus ‘desktop first shown in’ [Image A]. Beneath this is a list of detected start-up items, each with a percentage figure allocated to them – the bigger this is, the longer that app requires to load.
Benchmark your startup
Startup Timer is useful as a quick exercise, but for a more detailed look – and access to tools to help optimise your startup – head to https:// greatis.com/bootracer/ to download the free version of BootRacer. After extracting BootRacerSetup.exe from boot_racer.zip, double-click the file and install the application. Once done, leave all four boxes ticked and click Finish.
When the main screen appears, you’ll see two options, Full Boot Test and Startup Control, plus a large Start button. Click this to open the Quick Speedup tab of Startup Control and click ‘Start Test’ followed by Yes to reboot and perform a full benchmark of your system.
When you next log in, you’ll see a series of messages above the Taskbar notification area revealing BootRacer is monitoring your system. Among these is a countdown clock declaring “Windows is almost ready”. As start-up items load around you, the clock will keep resetting to 10. Eventually, it counts down to zero and you’ll get your first report [Image B]. It’s likely to say average or slow, indicating that there’s room for improvement.
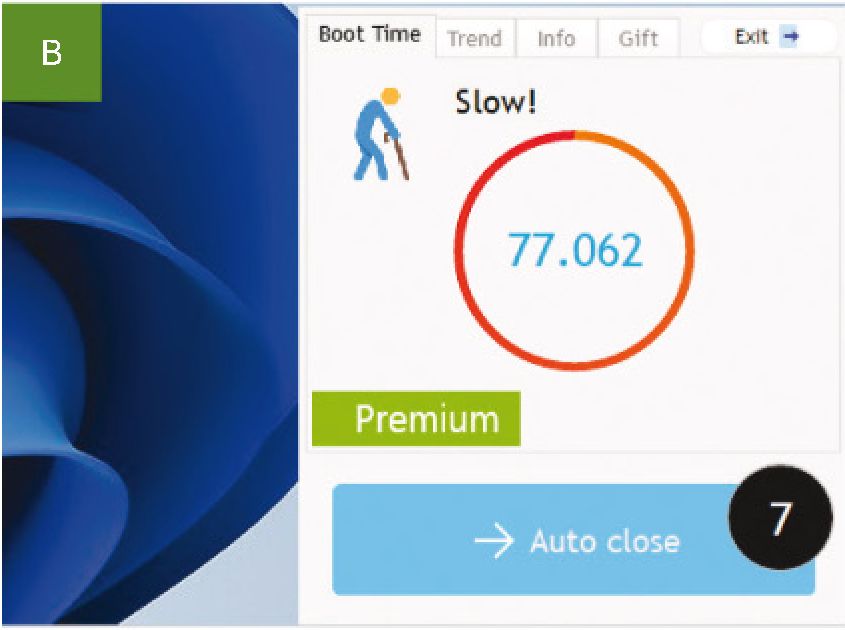
Underneath is a blue button that alternates between ‘Auto close’ and ‘Know more?’. Click this to start our deep dive into optimising your startup. If it closes, open BootRacer via the Start menu or search tool.
Examine results
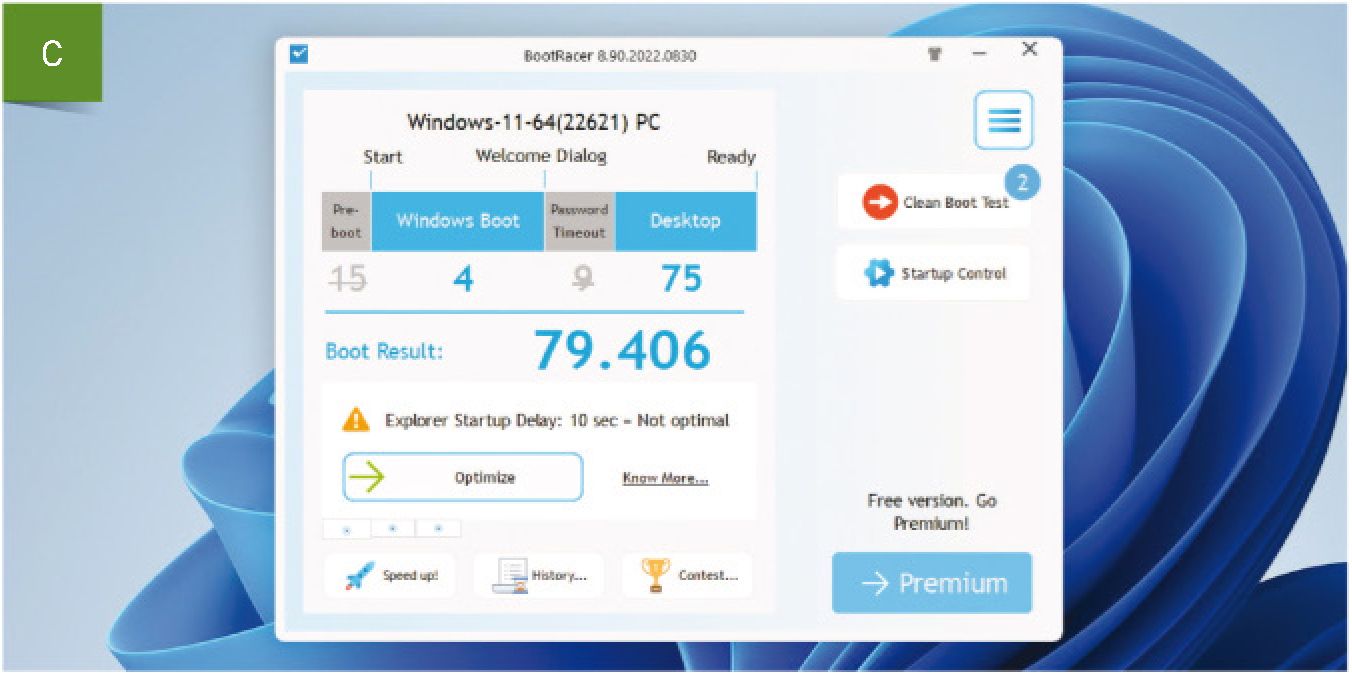
A window opens with a detailed summary of the boot results. BootRacer splits the boot process into four stages: Pre-boot (your PC’s initial hardware checks), Windows Boot, Password Timeout (the time while your PC is sitting at the login screen waiting for you to act), and Desktop. Each section is given a time in seconds, but only the Windows Boot and Desktop times count toward the final Boot Result calculation [Image C].
———————————————
MANAGE YOUR SYSTEM WITH PROCESS LASSO
1. SYSTEM RESOURCE USAGE
This graph tracks your processor’s CPU use and responsiveness, plus memory load. When a process threatens to reduce overall responsiveness, Process Lasso steps in.
2. PROCESS INFORMATION
Monitor how individual processes are performing. To focus on running apps, switch to the Active Processes tab to filter system processes.
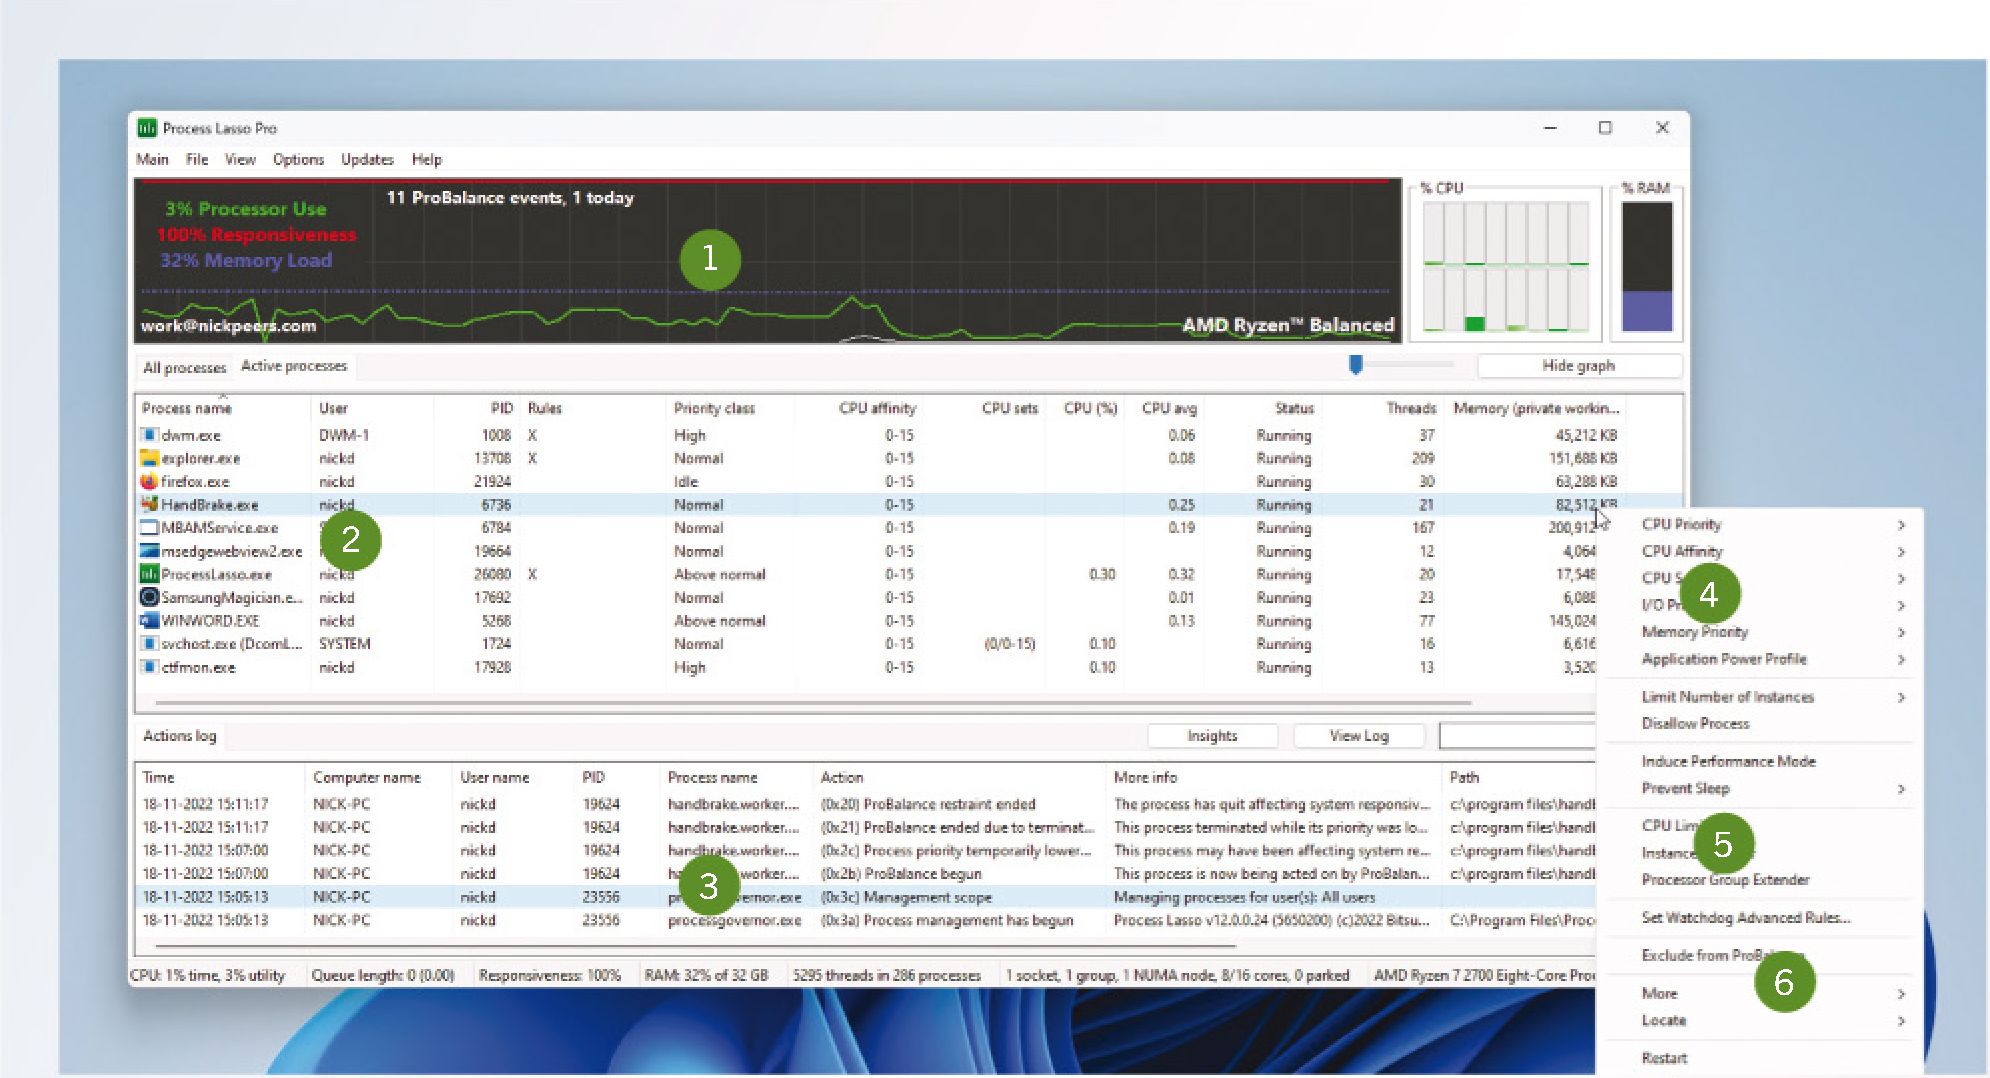
3. ACTIONS LOG
his enables you to track how Process Lasso monitors – and manages – your processes. Look for references to ProBalance being enforced on resource-heavy apps.4. MANUAL SETTINGS
In most cases, Process Lasso knows what it’s doing, but if you need to override it for any reason, right-clicking the process allows you to do so.
5. CPU LIMITER
This setting allows you to restrict the number of processor cores available to the selected process when the system needs additional resources.
6. BYPASS PRO-BALANCE
There will be times when you want certain apps or services to have access to all the resources they need – select ‘Exclude from ProBalance’ to prevent Process Lasso from managing them.
————————————-
Beneath this is a reference to ‘Explorer Startup Delay: 10 sec=Not optimal’. Confusingly, this isn’t a reference to the ‘Windows is almost ready’ clock you saw earlier but is actually a reference to an arbitrary 10-second delay Windows inserts into the post-logon process before start-up apps are processed.
Leaving it in place ensures the desktop is ready to use more quickly, but if you needed to prioritise a specific start-up app or you’re running a fast machine where the delay isn’t as important then you can reduce the delay to just two seconds by clicking Optimise followed by ‘Remove Delay: 10 Seconds’.
BootRacer will tell you this is a premium feature, but by clicking the ‘Use Free Bonus’ button it will set the delay to just two seconds instead.
You’ll be prompted to ‘Restart Computer’ to apply these changes to see whether BootRacer measures any
improvement. If you want to go further and disable the delay entirely, you can open Registry Editor (press Win-R, type regedit and hit Enter) and navigate to the following key:
Computer\HKEY_CURRENT_ USER\Software\Microsoft\Windows\CurrentVersion\Explorer\Serialize
Double-click the Startupdelayinmsec value in the right-hand pane and change its value from 2,000 (milliseconds) to 0. Reboot and benchmark the change.
Should you find the tweak adversely affects boot times – that’s more common on older PCs and those running from slower hard drives – then simply click Optimise or Change again under Explorer Startup Delay, but this time click ‘Restore Factory Settings’, which simply deletes the Startupdelayinmsec value in Registry Editor to reinstate the default 10-second delay.
Review app start times
Thankfully, the main bulk of BootRacer’s Startup Optimizer tools are free to use. First, you need to enable the feature— look for the ‘Enable Control’ button in the carousel beneath the boot result (if it’s not showing, click the first tab beneath the carousel to bring it back into focus). After clicking this, tick the box under ‘Enable Startup Control’, then switch to the ‘Enable Measuring Startup Time’ tab and click ‘Restart your PC and Analyse Results’ to reboot and benchmark your startup once again.
This time, when you log back in, you’ll see BootRacer has instigated its own delay on launching start-up apps – once the timer counts down to zero, it starts loading them in sequence (and measuring their start-up times). Once finished, you should discover this simple tweak on BootRacer’s part may have already delivered noticeable savings on top of any recorded by disabling Windows’ 10-second delay.
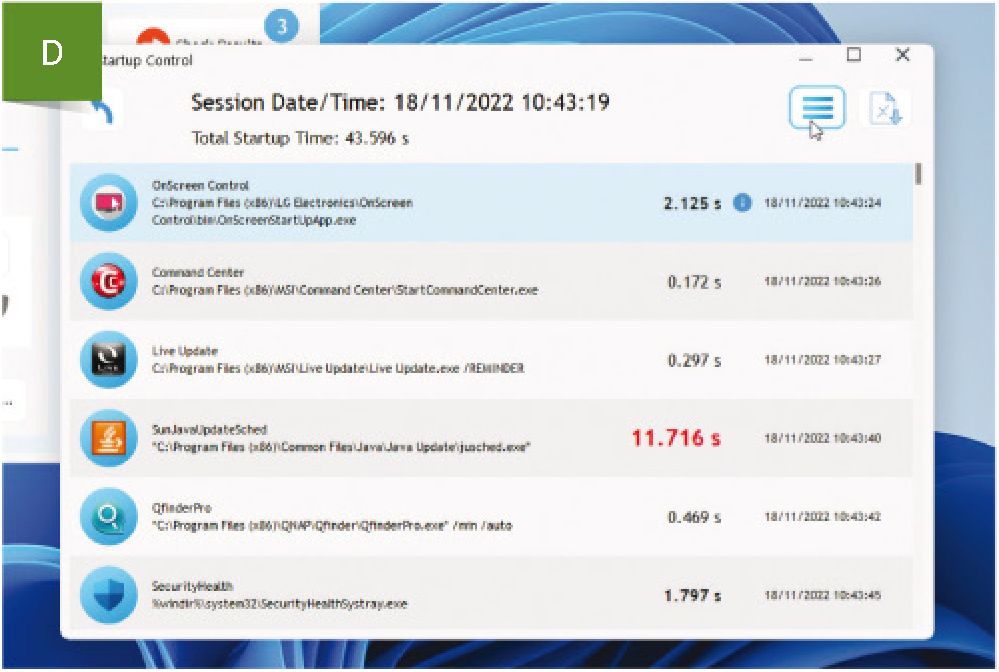
You’ll also see exactly how many apps are set to start with Windows – by clicking the ‘Check Results’ button followed by ‘Find Slowdown…’ under ‘Startup programs times:’ you’ll be shown a list of apps in the order they loaded along with the time it took for them to start [Image D]. Look out for items marked in red as particularly slow starters, one notable example is Java’s update scheduler.
Optimise startup
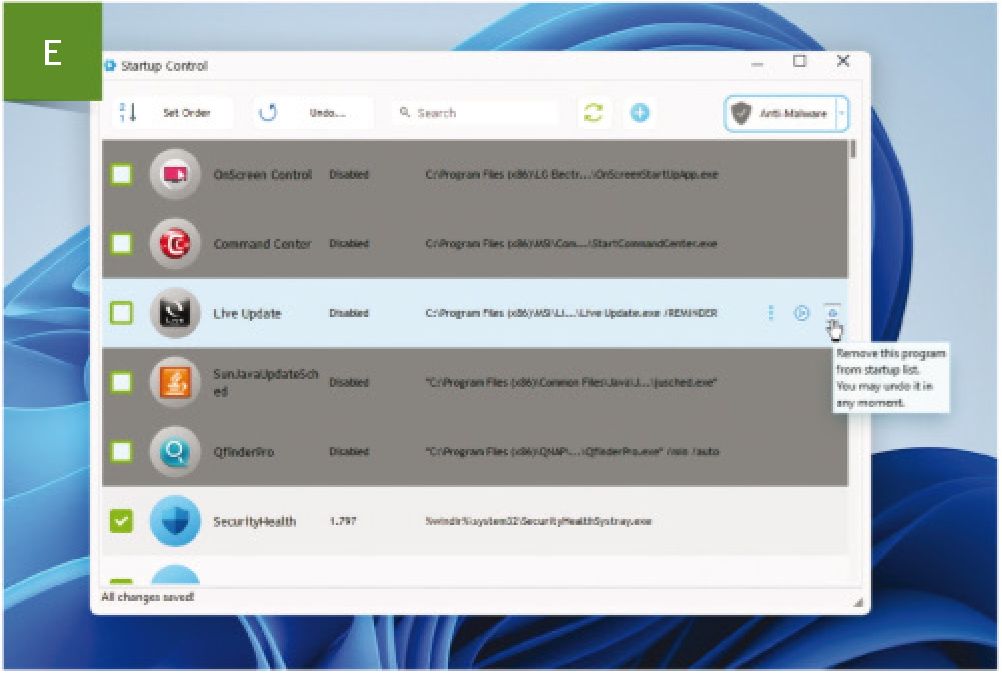
Once you’ve made a note, close the window and click the Startup Control button to start managing the list. Start by disabling those you don’t need starting with Windows – they will either take longer to start, or you’ll need to remember to check for updates manually. To do this, simply remove the tick next to the program and you’ll see its status set to Disabled.
If you’re convinced you don’t need a start-up program, you can delete it permanently from the list – roll your mouse over it and click the bin icon [Image E], although we suggest first disabling it and monitoring startup over several days to ensure it’s not actually needed for any reason.
As you trim the list, click ‘Undo.’ if you accidentally remove a start-up item and want it restored. The next thing to do is change the order in which items are loaded during startup. If there’s an app you want to be available quickly, click the ‘Set Order’ button and use the arrows to promote it up the list.
————————————–
FINER START-UP CONTROL
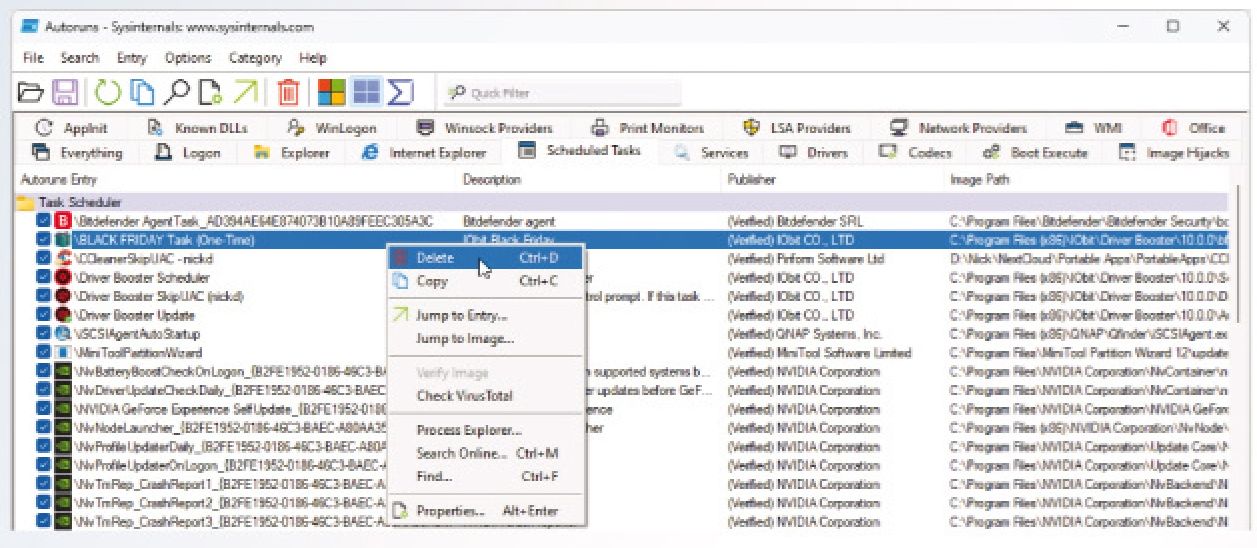
If you want more control over startup, including viewing hidden parts of the start-up process, download Autoruns from https://docs.microsoft.com/en-us/sysinternals/ You’ll find it under Process Utilities. Unzip its contents and then right-click either Autoruns.exe (32-bit) or Autoruns64.exe (64-bit) and choose ‘Run as administrator’ to launch it.
You’ll see a huge list of items appear under an all-encompassing Everything tab. The trick is to quickly navigate away from this tab to focus on specific start-up types. The Logon tab closely approximates what’s shown by BootRacer but may well include additional entries. You’ll also see that those items you have disabled or removed in BootRacer are shown as being enabled here – that’s because BootRacer suppresses this list in favour of its own settings (uninstall BootRacer, and they will all flood back).
Some tabs are empty but focus on Scheduled Tasks as well as Explorer and Services tabs. Look for items marked in red or yellow – try disabling these first by unticking them. If there are no consequences, you can later right-click them to delete them. Another benefit of Autoruns is that it allows you to check start-up entries for possible malware – right-click an entry and choose ‘Check VirusTotal’ to upload the file in question for a quick online malware scan.
——————————————-
You may notice an ‘Anti-Malware’ button in the top right-hand corner – this is a Premium feature, so ignore it; your existing security software should already be offering protection against this, but you can also vet your start-up items for free using another start-up manager (see the box).
Once you’ve finished tweaking, reboot your PC and your start-up times should improve further. You may also notice, particularly on lower-powered machines, that your PC is faster in day-to-day use too. In future, you can disable BootRacer or leave it to monitor your start-up times to ensure you don’t slip into bad habits. Don’t panic if, occasionally, boot times are much slower; this can occur when installing Windows updates.
Optimise your services
Start-up apps is just one area where you can trim the fat from system resources. Services – low-level programs used by both Windows and third parties such as your security tools- is another area where there may be opportunities to reclaim some precious resources.
There are two ways to tweak services – on an ad-hoc basis whenever you need additional system resources for certain tasks, from playing games to ripping media, or more permanently. The former option is best for most because it allows you to squeeze every last bit of performance out of your system by temporarily disabling both background tasks as well as services that can quickly be restored once you’re done with a single click.
This type of app is commonly referred to as a game booster for obvious reasons, but can of course be used whenever you need that extra burst of speed. There are dozens to choose from, and they all do much the same thing. One simple-to-use tool is Smart Game Booster (https:// gamebooster.itopvpn.com).
The Free version contains all the key functionality you need – just click Boost before playing a game. You’ll be shown the performance uplift, typically around 10 percent, and when you’re done, click Restore to bring things back to how they were.
Manually tweak your system
One-click apps are all well and good, but if you want to exert more fine control over your system, we recommend trying another lightweight (and free) tool called Wise Game Booster (www.wisecleaner.com/wise-game-booster. html).
The program opens to the empty ‘My Games’ tab, where you can store shortcuts to any application you like. Beneath this will be a list of ‘issues’ the program has found, divided into three sections. You can choose to optimise them all from here, but it’s a good idea to review what kind of optimisations to expect by exploring the System Optimizer, Process Optimiser, and Service Optimiser tabs in turn.
System Optimiser contains no fewer than 35 ‘recommended’ optimizations, some of which may already be set by your system. These optimisations are best reviewed carefully and set as permanent tweaks to your system. Note, if you click ‘Resume All’ to undo them, all optimisations, not just those you’ve set in the program, are removed.
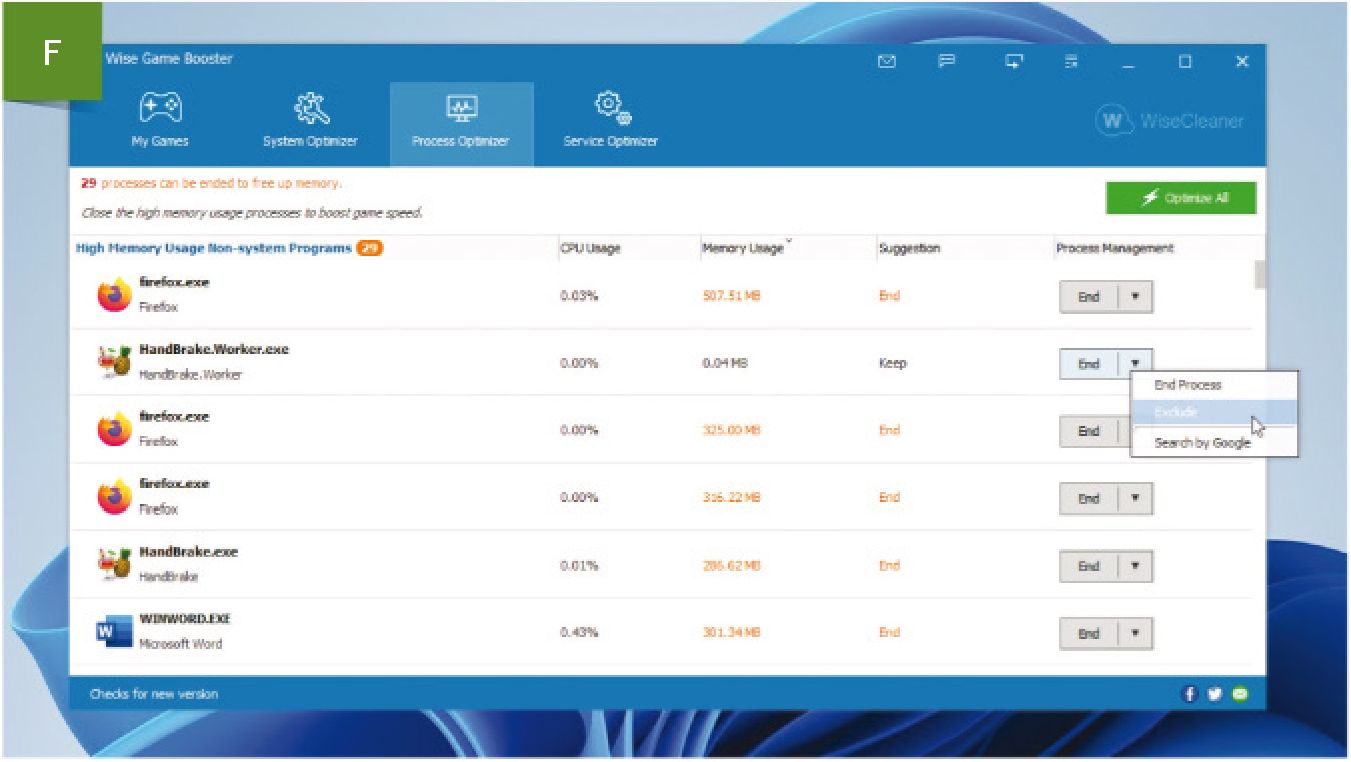
Of more potential use for quickly clearing resources for gaming is Process Optimizer [Image F], which identifies memory-intensive processes that Wise Game Booster thinks are worth ending – clicking ‘Optimize All’ will end these promptly with no ‘restore all’ button, so review carefully before diving in.
Finally, Service Optimizer identifies what the program describes as ‘irrelevant’ services that can be safely ended to provide an extra boost – again an ‘Optimise All’ button exists to speed things up.
Rein in runaway processes
Another way to allocate your PC’s finite resources is by managing your processes’ priorities. The higher the priority, the more demands a process can make on the system. By default, most processes are set to run at ‘Normal’, but there are options to give processes more (Above normal, High) or less (Below normal, Low) priority compared to others. You can set these manually via Task Manager’s Details tab (right-click a process and choose ‘Set priority’), but it’s a fiddly process and there’s potential to bring your PC grinding to a halt, and not simply by accidentally setting a process to Realtime, thereby giving it a higher priority than Windows.
Thankfully, some tools allow you to better manage the competing demands of processes. Though they are more suited to low-powered PCs that struggle whenever you open more than a couple of browser tabs, these tools can help higher-end PCs too.
Our favourite tool is Process
Lasso (https://bitsum.com/). The annotation opposite provides you with a key run down of its features, while a Pro license gives you complete control of your system (prices start from US$ for a one-year, single-PC license, but US$ buys you a lifetime license), the free version has all the core functionality you need if you’re happy for the app to do the heavy lifting for you.
————-
FIX START-UP DELAYS
The boot process consists of several phases: first is Pre-boot when your hardware runs start-up checks and the boot manager waits to hand over to your selected operating system. Next is the Windows loading process (Windows Boot), then a pause at the login screen, followed by the post-logon process (or Desktop), as Windows loads your user profile along with apps configured to run at startup.
If your pre-boot time is longer than five seconds, this may indicate several things: you may not have enabled Fast Boot in your system UEFI – there may be a reason for this (dual-booting with Linux), otherwise, give it a go. There may also be a delay if you have a dual-boot menu that pauses for a lengthy period before booting the default OS.
Delays in the Windows Boot portion of the boot process may indicate errors on the drive (press Win-X, choose ‘Terminal (Admin)’ or ‘Command Prompt (Admin)’, then run ‘chkdsk c: /f /r /x’, selecting yes to perform the check and repair on your next boot). If you’ve not yet upgraded your boot drive to SATA or NVMe, you might also want to check to make sure it has recently been defragged (type defrag into the Search box).


