REMOVE AND BLOCK WINDOWS JUNK

EMPTY WINDOWS FOLDERS
What’s the problem?
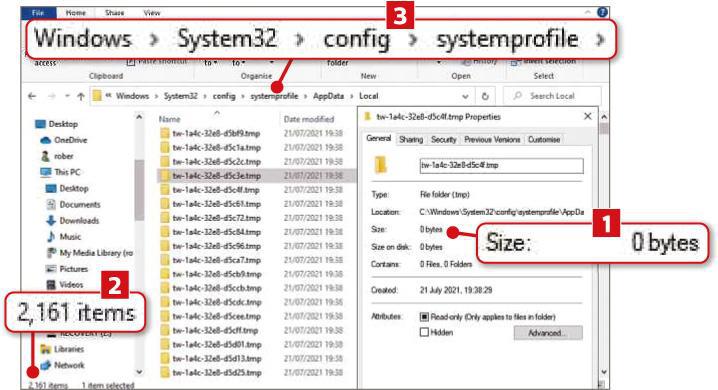
Many Windows 10 users have experienced a bug whereby the operating system creates thousands of temporary folders for no apparent reason. Right-clicking these folders reveals them to have a file size of ‘0 bytes’ (1 in our screenshot below) and opening them confirms that they’re empty.

That might not sound like a major concern – after all, they aren’t using any drive space – but the sheer number of these pointless folders can mean scanning your PC for malware and junk takes much longer.
The folders all have names beginning with ‘tw’ and end with a ‘.tmp’ extension. On our system, we had more than 2,000 of them 2 – you can check your own hard drive by opening File Explorer and going to C:\Windows\System32\config\systemprofile\AppData\Local 3. You may be warned that you don’t have permission to access system folders, but you can click Continue to proceed. Enabling your PC’s Administrator account (see page 62) will bypass this warning.
Frustratingly, the problem also exists in Windows 11, with users of the new operating system reporting the presence of empty folders in the same location, in both the Home and Pro editions.
The folders are believed to be generated by the Provisioning Package Runtime Processing tool – ProvTool.exe, for short – an essential Windows feature that can’t be disabled or removed. But we’re surprised and disappointed that Microsoft still hasn’t fixed the bug, which has plagued users for the last three years, and has allowed it to carry over to Windows 11.
How to fix it
The good news is that these junk folders are safe to delete from your hard drive. You can either do this manually, by right-clicking each one and choosing Delete, or – if, like us, you have thousands of them – use a dedicated program to remove them all in one go.
Download and run the free tool Remove Empty Directories from www.snipca.com/39995. The latest stable version is 10 years old, but it still works fine in Windows 10 and 11, or you can try the new beta version that was released in February.
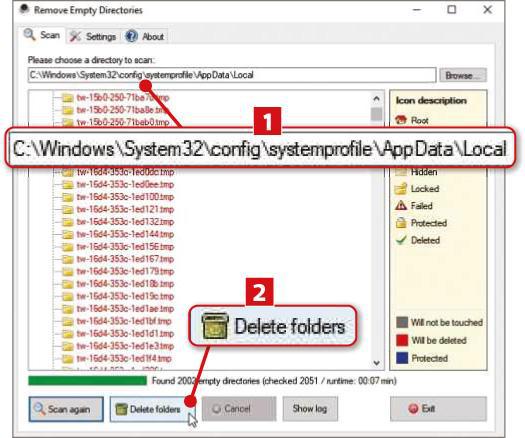
When the program opens, click Browse, navigate to C:\Windows\System32\config\systemprofile\AppData\Local (1 in our screenshot above right)then click OK. Click the Scan Folders button in the bottom-left corner and Remove Empty Directories will quickly identify empty and temporary folders. It marks the items to be deleted in red, while important system folders are marked in grey and won’t be touched. Click the ‘Delete folders’ button 2 to send the unwanted items to the Windows recycle bin – this can take a while, depending on the amount.
If you’d prefer to erase the folders permanently, click the Settings tab and choose ‘Delete directly and don’t ask any questions’ in the dropdown menu.
Unfortunately, until Microsoft fixes this problem, there’s no way to stop ProvTool.exe creating these empty junk folders, but at least you can delete them as soon as they appear. Just make sure you only erase harmless temporary items and not essential system folders.
PC HEALTH CHECK TOOL
What’s the problem?
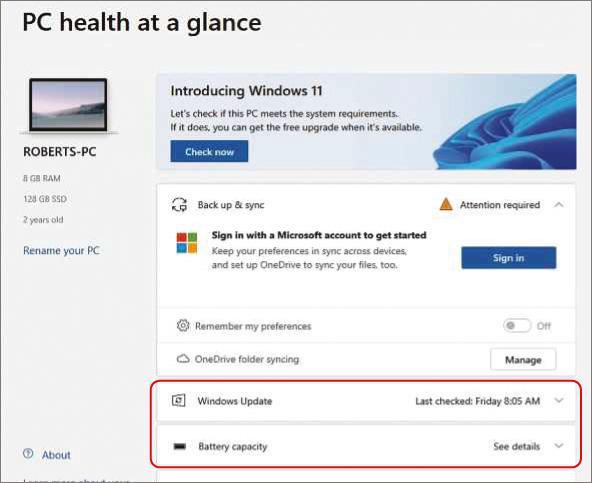
Microsoft’s PC Health Check tool offers a convenient way to find out if your computer is compatible with Windows 11 and, if not, which requirements it fails to meet. It’s available to download from www.snipca.com/39463, but since October Microsoft has been forcing the program on users, regardless of whether they want to check their system specifications.
This aggressive approach came into play when the KB5005463 update rolled out to Windows 10 PCs in October. PC Health Check can be useful, and also includes options for checking your battery and storage capacity (see screenshot top of page 52), but we think Microsoft should let us choose whether to install it, rather than having the tool foisted upon us.
Some users have even reported that PC Health Check automatically reinstalls after you uninstall it, when Windows next checks for updates (see www.snipca.com/39997). By removing our choice and installing PC Health Check without our permission, Microsoft has effectively turned a handy but optional program into a piece of bloatware.
How to fix it
You can remove PC Health Check by going to Settings, then Apps and scrolling down to its entry in the ‘Apps and features’ section. Sneakily, it’s labelled Windows PC Health Check, which means it’s near the bottom and easy to miss. Select the tool and click Uninstall, then Uninstall again – you’ll need to restart your PC to remove all traces.
However, as we’ve mentioned, PC Health Check may get reinstalled with the next Windows update. There is a registry tweak that can prevent this from happening, but it only works on systems with a specific registry value.
Type regedit into the Windows search box and select Registry Editor, then navigate to the key HKEY_LOCAL_ MACHINE\SOFTWARE\Microsoft\PCHC – or HKEY_CURRENT_USER\ SOFTWARE\Microsoft\PCHC. Double-click the value PreviousUninstall, change its ‘Value data’ to 1 then click OK. If you can’t find that key or value, you’ll just have to hope the tool doesn’t come back. In fairness, PC Health Check doesn’t run automatically, but it seems Microsoft hasn’t learned its lesson after forcing its Get Windows 10 (GWX) app on users in the same way, back in 2015.
WINDOWS UPDATE AND INSTALLATION FILES
What’s the problem?
By far the biggest space-wasters on your PC are the update and installation files left behind by Windows itself, which can consume several gigabytes of storage. Windows does a poor job of removing these files once they’re no longer needed, keeping copies even when the updates have been superseded. You really only need the most recent update file, so you can ‘roll back’ your system should you experience any problems.
Although this isn’t a new type of junk, the fact that updates are getting larger and more frequent makes it a pressing problem in 2022, especially if you’re running out of space on your hard drive.
How to fix it
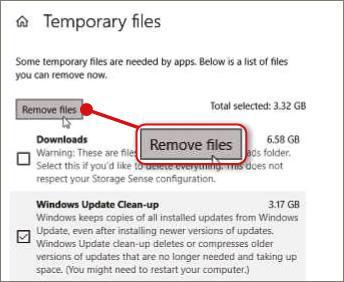
Microsoft now lets you remove Windows updates through its Storage Sense tool, rather than using Disk Clean-up (see box below left). Open the Settings app, choose System, then Storage and click ‘Temporary files’. Here you can select ‘Windows Update Clean-up’ and ‘Temporary Windows installation files’, and click ‘Remove files’ to delete them (see screenshot above right). On our PC, these entries took up 3.17GB and 49.3MB respectively.
However, this method doesn’t give you the full picture. At the bottom of the window, you’ll see another entry for Updates – for us, this said a further 12GB of storage was taken up by update files (including the most recent one – KB5006670 at the time of writing). Clicking ‘View update settings’ then ‘View update history’ will tell you exactly what these files are and let you click ‘Uninstall updates’ to remove them.
However, if you’re unsure what to uninstall and don’t want to risk removing an important update, it’s wise to turn to a specialist disk-cleaning tool. They don’t come much wiser than Wise Disk Cleaner, which you can download for free from www.snipca.com/40057.
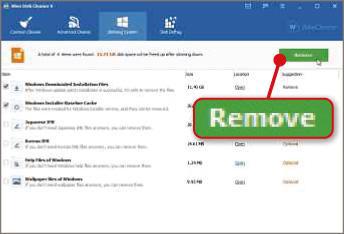
Install and run the program, then click the Slimming System tab. This will scan your hard drive for old and unnecessary update and installation files that can be safely removed, and tell you how much space you’ll reclaim by doing so. On our PC, these amounts were 11.4GB and 262.8MB respectively, which was a big increase on the numbers quoted by Storage Sense. Click the green Remove button (see screenshot above right) and Wise Disk Cleaner will delete the selected files and free up a considerable amount of drive space. It creates a system restore point first, in case you have any trouble after ‘slimming down’.
If you’ve upgraded from Windows 10 to Windows 11, Microsoft will automatically delete the old operating system’s installation files after 10 days. This means you can no longer roll back to Windows 10, but it also saves you the trouble of removing the files manually.
Blocking future Windows updates isn’t advisable, because many contain essential security and maintenance fixes, but you can ‘pause’ them until you’ve made space on your hard drive. Go to Settings, then ‘Update & Security’ and select Windows Update in the left-hand menu. To turn off automatic updates for one week, click the ‘Pause updates for 7 days’ option, or to delay them for up to 35 days, click ‘Advanced options’ and choose a date in the ‘Pause updates’ menu.
WINDOWS 11 WIDGETS
What’s the problem?
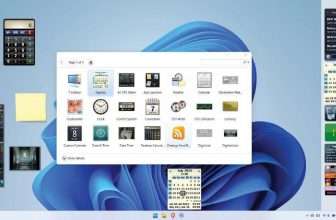
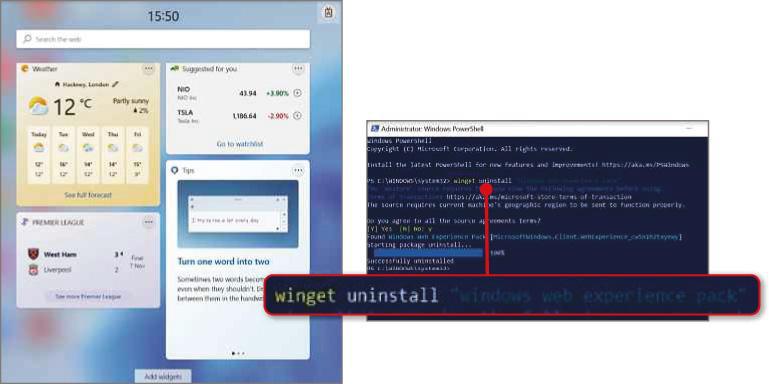
Every new version of Windows brings a feature that some users find useful, but most people regard as an annoyance. In Windows 10, it was Live Tiles in the Start menu and in Windows 11, it’s arguably Widgets (see screenshot right). This app provides one-click access to the latest news headlines, weather forecast, stock-market data, Windows 11 tips and more. It’s enabled by default and has a taskbar button that’s easy to click accidentally when you’re not interested in seeing this information. You can delete a specific widget (apart from news) from its pop-up panel by clicking the three dots in its top-right corner and selecting ‘Remove widget’. You can even hide the app’s taskbar button by right-clicking the taskbar, choosing ‘Taskbar settings’ and switching off Widgets. But Windows 11 doesn’t give you the option to remove Widgets altogether or stop it automatically running in the background.
How to fix it
If you’re not a Widgets fan, you can uninstall the app through Command Prompt or PowerShell. Type cmd or powershell into the Windows 11 search box and click ‘Run as administrator’ next to Command Prompt or Windows PowerShell. When either tool opens, type the following command and press Enter: winget uninstall “windows web experience pack” (see screenshot below) – you can copy and paste this from our Pastebin account at www.snipca.com/40028. When asked if you agree to ‘all the source agreements terms’, press ‘Y’ on your keyboard for ‘Yes’. The Widgets app, which has the official name the Windows Web Experience Pack, will now be uninstalled, though you’ll need to restart your PC for all traces to disappear.
If you change your mind and want Widgets back in Windows 11, open the Microsoft Store and search for Windows Web Experience Pack – or go to www.snipca.com/40030 in your browser – and click Get to reinstall the app. Open ‘Taskbar settings’ and switch the Widgets slider off and back on to make its taskbar button reappear.


