PLAY CLASSIC RETRO GAMES ON YOUR PC
WHEN IT COMES TO NOSTALGIA, you can’t beat a bit of retro gaming. Why dig out your old computers and consoles when—armed with the right tools, tips, and know how—you can recreate your old favorites using your own PC? Emulation—the art of recreating one type of computer in another—is nothing new, as anyone who has attempted to play old 8-bit games on 16-bit hardware will attest. But as PCs grow ever more powerful, their ability to emulate older machines has only got easier over time.
These days, you can emulate just about any gaming machine from yesteryear on your PC, including arcade games. The more powerful your PC, the more options you have, but you don’t need anywhere near the latest hardware to relive games released in the 80s and 90s. In this feature, we’ll reveal everything you need to know about creating your own retro-gaming environment, from standalone emulators to slick frontends that make running a variety of games across a multitude of platforms as easy as it can be. We’ll even help you spec your own dedicated retro-gaming PC and show you how to run retro games on any PC to hand, armed only with a USB thumb drive. Enough chatter—the
LET’S BREAK DOWN WHAT you need to enjoy retro gaming. First, you need some form of emulator for whatever platform(s) you wish to recreate. Virtually every home computer ever built has at least one emulator available for it, from popular classics like the Commodore 64 and Amiga to more obscure machines like the Welsh Dragon 32 and Japanese MSX family of computers. The same is true for games consoles, whether you’re a fan of Sony, Sega, Xbox, or Nintendo. Long story short, whatever gaming platforms you’ve owned in your life, you’ll almost certainly find an emulator for it.
If you spent most of your youth hanging out in arcades, you’ll also be pleased to learn that it’s possible to recreate classic arcade games on your PC too. The best platform for this job is MAME (www.mamedev.org), on which hundreds of classic games from the 70s onwards are widely available. There’s even an emulator for playing classic PC games—see the ‘Play Classic PC Games’ boxout for full details.
If you’re only interested in emulating one or two old machines, then the simplest thing to do is source only those emulators you need, then use them as and when you fancy a bit of nostalgic gaming. If this idea appeals, check out the box opposite on picking and choosing standalone emulators (along with some tips on which emulators work best).
TIE MULTIPLE EMULATORS TOGETHER
Setting up and configuring individual emulators can also be a fiddly process, so if you fancy sampling from a wide range of platforms—those of friends and farflung family members as well as your own collection—then you’ll be pleased to learn there are umbrella projects out there that aim to provide a single frontend for all your retro gaming needs.


The process is driven by the Libretro API (www.libretro.com), which is designed to help developers create both games and emulators. Libretro can package both games and emulators into single files, which can then be organized under a single package for easy access. These files can then be packaged together under a single ‘frontend’ application to provide a consistent end-user experience that covers all your retro-gaming needs.
Libreto also comes with an official ‘reference’ frontend: RetroArch (www.retroarch.com). This is available on all major desktop, mobile, and even console platforms—there’s even an online version (https://web.libretro.com) you can run in your browser. The aim of Retroarch is to keep everything organized in a single location while providing you with a relatively consistent user experience—at least up to the point where you launch each emulator. On top of this, frontends also strive to simplify the often-awkward task of sourcing files and configuring them to get each emulator up and running.

RetroArch is powerful, but can be off putting. To make things more complicated, you’ll find another level of frontends that let you combine RetroArch with other gaming platforms (such as Steam) to provide another single layer of organization for the games on your PC. One such example—EmulationStation—we’ll be showcasing with our retrogaming OS, but unfortunately the desktop version (www.es-de.org) is quite fiddly to implement and set up.
INCORPORATE EMULATORS INTO WINDOWS
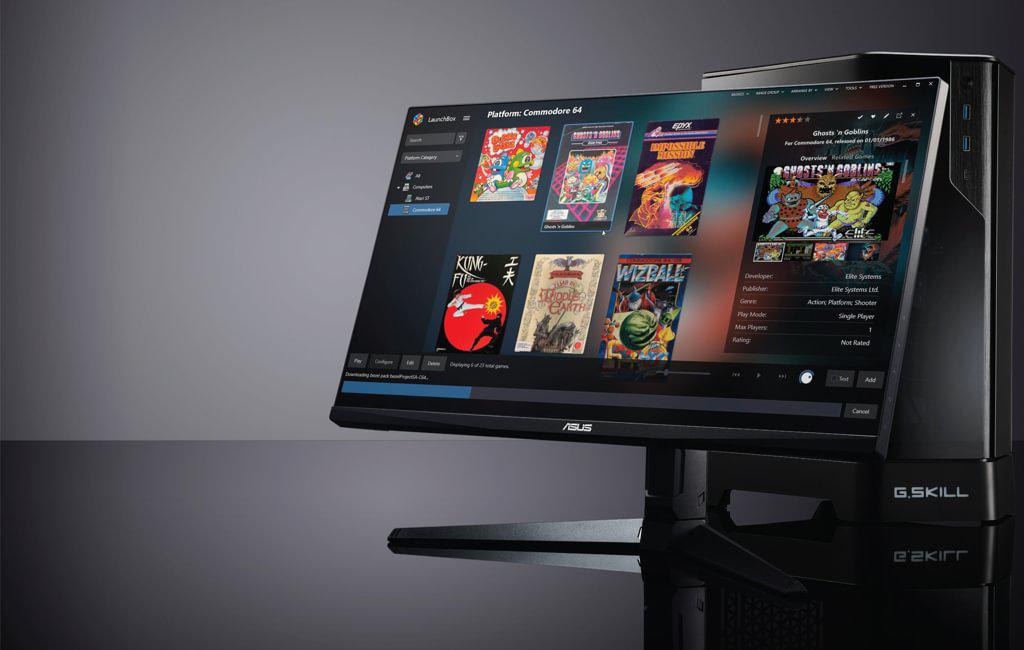
Fortunately, there’s a much easier way to provide a user-friendly platform for all your emulation needs in Windows, and that’s through the LaunchBox frontend (www.launchbox-app.com). LaunchBox exists in paid-for and free forms, but for retro-gaming purposes, the free version does everything we need, and with a lot less hassle than EmulationStation, never mind RetroArch itself.
After downloading and installing (ignore the SmartScreen filter warning—it’s perfectly safe), LaunchBox will automatically load to prompt you to populate your games collection from a variety of different sources—retrogamers will be primarily interested in the first option: Import ROM Files, so select it.
You’ll now be guided through a wizard that will ask you to select the files (or folder full of files) to import—this must contain ROMs for the same platform. But now you’re asking yourself an awkward question: Where do I get these ROMs from?
The answer, of course, lies with the internet, but before we proceed, it’s worth noting that many of these games are still considered under copyright. To stay on the right side of the law, it’s expected that you own a physical copy of the game in its original form—disk, cassette, or cartridge. This has no bearing on whether you can download and play these games, but we’re going to assume that—like us—you have copies of old classic games, computers, and consoles still gathering dust somewhere.
There are several sources of ROMs online. There are several multi-platform sites like EmulatorGames (www.emulatorgames.net/roms/) and Planet Emulation (www.planetemu.net). The former has a relatively small library of games, but spans a wide range of platforms; Planet Emulation focuses on the most popular models, but has collections spanning thousands of titles. It’s all in French, however—browse by platform, download type (such as games or applications), and download format, then go through an A-Z list. Click an entry, followed by Télécharger, to download it.
ADD GAMES TO LAUNCHBOX
Once you’ve download a selection of games for a single platform, return to LaunchBox, and point it at this folder before clicking Next. Confirm the computer/console model (it should be automatically detected by filetype), and click Next. You’ll be given the option of letting LaunchBox automatically download and configure RetroArch, or you can manually choose an emulator if you prefer.
In most cases, choose the RetroArch option. If prompted, select which emulator to use (such as puae for the Amiga), then choose how you want your game files organized (copying into LaunchBox’s own folder is the logical option). Allow LaunchBox to look for metadata (and choose what artwork to use), and we also recommend downloading bezels to make the gaming experience more attractive. Tweak any custom settings offered (if in doubt, leave untouched) and then LaunchBox will scan the folder and present you with a list of games it has found. Click Finish to complete the import wizard.
LaunchBox will now download, install, and configure RetroArch. When it’s done, you’ll see your games displayed on the main LaunchBox screen. Select one for details, or double-click it to launch the game.
CONFIGURE YOUR CONTROLLER
As things stand, you can now play games using your mouse and keyboard. But what about gaming controllers? LaunchBox will work with any controllers visible in Windows, so if necessary, install the drivers for your controller before proceeding. Once done, open LaunchBox’s Tools menu and choose Options, then scroll down to the Game Controllers section. Verify that your controller is present, then check ‘Enable Game Controllers’ and select your controller from the list before clicking OK.
When you’ve had enough of a game, press Alt + F4 or Esc twice to quit and return to the main library screen. To add more games to RetroArch, click the menu button next to its name, and choose Tools > Import to access the submenu, where you’ll find options for incorporating more ROMs, MAME arcade files, and DOSbox-compatible games too.
While some emulators come with BIOS/firmware/operating system supplied, others may require additional files—for example, when setting up an Atari ST, you’ll be prompted for a tos.img file. Libreto supplies most of these itself—get them from https://github.com/Abdess/retroarch_system if prompted—and then hopefully the games will run fine. If you run into problems, skip to the ‘Configure games and troubleshoot’ section for more advice, or check out its troubleshooting forums (https://forums.launchbox-app.com/forum/64-troubleshooting/), in particular the first post, where you’ll find links to helpful tutorials and tips.
A GAMING OPERATING SYSTEM
We’ll leave you to continue playing with LaunchBox and move on to configuring a whole retro-gaming operating system for your pleasure, one that’s installed directly to USB flash drive for portable use, or SD card or internal hard drive if you want to dedicate a single machine solely for retro gaming without any other distractions (see the box). That OS is the excellent Batocera.linux (https://batocera.org/).
Batocera.linux works across a wide range of systems, from Intel-powered desktops, laptops, and NUC PCs to various handheld platforms, as well as the likes of the Raspberry Pi, Odroid, and Rockchip. If you choose the portable option, everything is contained on the flash drive, making it easy to set up and configure Batocera on your desktop PC, then take it with you to play on your laptop, or even a friend or family member’s PC, without having to set it up again.
The bare minimum you need to run Batocera.linux is a USB flash drive (or micro-SD card) that’s at least 16GB in size. You’ll also want at least one game controller—see https://wiki.batocera.org/supported_controllers for a list of supported controllers, which covers most common types. If you’re installing it on a NUC PC to keep under the TV, we’d also recommend investing in a wireless keyboard/trackpad like the Logitech K400 Plus ($, www.logitech.com) for older games that used computer keyboards or mice rather than joysticks. If you plan to install it directly to an internal hard drive, you’ll also need a USB enclosure to temporarily house the drive in, so the OS can be ‘flashed’ directly to it.
SET UP BATOCERA.LINUX
Once you’ve got your hardware set up, your next task is to copy Batocera to your boot medium of choice. First, head over to https://batocera.org/download to obtain the relevant build (‘Desktop, Laptop, NUC and Intel-based Apple Computers’ in most cases). This is a hefty 2.6GB download, so while you wait for it to download to your PC, go to www.raspberrypi.com/software/ to download and install Raspberry Pi Imager, the tool that will transfer it to your bootable medium.


Once the image is downloaded, launch RPi Imager, then click ‘Choose OS’ followed by ‘Use custom’ before selecting the. img.gz file you just downloaded. Make sure your chosen destination (USB flash drive, microSD card reader, or external USB enclosure) is selected before clicking Write. Wait for the image to be written to the drive (and verified), and once complete, close the installer.
Now is the moment of truth: if necessary, fit the internal hard drive back into your retro-gaming PC or slot the SD card into your handheld emulator, RPi or similar device. If you’re running Batocera from your main PC, leave the drive plugged in, and reboot.
FIRST-RUN SETUP
When Batocera.linux boots for the first time, it’ll first resize the drive’s partition to fill all available space, and provide you with plenty of room to store your games and ROM files. It’ll then reboot to its loading screen, and eventually place you at the main screen for the EmulationStation frontend. You’ll see that several emulators are already on show, which you can cycle through using either your game controller or the cursor keys on your keyboard.
EmulationStation Basic Navigation Control

If you’re lucky, your game controller should be configured to work out of the box—otherwise, hold a button when prompted to go through a wizard that will allow you to map controls to the buttons, joypads and—if applicable—analog sticks on the controller. Once done, navigation is a mixture of controller, mouse, and keyboard, but primarily controller. It pays to understand the basics of navigating the EmulationStation frontend, which is why we’ve put together a screenshot that offers a cheat guide to basic navigation using the controller, mouse, or keyboard.
NAVIGATE EMULATIONSTATION
Returning to EmulationStation, you’ll see several emulators have been preconfigured to give you a flavor of what’s available and how it works—they include that ubiquitous 80s machine, the Commodore 64 along with the classic Nintendo ES, Gameboy Advance handheld, and two less well-known entries titled Ports and Pygamer. For a description of these, as well as a comprehensive list of all supported platforms on Batocera, consult its wiki (https://wiki.batocera.org/systems).
Start by selecting one of the listed platforms using the south fire button and a list of games for that emulator will be displayed. Click one and your chosen emulator will load itself followed by the game itself. You should now be able to play the game using your controller or—if applicable—keyboard/mouse, but how do you quit when you’re done?
It’s worth noting that when you configure a controller, you’ll be prompted to set up a special hotkey—typically Select if it exists, but any unused button will do. Creating this allows you to use hotkeys on your controller to configure, reset, or exit your emulator—the exact behavior will depend on the emulator in question, but basically the hotkey is used in conjunction with the four fire buttons or Start button to trigger certain actions. However, there’s one fail-safe keyboard combo that will always come to your rescue, regardless of the game you’re playing: Alt + F4 will force quit the emulator and return you to the main game menu.
CONFIGURE BATOCERA.LINUX
Pressing the Start button on your controller opens the main Batocera menu. When navigating, be patient: there may be a slight lag in selecting an item and it being enabled or popping up—particularly on low-powered machines, like the Raspberry Pi.
Ignore the Kodi Media Center option at the top, and instead focus on the other options. If you want to connect your retro-gaming machine to a wireless network, make sure you head into Network Settings. Start by flicking the ‘Enable Wifi’ switch to On—this will then reveal WiFi SSID and WiFi Key options. Select the first to browse a list of detected networks and select yours. Once done, enter the code into WiFi Key using your controller (in conjunction with an on-screen keyboard) or just your keyboard. Select the check key and hit Enter, then wait for the WiFi Enabled box to pop up, then select Network Settings again to verify your gaming machine is connected (and so able to easily receive ROMs and game files over the network, plus download metadata from the internet).
Speaking of metadata, the Scraper section is where you can quickly scan through all your game titles to download artwork and metadata to help organize them in your ever-growing library. You need to define a default scraper (the default ScreenScraper is geared towards European audiences, so we suggest choosing TheGamesDB instead, which has the added advantage of being more comprehensive). Once set up, choose ‘Scrape Now’ to quickly find metadata for titles that haven’t got any.
Other options are self-explanatory—use Controller & Bluetooth Settings to reconfigure your controller or add others for multi-player gaming, or navigate to System Settings > Audio Output to select your HDMI connection if you can’t hear any sound. One other area of interest: Updates & Downloads provides not just a source of keeping Batocera.linux and your emulators updated, but it offers a ‘Content Downloader’ too, where you’ll find freely distributed content, including lots of games across multiple platforms. Some—such as Tic-80 games—will automatically add the required platform or emulator as required.


ADD MORE EMULATORS AND GAMES
There’s no need to go sourcing and setting up emulators for Batocera—a wide range are installed alongside the main program, thanks largely to its underlying support for Libreto; indeed, some platforms like the Atari ST have multiple emulators (Libreto and non-Libreto variants in the case of the ST) to choose from.
Emulators will remain hidden from Batocera until you’ve copied across some games into the relevant folder and—if necessary—obtained the machine’s underlying operating system as a ROM (return to https://wiki.batocera.org/ systems for confirmation about whether a specific platform requires this). Getting files copied across is relatively straightforward: if you’re running Batocera on your PC, you can copy files across via USB—plug it into your computer and then press F1 on the main screen to open Batocera.linux’s built-in file manager.
A quicker method is to copy files via your network. By default, Batocera makes all key folders available via a single ‘share’ folder. If it doesn’t automatically show up under Network, try typing one of the following into File Explorer’s Address Bar: \\BATOCERA\share or \\192.168.x.y\ share, where 192.168.x.y is the IP address displayed under Network Settings.
Start by entering the bios folder and double-clicking the readme.txt file to discover what operating system file(s) each emulator supports. If your machine isn’t listed, skip to the next section. If it is listed, you should be able to source most required files via https://github.com/Abdess/retroarch_system, but otherwise you’ll need to engage in some detective work to find the files (Planet Emulator is a good place to start).
Once sourced, copy the file(s) into this folder before navigating up one level to open the roms folder, where you’ll see folders for each machine. Open this to read an _info.txt file that reveals the file types the emulator supports. Copy the relevant game files into here—they can be organized into sub-folders if you wish.
Press F4 on the main EmulationScreen, and your PC will scan for new content. All being well, your new machine (and games) will be ready. Select a game and tap the South fire button to launch it—if you get a warning about missing BIOS file(s), but have already sourced at least one file, tap Yes to continue to boot. If the file is compatible with your game, you should have no issues.
For more on emulator ROMs and game files, keep reading, and don’t forget to download your metadata—if any titles were missed out when you scraped earlier, you can scrape for individual titles across all supported search engines: select the game in the list, then hold down the south fire button to bring up its ‘Advanced Game Options’ menu. Choose Scrape to search for a possible match. If one is found, select it from the list, and hit the south fire button. If no match is found, select Input to enter different search terms, and try again.
CONFIGURE GAMES AND TROUBLESHOOT
Whether you’re using LaunchBox or Batocera, there will be times when emulators don’t perform how you want—or they might exhibit stability problems. When downloading games, check if the download page offers any clues—you may need a specific version of the machine’s OS (kick34005.A500 for the Amiga 500, or tos102uk.img for a UK-released game on the Atari ST), for example.
These files can be found online—often through Planet Emulator (see above)—but the same legal caveat applies, in that you should have access to a legitimate copy of the original operating system—typically in the form of the actual computer gathering dust in your loft or basement. Copy these files to the C:\Users\[username]\ LaunchBox\Emulators\RetroArch\ system folder in LaunchBox, or the bios folder in Batocera.
Emulators can be configured in two places. You can start by seeing what options RetroArch has—for example, by allowing you to run the game using different settings. Batocera users can do this by pressing Start, then navigating to Game Settings > Per System Advanced Configuration and selecting your machine. Here, you can do things like force EmulationStation to use a specific emulator if more than one is available or play around with video and audio settings if you run into display problems.
These settings can also be set for individual games—select the game and hold the South fire button to bring up its own menu. Selecting ‘Advanced Game Options’ from here allows you to make the same changes, except they’ll only apply to the selected game. LaunchBox users can access similar options by selecting a game and pressing Ctrl + E.
The other place to configure a game is in the emulator itself when it’s running. Consult the documentation for how this is done and what options are available—such as swapping floppy disks when loading multi-disk games, or choosing a different TOS version if you’re running the Hatari emulator for the Atari ST. When tweaking your settings, look for an option to save any configuration file—in most cases, changes won’t be retained the next time you open the emulator otherwise.
Standalone Emulators

If your nostalgic yearnings only venture as far as one or two computers or consoles from yesteryear, then both Batocera.linux and LaunchBox might be overkill. All you need to do is source one emulator for each platform you want to recreate, then configure them directly. That would be simple enough if there was a single emulator for each platform, but when the Commodore 64 has 16 different options to choose from, how do you know which one to try?
A good starting point is EmuGen (https://emulation.gametechwiki.com)—select your computer or console from the list, and it’ll display a list of emulators, complete with a ‘Recommended’ column helping you narrow down which ones are worth checking out. Simply click the version number of ‘Latest Version’ to go direct to its home page.
If that is too much hassle, here’s a list of recommended emulators for gaming platforms that captured the US public back in the 80s and 90s. First up is VICE (https://vice-emu.sourceforge.io), which can emulate a wide range of early Commodore machines, from the PET to the C64, VIC20 and C16. The GTK3VICE-3.7-win64. zip build is best for most people’s needs.
Move into the 16-bit era, and we recommend Hatari (https://hatari.tuxfamily.org/) for the Atari ST (and its successors, the STE, TT, and Falcon), and WinUAE (www.winuae.net) for all flavors of the Commodore Amiga, including the A500 and A1200 models.
When it comes to gaming consoles, Mesen (www.mesen.ca) covers Nintendo’s NES and SNES models, while BlastEm (www.retrodev.com/blastem/) is popular for the Sega MegaDrive. Don’t forget MAME (www.mamedev.org), which emulates classic arcade games of yesteryear for those who want to relive hours spent in arcades without having to find a fresh stash of quarters. ■
Play Classic PC Games

We’ve covered virtually every home computer and gaming console platform in this feature, but what about your classic PC games? Chances are that you’ve spent a fair portion of your life playing on your PC—and many old favorites may now be gathering dust on your shelves as new models and updates to Windows rendered them obsolete. The good news is that there are ways to resurrect these too.
For those who remember 16-bit PC computing and DOS, the obvious choice is DOSBox (www.dosbox.com), which works brilliantly with old classics from the 90s. Install the program to the root of your C drive, then create a folder alongside called oldgames, into which you copy the games you own from your original disks and CDs (or from websites like www.dosgames.com) into their own subfolders.
Next, type ‘dosbox’ into the Search bar and click DOSBox to launch it. Type MOUNT C C:\OLDGAMES into the window that appears and press Enter. When drive C is confirmed as mounted to the oldgames directory, type C: and press Enter. Type CD followed by the name of the subfolder containing your game and press Enter, then type the game executable and press Enter to launch it. When the game starts, click inside the window to capture the mouse. Exit by pressing the Windows key.
DOSBox is also included with Batocera, although see https://wiki.batocera.org/systems:dos for platform-specific instructions on using it. It can also be incorporated into LaunchBox. And what about newer, 32-bit games? If you have access to copies of old versions of Windows, then the simplest solution is to create a virtual machine running your target version of Windows in VirtualBox (www.virtualbox.org), then install the game in there for you to play through the virtual machine itself.


