Next-level Windows file management
TWO OPEN-SOURCE APPS, WHICH REQUIRE WINDOWS 10 OR LATER:
Files (https://files.community/) and Sigma File Manager (https://github.com/alekseyhoffman/sigma-file-manager). Read our Next-level Windows file management.
FILE EXPLORER HAS COME ON LEAPS AND BOUNDS in recent years—the recent introduction of tabs in Windows 11 is just one example—but despite its many improvements, File Explorer is still little more than a basic tool for navigating and managing your files and folders.
The good news is that you’re not stuck with Windows’ choice of file manager. There are plenty of alternatives, and we’ve sourced two great free and open-source examples. Both are designed to work alongside File Explorer, so you can try them without committing to a new way of doing things. Files aims to follow File Explorer in looks and feel, but still manages to offer plenty of good reasons to switch, from support for file and folder tagging to dual-pane navigation.
The other—Sigma File Manager—adopts a radically different look and approach, bundling a slightly different set of features (mostly notably support for ‘workspaces’, custom environments you can switch between as you see fit), but still manages to remain relatively straightforward to operate. In this tutorial, we’ll introduce you to both so you can decide which one suits your file-management needs best.
1 TWEAK YOUR EXISTING EXPERIENCE
If you’re broadly happy with how File Explorer looks and operates, head over to https://files.community/download to install Files—you’ll find a link to the Microsoft Store, as well as a direct download to the “classic installer”. Whichever option you choose, once in place, click Open or Launch.
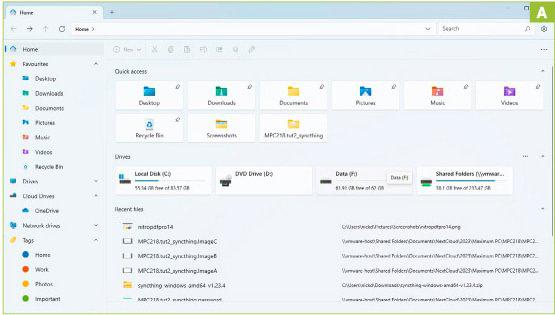
» You’ll see a familiar-looking two-column view with support for tabs, with the navigation panel on the left and the main view on the right. One subtle difference is that Files switches the position of navigation controls (placed directly beneath the tab) and file/folder buttons, which sit within the main column above the current folder or Home view, as shown in [Image A].
» Unlike File Explorer, Files’s Home view combines both quick access, recent files, and drives within the same view. This view can be customized via the program’s settings button (next to the Search bar), but more on that shortly. For now, let’s focus on mastering basic navigation.
2 NAVIGATION MADE SIMPLE
One difference you’ll notice is that drives and folders require a single click to open. If you don’t like this, open Settings and navigate to ‘Folders > Behaviors > Opening items’ to change both it and the default double-click behavior for files.
» When you select a file, you’ll see the icons on the toolbar light up, just as they do in File Explorer. You’ll also see context-sensitive items appear depending on the file type, such as rotating images clockwise or counterclockwise. Again, Files diverges from File Explorer by organizing these options differently, with selection, sorting, and layout options placed on the right [Image B], along with a button to quickly toggle the twin-tabbed (Details and Preview) preview pane on and off.
» The navigation panel on the left broadly follows File Explorer’s example, but again offers several advantages over its counterpart. In addition to the Home widget’s more useful display, Cloud Drives displays shortcuts to most installed third-party cloud providers—including Google Drive, Dropbox, and Nextcloud—in addition to OneDrive. But it’s the widget at the bottom of the navigation pane that reveals one of Files’s key selling points: Tags.
3 TAG YOUR FILES
Tags provide you with another way to label files to make them easier to find. Expand the Tags widget, and you’ll see four are set up by default: Home, Work, Photos, and Important. You can apply multiple tags to files and folders, either via the right-click menu, or by dragging a file, folder, or group on to the tag in the Navigation pane. Repeat the process for as many tags as you wish to use.

» Once applied, you can see what tags have been applied to a file or folder one of two ways: via the Tags column in Details view, or as a colored dot next to the filename when in Tiles or Grid view. Only one dot is displayed regardless of how many tags you apply; the color remains that of the first tag you applied. Tags are stored within the file themselves, meaning the files can be moved without losing the tag association, and can also be accessed using other apps that use the same system as Files.
» Once you’ve applied tags to files, clicking a tag under Tags in the Navigation pane will display a details list of all the files with the tag attached. You can also include tags in searches—simply use the ‘tag:’ prefix, such as ‘tag: Photos’ or ‘tag: Documents, Important’ for multiple tags.
» To manage your tags, click the Settings button and navigate to Tags. You can create new tags, plus edit (and delete) existing ones. When applying a tag color, you’ll see that Files supports the entire color spectrum with multiple ways of selecting the perfect color, as shown in [Image C].
» Delete a tag, and it’s removed from any files it’s been applied to; the files themselves are otherwise left untouched.
4 DUAL-PANE NAVIGATION
The other big selling point of Files is the option to split its navigation pane in two. This allows you to place source and destination side by side without cluttering up your desktop with multiple file manager windows. To set up this split-screen view, click the … button next to the ‘Toggle the preview pane’ button and choose ‘New pane’.
» The pane will split equally in two, with the new right-hand column pointing to your Home page. Use the divider to resize the panes as required, then navigate each pane independently of each other before dragging and dropping between them as required. The usual defaults apply—files copy across drives or move between folders on the same drive unless you hold down Shift or Ctrl, before dragging the files across to force them to move or copy respectively.
» In order to remove the right-hand pane and revert to a single view, click the … button again and choose ‘Close pane’.

5 CUSTOMIZE FILES FURTHER
We’ve already touched on how you can tailor Files via its Settings button, but it’s worth highlighting some of the additional tweaks it offers that further differentiate it from File Explorer. Start with the General tab and ‘Startup settings’. Unlike File Explorer, which will always default to one of two places (This PC or Home), Files offers two additional options when you open it. The first allows you to pick up where you left off by restoring your previous window (including any opened tabs, split panes, and so on), while the second allows you to ‘Open a specific page or pages’. When selected, click theV button to reveal the options you need to add these ‘pages’, which are basically drives, folders, or files (like compressed zip files) that can be opened to show their contents. Each page then opens in its own tab.
» The General tab also gives you control over what widgets are shown on the Home page. Quick Access, Drives, and Recent Files are checked by default, but you’ll also see options for Bundles and Tags. Ignore Bundles—it has been superseded by Tags, and will be retired in a future program update.
6 A FRESH NEW LOOK
Switch to the Appearance tab and you can change Files’s color scheme and its ‘backdrop material’, as shown in [Image D]. The latter basically allows you to switch the default solid background (Mica Alt) to a semi-translucent (Acrylic) alternative. You can also compact the spacing between items in Details view to increase the number shown from here.
» The Folders tab concerns itself primarily with customizing how items are displayed in the folder pane, from selecting a default layout (Adaptive by default) to calculating folder sizes (which are then displayed in the Size column in Details view). You can also tweak behaviors such as automatically selecting folders and files simply by hovering the mouse over them or allowing you to double-click blank space to move back up one folder level.

7 EXPLORE SIGMA FILE MANAGER
If you’re looking for a more radical revamp of File Explorer, then Sigma File Manager (https://github.com/aleksey-hoffman/sigma-file-manager) is worth trying out. Its look and feel deviates more from File Explorer than Files does, but it doesn’t take too long to understand how it works, and in return you’ll gain access to even more features, including a smart global search tool, built-in compression utility that supports most popular formats, and the ability to bypass your shared folders and distribute files wirelessly to any device on your local network.
» Like Files, Sigma is free and open source, and you can install it through the Microsoft Store or its own standalone installer—click ‘Releases’ on the main Github page to access the relevant links. Whichever method you choose, once installed, launch the program. Sigma opens to its Home page, one of five distinct sections (the others are Global Search, Navigator, Dashboard, and Notes). Switch between them using the icons in the top left corner of the program window—click the hamburger icon above these to reveal the slide-out menu in all its glory.
» The Home page contains convenient shortcuts to user folders and drives, and is accompanied by a fetching media banner. Sadly, only the banner is currently customizable—control its appearance using the button to the right of the ‘Home page’ title. This reveals options for hiding the banner completely, selecting another image, and tweaking the image’s position within the banner. There’s also an option to change the banner’s overall height—if you like the look, but feel that it dominates the Home page, try setting its height to the minimum (38vh), as shown in [Image E].

8 NAVIGATION AND WIRELESS FILE TRANSFERS
The Navigator is where you’ll spend most of your time with Sigma—access it by double-clicking one of the shortcuts on the Home page or by simply clicking Navigator in the left-hand pane. This opens a simple two-paned view, with the contents of the currently selected directory on the left, and a details pane on the right, which either lists details of the current directory or any item you select in the left-hand pane—see the annotation for details.
» If you’d like to transfer a file or folder over your network without having to use a shared folder, right-click it and choose ‘Share file/directory with local devices’. After clicking OK and granting Sigma access to your network if prompted, you’ll see the Local share manager pop up as shown in [Image F]. Folders are shared via an ‘ftp’ folder, while files can be downloaded or streamed. The latter only applies to video, all other file types like images or PDFs will either be opened directly in your browser or trigger a download to that computer.
» Once you’ve made a note of the URL (or scanned it on your phone using the QR code), you can close the window. A ‘Local file share is active’ pop-up will remain, allowing you to copy the address again or cease sharing it by clicking ‘Stop Server’. Be warned: while we had no problems sharing individual files, attempting to share a folder resulted in errors.
9 COMPLETE YOUR TOUR
Select Dashboard, and you’ll see that it offers three views: Pinned and Protected refer to the context-menu items we’ve just discussed, while Timeline provides handy shortcuts to folders you’ve previously opened in Navigator view—doubleclick one to jump back to it in Navigator. The final section—Notes—is a place to store rich-text notes on any subject you like.
» Another of Sigma’s selling points is its support for multiple workspaces—at the simplest level, each workspace can be seen as a set of uniquely configured tabs pointing to different directories and drives, but that merely scratches the surface, because workspaces can also include specific actions you can choose to run on demand: open programs, view websites and access files, plus run commands and scripts from the command line.

» The box reveals how to set up your first workspace. Once it’s in place, click the workspace button at the top of the Sigma window, and your new workspace will be listed. Click this, and it’ll immediately switch to that workspace’s default directory, plus display a popup box containing a list of any associated actions. By default, these are only actioned if you click the relevant Run button (or click ‘Run all actions’ to run them simultaneously).
» Each workspace can also contain up to nine tabs, each one pointing to a different folder on your system. To create a new tab, first navigate to the directory you want it to point at, then click the + button to the right of the Workspace tabs button at the top of the Sigma window to create it. To add more tabs, make sure you’ve browsed to the folder before clicking + again. Tabs can be rearranged by drag and drop or via the Workspaces tab button. When you close Sigma or switch workspace, the tabs are saved in their current state, allowing you to pick up where you left off later. ■


