Make E-mail Easier With Thunderbird
YOU’LL NEED THIS
PC LOVERS ARE SPOILED for choice when it comes to email clients, so it’s strange that so many just stick with the programs that come bundled with their OS. Read our Make E-mail Easier With Thunderbird.
THUNDERBIRD
The latest version (115.0) is compatible with Windows 7 onwards and most versions of Linux, provided you have at least a 1GHz Intel/AMD CPU and 1GB of RAM
Thunderbird is a free, open source, cross-platform email client, originally developed via the Mozilla Foundation (of Firefox fame).
As it’s funded by user donations, you can rest assured that Thunderbird won’t spam you with ads or train AI on your personal emails. Its UI is incredibly clean and easy to follow, plus you’ll find that setup is a breeze. Aside from supporting email, the client can also help you manage your calendars, news feeds, and even certain chat protocols.
Thunderbird is also very customizable. You can alter aspects such as the layout of panes and messages with a few quick clicks. Thunderbird also supports thousands of ‘add-ons’, which can change the look and feel of the client, and even add extra functionality.
1 INSTALL & SET UP
If you’ve decided to make the switch to Thunderbird, head to https://www.thunderbird.net/en-US/download/. The installer will begin downloading automatically.
» Once the Setup Wizard launches, click ‘Next’ then select a ‘standard’ install. (You can add extra features later.) Confirm the install location and click ‘Finish’. Thunderbird should launch automatically, but if not the installer creates a desktop shortcut.
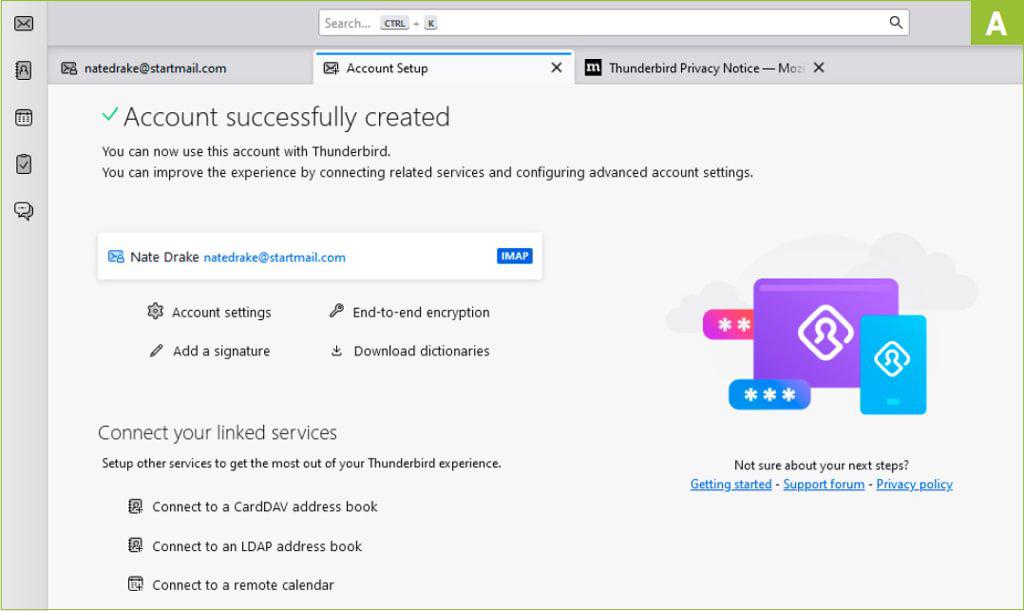
» On first run, take a moment to read the ‘Privacy Notice’ to see how serious Thunderbird is about protecting your data. Next, go to the ‘Set up your e-mail address’ tab. [Image A]. If you feel like a change, choose ‘Get a new email address’ to buy one from Mailfence or gandi.net. Otherwise, just fill in your name, email address, and password. Thunderbird has an online configuration database with settings for most providers, but you can click ‘Configure Manually’ to enter the settings yourself. Click ‘Finish’ to complete setup. From here, you can set Thunderbird as your default client for calendars and news feeds, as well as mail.
» After setting up your existing email address, Thunderbird should automatically detect your remote address books and calendars based on the information you provided.
» If you have a local mail folders/contacts already set up in an existing e-mail client like Outlook though, you can import these into Thunderbird. Follow the steps at https://kb.mozillazine.org/Importing_and_exporting_your_mail to do this.
» If you use an online calendar, click the corresponding icon in the ‘Spaces’ toolbar on the very left of the Thunderbird window to view it. [Image B] If your calendar wasn’t automatically imported, follow the steps at https://support.mozilla.org/en-US/kb/creating-new-calendars to manually input settings.

» The ‘Unified Toolbar’ can be used to search your Mail, Address Book, Calendar, and so on. Right-click here to enable the ‘Menu Bar’. You can now choose ‘File’ > ‘New’ to set up additional mail accounts or calendars.
2 MANAGING THE MAIL WINDOW
The latest version of Thunderbird (Supernova) has an overhauled main window. There are many different possible layouts, including ‘Classic’ and ‘Vertical’ views. For a full rundown of all features, visit https://support.mozilla.org/en-US/kb/getting-started-thunderbird-main-window-supernova.


» The ‘Message List’ pane has messages listed from oldest to newest. Click on a message to update the ‘Message Header’ pane. By default, Thunderbird blocks remote content—choose ‘Options’ to allow certain domains. [Image C]
» Use the ‘More’ button in the Message Header pane to categorize emails. From here, choose ‘Tag’ to color-code messages from several presets or create your own. [Image D] If you have IMAP/Local folders, right-click selected messages in the Message List pane, and choose ‘Move To’. Right-click your inbox or ‘Local Folders’ in the Folder Pane, then ‘New Folder’.
» Feel free to adjust the dimensions of any pane using the mouse until you’re comfortable with the interface. Once your inbox is just so, it’s time to think about composition.
» Choose ‘Tools’ > ‘Account Settings’ from the Menu Bar, then scroll to ‘Signature Text’ to enter your own. Check ‘Use HTML’ to add formatting and hyperlinks to your signature. [Image E] By default, your signature is placed at the bottom of emails when replying to messages. If you prefer to have it underneath your response, select ‘Composition & Addressing’ in the left-hand pane, then under ‘when quoting’, click the dropdown menu next to ‘and place my signature’ > and choose ‘below my reply’.


» Thunderbird now supports OpenPGP for signing and encrypting emails. To start, choose ‘End to End Encryption’ from the left pane, then ‘Add Key’. You can import an existing key or generate a new pair. [Image F]
3 EXCITING EXTENSIONS
Once your signature is set up, just click ‘New Message’ at the top left or ‘Reply’ in the Message Header pane to fire off your first Thunderbird email.
» Next, choose ‘Tools’ > ‘add-ons and Themes’. Thunderbird will display ‘Recommendations’ for extensions and themes from https://addons.thunderbird.net/.
» Scroll to a theme you find appealing, then select ‘Install Theme’. Visit https://addons.thunderbird.net/en-US/thunderbird/static-themes/ to see a list. Click ‘Themes’ in the left pane to switch. [Image G]
» Use the search bar at the top to find more addons, such as ‘Provider for Google Calendar’, which allows bidirectional access to Google Calendars. Select ‘Extensions’ in the left pane to view and manage.

TROUBLESHOOTING:
If Thunderbird refuses to accept your email account’s password during setup, log in to your webmail and check that access by IMAP/POP is enabled. Some providers may require you to create an app-specific password for security reasons.
If you find that messages still aren’t downloading or being sent directly, go to ‘Tools’ > ‘Account Settings’, then select ‘Server Settings’ from the left-hand pane to make sure they match the information from your email provider.
Not all add-ons are compatible with every version of Thunderbird; some extensions can also prevent others from running properly. You can filter out incompatible add-ons just by searching within the client rather than directly on the website. To remove an add-on that’s interfering with the smooth operation of others, just go to ‘Extensions’ in the left-hand pane, select options (…), then ‘Remove’.
Mozilla maintains an excellent knowledge base for other common issues, as well as a dedicated forum. You can access these via https://support.mozilla.org/en-US/products/thunderbird.


