HOW TO… Reinstall Windows using your Android phone
What you need: Android phone; Ventoy app; OTG cable; USB stick or external hard drive
Time required: One hour
We’ve always recommended preparing a USB-based emergency toolkit, from which you can boot and reinstall Windows if your PC suffers a serious corruption. This isn’t an alternative to maintaining regular backups, but a supplement: reinstalling the operating system usually means you’ll lose everything on the drive your PC boots from. So, if you store important files there, they’ll disappear unless you have duplicates.
Table of Contents
The trouble is, without anticipating a system collapse and getting your toolkit ready, a breakdown of this kind will plunge you into a Catch-22 situation: you won’t be able to use your PC to compile the tools required to fix it.
But all is not lost if you have an Android phone or tablet. Here, we’ll show you how you can use it to make a bootable USB stick and copy across the Windows 10/11 installation files. You can then use that to boot your PC and may be able to reinstall the operating system, depending on the state of your hard drive.
We’ll be using software called Ventoy (www.ventoy.net), which lets you install multiple operating systems on the same stick (it supports around 750, including hundreds of Linux systems). So, if you’re confident working with anything other than Windows, there’s no reason why you can’t install a version of Linux on your stick, either instead of the Windows installation media, or alongside it. Doing so will let you start your PC in Linux without touching the hard drive. All your data will be left intact and, assuming the drive isn’t encrypted or corrupted beyond repair, you may be able to recover some files this way.
Check whether your phone supports USB OTG
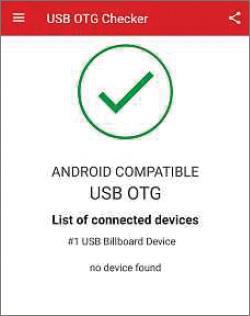
This process relies on your phone or tablet supporting USB OTG. OTG stands for On The Go, which is shorthand for its ability to interact with USB devices directly. OTG-compatibility is very useful, because it means you can connect a camera or hard drive directly, for example, and use them without relying on your PC. Not every phone has this ability, so your first task is to check that yours is compatible. Download ‘USB OTG Checker’ from the Google Play Store (www.snipca.com/39835) and, if it confirms your phone has the necessary components (as ours does in the screenshot above), you can continue.

You may also need to buy a cable or adapter, depending on which ports are supported by your phone and the stick you want to use. Start by checking the USB socket on your phone, which will probably be a USB-C or microUSB port. You can buy sticks that have matching plugs, but most will be full-size USB. If yours falls into the latter category, you’ll need to buy an OTG cable that has a fullsize ‘female’ USB socket that you can connect the stick to, and a smaller ‘male’ plug to connect to your phone. You can pick up an OTG cable with microUSB (for example, https://amzn.to/3YlA0ly) or USB-C (such as https://amzn.to/3YqOzEA) for around £ apiece.
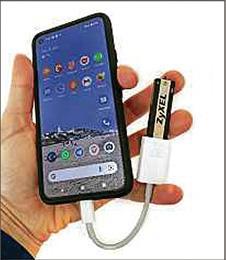
The picture above shows our OTG cable connecting a USB stick with a full-size USB plug to the USB-C socket on our Google Pixel 5 phone.
If you’re tempted to skip the cable and just buy a USB stick with a plug that matches the port on your phone, bear in mind that you’ll also need to be able to plug it into your PC. There’s no point buying a USB-C stick for your phone if you don’t have USB-C port on your PC, as you’ll just be moving the problem from one device to another: you’ll need an adapter for the computer instead.
Download the Windows 10 installation file
We’ll show you how to set up your phone to recover a Windows 10 PC (the principle is the same for Windows 11). If we were showing you how to create a bootable stick using a regular computer, we’d direct you to the Windows 10 media-creation tool (www.snipca.com/39828). However, if you’re reading this because that’s not an option, instead open your phone’s browser and go to www.snipca.com/39829 to download the installer directly.
Tap the ‘Select edition’ menu and make sure the most recent version of Windows 10 is chosen (version 21H1, the May 2021 Update). Tap ‘Confirm’, select the language you need from the same menu, then tap Confirm again. You’ll now be prompted to download the 32bit or 64bit version of Windows. Tap ‘64-bit download’ and make sure you’re doing so over Wi-Fi (downloading over a phone network would take a lot longer, and eat into a large amount of your data – or even exceed data on some low-cost contracts).
Set up your USB stick
The download took around 20 minutes to complete on our phone (a Google Pixel 5) on a 35Mbps connection. While you’re waiting for it to finish, you can start setting up your external drive.
The slight complication is that Windows’ preferred drive format is NTFS, while Android phones use FAT32, ext3 or ext4 formats. Although you can format your stick using one of Android’s preferred formats on a computer, the ability to do so isn’t built into Windows – at least not through the graphical interface. In all likelihood, therefore, your phone won’t currently be able to read your stick. Thankfully, this is easily fixed.
Connect your drive to your OTG adapter, then connect the adapter to your phone. Assuming your phone is compatible with OTG devices, it should detect it and connect it to the phone’s internal file system.
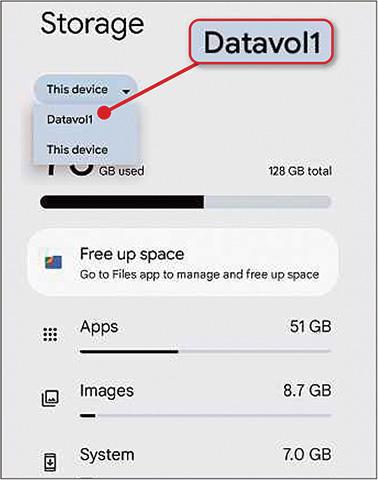
Open ‘Settings’ then tap Storage, followed by the dropdown menu at the top of the list. There should be two options here: ‘This device’, which is the internal storage of your phone, and a second option, which is your USB stick. This will have the name it was given when set up on your computer or when it was manufactured. In our case, it’s Datavol1, as you can see from the screenshot above left. Tap the stick’s name to switch to it.
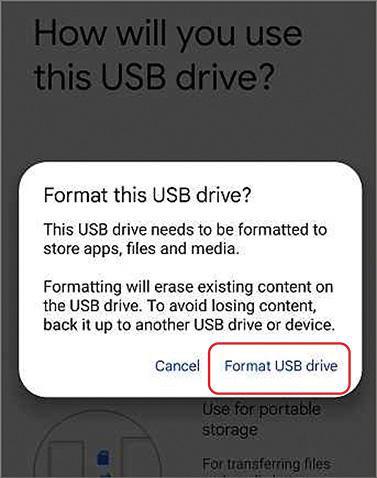
At this point, Android warns you that your drive is corrupted. Tap ‘Set-up’, followed by ‘Format USB drive’ (see screenshot above). As with any formatting option, on any device, proceeding beyond this point will wipe the data on your hard drive and it may be difficult or impossible to recover, so only proceed if you have a copy elsewhere of anything you need to hang on to. Tap ‘Done’ when it notifies you that ‘Your USB drive is ready to use’.
Switch to Ventoy
Install Ventoy from the Google Play Store (www.snipca.com/39842), and launch it. It will ask for permission to access your attached drive. Tap OK to permit this, then tap the Install button on the Ventoy home screen (see screenshot above). This copies across the core Ventoy files, which make your stick behave like a bootable stick when connected to your PC. These also let you choose between the different operating systems you add to the drive in the next step.
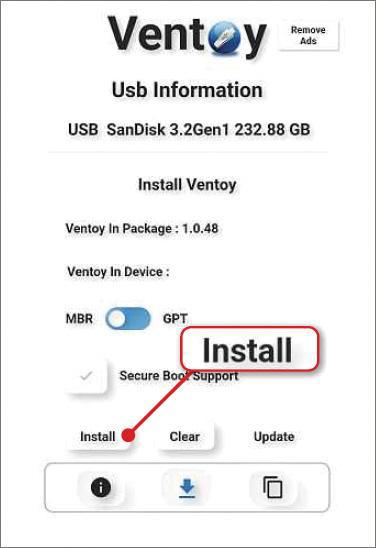
The time it takes to install Ventoy (and to copy your operating system) will depend on the speed of your flash storage, your phone’s port, and the cable between the two. In our tests, we experienced significant differences when installing on a 256GB SanDisk USB stick and a 500GB Kingston SSD, with the latter being significantly faster.
Both of these are overkill for this kind of job: an 8GB stick should be sufficient if you want to copy across only a single operating system, so you may be able to recycle an old stick you no longer use.
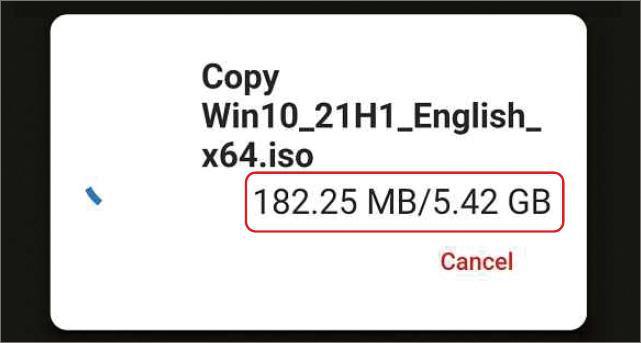
When Ventoy has finished installing its core files on your stick, tap the two overlapping rectangles on the right of the Ventoy toolbar, followed by ‘+’. On the next screen, which shows the folders in your phone’s internal storage, open Downloads, then tap the Windows file you downloaded through the browser.
Ventoy will immediately start copying this file to your stick, and display its progress throughout, as you can see in our screenshot below. As soon as it’s finished, quit Ventoy, then disconnect the USB stick.
Boot from your USB stick
Make sure your computer is turned off. Connect the USB stick and start it up, then watch the screen for any message about the key you need to press to access the BIOS or UEFI. This is the code built into the machine itself, which tells it how to access external drives and other components before Windows gets up and running. If it isn’t displayed, check any documentation that came with your PC, or support forums. Many manufacturers use F10, but some also use F1, F2 or F12.
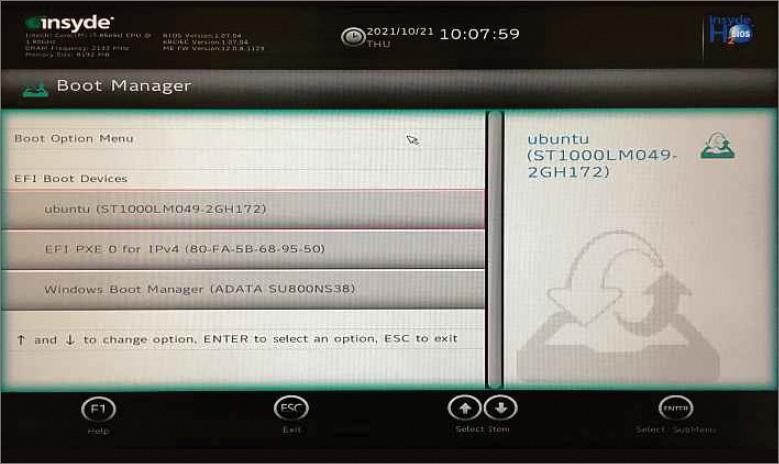
When you access the BIOS or UEFI, look for a boot sequence, boot order, or similar option, as in the screenshot above. This is used to specify which drive the computer should try booting from first, and it’s usually set to go straight to the internal hard drive. You want to pre-empt this, so change the setting to use external USB first, and the internal drive second. With this done, save your settings and exit, and your computer will reboot.
This time, rather than trying to start from your damaged hard drive, your PC will boot from the attached USB stick and, in doing so, launch Ventoy. Ventoy will display a list of all the operating systems copied to the drive (which will be Windows only at this stage, unless you downloaded a version of Linux). Highlight the one you want to launch, then press Enter.
When the Windows installer starts, work your way through the prompts that appear, selecting languages and locations as appropriate. As long as your internal drive isn’t physically damaged, it should be able to wipe it and reinstall the operating system. When it completes, remove the external drive and let the system reboot into Windows. Make running Windows Update one of your first tasks.
It’s worth keeping your bootable stick somewhere safe. Now that you’ve created a Windows-installation tool, it might come in handy again – although hopefully for someone else, next time.



I Need A Help
I need help please reply,