How To Recover Lost Files And Data
Everyone loses files at some point. Roland Waddi love shows how to prevent this and how to recover them when disaster strikes
Disk drives are supposed to keep our files safe and sound, and mostly they do. Sometimes they keep them safe for five or more years, and in some cases there have been disk drives that have lasted ten years or more without developing a fault. It is unwise to rely on them, though. Indeed, there’s an old saying that goes, ‘Hope for the best, but plan for the worst’. That’s true with disk drives: although you can hope that they’ll provide many years of reliable operation, you should treat them like they’ll fail tomorrow. Could you cope?

At some point in time, you’ll find you need to recover lost data and missing files, repair corrupted files, and perhaps even recover a whole disk drive that has suddenly died for no apparent reason at all. One day you might switch on your computer, the disk drive clicks and that that’s it. Dead! Could you cope with a failure like that? It could be a massive disaster, or it could be a minor inconvenience, depending on your circumstances and how well prepared you are for data loss. In this p, we’ll look at a variety of techniques for recovering from minor problems like a lost file to major faults like a completely dead drive.Sometimes files go missing, and what happens to them is a complete mystery. You know you downloaded a file last week and it should be in the Downloads folder, but now it isn’t there. It’s a similar story with documents saved from word processors and other applications. You know you saved a file and swear you put it in a particular folder, but now it’s not there. It’s like someone moves them or deletes them when we’re not around. It’s spooky, and it happens more often than many people realize.
Even if files are not lost, they can still become corrupted, and there are a number of reasons for this. One is that there was some sort of computer or software glitch just as the data – such as a photo, video or document – was being written to disk. Some bits or bytes are altered and the saved data is then corrupt. This might then prevent the file from being opened in the future. Bugs in applications can also cause files to be incorrectly saved to disk, and they might have bad data, corrupt information and so on.
File corruption and data loss is not always caused by a hardware or software error, though; sometimes we make mistakes ourselves. We might delete files or folders we later discover that we need. This can happen when we create a new version of a file and save it, either overwriting or deleting the original, before realizing we need the previous version after all. For example, we might edit an original photo and make changes to it, instead of creating a copy and modifying that.
We might power off a PC because it has locked up and refuses to respond to the keyboard or mouse. We might pull the plug of a USB disk drive or pull out a USB flash memory drive before files have finished being saved to it. The storage in digital cameras might become corrupt if you take a photo just as the battery is dying and it’s partially saved to the storage media and so on.
Recovering data, files, folders and whole disks is immeasurably easier if you’re prepared for disaster, but sadly many people aren’t. They lose a file, and only then do they look around for some way to recover it. The problem is that downloading and installing software onto the drive that has the lost data can destroy the data you want to recover by overwriting it.
You should be prepared for all types of data loss scenario. You need to have the tools and applications in place now, while your PC is running perfectly and has no problems, rather than after one has occurred. If you’re lucky, you might be able to recover what you lost, using some of the tools here. However, data recovery works best if you’re prepared. Get the tools now.
Essential Hardware And Software
File loss, corruption and even completely dead disk drives are much less of a problem when you have a backup.
They’re not the complete solution, because you can still lose files due to the time interval between backups. The more frequently a backup is performed, the more files are protected. It’s easy to see how you might lose a file with a weekly backup schedule. Files you created yesterday or the day before can still be lost because they are not yet in the backup.
You should at least back up on a daily basis and then at least you can go to yesterday’s files if you’ve lost some. You’ll lose any changes made today on them, and you could lose files this afternoon that you created this morning, but it’s better than weekly backups, where there’s no record at all of recently created files.
The best protection is provided by hourly backups. It might seem like an arduous and unnecessary task backing up every hour, but with intelligent backup software it’s not necessarily so. The number of files that change every hour is often very small, so a backup job can run in the background and finish in a minute or so without interrupting what you’re doing. Okay, you might want to pause backups when playing fast action games and you need lightning fast reflexes and an equally responsive computer, but apart from this, backups are not noticeable.
Two disk drives are required for backups, and an external USB disk drive is the easiest way to add storage to your PC.
There are lots of USB drives to choose from. Capacities are increasing, while price are shrinking, and it’s possible to pick up a 1TB disk for about £40 and 2TB drives for roughly £60. If you don’t have onem then buy one as soon as you can.
Recover Data With File History
If you’re running Windows 8.1 or 10, there’s a backup utility in the Control Panel called File History. It’s so simple that anyone can use it, and you won’t notice it running. It just gets on with the job in the background without you having to do a thing. Just plug in a USB drive, open File History and click Select drive on the left. Choose the USB, drive and turn on File History if it doesn’t automatically turn on. You can now forget it.
Whenever the USB disk is plugged in, File History backs up your files. If it isn’t plugged in or powered up, File History waits until it’s back online. Open File History in the Control Panel and click Advanced Settings. It saves copies of files every hour by default, but other backup schedules are available (it can back up every ten minutes if you really want to). It saves multiple versions of files, and there’s an option to choose the length of time old versions of files are kept. Choose ‘Until space is needed’, and File History will delete old copies of files as and when disk space is required for backing up new files.
It’s important to be aware that File History backs up only your personal folder (C:UsersYourName). However, this includes Documents, Music, Pictures, Videos, OneDrive, Contacts, Desktop and so on. Other files elsewhere on the disk are not backed up.
If you lose a file or want to return to a previous version of a file, open File History and click the link on the left, ‘Restore personal files’. A window opens, and the left and right arrow buttons enable you to browse the files and folders, while the date and time at the top show when they were saved. This means you can go back to 3pm a week last Thursday, for example, and look at files and folders as they were at that time. Select a file or folder, then the big green button restores it.
Free Backup And Recovery
File History is great for backing up files in your personal folder so you can recover them if they’re lost or corrupted, but you might have files elsewhere on the disk. There’s also the problem of total disk failure. It’s essential that you make a complete system image of the drive and store it on an external USB drive. If you have a big enough USB drive, such as 2TB or more, you can run both File History and a backup utility that images the disk drive.
Ashampoo Backup Pro 11 Review: Backup software is boring—until you need it
CloudBerry Backup Review: Perfect backup!
The recovery tool with backup software enables you to put the disk back as it was. It also enables you to browse the contents of the image and pick out single files and restore them. It’s simply a snapshot of a disk at a particular time, and it’s great for recovering lost or corrupted files.
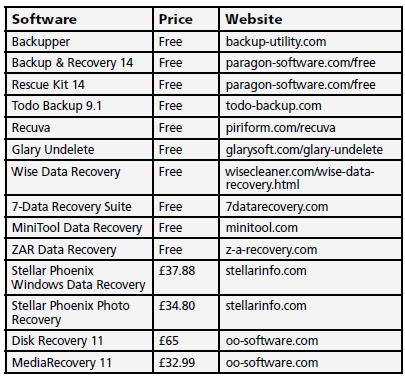
Paragon Software has two free utilities, Backup & Recovery 14 Free Edition, Paragon Backup Recovery Free 17 Review and Rescue Kit 14 Free Edition. They both have a backup/restore utility that can copy the whole disk sector by sector for an exact image. The backup can be saved anywhere, and a USB disk drive is best, but if you have a big disk in your PC that has lots of space, you can save backups to a hidden partition. If disaster strikes, you can restore everything or browse the backup for a single file. It avoids the expense of a USB disk, but ideally the backup should be on a separate drive.
The Rescue Kit, which runs from the boot media, includes data recovery tools that help to get your computer working again, like the Boot Corrector Wizard. It searches for Windows partitions, corrects drive letters, fixes master boot records, repairs boot configuration data, sets the active partition, hides or shows partitions and a lot more.
Backupper is another useful tool, which comes in free and Pro editions. The freebie is fine, and it enables you to back up the files and folders on your computer to an external disk drive. It also enables complete images of the whole drive, including all the partitions to be created and stored externally. It contains a boot media creator, which creates a bootable DVD or flash drive to start your PC. The boot media runs the recovery software, and you can restore inpidual files or folders, or even the whole disk including all the partitions.
EaseUS Todo Backup Free is another excellent backup utility that’s packed with features for backing up your PC’s disk and restoring lost files, partitions and even the whole disk. It enables you to use block-level disk imaging or sector-by-sector backups, which means the backup is identical in every way to your PC’s disk. It enables you to restore everything exactly the way it was in the event of a disk disaster. Bootable recovery media can be created from within the program, which is essential for when your PC’s disk is so corrupted you cannot start Windows.
Easeus Data Recovery Wizard 10.8 Free Review
[sc name=”easeus”][/sc]
EaseUS Data Recovery Wizard Free is a free data recovery software for both Windows and Mac operating systems, also a good choice for you. Recovering files is very easy to do with just a few clicks. My favorite aspect of EaseUS Data Recovery Wizard is that the user interface is structured much like Windows Explorer. While that may not be everyone’s ideal way to display files, it’s a very familiar interface that most people are comfortable with.EaseUS Data Recovery Wizard will undelete files from hard drives, optical drives, memory cards, and pretty much anything else that Windows sees as a storage device. It also does partition recovery!
The options for recovering data are good for a freebie, and you can restore files, disks and partitions. You can restore to the original location or a new location, and it supports migrating Windows to an SSD.
Online Backup And Data Recovery
Online storage like OneDrive, Google Drive, Dropbox and others can help with recovering lost files and data. Each service provides several gigabytes of free storage, and there are ways to earn more, such as by agreeing to store mobile phone photos.
All of these services provide PC applications that keep a folder on your local drive synced with the remote online storage. By using these folders to store important files like documents, photos, music, videos and anything else you have, you’re protected to a certain degree and, should you lose one or more files, you can often recover them.
One way in which online storage helps is that these services provide their own trash handling and versioning. If you delete a file on your PC’s drive, it’s moved to the Recycle Bin and is easily recovered by opening it and dragging the file out. But what if you then empty the Recycle Bin? The file is no longer on your PC.
If the file was deleted from OneDrive, Google Drive and others, it will be deleted online too, but these services have their own bin or recycle bin. Using a web browser, go to the website and log into your account. Go to the bin or whatever it calls it, and your file will be there. Google’s bin is never emptied, so deleted files will remain there forever unless you manually empty it. Files you deleted last year will still be there, and if you accidentally deleted a file and discover that you need it, it can be recovered. This can save you from disaster.
These online storage services store each version of a file, so if you create a document last week and edit it today, both last week’s and today’s documents are stored in your account. This is very useful if you want to recover information that was in an earlier version that you changed or deleted.
Go to OneDrive in a browser, click a Word document, for example, click the three dots in the top-right corner to display the menu, and then select Previous Versions. A panel opens on the left with a list of dates. Click a date to see the version of the file that was saved on that date. You can then edit it, save it, copy it and so on.
Google Drive and Dropbox offer similar facilities, but the menus are different. On Google Drive, for example, select a file and then click the i icon in the right corner. A panel opens, and the Activity tab lists the previous versions. Recovering lost information and previous versions is easy.
Another technique you can use if you have more than one computer with Drive, Dropbox or OneDrive is the make use of the duplication of content. Any file you put in the synced folder gets synced to every other computer with that folder. If you lost files on your online storage, remember that there’s an exact copy of them on your other computer.
You just need to start it up without letting it connect to the internet. Switch off your router and switch on your computer so it can’t sync. Copy the files out of the synced folder before connecting to the internet or they’ll be deleted.
An advantage of having online storage mirrored in synced folders is that it will be backed up by backup software. There’s a copy of the current files and previous ones on the USB drive you use for backups.
Free Recovery Software
Let’s suppose that you don’t have any backup software installed and no backups of your files. You don’t use File History and you don’t use online storage for your files. You have also recently emptied the Recycle Bin, so there’s nothing in there either. What a crazy situation, but sadly this is more common than you might think, and people are too trusting of their computers. It works every day and never misses a beat, so users assume it will continue like that forever. It won’t.
When files go missing or become corrupted, people look for some way to recover them. There are free utilities that can be used to scour the drive for recently deleted files, but you should be aware that downloading and installing software might overwrite the data and files you’re trying to recover. Being prepared is the key, and if these file recovery tools are already installed on the drive, then recovering data is a lot easier and is more likely to be successful.
Recuva is a popular utility that is available in free and Professional versions. When it starts, it asks what sort of files you want to recover, such as music, documents, photos and so on. You can look for all types of files, but this can produce a lot of results that make it hard to find the file you’re after. The filters should be used to narrow down the search. You are also asked where to search for deleted files. You can search everywhere, but the results can be overwhelming on a well used computer, so it’s best to choose one of the options such as My Documents, Recycle Bin or a specific disk location. There’s an option to choose a media card, such as from a digital camera.
You can view (and restore) deleted files using specialized recovery software.
We’d specifically point you towards Recuva (www.piriform.com/recuva) from that round-up as one of the simplest to use.
As long as you’ve not written any data to the SD card since deleting the file, your chances of recovery are high, and you can view many file types before restoring them, too.
Cat Ellis
There are standard and deep scans for lost files, and a standard scan should be run first. Only if this doesn’t locate the file you lost should you use a deep scan, because it produces long lists of files you aren’t interested in.
Switch to the advanced mode when it has scanned the disk, because this displays a panel on the right that can be used to preview files, such as images, before recovering them. There’s a file info tab and a tab that displays the file header, both of which are useful for identifying files. The traffic light icons next to files shows the chances of recovery, with red for poor and green for good. Use the filter control to select photos, music, documents and so on.
You can select a file and restore it to another drive (restoring to the same drive can cause problems), a flash drive and so on.
Other free file and data recovery software works in a similar way. Glary Undelete scans the drive and lists every deleted file it finds. You then use the quick filter box to enter a file extension like *.jpg or *.docx and so on. This reduces the number of deleted files listed and helps you to find the one you want. There’s an advanced filter function, which enables files above or below a certain size to be excluded, and a date range can be selected, such as yesterday, last week, last month or whatever time period you choose. The chances of a file being recoverable is shown, and you can filter and show only those that are in very good condition.
Wise Data Recovery is more of the same. Run this free tool, and it scans your disk and displays a list of deleted files. Use the filter box to focus on the file type you want, such as *.bmp, and you can view the matching files. A traffic light system of red, amber and green is used to show whether a file is recoverable, and there’s a preview page that is useful for viewing photos and text files to see if they’re the right one before proceeding to recover them.
There are a number of semi-free tools, such as 7-Data Recovery Suite and MiniTool Data Recovery, which allow you to recover 1GB of data before you have to pay anything. That could be sufficient to get you out of a dire situation. ZAR Data Recovery allows you to recover lost and deleted photos for free, but you must pay to recover other types. It has a list of known digital cameras that it’s compatible with, which is useful. If your camera isn’t on the list, it still might work, though.
Pro Recovery Software
There are lots of free tools for recovering lost files. If you’ve lost files that are extremely valuable, such as wedding photos that are irreplaceable, you might want to try paid software that offers more features and better recovery features.
Stellar Data Recovery has more utilities than you can imagine, and there’s a comprehensive range of them. Some are for business users, but there are utilities suitable for home users too. There’s Windows Data Recovery, Photo Recovery and CD/DVD Recovery, as well as JPEG, Excel, Word, PDF and other file repair utilities. A recovered file might be corrupted, and these repair tools can help in some circumstances. Stellar Phoenix Data Recovery Home is £37.88, and Stellar Phoenix Photo Recovery is £34.80, for example.
O&O Software has two useful utilities: Disk Recovery 11 costing £65 and MediaRecovery 11, which is cheaper at £32.99. MediaRecovery is designed to track down deleted videos, photos and music files, so they can be recovered.
Disk Recovery is a general tool that can recover any type of file.


