Clean Out Windows 11
THE EMERGENCE OF SMALLER, faster boot drives has resurrected an age-old problem: how to stop your hard drives from filling to capacity. What wasn’t such an issue with a 2TB drive is now a hot topic as you struggle to maintain Windows 11 and your apps on a super-speedy 256GB NVMe boot drive. In this tutorial, we’ll reveal a range of tips, techniques, and tools to help you bring back some semblance of order to your drive’s contents while ensuring you have plenty of room to allow your personal files to sit side-by-side with Windows, your games, and other apps.
YOU WILL NEED SOME OR ALL OF THE FOLLOWING TOOLS: Bulk Crap Uninstaller, CCleaner, TreeSize Free, Awesome Duplicate Photo Finder, SteamMover (all free)
We’ll start with a quick tour of Windows’ own cleaning tools—all conveniently accessible via the System > Storage section of Settings—before going deeper and using the best free tools to thoroughly remove multiple apps in one go, perform a deep clean of areas Storage Sense couldn’t reach, plus help thin out your gargantuan photo collection so only the best version of each photo is kept. And if that still isn’t enough to free up the space you need, discover how to safely move apps to another drive with just a few clicks.
GET AN OVERVIEW
Start your cleanup by opening Settings and navigating to System > Storage. You’ll see a bar chart revealing your system disk’s current capacity and how much space has been filled. Beneath this is a list of categories revealing where much of that space has gone—Apps & Features, Other, and Temporary files are shown by default [Image A]. Click one for a more detailed look or click ‘Show more categories’ for additional views of your personal files, the desktop, and OneDrive storage.

>> While useful, Settings doesn’t provide a full overview of the drive—if you’re looking for an alternative way to visualize the missing space on your drive, check the box.
CLEAN YOUR DRIVE
When examining your drive in-depth, you’ll be given an opportunity to delete file types, such as those classified as temporary files [Image B]. Scroll through the list checking any items you want to get rid of before clicking ‘Remove files’.

>> It’s a similar procedure with other drives. To view their contents, click ‘Advanced storage settings’ under System Storage, followed by ‘Storage used on other drives’. Click on the drive to view a breakdown of how the space is used.
>> Each category comes with a link beneath it to help manually clean up files in that category. In some cases, such as Music, Videos, or Other (for large folders), you’ll be shown a list of folders (sorted by size), allowing you to click any items to open the folder in File Explorer to review and delete its contents.
>> Other categories, such as Recycle Bin and Temporary Files, will take you to a new screen where you’ll be shown a list of options with checkboxes. These work in the same way as with the main Windows system drive—check those you want to delete before clicking the Remove button.
STORAGE SENSE
Wading through your drives manually is time-consuming, so Windows has introduced a more dynamic clean-up tool in the form of Storage Sense. This can be configured to automatically keep an eye on your hard drive(s), freeing up space as and when required. You’ll see a switch next to its entry under System > Storage for turning its automatic features on or off; click Storage Sense itself to configure it further.
>> You’ll see a handy checkbox for keeping the unruly temporary files introduced by Windows and third-party apps in check, along with options for scheduling when Storage Sense should run. The default is whenever disk space runs low, but you can run it on a daily, weekly, or monthly basis if you prefer. You can also configure Storage Sense to empty the Recycle Bin and your Downloads folder after a specified period if you wish. Once done, click the ‘Run Storage Sense now’ button if you’d like it to manually clean your PC.
>> Windows’ Storage tool also offers recommendations on how you can clear up more space—how much is listed under ‘Cleanup recommendations’ beneath Storage Sense. Click this to review in more detail—Temporary Files includes the Recycle Bin and Downloads, while ‘Large or unused files’ targets big files that haven’t been opened in a while. ‘Files synced to the cloud’ links in with your OneDrive account to remove local copies of uploaded files, while ‘Unused apps’ works in a similar way to unused files, but with apps installed through the Microsoft Store.
>> Each section comes with its own ‘Clean up…’ button and you can easily clear gigabytes of redundant files with a few clicks.
REMOVE UNWANTED APPS
Another way to clean up your system is to reduce the number of apps installed. You can make use of Windows’ own uninstall tools, found under Settings > Apps > Apps & Features. One time-saving tip is to use the ‘Sort by’ dropdown to list apps by their size to quickly identify space hogs.
>> A more effective timesaver is to bypass Windows’ own tool. Its shortcomings include a need to remove one app at a time, which is frustrating if you’re looking to clear a few apps in one go, and that it relies on a program’s uninstall utility, often leaving behind detritus such as redundant files and Registry entries.
>> Both problems can be fixed with a good third-party tool. We’ve plumped for Bulk Crap Uninstaller (BCU) because it’s open-source (so free) and doesn’t come with any bundleware or adds. BCU can target Windows Store apps as well as regular programs, scans for leftover files and Registry entries after programs have been removed, and can remove multiple apps in one go.
>> Visit www.bcuninstaller.com to learn more about BCU and to download the installer from the link provided. Whether you choose a standard or portable installation, once complete, you’ll run through the orientation wizard, then be presented with the main screen (see box above).
CHOOSE WHAT TO UNINSTALL
By default, apps are displayed alphabetically—use the filters on the left or the Quick Filter menu to determine what’s shown. You’ll see apps are colorcoded—note that unregistered applications (marked in pink) aren’t installed programs, but program installers. Untick ‘Show unregistered applications’ to remove them from view unless you want to prune redundant installers.
>> Next, select apps from the list using the Ctrl-click method before clicking one of Uninstall or Uninstall quietly. The latter attempts to remove selected applications without involving any dialog boxes, which typically require you to be poised with the mouse ready to click at the appropriate moment. Don’t worry, if certain uninstallers don’t play ball, then BCU will alert you.
>> We recommend choosing the regular Uninstall option the first time to see how the process works. You’ll be taken through a wizard, covering related applications you might wish to uninstall, followed by options to determine the type of removal and the order in which programs are removed.
>> You will be shown any running programs or processes that you need to kill before reviewing global uninstallation settings, such as avoiding system restarts and how to handle quiet uninstallers. After reviewing these settings, click ‘Begin Uninstallation’.

>> A Restore point is taken, and then a progress bar reveals where you are with the removal process. Each program is removed using its own uninstaller and then when all are removed, click Close followed by Yes to go hunting for leftovers. A screen will reveal what files and Registry entries have been found along with a ‘confidence’ rating for whether it’s linked to the program in question [Image C]. Review and click ‘Delete selected’ to clear more space from your computer.
>> BCU will offer to back up any Registry entries, while deleted files are sent to the Recycle Bin, giving you a window of opportunity to restore them if required. Alternatively, you should be able to undo your changes by using System Restore to recover the Restore point you took at the start of the process, if necessary.
6 PERFORM A DEEP CLEAN
Redundant files hide in all sorts of places, from application folders to browser caches, and Windows’ Storage Sense doesn’t catch all of them. You can target these individually, but there’s a range of free cleaning tools that can scoop up all these and other redundant files with the minimum of fuss.
>> CCleaner (www.ccleaner.com) is the best-known tool, and while it’s increasingly focused on upselling its Pro version, the free version contains all the core cleaning tools you need. As always, we prefer running portable versions of tools to prevent cluttering up your system, and you’ll find the portable version of CCleaner hidden under www.ccleaner.com/ccleaner/builds. After unzipping the contents to your portable apps folder, launch CCleaner from the x64 directory and click ‘Check for updates’ to update its files to their latest versions.
[sc name=”ccleaner”][/sc]
>> The Health Check button can scan and provide a quick summary of items CCleaner has found (Privacy covers your browser, Space covers other potentially redundant files from Windows and apps), but for full control, we recommend clicking Custom Clean. Here, you’ll see a list of categories split into two tabs (Windows covers system files and both Edge and Internet Explorer, Applications any third-party apps including other web browsers). Any checked boxes are included in the scan.
>> Once you’ve selected what to clean, click Analyze and let CCleaner scan to produce a summary of what it’s found in each category. Double-click each category to see what files are there—if you spot a file or setting you wish to keep, right-click it and choose ‘Add to Exclude list’ to protect it from this and future scans.
>> Once you’re happy with your choices, click ‘Run Cleaner’ and let the program free up space.
7 REGISTRY ‘CLEANING’
>> CCleaner also offers a tool for cleaning out redundant items from your Registry. Not only is this risky—binning parts of the Registry without due care can render applications or even parts of your system unusable—but it also achieves nothing in terms of performance. That’s because when you delete items, the Registry doesn’t shrink in size; like files, the ‘space’ isn’t recovered but marked available for future entries to reside in.
>> Registry entries should always be deleted manually, in context, and with care. That’s why Bulk Crap Uninstaller is useful because it shows you the Registry entries it thinks can be deleted, which you can link to the application you’re removing. CCleaner will also invite you to manually review each Registry entry it identifies as removable, but when there are hundreds to process it’s easy to just click yes to all and damn the consequences. Make sure you back up the Registry when prompted, so you can easily restore deleted entries if things go wrong.
>> You can compact and defrag the Registry’s hives, the files that make up its contents. Many third-party tools exist, including Eusing Free Registry Defrag at www.eusing.com/free_registry_ defrag/registry_defrag.htm [Image D]. But even after compaction, the effect on free drive space and performance is negligible on today’s super-fast PCs.

8 REMOVE DUPLICATES
CCleaner also offers other cleaning tools, including a Duplicate Finder for rooting out multiple copies of the same file. However, its duplicate tool pales in comparison to standalone tools that offer a wider range of options to help weed out duplicate files, particularly images.
>> A good duplicate finder will allow you to widen your search to target visually similar files, enabling you to finally pick out the best versions of all those snaps you keep taking on your phone or digital camera. If you’re happy to pay, then Duplicate Files Fixer (www.duplicatefilesfixer.com) covers all bases while offering dedicated tools for weeding out music, photos, and videos, which can consume vast amounts of space if left unchecked. The free trial lets you scan to see what it finds, but you’ll have to pay to delete more than 15 files.
>> If you’re strapped for cash and are primarily targeting photos, then try Awesome Duplicate Photo Finder (www.duplicate-finder.com/photo.html). Again, a portable version is available. It’s simple to use: open the app, then drag a drive or folder from File Explorer into the app window and click ‘Start Search’.
>> Once the scan completes, a list of files will appear at the bottom of the window, with the first image selected along with its duplicate. A similarity score indicates whether it’s an exact duplicate or a close relative and by clicking the delete button next to either image you can remove the unwanted version. To avoid being prompted to confirm each individual deletion, click Settings. We’d advise against bypassing the Recycle Bin; instead, periodically empty it manually after you’re happy you’ve deleted the right version of each file.
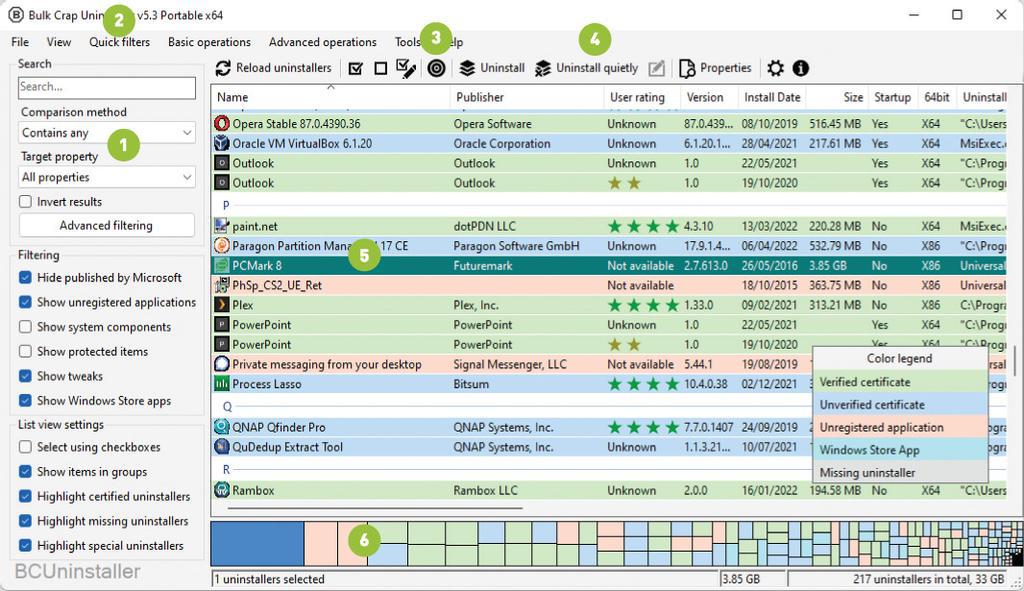
TAKE THE BCU TOUR
1. FILTER LIST
Use these tools to either search for a specific app or to filter the list. Add more filters like ‘Windows features’ to the displayed options via the Settings menu.
2. QUICK FILTERS
Click here to quickly apply commonly used filters – such as showing only unregistered apps – to the list view. Choose ‘Default filters’ to restore the previous view.
3. UNINSTALL BY TARGET
If you have the unwanted program’s window or directory open, or its program file visible, you can uninstall it quickly by clicking this button before clicking on the relevant target.
4. UNINSTALL QUIETLY
Click this button and BCU will attempt to remove all selected programs without requiring you to run through any installation wizards if possible.
5. APP LIST
Apps are color-coded by type, so use the column headers to change the sort order and select multiple apps by holding Ctrl as you click each one.
6. SIZE CHART
This chart displays apps by the space taken up on your hard drive. Click one to select the app in question—a quick and easy way to identify and remove space-hogging programs from your PC.
LOCATE SPACE HOGS
Knowing what files reside where on your hard drive is obviously a great help when it comes to trying to clear space. Do you need to simply target a few large files, for example, or will it require the help of third-party tools to identify the files you can safely delete?
What you need is a tool that can visualize your drives or folders in a way that’s easy to understand, and TreeSize Free (www.jam-software.com/treesize_free) is one such tool in both portable and installer form. After launching, click ‘Start TreeSize Free as Administrator’ to gain full access to your drive. Click the dropdown arrow next to ‘Select Directory’ to select a drive and wait for it to be scanned.

Once completed, you’ll see a list of folders sorted and clearly marked by size, helping identify where most space is being used. You can either drill down through the folders to identify exactly which files or folders are taking up the most space, or switch to the View tab on the ribbon and click ‘Show Treemap Chart’ for a handy visualization helping to pinpoint where those files are.
MOVE APPS WITHOUT REINSTALLING
If you’re struggling to free up space on a small primary boot drive, then uninstalling apps is usually only a temporary fix, and not always practical. If you have access to another faster SSD or NVMe drive, then a better option is to move apps to that drive. Ordinarily, this requires uninstalling and reinstalling each app in turn—a time-consuming task that could result in lost settings.
Instead, download SteamMover (www.traynier.com/software/steammover), a tiny portable app that works with any application. Make sure you run the program as an administrator. Then select your current programs folder, which for most is a two-step process: C:\Program Files followed by C:\Program Files (x86). Set up a folder on your target drive, select the apps you want to transfer, and click the transfer button.

SteamMover simply moves your program folder to your new drive, then creates a special shortcut known as a junction point in the original folder pointing to the new location. Windows is none the wiser, and everything runs as before. Make sure the program and all related apps are closed before moving. If you get an error, move the folder back to its original location and try again.


