Windows Defender – The missing manual

Windows Defender has matured into a surprisingly powerful and comprehensive security suite. Nik Rawlinson explores its essential features and best hidden options
Table of Contents
Over the course of Windows 10’s recent updates, Microsoft has paid a lot of attention to improving and expanding the operating system’s built-in security tools. However, it can’t seem to make up its mind what to call them. Originally referred to as Windows Defender, the name for the Windows 10’s security tools changed to Windows Defender Security Suite following the Creators Update, and they now appear to go under the generic banner of Windows Security. You’ll still find the name Defender used in various official quarters, however, so that’s what we’re sticking with here.
Despite stiff competition from big-name free and paid-for rivals, Defender frequently ranks highly in antivirus labs tests and is used by more than half of all Windows users – and it’s easy to see why. It’s free, simple to use and – because it’s a native Windows component – the software is unobtrusive and lightweight compared to other security tools.
Access the tools
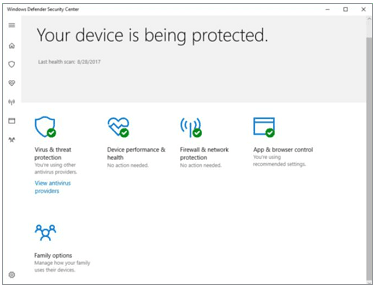
Launch Defender, either by opening the Start menu, typing defender and clicking ‘Windows Security’ or by expanding the taskbar’s hidden icons (click the upward-pointing arrow to the right) and clicking the shield icon. Windows overlays this icon with a yellow warning triangle if Defender detects anything that needs your attention.
Opening Defender will display a dashboard for controlling applications’ rights and restrictions. Windows’ built-in firewall, antivirus protection and more. To make it easier to navigate, maximise the window so the sidebar menu is permanently extended (with names beside the icons) or click the three-line
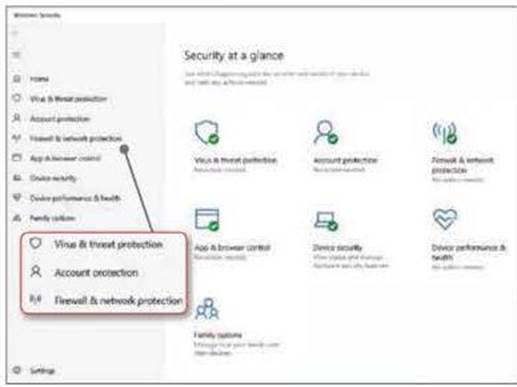
Windows Defender’s security dashboard includes antivirus, malware protection and more
button in the top-left corner to reveal the menu’s contents.
Scan for viruses
Click ‘Virus & threat protection’ and look under ’Virus and threat protection settings’ for a button labelled ’Turn on’. If it’s there, click it, so you’re protected. Now click either the ‘Quick scan’ button or the ‘Scan options’ link below ‘Current threats’. The former speaks for itself, but ‘Scan options’ lets you choose from full, custom and offline scans. ‘Full scan’ checks all the files and folders on your hard drive, which could take more than an hour, while ‘Custom scan’ lets you limit the folders it examines. ‘Windows Defender Offline scan’ is designed to deal with malware
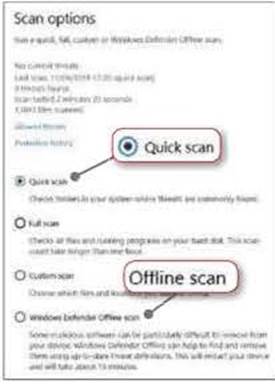
Use Defender’s offline scan for stubborn infections
that’s so deeply embedded in Windows it can’t be removed while the operating system is running. Selecting this reboots your PC in a stripped-down security environment. Because Windows isn’t active, your system files will be unlocked and visible to the scanner.
Make an exception
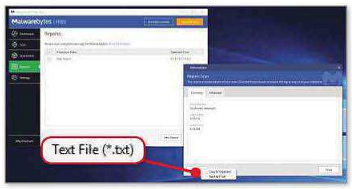
Antivirus software sometimes alerts you to a ‘false positive’ – something that it thinks could be a threat, but which is actually benign.
In such instances, simply mark the ‘threat’ as safe and Defender will ignore it in future.
If you accidentally clicked this and meant to quarantine the threat instead, you can undo your action by clicking the ‘Allowed threats’ link near the top of the
‘Virus & threat protection’ page. Now select the threat you mistakenly permitted and click ‘Don’t allow’.
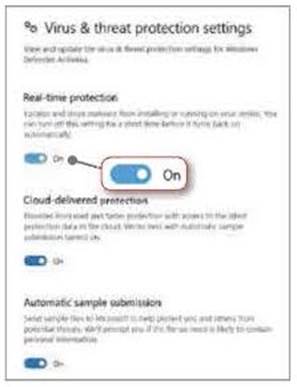
Disabling real-time protection can leave you exposed to malware

You can temporarily disable Windows Defender’s antivirus engine if it’s stopping you installing or running an application. To do so, click ‘Manage settings’ beneath ‘Virus & threat protection settings’, then click the ‘Real-time protection’ switch so it slides to the left. Don’t forget to re-enable antivirus once you’ve performed the operation it was blocking.
Add ransomware protection
Ransomware encrypts part or all of your hard drive, then holds your files hostage by popping up an on-screen demand for payment, often in a digital currency, such as Bitcoin. In return for the payment, ransomware makers claim they’ll provide you with the keys to unlock your file, but there’s no guarantee that giving in to these demands will get your data back, and you could end up both out of pocket and out of luck.
Windows Defender can stop malicious programs meddling with folders commonly targeted by ransomware. Open ‘Virus & threat protection’ and click the link beneath ‘Ransomware protection’, followed by the switch below ‘Controlled folder access’.
Add and remove as many folders as you like to the ransomware protection tool. The default folders can’t be removed
Behind the scenes, the Windows Firewall provides lots of control over the flow of data into and out of your computer
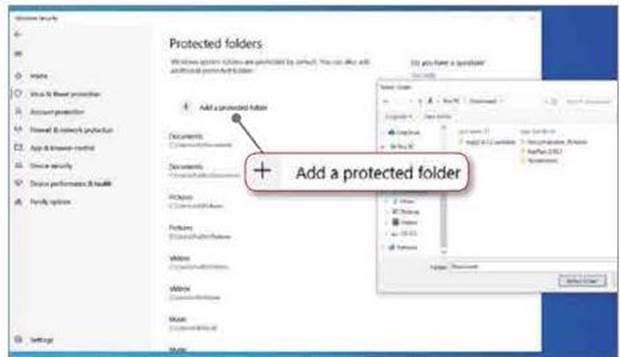
By default, Windows protects your Pictures, Documents, Videos, Music and Desktop folders, but you can supplement these by clicking ‘Protected folders’ and, on the following screen, clicking ‘+ Add a protected folder’.
To remove a folder you added, click its name, followed by the Remove button. You can’t remove protection from the folders included by default.
Allow a program access
Windows warns you when a program tries to access a protected folder. Click the warning to see what triggered it and, if you want to authorise the action, click its name in the list of warnings followed by ‘Allow access’.
You can authorise programs without waiting for an alert by clicking ‘Allow an app through controlled folder access’. Click ‘+ Add an allowed app’ followed by ‘Browse all apps’, then navigate to the program you want to authorise and click Open.
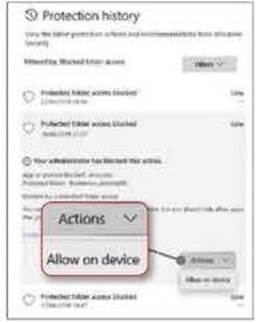
If Defender blocks access to a protected folder, you can authorise programs on a case-by-case basis
Protect your network connection
Inbound security threats may arrive via remote computers but outbound threats can come from your own PC. too. Windows Firewall blocks both, as long as it’s properly configured. Click ‘Firewall & network protection’ and you’ll see the firewall protects you at the ‘domain’, ‘private’ and ‘public’ network levels. Domain is primarily relevant to business, but private and public are
your local network and internet respectively. If the line below any of the three networks says ‘Firewall is off’, click the accompanying Turn on’ button.
If the firewall is blocking an application from accessing the internet, permit it by clicking ‘Allow an app through firewall’, which opens a Control Panel window. Here, click ‘Change settings’ followed by ‘Allow another app…’. Click Browse and navigate to the program you want to unlock, then select it and click Add. Only do this for programs you trust and not just because a pop-up asked you to grant access to software you don’t recognise, because this could be malware trying to phone home.
Adding firewall rules
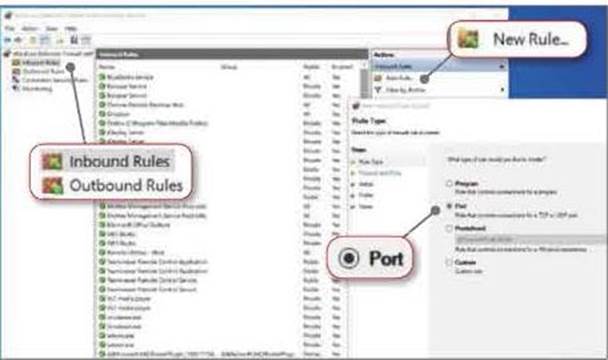
The firewall works by checking every bit and byte of data against a set of rules that authorise or block each item from coming into or leaving your PC. To define your own rules, click ‘Advanced settings’ to open a sidebar of the advanced interface and click either ‘Inbound Rules’ to control data coming into your computer or ’Outbound Rules’ to manage data heading out to the network and Internet.
You can tweak the settings for programs or the ‘ports’ through which specific traffic, such as web pages, email and internet telephony pass. In this instance, we’re going to block port
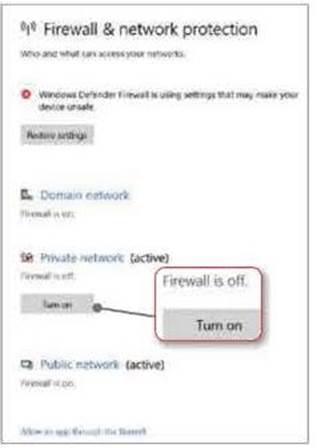
Protection for our private network isn ‘t active. Click ‘Turn on’ to fix this
21, which manages file transfers (FTP). Make sure ‘Inbound rule’ is selected and. in the right-hand sidebar, click ’New rule…’. Select Port and click Next, then type 21 in the ‘Specific local ports’ box. On the following page, click ‘Block the connection’, then click Next twice and give the rule a memorable name, such as ‘Block incoming FTP connection attempts’. Click Finish to implement the rule.
Check software and code
Even without internet access, malicious code can still cause serious harm, so make sure Windows is watching out for anything suspicious. Click ‘App & browser control’ and make sure that all three settings on the page are set to warn. Windows will then pop up alerts if you try to install software sourced from outside the Microsoft Store or visit questionable sites using Edge, or if Microsoft Store software downloads dangerous data from the web. Unfortunately, SmartScreen web protection is ineffective if you’re using any browser other than Edge, but Chrome and Firefox both have their own built-in alternatives.
You can also stop any software Microsoft doesn’t recognise by clicking Block beneath ‘Check apps and files’. This doesn’t limit you to shopping in the Microsoft Store – rather, it spares you having to make a judgement call because trusted developers’ products will still install without any problems.
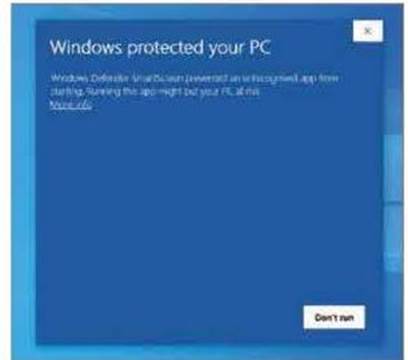
Defender protects from potential threats, even if they are already on your hard drive
Run a health check
Defender is a native Windows component, so it’s familiar with how your system should – and shouldn’t – be running, which makes it best- placed to spot glitches before they become a problem. Click ‘Device performance & health’, and check that each of the four categories under ‘Health report’ has a green tick. If any show a yellow warning triangle, click them for a description of the problem and a link to resources that will fix it.
Note the ‘Fresh start’ section at the bottom of this page.
If you’re battling a stubborn problem you simply can’t fix, this could be your last line of defence.
Fresh start installs a copy of the latest version of Windows in its factory-fresh condition. While Microsoft promises to retain your data and some of your settings, we’d still recommend making a backup first – and to put aside time for it to complete. Fresh start installs the latest version of Windows, not the
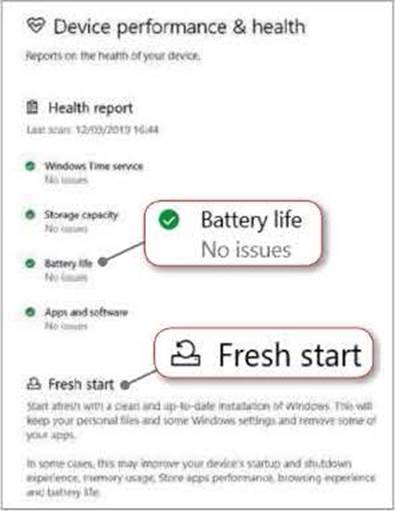
Defender is perfectly placed to know exactly what constitutes a problem
version stored on your PC’s recovery partition, so it needs to download several gigabytes of data.
Protect your family
Clicking ‘Family options’ lets you monitor what children in your household see and do online, and how long they spend on their devices. There are no controls on this pane – just two links that send you to the web. The second of these – ‘View devices’ – lets you remotely check that every device enrolled on your Microsoft account.

Restrict the kind of content younger users can access
and limit their daily computer use
whether it’s yours or a child’s, is fully patched. The one above it – ‘View family settings’ – is of more interest because it gives you greater control over how a child’s account can be used.
You’ll first need to define which accounts are for younger users. On the machine you want to control (which may be different from the machine you’re using yourself), open Settings and click Accounts followed by ‘Family & other people’. Click ‘Add a family member’ followed by ‘Add a child’ and provide an email address to which they have access.
This account will now be tied to your own Microsoft account. Click ‘View family settings’ in Windows Defender’s dashboard on your PC. then use the Activity, ‘Screen time’ and ‘Content restrictions’ tabs in the browser interface to see what your child account holders have been up to, dictate when they can log into their PC and specify what kind of age-rated content will be restricted.
WHY PAY FOR ANTIVIRUS?
If Windows Defender is so good, then why – you may ask – should you pay for third-party security software? Well, it largely comes down to tech support (which is often more personable when you’re using a paid-for product) and features.
Some paid-for security tools come with additional extras, such as uninstallers, password managers, VPNs and more.
Don’t run two security suites simultaneously because they may throw up false positives. That’s why Windows Defender’s antivirus tools are disabled when you install a rival virus scanner. If you want to take a belt-and-braces approach, download the portable edition of ClamAV (bit.lv/clamav485) and run it on an ad-hoc basis. It’s free and doesn’t need to be installed on your hard drive.