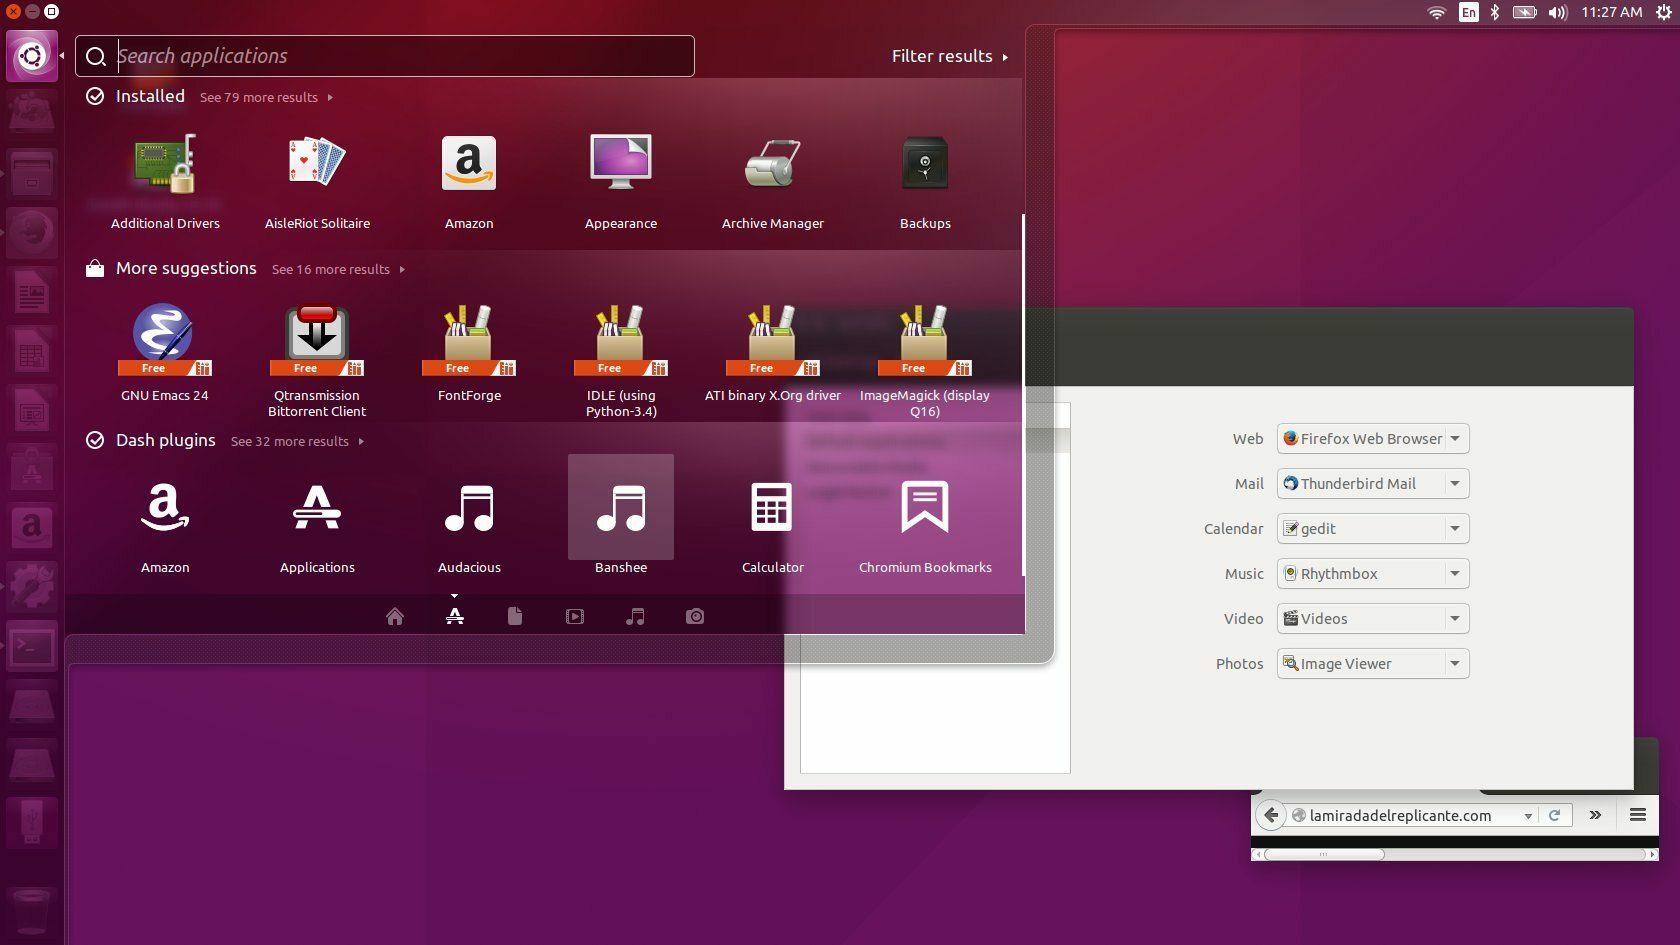
The project hosts test builds that let you preview Unity 8 atop Ubuntu 15.10.
Mayank Sharma runs through everything you need to know to get productive with the latest Ubuntu release.
Ben Everard’s purple werewolf costume left some people confused at Halloween.
Fire up Ubuntu 15.10 desktop and you could be forgiven for thinking you’re running 15.04, or 14.10. Not much has changed in quite some time. There’s a purple-ish geometric background, a set of blocky icons on the left-hand side and the same Unity experience that you’ll either love or hate. As you’d expect, Werewolf comes with the latest upstream software, but otherwise, there’s no reason to upgrade.
Table of Contents
Let’s now move swiftly on to the Server edition of Ubuntu 15.10, where there are some pretty big changes afoot. The biggest of which is the new OpenStack installer (Autopilot). It’s a little bit of a shame that in 2015 an easy installer for software can be considered a feature. However, OpenStack isn’t an easy system to set up, and having a simple path to running a private cloud will make Ubuntu a much more attractive option for people taking their first foray into this system.
LXD, Canonical’s container management tool, is now shipped by default. This isn’t a huge change, since LXD has already been available for some time, but by pushing it into every installation, Canonical is trying to get people into its own tool rather than alternatives such as Docker.
Users with heavy network loads may be interested to see the inclusion of the Data Plane Development Kit (DPDK) in the latest version of Ubuntu. This set of drivers and libraries enables users to handle network packets far more quickly than with traditional kernel drivers.
Like all regular versions of Ubuntu, 15.10 will only be supported for nine months, which isn’t long enough for many organisations. However, these new technologies are a show of strength from Canonical six months before the release of the next LTS version (which will be supported for five years). If the new technologies prove to be stable, it will pave the way for the next release (16.04) to further cement Ubuntu’s position as the leading OS for modern data centres.
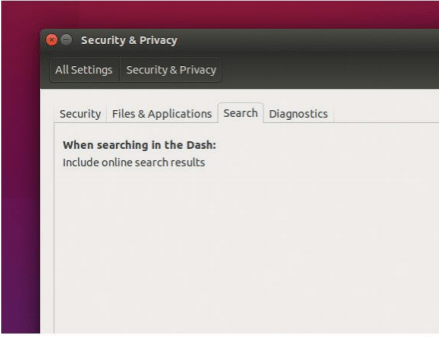
Ubuntu still includes online results in local searches, but it’s easy to disable if you want to increase your privacy.
Not much new on the desktop, but a strong sign of things to come in Ubuntu server.
Web www.ubuntu.com
Developer Canonical
Licence Various free software licences
There was a time when Ubuntu releases, especially the non-LTS ones, brought about more change than in a slot machine. However, the last few releases have broken away from that tradition and have shipped with only incremental changes. Ubuntu 15.10 follows this script as the developers have concentrated their efforts on polishing the next iteration of the core components.

The release comes at a time when the desktop is shunning its traditional definition and is trying to find its feet in the battle of the form factors. Developers everywhere are trying to consolidate many devices with a standardised user experience: from computers that you strap onto your wrist to the one that sits beneath your office table.
The changes in Ubuntu 15.10 are mostly at the Invisible end of the spectrum. In visual terms.
the dlstro doesn’t look all that different from the previous one too which has led to many online commentators terming it as a ‘boring’ release. While it won’t have many reviewworthy features, we’re sure long-time users will prefer “boring over broken” any day, to borrow a phrase from Mark Shuttleworth.
In a keynote address at the Ubuntu Online Summit (UOS) back in May 2015, Shuttleworth outlined the plans for Ubuntu 15.10 which will continue the project’s march towards single-device convergence and bringing Ubuntu to PCs, TVs, and mobile devices. He explained that working on the next iteration of the Unity Shell, Unity 8, has given the team a clear vision of how to bring together the different form factors. The project hosts test builds that let you preview I Unity 8 atop Ubuntu 15.10.
Another core feature that’s only currently available for testing is the Ubuntu Snappy package management system that’s being prepped to eventually replace Debían packages across the range of Ubuntu-powered devices. Ubuntu 15.10 lays the groundwork for testing and previewing both these new components that are core to Ubuntu’s converged desktop experience.
However, it’ll take several releases before any of these become a mainstay of the Ubuntu desktop. In the meantime, users looking for continuity can use our guide to safely upgrade to the new desktop. We also have tips and tricks to help you customise your install and rein in some of the distro’s more esoteric features.
What’s new Werewolf?
Drum roll, please. Ubuntu 15.10 entrance, stage left.
Ubuntu has a reputation of living on the bleeding edge and introducing new and revolutionary changes, especially with its non-LTS releases. However, the changes in Ubuntu 15.10 are pretty much incremental in nature, which is good news for users that prefer stability and consistency.
Unity 7, the last release of Ubuntu’s controversial desktop is essentially in maintenance mode while the developers focus their full attention on Unity 8 which is slated for debut in the 15.04 release. While the user interface engine isn’t much more than a bug fix release, the distribution (distro) is shipping the Mesa 11 graphics library, which is notable for bringing OpenGL 4.1 support to RadeonSI and Nouveau drivers. The release also switches the Gnome stack to v3.16 for a majority of the components while some, such as the Nautilus file manager, are still using a heavily patched version of the older v3.14 release.
The changes
Ubuntu 15.10 ships with a customised Ubuntu Linux kernel 4.2.0-11 based on the upstream 4.2.1 Linux kernel. This release supports: the new AMD GPU driver; per-file encryption for the F2FS (Flash-friendly file system); NCQ TRIM handling for improved support for SSDs and several other improvements. One important semi-visible change in the release is the switch to stateless persistent network interface names. This means that instead of labels like ethO and ethl network interfaces will have more comprehensive names, such as enpOs3 and enpOsS. Furthermore, for added consistency, these names will be attached to the, particular interfaces even after you restart the machine or remove the hardware.
The only real visible change in Ubuntu 15.10 is the switch to Gnome’s scrollbars. Canonical’s idea was to have scrollbars that didn’t take up a lot of screen space, and only showed up when they were needed. It was a good idea poorly implemented. After a constant barrage of complaints. Ubuntu dropped them in favour of traditional scrollbars from the upstream Gnome.
Also the option to enable locally integrated menus was made available in the last release. However, the menus were only displayed for the active window. In 15.10, the menus are also available for unfocused windows.
Meet the family
An Ubuntu release isn’t just about a solitary Unity-based desktop distro but a whole family of spins. Besides the changes in the core infrastructure of the main release, every spin also adds its own.
Kubuntu 15.10, eg uses the latest KDE Plasma 5.4 desktop and KDE Apps 15.08. Plasma 5.4 introduces a slew of improvements and changes, including preliminary support for Wayland and improved support for HiDPI (High Dots Per Inch) screens. The release also removes any remaining wrinkles from Plasma 5’s new flat look.
The newest member of the Ubuntu family, Ubuntu Mate 15.10, ships with Mate 1.10. This release of the lightweight desktop comes with several improvements to its core components and applications. The distro also uses an updated Ubuntu Mate Welcome screen, which now enables you to quickly install browser plugins, apps and games.
If you’re a Gnome user you can experience the full Gnome 3.16 improvements via the Ubuntu Gnome 15.10 release. It features a new notification system and a mildly toned down theme. The release has also made some changes to the application stack. The distro includes Gnome Music by default and has replaced the Shotwell image manager with Gnome Photos. Like Kubuntu, Ubuntu Gnome 15.10 also includes experimental support for Wayland. If you use open source graphics drivers you can install the gnome-session-wayland package and then select the ‘Gnome on wayland’ option at the login screen. Xubuntu 15.10 has also swapped applications in its effort to pitch itself as a lightweight yet full-fledged desktop distro. It has replaced the two main productivity applications, Ablwordand Gnumeric, with the fully featured Writer and Calc from the LibreOffice suite.
In terms of the overall desktop, the previous 15.05 release included the overhauled Xfce 4.12 desktop and this one ships with primarily a bug fix release with minor updates, such as the new Xfce 4 Panel Switch application for changing panels along with five preset panel layouts. The other mainstay of the Ubuntu family, Lubuntu 15.10 has also pushed out a bug fix release as they prepare for the LXQt-based version that’s expected next year.
Easy install and upgrade
Carve up some space for Ubuntu.
Ubuntu has always been one of the easiest Linux distros to anchor to your hard disk. Its Ubiquity installer is one of the easiest to navigate and besides the official Ubuntu spins it’s also been ported to several other distros, including the popular Linux Mint The Ubuntu installer does a wonderful job of helping you install the distro on your computer. It’ll detect existing installations of other popular operating systems, such as Windows, and resize them automatically to make space for itself. However, if you’re installing Ubuntu on a Windows 8/8.1/10 computer, make sure you turn off FastStartup from the Control Panel in Windows. If you get a signature error when you boot the media containing the Ubuntu ISO image, you’ll have to disable SecureBoot from the BIOS/UEFI and beyond that you can try BIOS compatibility mode.
Partitioning is the most crucial step while installing Linux.
If you have an existing Windows installation on the hard disk, the Ubuntu installer will offer to automatically resize it and make room for Ubuntu. If you want greater control over the size of the Ubuntu partition, you can manually slice your disk from within Windows using its Disk Management tool.
To make room for Ubuntu, launch Disk Management and right-click on the drive on which you want to install Ubuntu and select the ‘Shrink Volume’ option. In the dialog box that pops up, you can specify the space by which you want to shrink the disk. This will shrink the existing partition and mark the rest of the space as free. You can then point the Ubuntu installer to create a partition for itself from this free space.
Step up
If you’re already using Ubuntu 14.04 and wish to upgrade to the new release, you can do so without much trouble. Although the upgrade process have been refined over the years, there are a few things you need to take care of to ensure that it doesn’t end up breaking your system. First up, while the upgrade process hasn’t failed for us for a long time now, it always helps to spend some time creating a backup of your data. Chances are you are already smart enough to regularly backup your important data using Ubuntu’s built-in backup application. As an additional precaution you can also create a bare metal clone of your disk using Clonezilla which can image your disk and save it to a remote location or to another locally attached disk.
Also, the upgrade process will install newer versions of any proprietary drivers that you’ve installed using the Additional Drivers tool. However, if you’ve manually downloaded and installed proprietary drivers straight from a vendor’s website, then you should first remove these and revert to the open source equivalents before initiating the upgrade process.
If you’re using ATI drivers, to zap them type: sudo apt-get purge “fglrx.*”
Now backup the xorg.conf file and remove the original with: sudo mv /etc/X11/xorg.conf /etc/X11/xorg.conf.backup
Now reinstall xorg with sudo apt-get install –reinstall xserver-xorg-core libgl1-mesaglx:i386 libgl1-mesa-dri:i386 libgl1-mesa-glx:amd64 libgl1-mesa-dri:amd64 and then reconfigure it with: sudo dpkg-reconfigure xserver-xorg Similarly, Nvidia users can revert to the Nouveau open source drivers by installing them with sudo apt-get install nouveau-firmware and then reconfiguring Xorg with: sudo dpkg-reconfigure xserver-xorg Also, while a majority of PPAs don’t interfere with the upgrade process, some like x-swat and xorg-edges should be removed with the ppa-purge utility, such as sudo ppa-purge xorg-edgers
After taking these precautions, you can safely upgrade to the new release. The existing installation will alert you of the new release. To manually check for new release, type sudo update-manager -d which will launch the Software Updater and search for new releases. When it finds one, click the ‘Upgrade’ button to begin the upgradation process.
Taking complete charge
All the important details to do on a fresh Ubuntu install.
» Set up online accounts
Not everyone will be keen to use proprietary services, but for those who don’t mind sullying their open source credentials can use some of the popular online ones, such as Gmail, Google Docs, Flickr, Plcasa, Facebook, Google+ and more In Ubuntu 15.10 by configuring the distro to grant access data housed inside these services.
To get started, bring up the System Settings by clicking on the gears icon in the top-right corner of the screen and head to the Online Accounts option. Once you’ve added an account, you can search for content on these online services from the Dash. Just as you would search for local content, the Search lens will also display documents on Google Docs and the Photos lens will show pictures from Facebook, Flickr, and Picasa. Similarly, you will also be able to publish photos from Shotwelldirectly to a Picasa album or a Facebook album or on Flickr, if you have added those accounts.
“Ubuntu ships with one of the simplest to use backup tools called Deja Dup.”
» Configure backups
One of the first things you should do before you start using your new installation is to configure the built-in Backup application. Ubuntu ships with one of the simplest to use backup tools called Deja Dup. The application has a very minimal interface and you’ll need to configure it before putting it into action.
Again bring up the System Settings window and click the ‘Backups’ option under the System section to launch Deja Dup. In the application, switch to the Folders to Save tab and use the’+’ button at the bottom to point the application to the folder you wish to save. After you’ve selected the folders to backup, switch to the Storage location tab to point the tool to the location where you want to house your backups. Deja Dup can save backups on a separate partition or on a remote location accessible through SSH, FTP, Samba or WebDAV.
While creating a backup, Deja Dup will also, optionally, allowing you to encrypt the backups. Creating the initial backup usually takes quite some time, but subsequent backups are much faster because the tool only backups data that has changed.
Most users will want to share files from their Ubuntu computer with other systems on their network which can be easily done using Samba, the free software re-implementation of the SMB/CIFS networking protocol. You can Install Samba along with its graphical configuration tool simply enough with the following: sudo apt-get install samba samba-common system-config-samba.
To begin sharing, open the graphical Samba configuration application and add the folder you want to share and set up Its access permissions. Then give it a name: which is what others will see when they’re browsing network shares on your machine. Last, you’ll have to select whether you wish to restrict access to specific users or grant access to everyone. Now right-click on the folder that you want to share and open the share options to select the ‘Share this folder’ option. It’s worth noting that Samba uses a separate set of passwords than the standard Linux system accounts. Use the smbpasswd command to create a Samba password for your user [see tutorials p68for more details]: sudo smbpasswd -a bodhi
Enable the firewall
Setting up a firewall helps insulate your computer from the crackers and malicious users looking for illegal entry into your system. Linux includes the powerful and comprehensive iptables firewall which can be easily managed with the Gufw application. It’s available in Ubuntu’s Universe repos and can be installed with nffïîEffigîTJIrjAMIF.Tffffl Once the app is installed, bring up the System Settings window and click the ‘Firewall Configuration’ option under the System section.
Begin by first enabling the firewall. Once enabled you can set the Incoming and Outgoing policies by selecting one of the three options in the drop-down menus. The Allow option will allow traffic without asking any questions. The Deny option will silently discard all incoming or outgoing packets. The Reject option Is different in that it sends an error packet to the sender of the incoming packets.
After you’ve set the policy for both Incoming and Outgoing traffic you can define specific rules for individual apps and services. To create a rule, switch to the Rules tab and click on the ‘+’ button. Use the Preconfigured tab to select the application you wish to control traffic for and the application will automatically define the most effective rules.
Customise Ubuntu
Your installation, your way.
» Manage repos
» The larger open source community offers a lot more
packages than you can find in Ubuntu’s official repositories (repos). Third-party repos that host Ubuntu packages are known as Personal Package Archives (PPA), and you can search for various PPAs on Ubuntu’s launchpad (http://bit.ly/PPAsForUbuntu). Every PPA page will list its location which begins with ‘ppa:’, eg the location of the PPA for the Chromium browser is pparwinski/chromium You can add this PPA to your system with: sudo add-apt-repository ppa:winski/chromium . Ubuntu will now fetch the PPA’s key to verify the archives integrity. When it’s done refresh the list of repos with sudo apt-get update after which you can install packages from this PPA.
» Add graphics drivers
Most video cards have open source drivers available which are usually adequate for regular desktop work. But if you plan to use your computer for gaming you might need to use proprietary drivers from the graphics card’s vendor. Before you can install the driver for your graphics card, find out its make and model using the lspci I grep VGA command.
You can get more details, such as its clock speed and capabilities, using sudo lshw -C video .
The Oibaf repos is popular for getting the latest bleeding edge open source drivers to users. Add and enable the Oibaf repo with sudo add-apt-repository ppa:oibaf/graphics-drivers; sudo apt-get update before upgrading your driver stack with sudo apt-get dist-upgrade . Similarly, to fetch the latest stable Nvidia drivers, add and enable the X-Swat PPA with sudo add-apt-repository ppa:ubuntu-x-swat/x-updates; sudo apt-get update before installing the drivers with sudo apt-get install nvidia-current.
For AMD cards, the best source for the proprietary driver is AMD’s website (http://support.amd.com). Use the dropdown menus on the website to enter details about your graphics card and then download the suggested driver. Unzip it to reveal a .run script. Before you install the driver make sure you install its dependencies with sudo apt-get install dh-make dh-modaliases execstack Iibc6-i386 lib32gccl. Now run the script, such as sudo sh ,/amd-driver-installer-13.35.1005-x86.x86_64.run . This will launch the graphical AMD Catalyst proprietary driver installer which will also install the Catalyst Control Center GPU management software.
» Customise boot loader
By default, Ubuntu sets the bootloader to boot the distro automatically in 10 seconds. There are several reasons you might want to change this behaviour, eg if you have multiple OSes on the machine, you might want to reorder them and change the default OS, or you might want to increase or decrease the time before the default operating system is booted automatically. The Grub Customizer [see step 5 and 6 on the next page] on is a wonderful tool for graphically modifying the bootloader. To tweak the default OS to boot, launch the tool and switch to the General Settings tab. Select the ‘Predefined’ radio button under the Default Entry section and use the drop-menu to select the default OS. If you toggle the ‘Previously Booted Entry’ radio button, instead of using a predefined default entry, Grub will boot by default into the last booted OS. You can also adjust the timeout value for booting into the default OS from within this page. When you’re done making changes, click on the ‘Save’ button and this will write the changes to the bootloader.
» Stop leaking information
By default, every time you search for an app or a file in the Dash, Ubuntu also displays “relevant” suggestions from online web stores such as Amazon. If you don’t want your queries being routed to Canonical servers and then to third-parties on the internet you can turn off this feature. To selectively exclude some services from the results, click the Dash Home icon on the launcher and click ‘Filter Results’ next to the search box. Now deselect the categories or sources that you want to exclude from the search results, such as Amazon and eBay. To disable the feature for good, head to System Settings and under the Personal section select Security & Privacy. Now switch to the Search tab and turn off the option labelled ‘When Searching in the Dash: Include Online Search Results’.
» Don’t record file/app usage
For easier access Ubuntu’s Dash displays all recently accessed files on your system. To prevent the distro from keeping track of particular apps, head to System Settings and under the Personal section select Security & Privacy. Now switch to the Files & Applications tab, where you can selectively turn off tracking, such as Music, Pictures, Videos, Presentation etc. If you wish to exclude the contents of particular folders, then click on the V icon beneath the Exclude section and point to the folder you want to omit. Similarly, you can exclude particular apps as well. You can also use the ‘Clear Usage Data’ button to delete existing records of accessed files and apps. To turn off the feature for good, toggle the Record File and Application Usage setting to ‘Off.
Ubuntu vs the world
How the Ubuntu family tree rules the waves.
While you can credit Ubuntu for helping establish Linux as a mainstream alternative, it isn’t the only distro that’s designed for use as a regular desktop. The distro that has spawned several spins and downstream projects is itself based on a project that adorns many a desktops. Besides Ubuntu there are several other projects that are toiling hard to create the perfect desktop distro that will appeal to a wide range of use cases.
The outstanding pupil
Linux Mint is one of the most popular distros built on top of Ubuntu. Despite this connection, the two have grown apart quite a lot and take different approaches to providing an easy to use and intuitive desktop.
One of the main reasons for Linux Mint’s popularity is its custom tools. Fans of the distro like the fact that Mint packages the best of Ubuntu in a more usable and relatable desktop. The core component of its enhanced usability experience is its home-brewed Cinnamon desktop that has established itself as a mainstream desktop environment that follows the conventional desktop metaphor. So while Ubuntu went ahead with Unity despite users voicing their displeasure, Mint paid attention to the users’ frowns and tried to look for a solution by initially introducing a set of extensions for Gnome 3 and then building its own desktop.
Both Ubuntu’s and Mint’s desktop shell take cues from proprietary desktops. But while Ubuntu will feel familiar to users from Mac OS X, Mint will appeal to users coming from a Windows desktop. For new users getting familiar with and navigating Ubuntu’s Unity takes more time than it takes to get started with Mint’s Cinnamon.
Cinnamon features a taskbar at the bottom of the desktop which has a Start menu-esque Mint Menu that brings up a categorised list of apps and gives you access to the various settings on your computer. You can even add shortcuts to the side of your taskbar to mimic Windows’ quick launch behaviour. Another reason for Mint’s popularity is its ease of customisation; Mint has loads of settings for tweaking everything down to the minute details of your interface.
Although Linux Mint bundles its own custom settings tool that can be used to Influence the appearance of the desktop and tweak compositing effects, some of its elements are similar to Ubuntu’s. The one major difference is the Device Drivers tool. In contrast to the one that’s bundled with Ubuntu, Mint’s tool has a tweaked user interface and helps users make an informed decision about which drivers to use for their devices.
In terms of applications, both Ubuntu and Mint come with a set of preinstalled apps that cover most of your needs, but Mint supplies a wider collection. It’s also a lot more usable straight out of the box as it ships with the popular codecs and plugins. For adding apps, Mint uses its own Software Manager app which isn’t as slick as the Ubuntu Software Center, but does its job nicely.
Going upstream
Ubuntu is based on Debian’s Unstable branch but the two have marked differences. For starters, Debían caters to over a dozen hardware architectures as compared to Ubuntu’s three supported architectures; 32-bit, 64-bit and ARM.
Also, while the Debían installer can be used by first time users, it puts more emphasis on flexibility and rolls up enough options to be of use to experienced campaigners as well. While it selects sensible default options, it allows users to customise selections at every step of the installation process.
Visually speaking, Debían defaults to a stock Gnome release and the dlstro boasts of one of the largest repos of software so you can replace the desktop with virtually any of the available options. One of the biggest difference between the two is in the age of the package available In their respective repos. Ubuntu’s software is usually more current than Debian’s, but as a trade-off, Debian’s software tends to be more thoroughly tested and stable. The two distros also use different security models: Ubuntu does away with the root user and instead uses sudo .
Debian’s packages are divided into three main repositories: Unstable, Testing and Stable. Between these three repos Debían caters to users looking for stability at the cost of features as well as to users looking for bleeding edge software and everyone in between.
Lastly, Debían like Linux Mint is primarily a community supported project. All Its maintainers get a vote on all issues, including the selection of a Debían Project Leader. Ubuntu does things differently. Although it does have a Community Council and Technical Board, Ubuntu’s founder Mark Shuttleworth is a permanent member of both, and is known to use his veto power to push certain changes through that he feels are important to Ubuntu’s and Canonical’s future, some of which we’ll see in Xenial Xerus 16.04 LTS In 2016. E23
Ubuntu vs Fedora
There are several similarities between the Ubuntu and the Fedora project. For instance, both projects are backed by for-profit companies and employ the top software developers that are critical to the respective projects. One difference between the two is their package management systems.
Fedora uses RPM packages in contrast to Ubuntu that uses Debs. Another difference between the two is the default desktop, with Fedora defaulting to Gnome 3. That said both Ubuntu and Fedora projects support other desktops as well via a number of distro variants.
In addition to the desktop flavour, both projects also produce server releases. However, while Fedora has long been used as a test bed for Red Hat’s subscription-based RHEL distro, Ubuntu has always focused on the desktop user. This is also why Ubuntu is better equipped for a wide variety of desktop users than Fedora.
While both Fedora’s Gnome and Ubuntu’s Unity involve a learning curve, the Gnome learning curve is much steeper than Unity’s as the desktop has made some usability tweaks starting with its 3.x release that take some time getting used to. But the desktop is tweakable and you can use official extensions to mould it as per your comfort level. Also with each subsequent release Gnome is expanding its repertoire of official apps and now includes apps for managing everything from music and graphics to running virtual machines. Due to this. Fedora, which is often regarded as the premier Gnome distro, comes out as a polished and well integrated distro with a consistent look.
Ubuntu vs Mageia
Mageia, which came out on top in our annual best Linux distribution roundup [see Features, p32, LXF203] sits pretty much in contrast to Ubuntu. The distro. which has had a long association with the Linux community In one form or another, Is managed by a non-profit and has a very democratic and transparent development process. Mageia Is a wonderfully put together distro that looks elegant with its custom theme and customised KDE desktop. The KDE Plasma desktop also adheres to the classic desktop metaphor and unlike Ubuntu will not trip up first-time users.
By default. Mageia ships with only open source software, but you can infuse proprietary applications and codecs into your installation without much effort. Unlike Ubuntu, Mageia greets its users with a Welcome app which does a nice job of educating the users about the distro’s repos structure and also gives them the option to flesh It out by adding popular proprietary apps and codecs. In addition to the Installable live medium, much like Ubuntu.
Mageia Is also available in an install-only DVD which offers users a wider selection of apps as well as multiple desktops.
Also In contrast to Ubuntu, Mageia has an expansive set of custom tools and utilities that can be used by first-time users and many offer enough flexibility to satisfy advanced users. Magela’s Control Center offers a lot more tweakable options than Ubuntu’s System Settings. Still, the distro ships with reasonable defaults and most users can get started with the distro without any tweaks.



Loving the in-depth review! I was considering giving Ubuntu 15.10 a try, but now I’m more convinced than ever. The performance and updated features are impressive. Has anyone else tried installing it on a laptop?