Install Ubuntu on an old Android tablet
Hardware doesn’t get slower as it ages. Rather, we demand more and more of it by installing software and updates which its components were never designed to handle. In essence, it takes longer for the same hardware to process the increased number of instructions being thrown at it, and inevitably it feels like it’s running more slowly – even though, technically, it’s running as quickly as it ever was. Read our Install Ubuntu on an old Android tablet.
by Nik Rawlinson
Manufacturers eventually stop supporting old devices because doing so would hold back owners of newer, ‘faster’ hardware – and, at that point, you must make a decision. Do you buy a new device? Keep running your existing device with out-of-date software? Or install a new operating system?
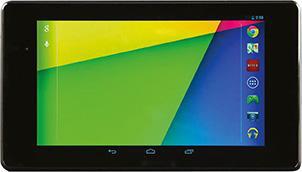
Here, we’re going to take the third option. We have a second-generation Nexus 7 tablet (pictured right), jointly built by Asus and Google, which was released in August 2013 and discontinued in April 2015. The most recent version of Android it can officially run is 6, released back in September 2015.
Rather than try to force an update to the latest version of Android (13, released in August), we’re going to install Ubuntu Touch (www.ubuntu-touch.io), an opensource Linux-based operating system being developed for a wide range of Android devices. Compatibility varies from device to device and, as you might imagine, replacing an operating system is a big job. However, if you can get Touch to work on an old tablet or phone that you own, you might be able to breathe new life into an old piece of kit.
Bear in mind that installing a new operating system on your device, or even playing around with some of the advanced settings we’ll be accessing here, will probably result in the irreversible loss of all data on it. Make sure you have a full backup of anything you need to keep because you may end up with a device that no longer works and cannot be repaired, and data that can’t be recovered.
Check whether your Ubuntu Touch
The easiest way to check whether Ubuntu Touch supports your phone or tablet is to search for it in the official devices list at www.snipca.com/43327. Click the tabs at the top left to see just tablets (eight of them) or phones (72). If your device is listed, click its name to open its full details page, which you’ll need to refer to later.
Unlock the bootloader
Your next job is to unlock the bootloader. This is the code that’s responsible for waking up the tablet and loading the operating system. As this is a fundamental function, it’s locked to prevent programs interfering with it because some could install malicious code to launch when the tablet starts, monitor everything you’re doing and report back to hackers. This would allow them not only to gather useful information for marketing and advertising, but potentially to gather payment-card details, monitor your conversations via the microphone, watch you through the camera, and more.
The actual process for unlocking the bootloader varies between manufacturers and models, so you have no choice but to search for the method online. We found instructions by searching for nexus 7 unlock bootloader, so try something similar for your device.

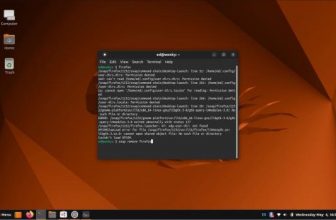
These instructions asked us to install Google’s Platform Tools, and drivers specific for our device. Again, you’ll probably need to search for these (we found ours for the Nexus on Softpedia: www.snipca.com/43351, see screenshot above). Having downloaded the drivers, we moved them to a folder on our computer. We then connected the tablet and opened Windows Device Manager (press the Windows key, type device and click Device Manager).
Here, we expanded the Mobile Devices section within Device Manager and double-clicked on our tablet. This opened a box, on which we switched to the Driver tab, clicked Update Driver, and navigated to the driver we had just downloaded. With the driver updated, we closed the boxes, quit Device Manager, unplugged the tablet and turned it off completely (just putting it to sleep isn’t sufficient).
We then searched for Google’s Platform Tools and downloaded them from Google’s site for Android developers (https://developer.android.com/studio/releases/platform-tools), clicking the ‘Download SDK Platform-Tools for Windows’ link.
We then double-clicked the downloaded file to open it in File Explorer. This revealed that it contained a sub-folder called ‘platform-tools’. Selecting this, we clicked ‘Extract all’ on the toolbar and extracted the compressed file to a folder called ‘platform-tools’ in our Downloads folder.
At this point, we turned on the tablet again while pressing the volume down button, which prevented it from launching the Android operating system. In this mode, the screen displayed configuration data and a ‘Restart bootloader’ graphic pointing to the power button, which we’d use in a few minutes.
We connected the tablet to our computer, then switched to the Windows Command Prompt by pressing Windows key+R, typing cmd and pressing Enter. We navigated to the extracted files by typing cd Downloads\platform-tools and pressing Enter, then typed fastboot oem unlock and pressed Enter.

At this point, our tablet asked us to confirm that we wanted to unlock the bootloader, warning us that doing so would allow us to install a new operating system (1 in our photo left), which could pose a security risk. It also warned that unlocking would delete all our personal data 2. Because this was what we wanted to do, we pressed the volume up button (the touchscreen was not enabled in this mode) to highlight Yes, then briefly pressed the power button to select it.
This returned us to the previous information screen, where the ‘Restart bootloader’ had been replaced by a graphic saying ‘Start’ – again pointing to the power button. We briefly pressed the power button, and our tablet went into a lengthy restart process during which it removed all our personal data. This took more than 30 minutes to complete.
Once rebooted, we then followed the instructions, selecting the language we wanted to use and connecting to our wireless network.
Turn on developer mode
If you’ve managed to get this far, well done. Having unlocked the tablet’s bootloader, you now need to enable developer mode, which reveals options and tools that are otherwise kept separate for developers to use. Again, the process may vary for your device, so, if the following instructions don’t work, search online for your device name followed by ‘enable developer mode’.
Open ‘Settings’ on your tablet, scroll down to ‘About tablet’ and tap it, then scroll down to ‘Build number’ and tap this seven times. ‘You are now a developer!’ will appear on screen.
Now tap the left-pointing arrow at the top of the screen to go back to the previous menu, then tap ‘Developer options’ or ‘Developer settings’, depending on which is shown on your screen. Look for an option for ‘USB debugging’, ‘ADB’ or ‘Android Debug Bridge’ and enable it. Android will warn you that this function is only intended for development purposes – ie, for software developers to add new tools. It’s fine to use in this case, so tap OK.
Now, if you have it, enable the option for ‘Allow OEM unlock’. At this point, you’re ready to install Ubuntu Touch. Thankfully, things are more straightforward from this point on.
Install Ubuntu Touch
Now return to the Ubuntu Touch web page for your device that you opened in Step 1, then scroll down to the ‘Windows & Mac’ section and click Windows to download the installer. When it’s finished downloading, launch the file. On our computer, Windows blocked it from running, warning that it might put our PC at risk. However, we clicked ‘More info’, followed by ‘Run anyway’ to launch it. We then ran into our next problem: our tablet wasn’t detected.

If you experience the same, click ‘Select device manually’, then choose your tablet from the menu (see screenshot above) and click Select. Leave ‘Ubuntu Touch’ selected on the menu asking ‘What operating system do you want to install?’, then click Install.

You’ll now see your installation options. The Channel menu lets you select whether you want stable or development versions of Ubuntu Touch. Leave ‘16.04/stable’ selected 1 in our screenshot below) as this is the smoothest version. Also leave the box beside ‘Bootstrap’ ticked 2. Finally, tick the box to format the system partitions on the internal memory 3, then click OK.
The installer will download several files from the internet and send them (or ‘push’ them) to your tablet via the USB cable. When the installation process completes, you’ll be prompted to report the outcome by clicking PASS if everything worked as expected, WONKY if you had a problem, or FAIL if it didn’t work at all. If you don’t know which applies, just click Dismiss. Meanwhile, in the background, your tablet will complete the remaining configuration steps, with a bar tracking its progress. Once it’s finished, your tablet will launch Ubuntu Touch.

Update apps on Ubuntu Touch
Follow the instructions, choosing a language, connecting to your Wi-Fi network, selecting a time zone, entering your name, and applying a password or passcode. You can then start using your device. The operating system might be different to what you’ve experienced before, so it’s worth spending a few minutes exploring how it works.
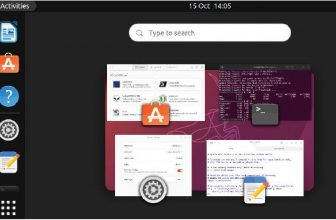
Swipe down from the top of the screen to access settings and notifications, just as you would in Android. Swipe up again to dismiss that mode. Swipe in from the taskbar that runs down the left side of the screen to open the full range of apps installed on your tablet (as shown in our screenshot top right), then swipe in from
the right to close that view. Swipe in from the right when the apps menu isn’t open to view running programs and to switch between them – then either tap an app thumbnail to switch to it, or tap the empty area surrounding them to dismiss this view.

You should now make sure your apps are all up to date. Tap the A icon on the taskbar (1 in our screenshot above) then tap OpenStore 2. It’s worth noting at this point that the taskbar’s contents will change depending on what you’ve recently launched. The default icons are ‘pinned’ to it, in the same way that you can pin icons to the taskbar in Windows.
Apps that you launch will be added to them and remain on the taskbar until you close them. To close an app, long-press its icon until a menu appears, then tap Quit. Doing this on the icon for a program that isn’t already pinned to the taskbar will give you an option to pin it, while doing it on an icon that is already pinned gives you an option to unpin it. Unpinning doesn’t uninstall the program from your device – it just means it doesn’t remain in the taskbar when it’s not running.
On launching OpenStore you’ll be informed whether any updates are available. Tap ‘Installed Apps’, followed by the green ‘Update all’ button.
How I use my old tablet
I didn’t use my day-to-day tablet in this test, as that’s an iPad running the most recent version of iPadOS. However, having installed Ubuntu Touch on my Nexus, I rather like it – particularly as I use Ubuntu regularly on one of my computers. I’ll be using this device as a secondary tablet, perhaps for use in the kitchen, or other places where I wouldn’t want my main tablet getting grubby, wet or damaged.


I have going through all the steps to install but when i try to connect the vnc app it give the error message of “this computer’s domain name could be resolved” help!