Spacedesk Review: How to use a tablet as a monitor?
Install Spacedesk on your tablet
You now need to install Spacedesk’s app on your tablet – download it from Play store (Android); Apple Store (iOS, iPadOS); or at Amazon (Kindle Fire). Once it’s installed, launch it and, if you’ve already installed the server program on your PC, dismiss the message that tells you to download it.

The app will now start searching your local network for your PC and, when it recognises it, will display its IP address. This is a unique number assigned by your router to each of the devices on your network. It’s made up of four sets of digits, with the first three sets generally being the same across the whole network, while the final set will be anything between 0 and 254 (to accommodate a maximum of 255 devices on your network).
Our tablet found a PC using the IP address 10.0.0.68. We checked this was correct by comparing it to the information shown in the Spacedesk Driver Console software that we just installed on Windows. You can launch this from the Start menu and, when it appears, check the address in the Communication Interfaces section. In our screenshot above, we can see the same IP address -10.0.0.68 [1].
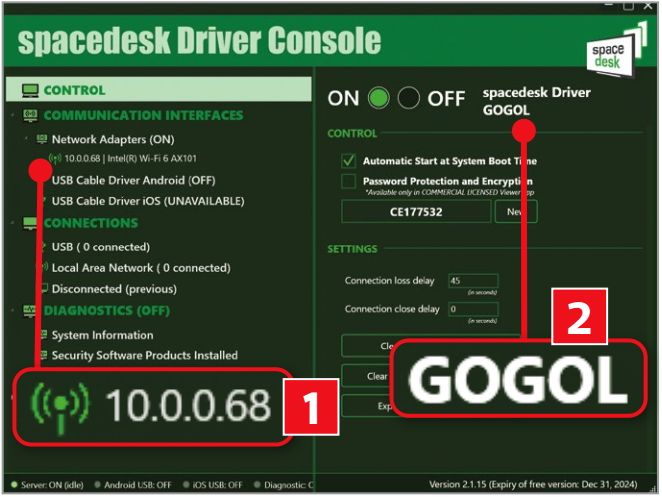
To double check, we make sure our computer’s name (GOGOL [2]) is displayed at the top of the right-hand column in Driver Console, as well as at the top of the home screen on the Spacedesk app on our tablet.
Move windows to your tablet Tap the computer’s address in the app and the two devices will be connected, with your tablet’s display behaving like a touch-sensitive extension of your computer screen.
You can now drag windows from your PC to your tablet. However, because Spacedesk can’t automatically work out where your tablet is sitting in relation to your computer screen, you may need a little trial and error the first time you do this. We found that dragging windows to the right edge of our main display, slightly above halfway, transferred them to the tablet’s screen, even though our tablet was sitting to our left, flat on its back.
Once the window is on your tablet’s screen, you can control it by clicking with the mouse or by tapping it with your finger. If you want to use your fingers on the tablet and your mouse and keyboard to control your computer, you don’t need to make any more changes, as long as you’re happy with how the two screens are configured relative to each other.
Reconfigure your screens
If however you want to move your cursor off the edge of the main screen nearest to your tablet screen so that it travels directly toward it, it makes sense to tell Windows where they sit in relation to one another. This makes working much easier when sweeping the cursor off your PC’s screen and back again.
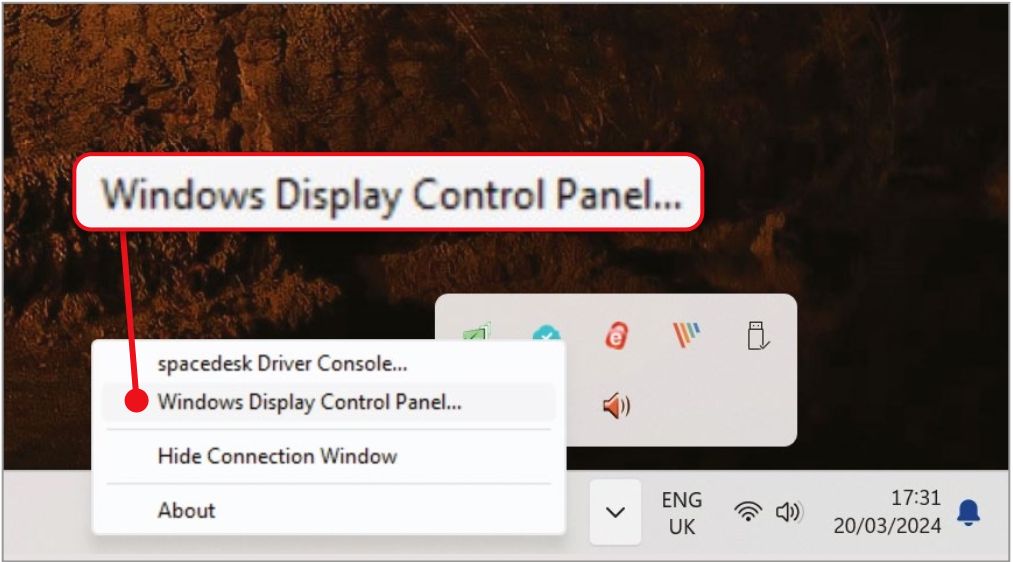
To do this, click the up-arrow on your Windows taskbar to reveal your hidden icons, then right-click the Spacedesk driver icon, followed by Windows Display Control Panel’ (see screenshot below)
This will take you to the Display pages of the Windows Settings program, where you’ll see a basic graphic of your two screens. The larger of the two (labelled 1 – [1] in our screenshot below), is your PC screen. The smaller screen 0 at its top-right corner (labelled 2) is your tablet.
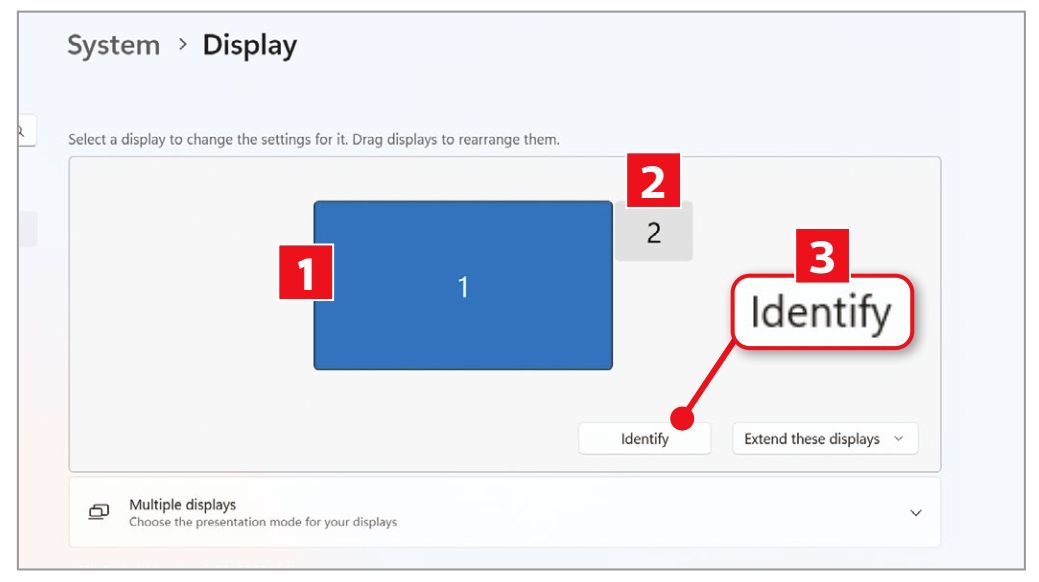
If this is less clear in your specific setup, you can ask Windows to identify each one. Click the Identify button 0 and it will display the relevant numbers in the corner of each display, so you can see them at a glance.
Use your mouse to click and hold the number 2 (tablet) box in the Settings window, then drag it around the number 1 box. Let go when its location roughly equates to your tablet’s position relative to your PC screen. When you’ve finished, close Settings.
In case you were wondering, you’re not restricted to connecting just one external tablet, nor to working with tablets. We installed Spacedesk on an iPad Pro, Kindle Fire 8 tablet, Google Pixel 5 phone, and iPhone 15 Pro, and set them all running simultaneously.
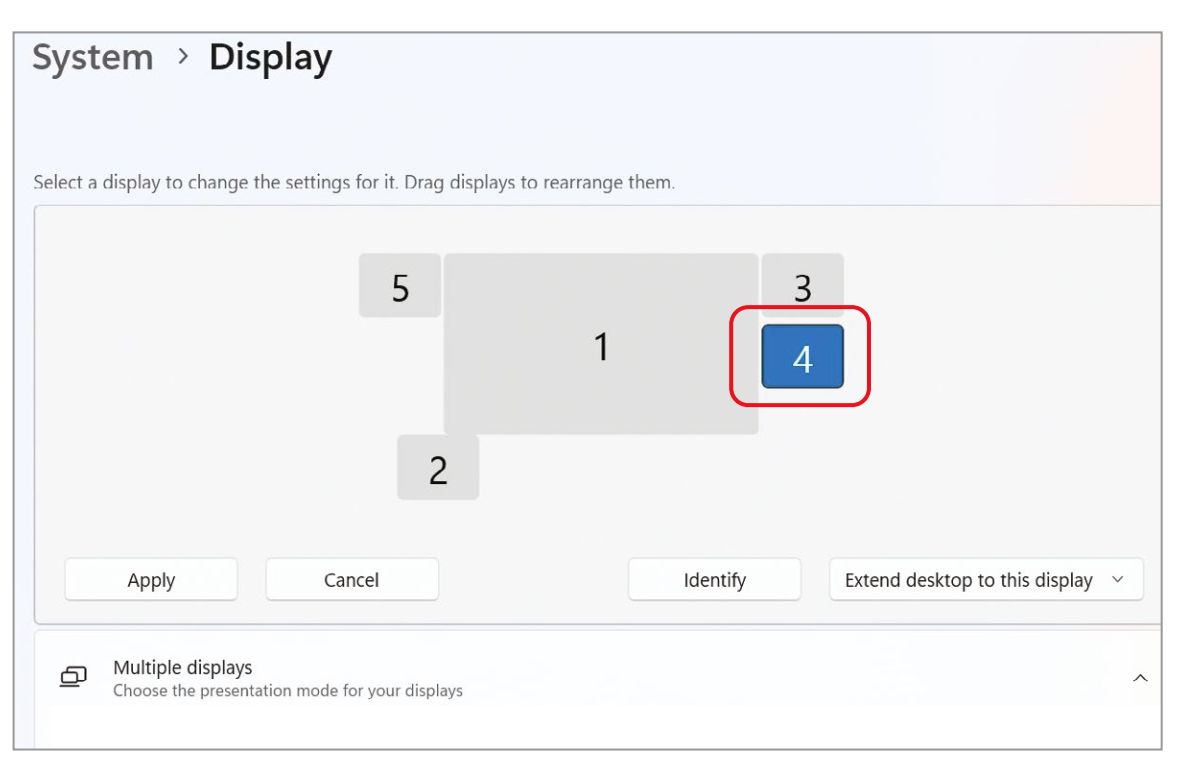
You can see the result in our screenshot above where our primary monitor is surrounded by four smaller screens. This allowed us to move both our cursor and – when practical given size restrictions -program windows from one to the other.
Use programs on your second screen
Now that you’re all set up, you can use your second screen as a place to put programs that might otherwise get in your way. You could drag across your music player, for example, so you have an interface you can tap to select songs, reclaiming the space it would have taken on your main screen. Or, you could use it to stream live TV, or keep track of social-media posts.
If you prefer not to use your finger to control a program on your tablet screen, you can use your mouse, as we explained earlier. Your PC’s keyboard will work just as well in any program on the second screen: just make sure the program is active and selected. It makes no difference which screen is hosting it.
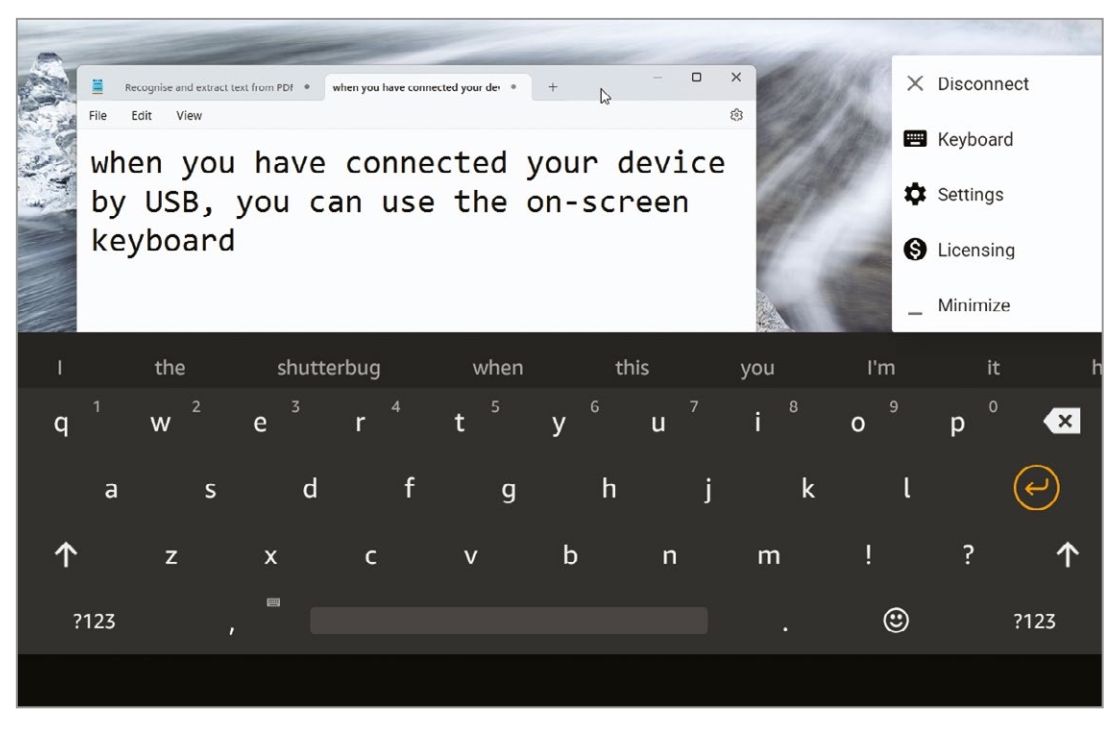
Spacedesk also has its own on-screen keyboard, which lets you type on your tablet. You’ll find it by tapping the three-line menu button on the tablet screen, followed by Keyboard (you can move this menu around by tapping, holding and dragging it to any position you want). However, using the on-screen keyboard in wireless mode is a premium-only feature, which requires an upgrade to the £ commercial business licence on an Android device.
Spacedesk hasn’t yet added this licence to the iPad, iPhone or Kindle Fire editions of the software, though you can use the keyboard for free on Android or Kindle Fire by connecting via USB rather than wirelessly.
If you do connect with USB, open the Spacedesk Driver Console software on your PC and click the Communication Interfaces header in the left-hand column. Now untick the box beside Local Area Network, and click in the box below it next to USB Cable Android.
When the connection has refreshed, tap the three-line menu button at the edge of your screen on your device, then tap Keyboard. Tap within the window of your active program and you can use the on-screen keyboard in place of the keyboard attached to your PC. In our screenshot left we’re using the on-screen keyboard on a Kindle Fire tablet to type into Notepad in Windows 11.
USE AN OLD LAPTOP AS YOUR SECOND SCREEN
At the start of this feature, we downloaded Spacedesk to our primary PC (or ‘server’ in Spacedesk terms). This server handles the sharing of the virtual display connection with a secondary device (called the ‘client’). So far, we’ve only used a phone and tablet as the client, but if you have an old laptop with a working screen you could also use that. Rather than download another copy of the server software to the laptop, go to the Microsoft Store and install the client software.
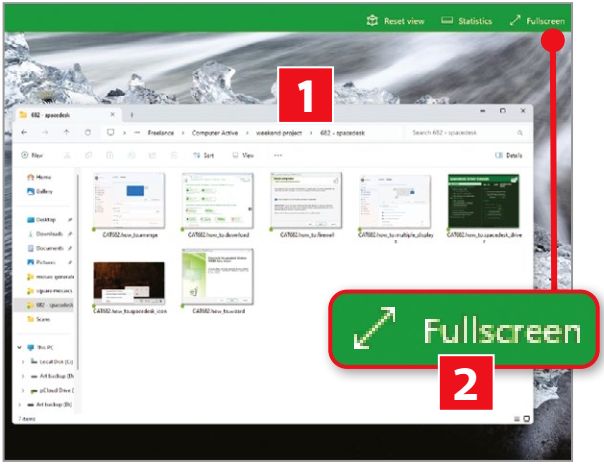
Once launched, it should spot your main PC across your wireless network. Click the primary PC’s IP address in the Spacedesk client on your laptop and the two will connect, with the Windows desktop of your main machine extending into the window now shown on your laptop ([1] in our screenshot). Hover over that window and click the Fullscreen button [2] so it fills the whole display.
Why I wish I’d used Spacedesk
I used to have multiple monitors running side by side, each connected to a single computer, so I could arrange my windows the way you can with Spacedesk. Ultimately, I found it wasn’t a great solution for me because I had to disconnect them all whenever I wanted to work elsewhere, so I bought a larger screen that would fit everything side by side. If I’d been using a system like Spacedesk, the cables wouldn’t have been a problem, and I could have saved myself the expense of upgrading my primary monitor.
How do you set up multiple computer monitors? Please let us know!


