Run 200 Free Tools From One USB Stick

What you need: NirLauncher 1.30; a USB flash drive with 128MB or more space Time required: 20 minutes

It’s no secret that we at Computeractive love NirSoft’s excellent free tools. Indeed, the developer produces so many great little programs that it’s difficult to single out which ones we like best. Luckily, you can download the whole lot in one fell swoop, thanks to NirLauncher – a regularly updated package containing all NirSoft’s great tools under one roof. Naturally, there’ll be some you use more than others, so NirLauncher’s new Favourites feature (introduced in version 1.30) provides quick access to the tools you need most. Here we show you how to create and customise a handy NirLauncher toolkit on a USB stick. Read our Run 200 Free Tools From One USB Stick – Computeractive _ Scribd.
STEP 1
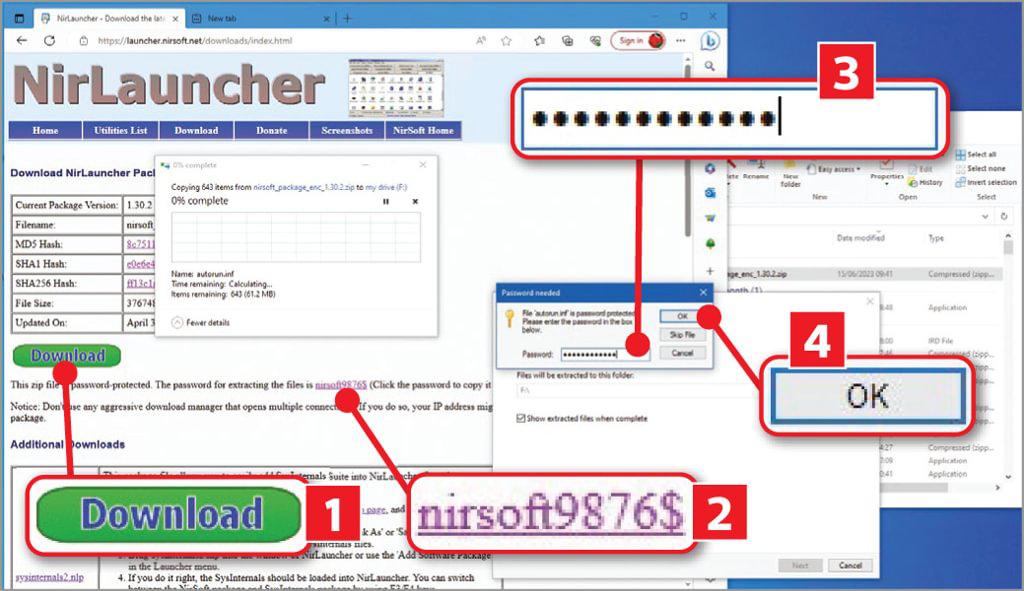
Insert a USB stick into your PC, then go to www.snipca.com/46479 and click the green Download button 1. This will download a ZIP file to your PC – right-click this and select ‘Extract all’. Click ‘Browse’, navigate to the root of your USB stick and click Select Folder, then click Extract. The ZIP is password protected but you’ll find the password (currently nirsoft$) on the tool’s download page, below the Download button 2. Clicking the password will copy it to your clipboard. Next, click in the ‘Password needed’ box 3, and press Ctrl+V to paste it. Click OK 4. You’ll need to wait a while as the packages are extracted.
STEP 2
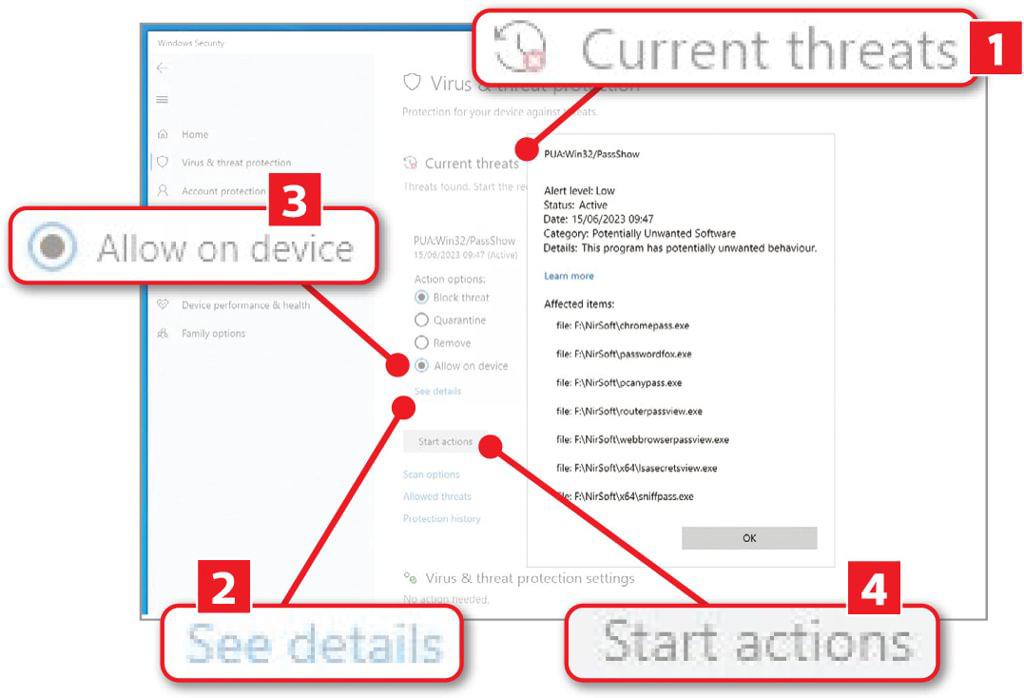
Depending on your security software, some of NirLauncher’s tools may be wrongly identified as a potential threat. Windows Defender, for example, displays multiple security alerts as you extract the ZIP to your USB drive. It’s safe to ignore these, however, because NirSoft is a trusted source. When you run NirLauncher for the first time, Windows Defender may actively block some of its tools. To unblock them, click the shield icon in the taskbar, then click ‘Virus & threat protection’. Click an item listed under ‘Current threats’ 1, then click ‘See details’ 2 to double-check that it’s related to NirSoft. If so, click OK, select the ‘Allow on device’ option 3 and click ‘Start actions’ 4.
STEP 3
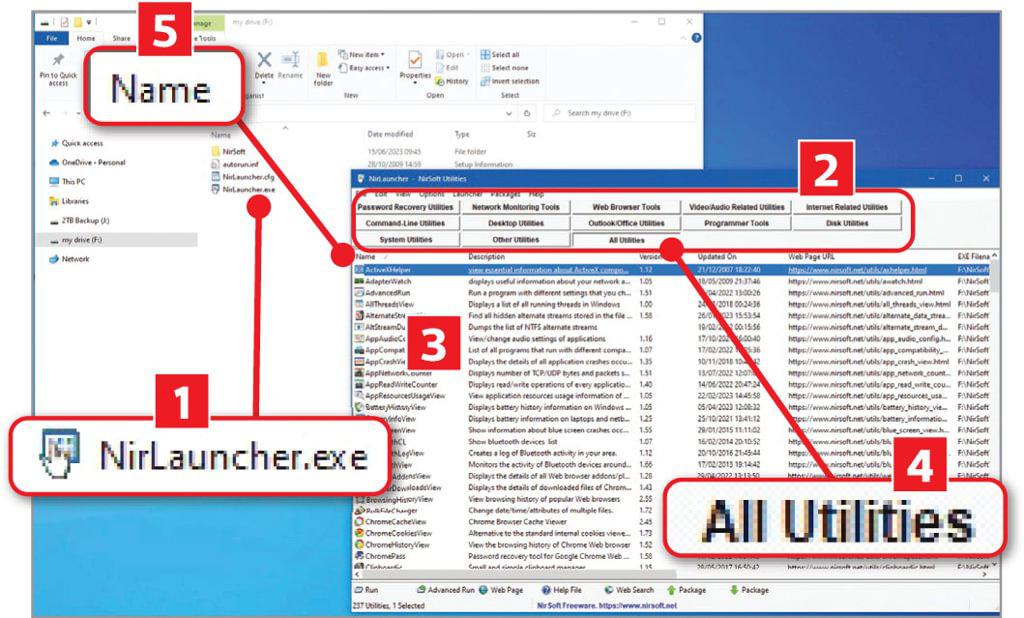
To run NirLauncher from your USB stick, open a File Explorer window, navigate to the drive, then double-click the ‘NirLauncher.exe’ file 1. If you see any security alerts at this point, refer back to Step 2 to resolve them. At the top of the NirLauncher window, you’ll see a selection of buttons 2 – Password Recovery Utilities, Network Monitoring Tools and so on. Clicking one of these will narrow the selection of tools displayed in the main window 3 by the relevant category. Alternatively, you can click the All Utilities button 4 to view all NirSoft’s tools in one long list. Click the Name column header 5 to organise the list alphabetically.
STEP 4
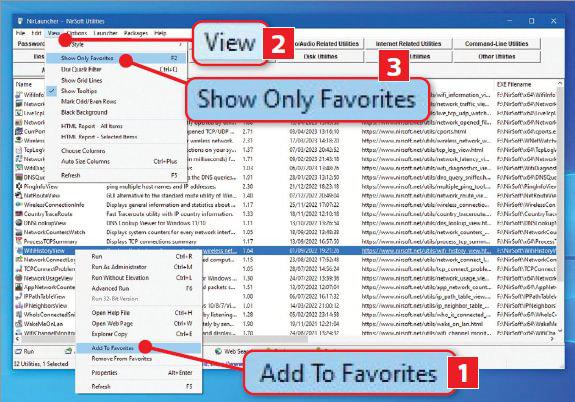
As we mentioned earlier, the latest version of NirLauncher introduces a new feature that lets you add specific tools to your favourites. To do this, locate a tool you use frequently in the main window, then right-click it and select Add To Favorites 1. To access your favourite tools, click the View menu 2 and select Show Only Favorites 3. Click View, Show Only Favorites again to go back to the full list of tools, or use the F2 key to switch between your favourites and the full tool list.
STEP 5
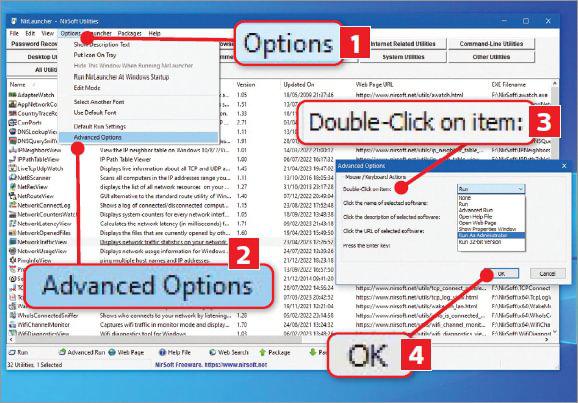
You can run a tool from NirLauncher by double-clicking its entry in the list. Some tools, however, need to be run with administrator privileges to work properly. For example, if you wanted to diagnose slow broadband problems, you could use NetworkTrafficView. But instead of double-clicking it in the list, you’d need to right-click it and select Run As Administrator. Unfortunately, it’s not always obvious when administrator privileges are required. One option is to click Options 1, Advanced Options 2 and select Run As Administrator from the ‘Double-Click on item’ menu 3, then click OK 4. From now on, all tools will run with administrator privileges by default when you double-click them.
STEP 6
If you plan on using NirLauncher’s tools on the same PC on a regular basis, you could make it quicker and easier to access your favourites by customising some of the program’s settings. For example, you might want to consider clicking Options 1 and selecting Run NirLauncher At Windows Startup 2, so that your toolkit is ready for use every time you boot up your PC. Similarly, you could select Put Icon On Tray 3 from the Options menu, which will show a notification-area icon in the bottom right of your taskbar whenever NirLauncher is running. This will let you start NirLauncher with one click.

STEP 7
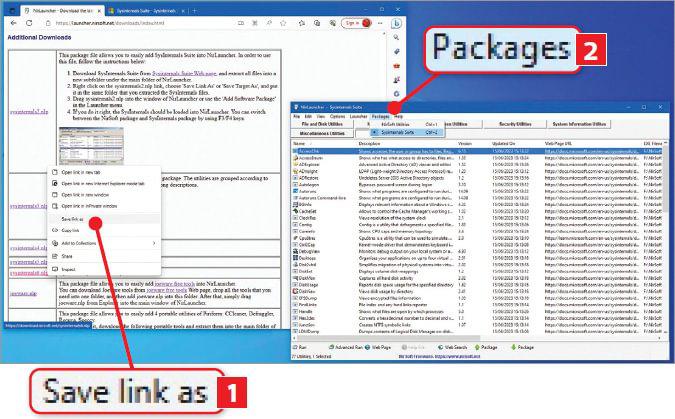
You can expand your arsenal by adding further free tools to NirLauncher. To add Microsoft’s brilliant Sysinternals Suite, for example, go to https://learn.microsoft.com/en-gb/sysinternals/downloads/sysinternals-suite and click Download Sysinternals Suite. Extract the ZIP and drag the resulting SysinternalsSuite folder into the NirSoft folder on your USB stick. Next, go back to https://launcher.nirsoft.net/downloads/index.html and scroll down to Additional Downloads. Right-click the ‘sysinternals6.nlp’ link and select ‘Save link as’ 1 (or Save Target As, depending on your browser) and save the file to the SysinternalsSuite folder on your USB drive. Now drag the ‘sysinternals6.nlp’ file from the SysinternalsSuite folder into the NirLauncher window. You can switch between NirLauncher’s tools and Sysinternals Suite’s tools via the Packages menu 2.


