Quickly transcribe long audio recordings

Quickly transcribe long audio recordings
What you need: Windows 7, 8.1 or 10; Listen N Free Time required: 5 minutes (plus transcription time)
Whether you want to transcribe detailed instructions from a podcast or create minutes from a recording of a club meeting, trying to keep up with the audio while typing is never easy. Tools like Google’s new Live Transcribe (see page 60 for more on this) provide a quick way to turn whatever is said in audio recordings into text, but if the sound quality is poor errors can creep in, meaning you’ll have to correct the transcription. Listen N Write is a small, free tool that makes it easy to transcribe recordings yourself by pausing the audio as you type.

Step 1
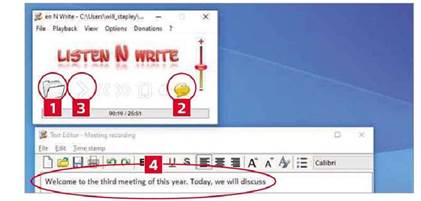
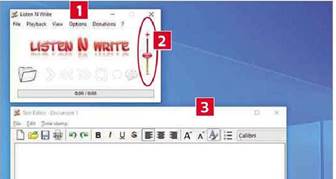
Download Listen N Write from www.snipca.com/32411. Open the ZIP file, extract it to a folder on your PC. double-click the exe File, then follow the setup instructions. Once open, Listen N Write displays two windows. The audio player window 1 lets you play and pause the audio recording and change other settings (including the volume 2). The second window 0 is a basic word processor, in which you type your transcription. Once you’ve finished, you can simply copy and paste your text into a program of your choice.
Step 2
Next, click the folder icon 1 and navigate to your audio recording. Make sure Dictation mode is turned on by ensuring the speech bubble 2 is highlighted yellow (if it’s not, click it), then click the Play button 3 or press F5 to start playback. As soon as you start typing in the word processor window 4, Listen N Write will pause the audio. When you stop typing, it will restart playback, and so on.
Step 3
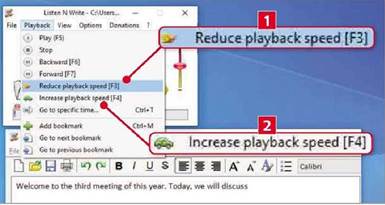
If the person in your recording speaks fast or is difficult to understand, try slowing the audio down by clicking the Playback menu then selecting ‘Reduce playback speed’ Dor by pressing F3 (repeat this to slow down the audio further). Alternatively, if you’re a fast typer, you can increase the speed of the audio by clicking Playback, ‘Increase playback speed’ 2 (or pressing F4).
Step 4
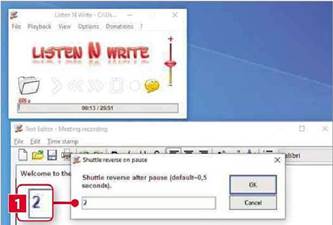
By default, when you stop typing Listen N Write rewinds the audio by 1.75 seconds before restarting playback – this overlap is designed to help you keep track of where you are. If you find this is too short, dick Options, ‘Shuffle reverse on pause…’, then enter the number of seconds you want the audio to rewind. We found increasing this to 2 seconds 1 worked best for us, but try a few different settings to find out what suits you.
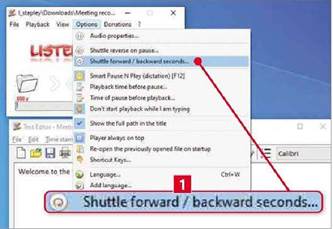
If you only want to transcribe certain sections of an audio file, you can quickly navigate to the relevant points using the *>>’ (forward) and ‘<<‘ (rewind) buttons in the audio player window (or press the F6 and F7 keys respectively). The audio will move forward or back by 3 seconds – to change this, open the Options menu, select ‘Shuttle forward / backward seconds…’ 1, then enter a new value in seconds. You can also jump to a specific point in the recording by pressing Ctrl+T and entering the time point.
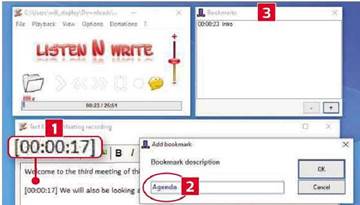
Step 6 You might find it useful to mark your text with timestamps (for example, to highlight sections where you’re not completely certain what has been said and where you may need to relisten to the audio). Press Alt+T at any point, and the current time point of the recording will be displayed in minutes and seconds 1 in your typed text. Alternatively, you can create a bookmark that lets you jump directly to that section of text. Press Ctrl+M, then enter a name for your bookmark 2. A new Bookmarks window will now appear 3. To jump to a bookmarked section of text, simply double-click its entry in the list.
Step 7
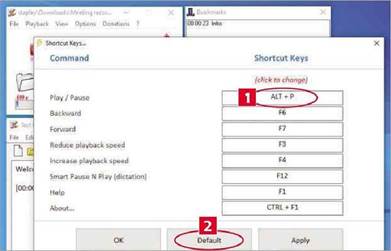
Listen N Write offers keyboard shortcuts for most of its tools to make life easier. To view all the shortcuts, open the Options menu then click ‘Shortcut keys…’. If you want to change a shortcut, click it, type your chosen shortcut key(s) (you can use key combinations, such as Alt + P 1), then click OK. To reset shortcuts to their original settings, click Default 2 followed by OK.
