New TV Streaming Sensation – KODI

Kodi is one of the most powerful media players that’s ever been released for Windows – and it’s also one of the most controversial.
David Ludlow explains how to use it legally
WHAT YOU CAN DO
Few programs in recent years have proved as controversial – or as popular – as Kodi. On one level it’s a brilliant music and video player, letting you stream content between computers. If you connect your laptop to your TV with an HDMI cable you’ll also be able to access and watch everything on the big screen of your television.
Kodi – known as XBMC until 2014 – also excels at online streaming. It gives you access to all kinds of add-ons that expand its basic features, so you can watch YouTube, iPlayer, out-of-copyright movies and a whole host of other video content straight from one convenient location. In addition, you can listen to hundreds of radio stations from around the world, view all your photos and stream podcasts.
Advanced users should consider installing custom builds to transform Kodi’s features. This adds more ways to watch and listen to your content.
All this is perfectly legal. But some developers have built add-ons for it that let users stream copyrighted material, such as films, TV shows and even live broadcasts of football matches. Copyright holders aren’t happy. Indeed, the FA is exploring how it can exercise new powers granted by the High Court to block illegal streams. Kodi itself is planning legal action against people selling TV boxes with the software pre-installed, and the police are cracking down too. In February they arrested five people selling Kodi boxes.
You won’t find advice on where to buy these boxes in this feature. Instead we’re focusing on what Kodi was originally built for – organising and watching your media files, and discovering legal content to watch online. Read on and we’ll explain how to install and use the latest version of Kodi (called Krypton) and how to add all your videos, music and photos. We’ll also reveal our favourite add-ons, and explain how to install Apollo, one of Kodi’s best custom builds. All you need to do is sit back, press play and enjoy.
INSTALL & SET UP KODI
Install Kodi on Windows
Your Windows PC is one of the easiest devices to install Kodi on. First, go to www.kodi.tv/download and scroll down to the ‘Current release’ section (Kodi v17.1 at the time of writing). Click the RC: Installer link beneath the Windows logo to download Kodi to your computer (see screenshot right). Double-click the downloaded file to start the installation process. You’ll see a pop-up box asking if you want to run the program – click Yes to continue. Click Next, I Agree, and you’ll be given a choice of which Kodi components you want to install. We recommend installing them all to give you the best experience. Click Next, choose an installation folder and click Next, then Install to complete the process.
Note: Windows 10 users can also install Kodi as an app. Go to www.snipca.com/ 23774 then click ‘Get the app’ to install it.
How Kodi works
Once Kodi has finished installing, tick the Run Kodi box then click Finish to open Kodi for the first time. Kodi will launch in full-screen mode. How you control Kodi is up to you. You can use your mouse, but we find it easier to use the cursor and Enter keys. You’ll see its interface lists types of content(Movies, TV Shows, Music, etc) on the left (see screenshot below).
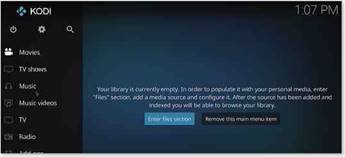
What’s so clever about Kodi is that it creates and maintains a library of your content. Once you tell it where video and music files are stored on your PC, it will tidily catalogue everything for you. It automatically detects new files that you add to folders.
Because Kodi can distinguish between films, TV shows and any videos you’ve created it makes sense to organise these into different folders first. To do that, open File/Windows Explorer then open the folder containing your video files. Create three new folders within it and call them Movies, ‘TV shows’ and ‘My videos’. Then drag your videos into the relevant folder.
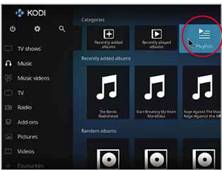
Once you’ve set up Kodi you can access all your content via its main menu
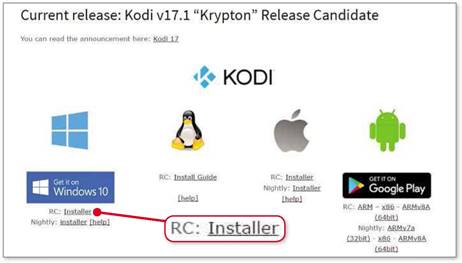
Click the RC: Installer link beneath the Windows logo to download the latest version of Kodi
Add videos to Kodi
Let’s start by adding your videos to Kodi. Click Videos (on the left), Files, ‘Add videos’, then click Browse. You’ll see a list of locations that Kodi can play video content from, including your computer’s hard drive. To add your Videos folder to Kodi, for example, click C:, then Users, your username, followed by Videos, then the Movies, ‘TV shows’ or ‘My Videos’ folder you created earlier (see screenshot right) and click OK. You’ll now see an ‘Add video source’ screen showing the path you’ve just selected. Type a name for the media source (it will be Videos by default), then click OK to add that as a source.
If the folder containing your videos fails to appear after clicking Browse (this can happen, for example, if you store your videos on a NAS drive), click ‘Add network location’. Next, type the IP address of your NAS or video server, then click OK. You’ll now be able to browse and add videos from these sources.
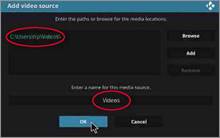
Specify the folder you use to store videos, then give it a name for Kodi to use
Once you’ve added a folder, you’ll see a new pop-up box where you can choose (from Music, TV Shows, Movies or None) the type of file you added. Select the type that matches the folder you’ve added and then select OK (see screenshot above). Click Yes to refresh all content. If you regularly add new videos to your PC it’s worth getting Kodi to check for new content every time you open it. To do that, click Settings (the cog icon on the screen you see when you first open Kodi), Media Settings, then switch the ‘Update library on startup’ slider (in the Video Library section) to on.
Play your videos
It will take Kodi a little while to scan all the content you’ve added. Once it has done this, your main menu options will be populated. Select TV Shows, for example, and you’ll see a list of all the TV shows you have saved, complete with thumbnail images. You can browse by genre, title, year and actors. Kodi will also track your viewing to let you know which shows you have and haven’t watched.
Select any thumbnail image, and the associated film or TV show will start playing. You can use the controls in the bar at the bottom of the screen to play, pause, rewind and so on, and you can click the ‘i’ icon to show information about the video.
Manage your music collection
Kodi is also a music player, letting you access and play all your music from one handy place. As with videos, simply tell it where you keep your music collection and Kodi will index and organise the albums and songs for you.
Unlike the Videos tab, which has three sections, the Music tab only has one. To begin adding albums and tracks, click Music (on the left), Files, then ‘Add music’. To add your music folders to Kodi, click Browse to see all your local hard drives and network locations. If Kodi fails to recognise your NAS or other shared folders, select ‘Add network location’, type your device’s IP address then select OK. You’ll now be able to browse and add any network locations.
Select a drive or network location, then navigate to the folder containing your music. For example, you’ll find Windows’ default Music folder by navigating to C:/ Users/[your username]/Music. Once you locate a folder you want to add, click OK, name the folder, then click OK.
Play songs in Kodi
Kodi will scan your music folder and automatically add cover art to your albums
Click Playlists in the Music section to create as many playlists as you want
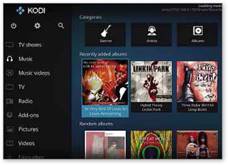
Kodi will now scan all the locations you’ve specified for your music. Once it has done this, you’ll be able to access your albums and tracks via the main menu’s Music tab. You’ll see a thumbnail view of each album, showing you the artwork (see screenshot below left). You can browse by artist, genre, songs and albums to find the track that you want.
Select any track, and Kodi will start playing it, moving on to the next track listed once that’s finished. To get full playback controls, expand the main menu, then click the pop-out button (a square with arrows pointing diagonally outwards). Here, you can play, pause, skip and fast-forward your selection.
To create a playlist, go to the main menu, click Music, then Playlists from the list of Categories (see screenshot above – you may have to scroll to the right using your keyboard’s arrow key to see the Playlists button). Click ‘New playlist’, then browse your library and right-click a track or album you want to add, then click Add to include it on your list. Next, click Save, then name your playlist so you can easily identify it again.
View photos in Kodi
Kodi’s photo viewer is a brilliant way to show off your digital photos. As with videos and music, Kodi lets you add folders of photos to its library. As you add new photos to these folders, Kodi automatically updates your library, letting you view new images as soon as you add them to your PC’s hard drive.
Change the way thumbnail images display using Kodi’s picture options
To add your photos to Kodi, click Photos in the main screen, then click ‘Add pictures’. Click Browse then add the folder(s) containing your photos in the same way you did for your Video and Music folders.
To view the photos you’ve added, click Photos in the main menu, then choose the folder you want to view (you can also specify any subfolders if you want more control over the photos shown on screen). You’ll see a list of thumbnails of your photos – click one to view it full screen.
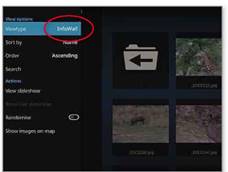
Change the thumbnail view When you’re browsing the thumbnails within a specific photo folder, click Options (at the bottom of the screen). Here, you can change the View type (how thumbnails are displayed). InfoWall is our favourite option because it displays more thumbnails than the default mode, and lets you select an image to get more information about it, including the camera/phone used and the location (if available).
Zoom into any photo
Kodi isn’t a photo editor, but it lets you perform some basic tasks. If you want to see more detail in an image, you can use the number keys (1-9) to zoom in. Pressing 0 zooms back out and makes the photo fit on screen again. Once zoomed in, use the arrow keys to move around the image.
If an image is displayed in the wrong orientation for your screen, tap Enter to rotate the image (clockwise) by 90 degrees. You can keep tapping until the image is the way you want it.
Create a slideshow
Kodi can also automatically create a slideshow of your photos. From any folder, click Options, then click ‘View slideshow’. You can also open a photo then tap the Spacebar to jump into Slideshow Mode from that image.
WHERE’S THE OFF SWITCH?
Kodi opens in full-screen mode, which means closing it isn’t as simple as clicking the usual ‘X’ at the top-right of a window. Instead, you’ll see there’s an off icon on Kodi’s main menu screen (see screenshot). Click it to access Kodi’s Power Options menu. From here, click Exit to close Kodi. Of the other options, ‘Power off system’ lets you switch off your PC without leaving Kodi. ‘Custom shutdown timer’ lets you set a time period (in minutes) after which your PC will turn off. Suspend puts your PC to sleep, Hibernate puts it into a low-power mode and Reboot resets it.
Note: if you change Kodi’s build or skin (see pages 55 and 56) the off button might be replaced by an option called Quit.
EXPANDING KODI WITH ADD-ONS
Install Kodi add-ons
Kodi doesn’t stop at the content on your PC – it also lets you stream video and music directly from the internet. To do so you need to install add-ons that add new features to the core Kodi package. Kodi’s approved add-ons restrict you to legal content only.
The easiest way to install an add-on is to click Add-ons (on the left in the main menu screen) and then click Download (see screenshot below). You will see a list of add-on categories to choose from. Browse through these and click individual add-ons to see more info about them. If you want to go back to the previous screen, click the two dots (..) at the top of each menu. Press the Escape key to return to the main menu.
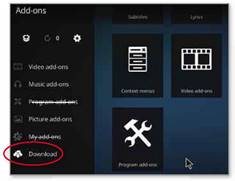
Click Download to browse through Kodi’s various (and legal) add-ons
To install the YouTube add-on, for example, click ‘Video add-ons’ and scroll down the list to YouTube. Click the Install button (see screenshot below), and the add-on will be automatically downloaded. You’ll see a notification when it’s been successfully installed.
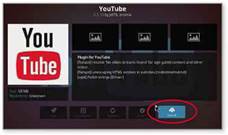
To install an add-on, select it from the list and then click its Install button
You will find your new add-on in the Add-ons section of the main menu. Kodi splits add-ons into categories: Photos, Videos, Music and Program. Select these sub-categories to find your installed add-on (YouTube’s will be placed in the Videos sub-category, for example).

Nasa’s add-on lets you watch live Nasa TV and images beamed directly from the ISS
The best Kodi add-ons
Video add-ons
There’s a lot in there, so spend some time finding the content that you want. We installed iPlayer WWW to get access to the BBC’s content. As we’ve already seen, YouTube is a great choice, too.
We’re also fans of the Nasa TV add-on (see screenshot above), which shows live interviews with astronauts as they orbit the globe onboard the International Space Station (ISS). TED Talks gives you access to recordings of lectures on a variety of global issues, while The Guardian’s add-on lets you watch daily news round-ups.
Music add-ons
There are tons of free music services to add in the Music
add-ons section. The Apple iTunes Podcasts add-on is a must if you listen to podcasts. If you enjoy hearing about the latest movie news and reviews then Kermode and Mayo’s Film Review is another great choice. We also rate Radio, a free add-on that provides live streams of thousands of radio stations from around the world.
Picture add-ons
The picture add-ons section is rather light on interesting content. There is a Flickr add-on but it is tricky to tie into your Flickr account, so it acts more like a search engine for photos. Fans of comic strips will find themselves well served by the Garfield add-on.
Program add-ons
Program add-ons furnish Kodi with extra features. For example, Dbmc provides access to your Dropbox account. You can also install the Facebook Media add-on to browse the social
network’s images, while Match Center gives you live football scores and tables.
Services
This contains lots of useful add-ons for displaying extra information. Unpause Jumpback will rewind videos by a few seconds when you pause them so you don’t miss anything, while Stinger Scene Notification lets you know if the film you’re watching has a scene after the end credits (called a ‘stinger’ in the film trade). You can also add RSS feeds to Kodi using the RSS Popus add-on. Once installed click Addons, ‘My add-ons’, Services, RSS Popus, then Configure. Click RSS Feed Add to add a feed. Type feedsbbci.co.uk/news/ rss.xml to add BBC World News, for example.
Weather
Here you can download add-ons that display a weather forecast.
Our favourite is OpenWeatherMap Extended. Click it to install it, then click it again and click Configure. Click Location 1 and type your location, then click OK twice, then Use. Press Escape to return to Kodi’s main menu and click Weatherto see the weather forecast. To change from °F to °C, click the cog icon, ‘Interface settings’, Regional,‘Region default format’ then select‘UK (12h)’. ►
Is Kodi legal?
In a word: yes. Kodi itself is completely legal and free, and there are no penalties for downloading and using it.
What is illegal, according to some definitions of the law, is creating an add-on designed to stream premium services (the very same content you’d usually have to pay for on Netflix, Amazon Prime, Sky and BT). Kodi officially distances itself from these addons, but it can’t stop them being created.
There’s even some question as to whether streaming paid-for content is illegal. In a landmark ruling in 2014, the Court of Justice of the European Union ruled that streaming copyrighted material is not breaking the law. To paraphrase the judgement, it suggests that streaming (by an individual) is not illegal, because you only ever store a small, temporary copy of the file. That said, the copyright holders – like Fox, Netflix and Amazon – want Kodi add-ons banned and are fighting every ruling to make that so.
Our advice is that if some Kodi content seems too good to be true then, at best, it’s morally wrong to watch it, if not illegal (at least for now).

Some Kodi add-ons let you access hundreds of films and TV shows, whether legally or not
If you follow the steps to install customised builds below, you’ll be able to see an example of some of Kodi’s more dubious add-ons for yourself.
CUSTOMISING KODI WITH BUILDS
Adda tailored build
Kodi’s default menu and look is rather lean on features – so you have to install the add-ons you want. However, you can transform it using what’s known as a ‘build’, which is a pre-made pack of addons. Here we’ll show you how to install a popular build called Apollo.
Before you can install new Kodi builds you will need to enable installations from unknown sources. Click Settings, ‘System settings’ and select Add-ons. Look for the ‘Unknown sources’ entry and move its slider to the right (see screenshot below). Click Yes when prompted.

Move this slider to allow Kodi to install any build you want
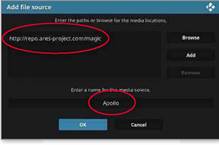
Once you’ve done that, click Settings (the gear icon on the main menu), then File Manager. Click ‘Add source’ (on the left), then double-click None and type http://repo.ares-project.com/magic, then press Enter. Give the media source a name (we chose Apollo) and click OK (see screenshot above right).
Now you have downloaded the Apollo build you need to install it. Go back to the main menu screen and click Add-ons (in the column on the left). Click the box icon at the top left (see screenshot right), then click ‘Install from zip file’. Doubleclick on the Source that you just named (Apollo in our case), then click repository. aresproject, then ‘repository.aresproject’
Before you can add a custom build, you need to tell Kodi where the installation file is
zip and finally OK. Next, click Add-ons, the box icon (top-left), ‘Install from repository’, Ares Project, ‘Program addons’, Ares Wizard and then Install.
Now press the Escape key a few times to return to the main menu screen and click Add-ons, ‘Program add-ons’, then double-click Ares Wizard. Click OK when prompted. The Ares Wizard (see screenshot above right) will open after a few seconds. If it doesn’t, press escape again to go back to the main menu, but this time hover the cursor over Add-ons and then click the Ares Wizard button. Again, wait a few seconds.
Then, within the Ares Wizard, click Browse Builds (top left) and then Apollo. Click Get PIN (which will prompt your browser to open) and write it down, then click Enter PIN and type it. Then click

To installa custom build, click Add-ons from the main menu, then this box icon

Once you see the Ares Wizard, you’re nearly there. Click Browse Builds to install Apollo
Install. Once the installation has finished you’ll be prompted to close Kodi. Once closed, open Kodi again using its icon in your Start menu and you’ll see that it looks completely different – this is the Apollo build (see screenshot below).
Using Apollo
When Apollo loads, ignore any requests to sign in and click Cancel to dismiss the messages. You can also ignore any error messages. You’re best off controlling Apollo using the arrow keys on your keyboard. For example, hit the left arrow until TV Shows is in the centre of your screen, then press Enter. You’ll see all kinds of add-ons listed (and more if you browse down using the down arrow on your keyboard). Some, such as BBC iPlayer, ITV and YouTube, are perfectly

To browse Apollo’s add-ons, use the arrow keys on your keyboard
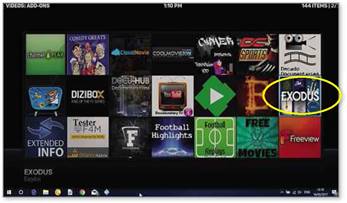
Exodus includes everything you’d find on iPlayer, ITV Hub and All4- but adds plenty more that’s illegal
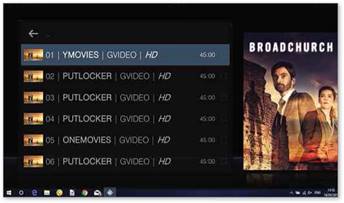
Once you select something to play you need to select a server, such as YMovies or PutLocker
legal. Others have a combination of legal and copyrighted content. For an example of this, highlight and click Exodus (see screenshot above) using the cursor keys and press Enter. Once Exodus opens use the cursor keys to highlight TV Shows, then Press Enter. Move all the way to the bottom of the available options to Search and type Broadchurch, for example, then press Enter. Select Broadchurch from the list of results, then Season 3, and you’ll see the available episodes. Click one and wait for a few seconds for a list of servers to appear. Click a server (YMovies or PutLocker are both good choices – see screenshot above right) to start the video.
You can search for anything in this way, or browse content by popularity. To do so, click the backwards arrow above the Broadchurch episodes a few times to go back and click Most Popular to see just a few of the TV shows available. You will
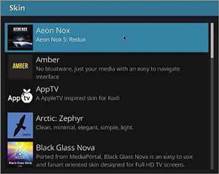
Each Kodi skin has a short description, but the best way to see if you like one is to try it
see there are hundreds of shows listed. Some, like Broadchurch, are legally available on catch-up TV services (like iPlayer and ITV Hub), so there’s no moral grey area to worry about. But others are only available on paid- for TV services like Netflix. Watching these, many people would say is morally wrong, and some would say illegal.
But that hasn’t stopped millions of people streaming copyrighted content through Kodi. To return to Apollo’s main interface, press the Escape key. To close Apollo, scroll to Quit on its main interface and hit the Enter key.
Change Kodi’s skin
If you’re put off by the complexity of installing a build, then changing your Kodi skin is a much less drastic way of changing its appearance. It’s a bit like changing your wallpaper on your Windows desktop – it changes the look and feel, but retains the same features.
To install a new skin, click Settings (the cog icon) in the main menu, Interface, then the Skin option (the default setting is Estuary). Click the ‘Get more’ button and you’ll see a big list of all available skins. Just select the one you want and

We found the Xperience1080 skin to be much more user-friendly than Kodi’s default
Kodi will download it. Now go back to the Skin option and select your downloaded Skin from the main list to apply it.
Kodi skins to start you off
Xperience1080
This changes Kodi’s interface, making it panel-based (see screenshot above) so it’s very easy to understand – in fact, it’s reminiscent of the Windows Start menu.
Aeon Nox
Aeon Nox isn’t much of a burden on your system and should run smoothly even on most PCs, regardless of their speed.
Amber
This skin might not look too exciting, but it is light, and easy to read. Text is sharp and clear while navigating menus is fast – even on slower PCs.


