Make Windows Better

WINDOWS 10 & 11
Stop OneDrive syncing to save battery

When your laptop goes into battery saver mode, it disables functions that use a lot of power, such as email and calendar syncing. One tool that carries on syncing, though, is OneDrive, which can consume a lot of battery just when you need to preserve it.
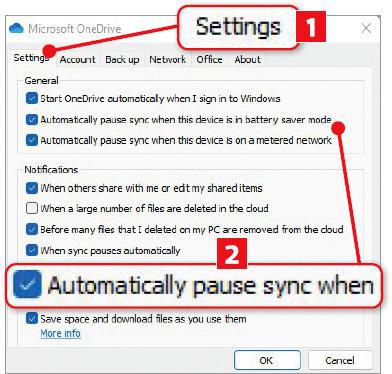
To stop this happening, open OneDrive from your taskbar, then click the Settings icon (cog), followed by Settings. Click the Settings tab (1 in our screenshot below), then tick the box ‘Automatically pause sync when this device is in battery saver mode option’ 2. Press OK to confirm.
WINDOWS 11
Check whether your system is ready for the 22H2 update

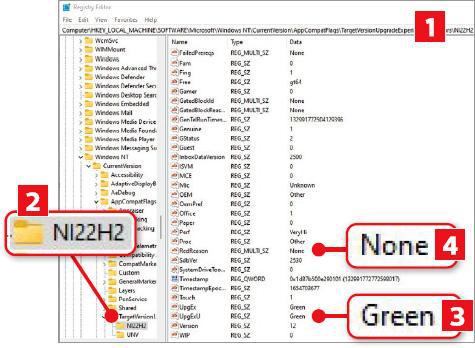
Microsoft has announced that Windows 11’s first Feature update, codenamed 22H2, will be released in autumn. Most Windows 11 machines will be able to run it, but you can confirm by diving into the registry. First, type registry in Start then click to open Registry Editor. You now need to navigate deep into the registry, so the best way to do this is to cut the copy from our Pastebin page (www.snipca.com/42390) and paste it into the Registry Editor’s address bar (1 in our screenshot below left). Press Enter and you’ll be taken to the folder NI22H2 2.
Next, in the central pane, look for the values UpEx and the UpExU, then check in the Data column whether it’s set to Green 3 or Red. Green means your system is ready for 22H2. Further up, check that RedReason is set to None 4, which again means it’s ready. If it won’t work with 22H2, the RedReason value should state a reason, such as missing TPM 2.0 or Secure Boot.
WINDOWS 10 & 11
Lock your Windows sound settings

If you share your computer, you may want to lock your Sound Scheme settings so they don’t get altered by anyone. These are the sounds that Windows makes when performing certain actions, such as showing an error message or when emptying the recycle bin. You can open these settings in one of two ways. The easiest is to search for Control Panel, then click Sound followed by the Sounds tab. Alternatively, press Windows key+R to open the Run box, then type control mmsys.cpl sounds and click the Sounds tab.
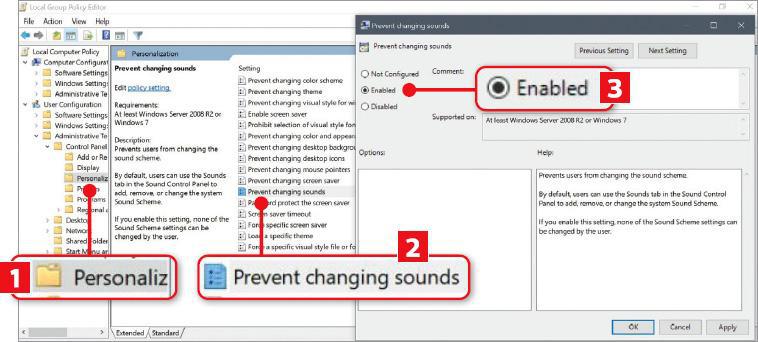
To lock the settings, you need to disable them. Press Windows key+R, type gpedit. msc and press OK to open the Local Group Policy Editor. Next, on the left, click the User Configuration menu, then Administrative Templates, followed by Control Panel, then Personalization (1 in our screenshot below). Double-click ‘Prevent changing sounds’ 2, then, in the next box, select the Enabled option 3. Press Apply, OK, then restart your PC.
LIBREOFFICE WRITER & MICROSOFT WORD
Change the indents of numbered lists

When writing a numbered list, you can set the gap between the margin on the left and the numbers/words to suit your tastes. Right-click the document with the list, then select Adjust List Indents.
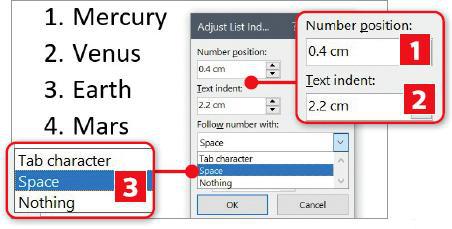
Choose a new number in the ‘Number position’ box (1 in our screenshot above) to change the distance from the margin to the number (or whatever you’ve used, such as bullet points). Select a new distance in the ‘Text indent’ box 2 between the number and the text. You can also choose what you want after the number/bullet point: a ‘Tab character’ (which is the space that appears when you press Tab); a normal space; or nothing 3.
You’ll find similar options in LibreOffice Writer by right-clicking the document, then selecting List to open the ‘Bullets and Numbering’ box. Here, click the Position tab and tweak the menus under ‘Position and Spacing’, then click OK.
MICROSOFT OUTLOOK
Empty ‘Deleted Items’ folder when you sign out

Outlook can automatically empty the ‘Deleted Items’ folder when you log out of your account, though you need to activate the option.
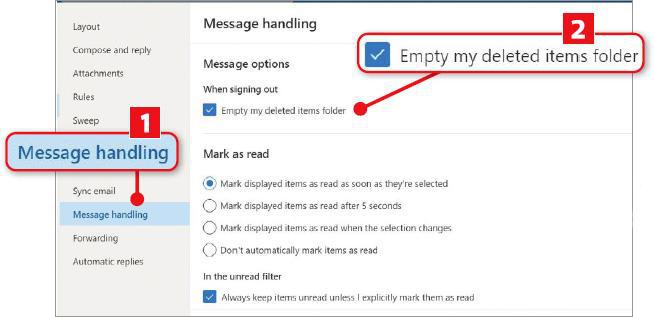
In Outlook, select File, Options, Advanced, then under ‘Outlook start and exit’, tick the ‘Empty the Deleted Items folder upon exiting’ box. In Outlook.com, click the settings (cog) icon, then at the bottom click ‘View all Outlook settings’. Next, click ‘Message handling’ (1 in our screenshot below left) then tick the ‘Empty my deleted items folder’ box 2, followed by Save.
ONLYOFFICE
See gridlines and headings in print preview

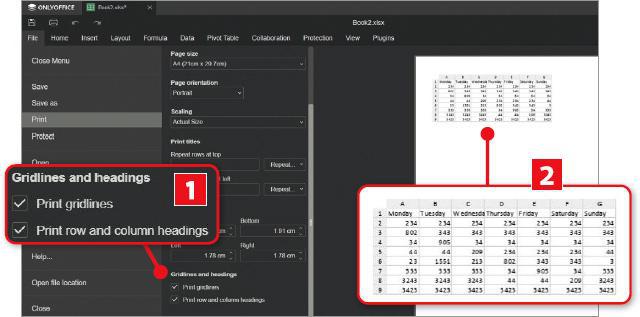
Version 7.1 of OnlyOffice, released in May, shows you a preview of a spreadsheet before printing, so you can check how it will look. By default though, it doesn’t show a spreadsheet’s gridlines, nor the headings of rows and columns. To see these, bring up the preview by clicking the Print icon at the top of the spreadsheet, then scroll down and tick both boxes in the ‘Gridlines and headings’ section (1 in our screenshot below). You’ll now see these appear in the preview on the right 2. While in the preview, click the ‘Print range’ dropdown menu at the top to choose how many pages you want to print.
WINDOWS 10 & 11
Add administrator processes to Task Manager

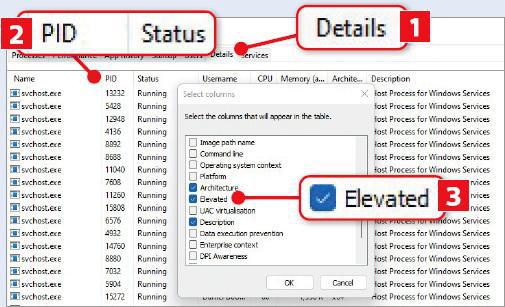
You can tweak Task Manager to show every program and process on your computer that requires administrator access (also known as elevated access). Press Ctrl+Alt+Esc to open 2 Task Manager (or search for it in Start), then click the Details tab (1 in screenshot). Right-click in the row that contains the column names (PID, Status, Username etc 2) and you’ll see a menu to hide and select columns. Click ‘Select columns’, then scroll down to and select Elevated 3. Finally, click OK. The new column will show a Yes or No to indicate whether a process is running with administrator access.
MICROSOFT EXCEL
Add coloured strikethroughs to cells

There are several ways to cross out data in a cell so that a line appears through it (called a strikethrough). The quickest is simply to highlight the data then press Ctrl+5. Alternatively, right-click a selected cell, then click Format Cells and tick the Strikethrough box in the Effects section.
One thing you can’t easily do is add a strikethough that’s a different colour to the data it’s crossing out. To get around this, you need to add a line as a shape.
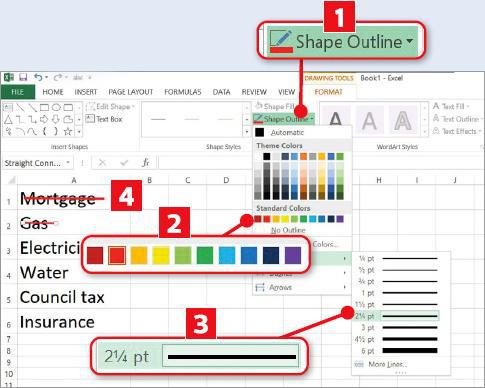
Click the Insert tab at the top, then the Shapes dropdown menu in the Illustrations section. Next, select the first diagonal line under the Lines heading, and draw a line through the data you want to cross out. This will open the Shape Format tab at the top. Click the Shape Outline menu below (1 in our screenshot), then hover your mouse over the squares in the Standard Colors section 2 and you’ll see how your strikethough looks in these different colours. Click a colour to apply it.
By default, these lines are very thin, so make them thicker by clicking Weight then selecting one of the lines in the menu that appears 3. In our example, the red lines are 2 ¼-point thick 4.


