HOW TO… Destroy an old hard drive
Your hard drive is full of sensitive data. The emails, photos and browsing history scattered across its disks present an intimate portrait of your daily life. An identity thief would love to get their hands on it, so it’s vital that you take extra care when disposing of old drives. Read our Destroy an old hard drive.
by Nik Rawlinson
What you need: Old hard drive; precision toolkit
Time required: One hour
Recycle your old laptop with the hard drive intact, and your files will be easy to recover, even if you’ve formatted it. This is because when you format a drive you don’t touch the files it contains: all you do is wipe the table of contents that Windows uses to locate them.
For an analogy, imagine you bought a second-hand book from which someone had torn out the index. Although it might be trickier to navigate, you could still find all the information it contains simply by flicking through the pages. The same is true of a formatted drive: it might no longer be possible to locate a file immediately, but they are all still there.
So, how can you safely dispose of an old hard drive? That’s the question we faced when we discovered a carrier bag of old drives while clearing out our garage.
Before we go any further, it’s important to point out that taking equipment to pieces is not without risks, and you should only do so if you are already confident in your abilities. Devices can have sharp edges, and could still contain residual energy – with the potential to give you a shock. Therefore, you should take all necessary precautions, wear eye protection and gloves, and don’t consider what follows to be instructive. We cannot be held responsible for any harm or damage.
Wipe files from your drive
Writing new data on top of old makes the old data much harder to recover. Harder, but not impossible. This kind of overwriting happens naturally over time, which is why the earlier you act to recover deleted files, the better. However, you can accelerate the overwriting process by taking a more proactive approach.
As long as the drive isn’t the one that you boot your PC from, you can tell Windows to write over every part of it with zeroes. The more times it does this, the more secure the wipe will be (but the longer it will take).
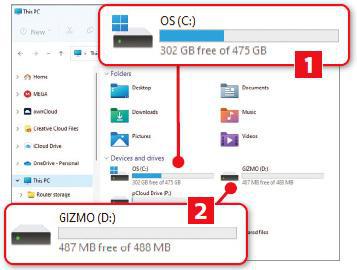
Open File Explorer and click This PC on the left, then look at the drives installed in your computer in the main pane. C: is your boot drive (1 in our screenshot below), which you can’t wipe using this process.
However, attached drives, like drive D: 2, can be used. Identify the drive you want to wipe, and its name (otherwise known as its label), then open the Start menu, type cmd and press Enter to open the Command Prompt. At the prompt, type format [drive] /P:3, replacing [drive] with the drive letter. In our case, that would be format d: /P:3.
This command tells Windows to overwrite every part of the drive with zeroes three times over. The higher the number after P:, the more secure the wipe, but the longer it will take. Press Enter and Windows will ask for the drive label. Type this in (GIZMO in our case) and press Enter. You’ll be warned that all data on the drive will be lost. Press Y then Enter to proceed.
How you wipe your boot drive depends on your version of Windows. In Windows 10, open Settings by pressing Windows key+I, then click ‘Update & Security’ followed by Recovery. Click ‘Get started’ below ‘Reset this PC’, then ‘Remove everything’, followed by ‘Local reinstall’, then Next, and finally Reset. In Windows 11, open Settings and click System followed by Recovery. Click ‘Reset PC’, followed by ‘Remove everything’. Click ‘Local reinstall’, then Next, and finally Reset.
Unfortunately, neither of these solutions was an option in our case as the drives had already been removed from the computers they once lived in. We were going to have to take more physical measures.
Dismantle your drive
It’s only when you take a hard drive to pieces that you appreciate how precisely it’s put together. Here, we’re dismantling a 500GB Seagate drive that was made in 2008. We started by removing the circuit board that connected it to the computer, then each of the seven screws at the top of the case. These were tamper-proof Torx screws (pictured below) with star-shaped apertures that you can’t unlock with a regular crosshead screwdriver.
Fortunately, we already had a 31-piece precision tool set, with several six-point star-head attachments of various sizes. There are plenty to choose from, and there’s no guarantee that they’ll all include the specific head you need, so it pays to buy the largest set you can afford. We bought ours a few years ago from Maplin, although it no longer appears on the store’s website. You can pick up similar products, like this 32-piece set from Amazon for less than £
After a little trial and error, we found an attachment that fitted and were able to remove the seven visible screws on the top of the case. This didn’t release the cover, however, which confused us for a while, until we found an eighth screw beneath a sticker (pictured below right), which itself was hidden under the drive label.

There were three disks inside, each with its own read/write head. We were able to extract the uppermost disk quite easily by removing the six screws from the spindle, turning it over and shaking it out. The ones below took some working out, because they were stuck between the read/write heads, which we couldn’t move.

They were locked in position by both a latch and a powerful magnet. In hard drives, magnets are used to precisely position the heads when reading and writing data, and hold them firmly in place when the drive moves to avoid damaging the surface of the disks. You can see the magnet in the photo left: it’s the horseshoe-shaped piece that surrounds the point where the arms on which the heads are mounted are screwed into the drive itself. The magnet was so strong that it kept snapping our screwdriver to it. However, prising it out of the case with a regular flat-head screwdriver revealed a small plastic release. Moving this out of the way unlocked the heads and we were able to swing them clear of the disks. We could then tip the disks out.


Our drive was now in many pieces (pictured above), and we’d feel fairly confident disposing of each of the three disks at different recycling centres, or at the same centre over several weeks, so they were never in the same place at the same time. If we wanted to go one step further, we might also consider scratching the surfaces to thoroughly damage them.

Smash your hard drive
We had two further drives that proved more difficult to destroy. Externally, they both used the same six-pointed star screw as the first drive, allowing us to gain access to the internals fairly easily. However, the screws securing the disks to the spindle, while still having six points in each aperture, were a different size, and none of the attachments in our precision tool set would fit.
We therefore resorted to brute force: a hammer. Specifically, we used a 16mm electrician’s hammer, because it is fairly light and has a nasty flat point at one end. This allowed us to get a good swing and focus all of the force into a small area. At this point, we took our drives outside and donned a pair of safety goggles. We wouldn’t necessarily recommend smashing a disk yourself because while the platters may be metal, they could also be coated in glass or ceramic, which could shatter and cause serious injury.
The disks in our drives were stronger than we’d expected, and the first few blows only caused superficial damage. We therefore concentrated on one area, to cause the maximum damage, by both scratching the surface and warping the disks themselves.
One of the drives contained only a single disk, so that was fairly easy to deal with. However, the other one had three, and while we were confident we’d damaged the top disk pretty thoroughly, we were unable to inspect the second or bottom disks in the stack. So, we just kept hammering until the three disks were pressed together, each a little bent, and unable to turn on the spindle any more. We’re fairly confident that our efforts have put the drive beyond the point of repair (pictured left) and hope the visible damage is sufficient to put off anyone who might otherwise consider trying to resurrect it.
How I recycled my old drives
Walking around my neighbourhood I often see CDs and DVDs hanging from strings in an allotment or above a vegetable patch, to frighten away birds with flashes of reflected sunlight. I don’t grow vegetables, but I liked the idea of turning my old disk platters into a wind chime. Plastic CDs and DVDs wouldn’t work in the same way. I used the upper cover of the drive case as a hanging point, then got some garden twine to fix three disks to its screw holes. Although you can’t see them in the picture (left), we’ve also used the rings that kept the disks apart as eyelets to hook the whole contraption on to a short branch.
Nik Rawlinson

Should you pay to have your drives destroyed?
Search for ‘hard drive destruction uk’ and you’ll find several firms that charge to wreck your old drives so they can’t be recovered. Their methods vary, but the process often involves either shredding the whole drive or punching large holes straight through it. However, they’re aimed at businesses that require proof they’re complying with data-protection regulations, rather than home users who simply want to destroy ancient drives found in a dusty drawer. If you do pay for the service, ask for verification of your drive’s destruction and that its contents won’t be accessed once it’s out of your hands.