WinCDEmu Review: How to create the most secure backup using an ISO file
You’ve almost certainly come across an ISO file before. They’re typically used to bundle huge amounts of data, such as in Windows installers. ISO is short for International Standards Organisation, which is the Geneva-based body that ensures all countries adhere to common standards on matters like film speeds, currency codes and food safety. It gives every ‘standard’ a number, starting with ISO 1, which in 1951 established 20°C as the reference point for measuring temperatures. That doesn’t mean every member state must adopt the exact same standards. Read our How to create the most secure backup using an ISO file.
What you need: WinCDEmu Time required: Two hours

For example, ISO 8601 (www.snipca.com/47293), which regulates time and date formats, rules that YYYY-MM-DD is the “internationally agreed way to represent dates” – and with good reason. When you use this format, it’s easy to keep things organised: list the dates in descending order and the most recent associated event appears first. List them in ascending order, and the oldest jumps to the top of the list.
You can’t do that with the DD-MM-YYYY format we use in Europe, nor MM-DD-YYYY, as used in the US. However, we can at least translate between the different formats – as long as we know our start and end points and which format has been used for the original dates.
The same can rarely be said for computer storage, so the ISO guidance governing files written to CDs and DVDs needs to be taken more literally. It doesn’t really matter which file format you use, as long as you have the software to read it or a tool to translate it into another format – plus, of course, the ability to locate the data in the first place.
Before the standards for optical-disc storage had been agreed, developers were free to write data in whichever order they chose on an optical disc. This could result in incompatibility between different systems and an inability to share discs or the files they contain.
However, with international standards for the way that data is written to disc (in this case, ISO 9660 and its successor ISO 13490) we can be sure that, whenever we put a disc in a drive, the system will at least be able to navigate the data. Whether you can open it depends on the software you have access to.
With the format being so predictable, it’s not surprising that new uses for it have since been found. One is to create virtual optical discs, which exist purely as bundles of data, and which have no physical presence at all. The data in the bundle complies with the ISO standards, so it can be opened reliably and repeatedly across multiple operating systems, which makes it a safe format for producing manual backups.
Because reading them doesn’t rely on a specific piece of software, you should be able to open an ISO file for years to come, as long as the standard is still supported by your operating system. There’s no guarantee the same will apply to a backup made using current software.
1 Using ISO as part of your backup strategy
We’ve mentioned the 3-2-1 rule of backup before: you should always maintain at least three complete copies of your data across two different media, of which one should be off-site (that is, not in your home).
If you’re going to follow our advice here and you’re not also using an online backup service to store your data off-site, we recommend combining it with backups made to external hard drives or USB sticks using regular backup software. You should also ask a friend or family member to look after one of the copies made using the backup software.
Why that and not an ISO file? Because most backup software lets you encrypt and password-protect your backups. We don’t want to do that with our ISO file because we want it to be easily accessible for years into the future. If it’s encrypted using a standard that falls out of favour or we forget the password, that won’t be possible.
As we’ll explain, the ISO backup of your data will behave just like a regular unencrypted drive. So, if you were to hand it over to someone else and they opened it on their machine, it would appear in the File Explorer sidebar like any regular external drive. They’d then be able to navigate through your files, read your personal documents, look at your photos, and so on.
2 Install WinCDEmu
While Windows can open (or ‘mount’) an ISO file natively – meaning without using any third-party software – it can’t create them without using another program. There are plenty of options, but we’re going to use the free software WinCDEmu.
The reason we’ve opted for this over its rivals is that it adds a handy right-click shortcut to File Explorer for converting folders into ISOs. Because backing up is something you should be doing on a regular basis, this could prove to be a significant time-saver.
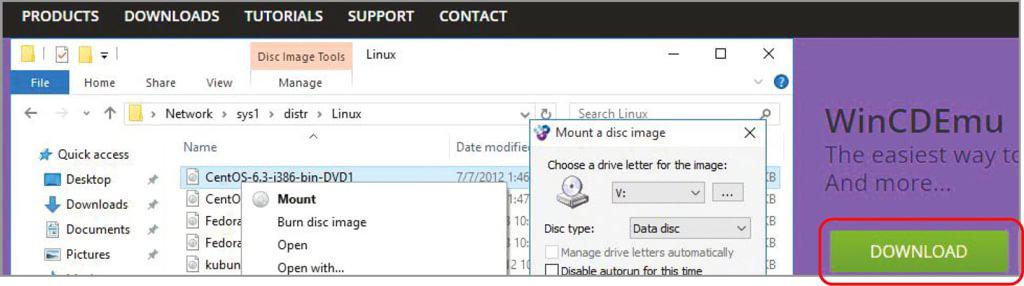
Visit www.snipca.com/47262 then click the green Download button top right (see screenshot above right). You may need to click another Download button on the next page. If either button launches an advert (as they did for us) close it by clicking the ‘x’ in the top-right corner, then click the green Download button on the following screen. The installer is very small, so it should download in a few seconds. Once it has, open the ‘WinCDEmu-4.1.exe’ file from your Downloads folder.
Windows will ask if you’re sure you want the program to make changes to your system – click Yes. By default, WinCDEmu will be installed to a subfolder of the ‘Program Files (x86)’ folder (1 in our screenshot below). If you’re happy with this, click Install 2. If not, tick the box beside ‘Customize installation options’ 3 then choose a different location before clicking Install.
As part of the process, Windows Security will pop up an alert asking if you want to install device software. Again, click Install to proceed (see screenshot above).


3 Create your first ISO file
Start by creating an ISO of your Documents folder as a test. Open File Explorer and click the C: drive in the sidebar. If this isn’t visible, scroll down to This PC and check the triangle to the left. If it’s pointing right, like a chevron (>), click it to reveal your attached drives, then click C:.
Now navigate through your file system by double-clicking Users, then your user name, until you reach your user folder. Right-click the Documents folder and, in Windows 10, click ‘Build an ISO image’. If you’re using Windows 11, you’ll need to perform one further step: after right-clicking Documents, click ‘Show more options’ to find the ‘Build an ISO image’ option (see screenshot above).


Now navigate to the location where you’d like to create your ISO file. Although WinCDEmu lets you save the file to the same drive as the one containing your source files, you should avoid doing this if you’re creating a backup. It not only wastes space by duplicating files already on that drive, but also doesn’t provide any protection against your hard drive failing.
Instead, navigate to an external drive or, if you plan to write the ISO file to a DVD or CD, only store it temporarily on your internal drive before copying it across and deleting this temporary ISO.
Your drives might not be visible immediately, in which case, click This PC (1 in our screenshot top right) in the ‘Create ISO image’ box to reveal them, then click the one you want. Name the file, leave the ‘Save as type’ menu set to the default – ‘ISO images (*.iso) 2 – then click Save. WinCDEmu will display a progress bar showing how far it has got creating your backup. When it’s completed, click OK, followed by Close.


4 Test your ISO file
As with any backup, it’s essential that you test your ISO file right away to make sure it’s both accessible and an accurate copy of the files you want to secure. Fortunately, this is easy because Windows can open your ISO as though it’s an attached drive.
Open File Explorer and navigate to the drive and folder in which you saved the ISO file. Double-click the file and it will mount in the sidebar. Our ISO has been given the drive letter D: (1 in our screenshot above) and is being treated as a CD-ROM 2 even though we don’t have an internal optical drive in the mini PC we’re using to write this feature.
Click through some of the folders and open a selection of files in the ISO to make sure they behave as expected.
Assuming everything works, keep the ISO somewhere safe so you can restore your files from it if disaster strikes – and don’t forget to create a replacement every few weeks so it’s an accurate reflection of the state of your master files.
If you want to write the ISO to a disc, eject the ISO file by right-clicking it in the File Explorer sidebar and clicking Eject. Now insert a writable DVD or CD into your optical drive and, when Windows has detected the blank disc, select your ISO file in File Explorer. When you do, a new Burn button will appear on the top toolbar (1 in our screenshot left).
We’ve attached an external DVD burner to our PC, which has taken the D: drive name because ejecting the ISO file freed up that slot. Make sure your burner is selected in the ‘Disc burner’ menu 2, then click Burn 3.


