Free up PC memory
Adding memory to your PC is one of the most effective upgrades you can make. The trouble is, not everyone can do it. Some computers are sealed boxes, and others have their memory soldered to the motherboard. In such cases, you’ll have to make the most efficient use of the memory you’ve got. But even if you can upgrade your computer, it’s silly to splash out on new memory without first checking to see whether a few tweaks could save you the expense. Here we explain different ways to unlock memory. Read our Free up PC memory.

Run memory-cleaning software
This should be your first step. Programs such as Windows Memory Cleaner flush your PC’s physical memory (or RAM) to make room for new data. It uses built-in Windows features to do this, and is available as a portable program, which means you don’t need to install it. You can also set it to launch when your PC starts and exclude Windows features you don’t want it to affect.
We particularly like that you can set it to kick in automatically at set intervals or when your PC’s available memory falls below a certain level. To do this, move the slider at the bottom-right of the screen (see screenshot below left).
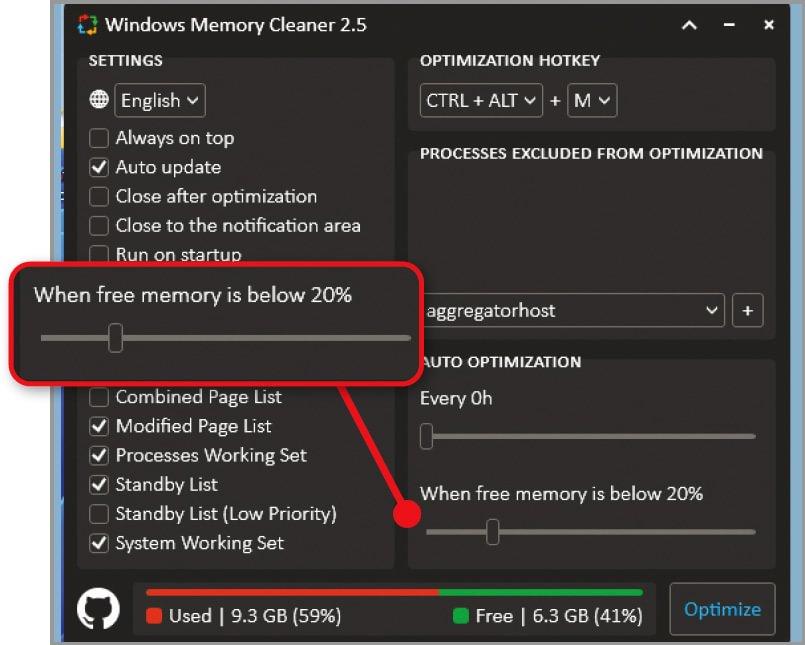
When we tested the program, it increased the available RAM on our machine from 1.1GB to 4.4GB. That’s not to be sniffed at, although it’s harder to say what actual difference this will make to your computer’s performance. When other processes spot the available memory, they may grab it – or Windows might shift data into it that it had temporarily offloaded to the hard drive because it wasn’t needed immediately.
To download Windows Memory Cleaner, visit https://github.com/IgorMundstein/WinMemoryCleaner/releases/tag/2.5 then scroll down and click ‘WinMemoryCleaner.exe’ under the Assets heading. Also keep an eye out for the forthcoming Microsoft PC Manager, which appears to include a feature for optimising your memory (see https://pcmanager.microsoft.com/en-us). We’ll take a closer look at it when it’s released.
Use Windows ReadyBoost
ReadyBoost, which first appeared in Windows Vista, lets you use a USB stick, SD card or external SSD to augment your computer’s internal memory. It only works on computers with an internal hard drive (but not an SSD), which would otherwise be used to host temporary files when they don’t fit into memory. It can’t improve the performance of a PC with an internal SSD, since that’s a faster caching option than a device connected externally.
To get started, plug in your drive or SD card, then open File Explorer and right-click on the external device in the sidebar. Click ‘Properties’, then switch to the ReadyBoost tab. Click ‘Use this device’ and Windows will check whether it’s compatible (it needs to have short access times, fast read and write speeds, and a capacity of at least 256MB). If it is, click OK to use it for ReadyBoost.
Although ReadyBoost can significantly reduce the time a computer takes to perform common tasks, we still recommend upgrading your internal memory if possible. Because internal memory becomes an integral part of the computer, your data won’t have to travel twice through a USB port (out to the external device and then back again) when in use.
Turn on Storage Sense
Whether you’re using a hard drive or an SSD, make sure it isn’t too full. As we’ve mentioned already, Windows uses disk space as a temporary store for any memory contents it doesn’t need immediately. However, if your hard drive is too full, Windows will have less space for offloading this data, and won’t be able to do the next job on its list until it has processed whatever is stored in your PC’s limited onboard memory.
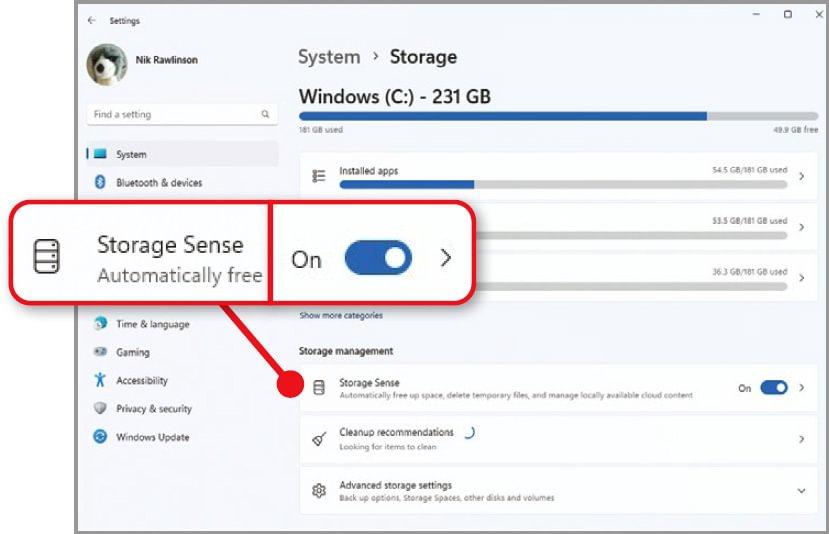
Before you move documents, photos and so on to an external drive, try turning on Windows’ built-in Storage Sense feature, which identifies wasteful data, such as unnecessary temporary files, and reclaims the space. To switch it on, press Windows key+I to open Settings, then click System, followed by Storage. Click the Storage Sense switch to turn it on (see screenshot above).
Turn off Windows animations
Windows uses animated effects to make the operating system look more stylish, but they can nibble away at your memory. Some of them, such as smoothing the edges of screen fonts and showing window contents while dragging, you probably don’t even notice. If you turn them off, Windows will devote less memory to making things look pretty, without losing any functionality.
Open Settings, then click System followed by About. Click ‘Advanced system settings’, then the Advanced tab. Click Settings in the Performance block (1 in screenshot below left), then the button beside ‘Adjust for best performance’ 2. This will turn off all the animations by unticking their boxes 3. If you feel confident making changes yourself, click Custom 4 instead and turn off only the animations you don’t need.
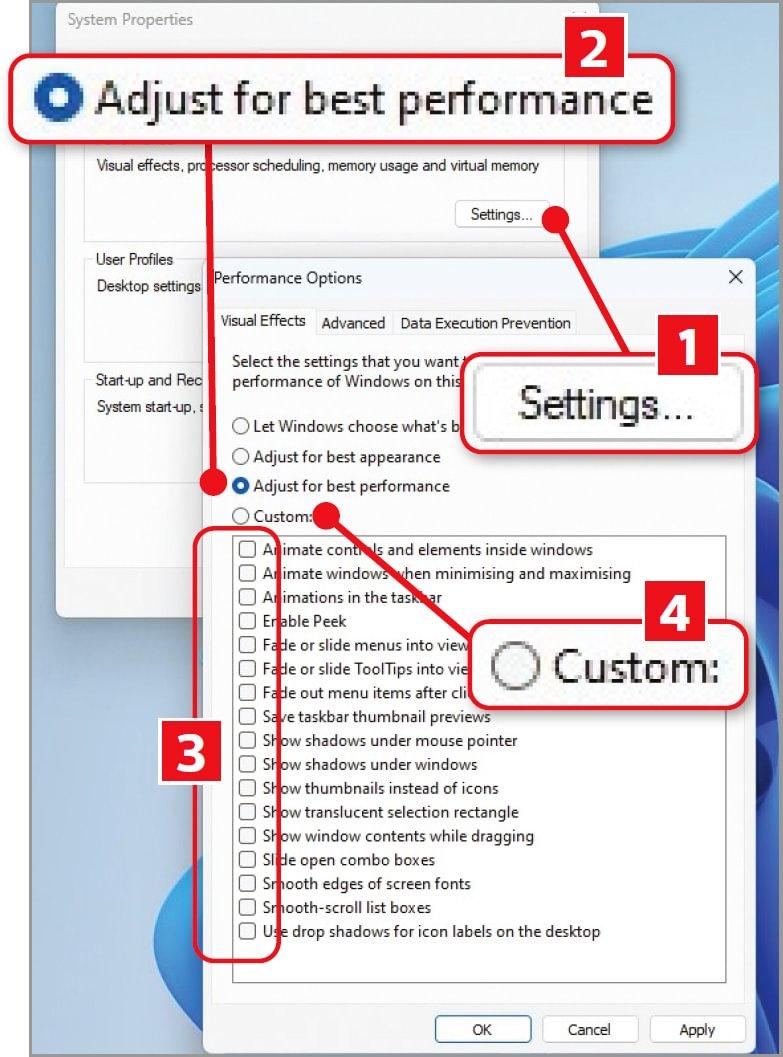
You’re safe to experiment here, because you’re not making any fundamental changes to the operating system. If you find that you miss any of the animations, you can easily turn them back on.
Change the paging file size
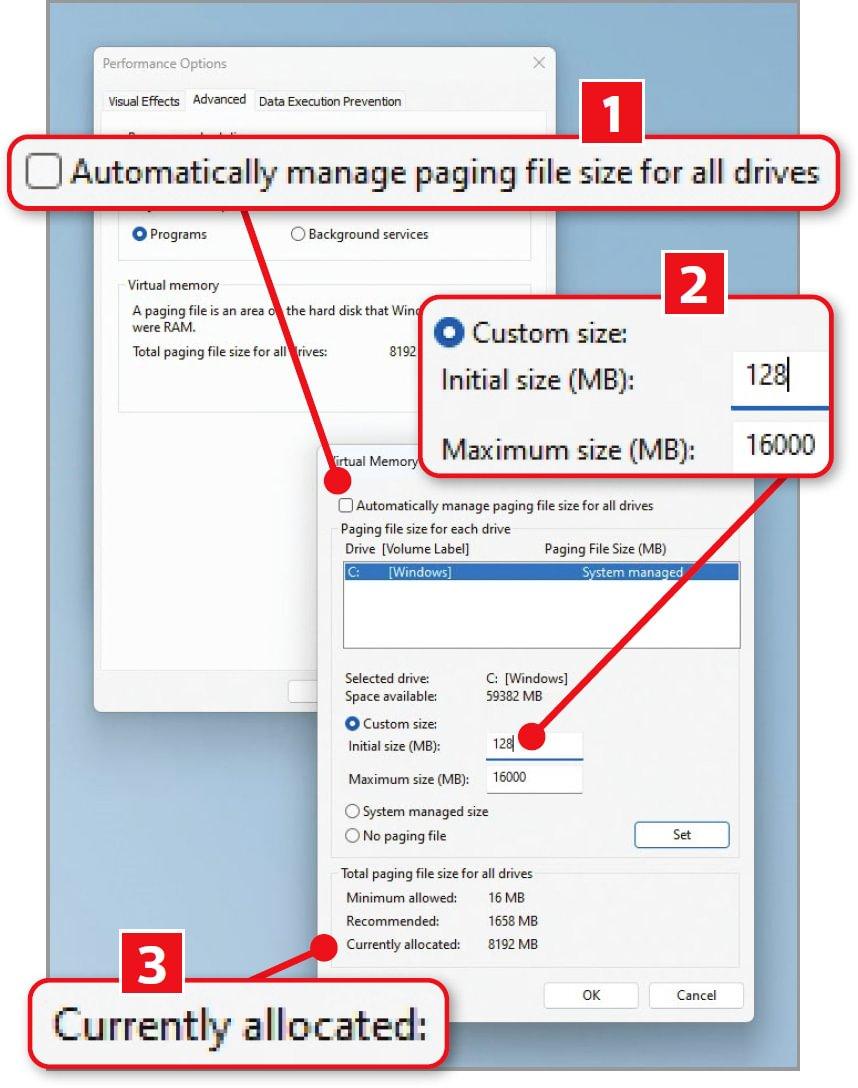
While you’re on the Advanced tab, click the ‘Change…’ button in the ‘Virtual memory’ block. This ‘virtual memory’, also known as the paging file, is the portion of your hard drive Windows uses to stash data that won’t fit into your physical memory.
Untick the box beside ‘Automatically manage paging file size for all drives’ (1 in screenshot above). Next, click the button beside ‘Custom size’ and enter your preferred values in the ‘Initial size’ and ‘Maximum size’ box 2. Before you do this, refer to the measurements in the ‘Total paging file size for all drives’ box at the bottom of the interface, which shows the ‘Minimum allowed’, and the amount ‘Currently allocated’ 3.
Don’t specify a size less than the ‘Minimum allowed’ in the ‘Initial size’ box, or less than ‘Currently allocated’ in the ‘Maximum size’ box if you’re hoping to improve your PC’s performance.
Cut software that starts when your PC boots
It’s easy to lose track of exactly what your computer is doing if you don’t know which programs launch automatically when you boot. This is well worth checking, as the more software you run simultaneously, the more data your PC’s memory needs to juggle.
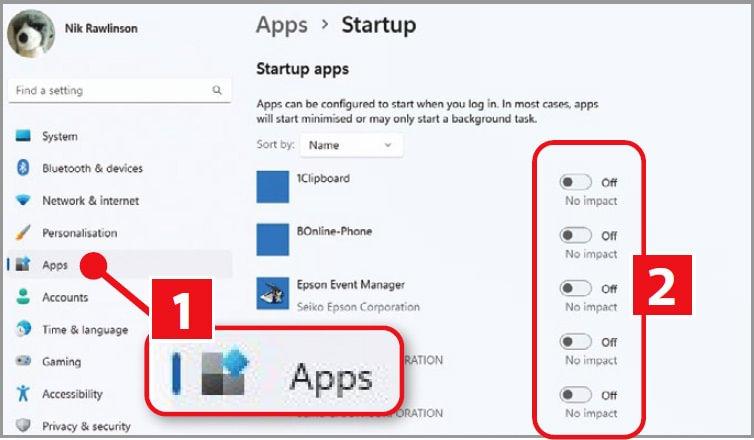
To prune the list of programs that start automatically with Windows, open Settings and click Apps (1 in screenshot above) followed by Startup. Click the sliders next to any programs you rarely use, but avoid switching off safety features such as Microsoft Defender and your backup software. When we checked our startup software, we saw five tools that didn’t need to launch at boot, so we disabled them all 2.
Snooze tabs in your browser
If you spend a lot of time browsing online, consider switching to Opera (www.opera.com). This has a handy tab-snoozing feature that puts background tabs to sleep, so they don’t use memory your PC could be better using elsewhere.
Launch Opera, type opera://settings into the address bar, then scroll down and click the small Advanced heading. Now scroll further down to the ‘User interface’ section and click ‘Snooze inactive tabs to save memory’. Restart Opera for the change to take effect.
Edge has a similar feature called ‘Sleeping tabs’, which saves memory by suspending inactive tabs. Go to Settings, then ‘System and performance’ and switch on ‘Save resources with sleeping tabs’. You can specify how long to wait before putting them to sleep.
In Chrome, use the new ‘Memory saver’ option in the Performance section of the browser’s Settings to free up RAM from inactive tabs.


