DUPLICATI Review: Create bulletproof backups in the cloud
DUPLICATI – Suitable online storage. Duplicati supports most popular services as well as WebDAV, FTP, and SSH, and can store backups locally too. Read our DUPLICATI Review.
The first rule of backups is that you can’t have too many backups. Better to have redundant copies of your data than a single copy that fails when you need it. Hopefully, you’ve already accumulated two separate backup devices, say a USB drive and network-attached storage, with backups alternating between them. You now need a third backup, stored offsite in case of fire, damage, or theft. The obvious choice is the online storage offered by Microsoft, Dropbox, or Google. But does your backup tool support cloud-based backups, and can you even trust your cloud provider—who controls the encryption keys that could unlock your data without consent?
Remove this worry by wrapping your backups in another layer of encryption, one whose keys remain in your possession, out of reach of others. The tool for the job is Duplicati—it’s optimized for cloud backups, straightforward to use, and completely free. nick peers
DOWNLOAD AND INSTALL
Duplicati supports all major platforms—you’ll find links for Windows, macOS, Linux (.deb and .rpm packages), and Synology NAS. Synology users can install the package directly, but other platforms require additional packages—Mono in the case of macOS and Linux, and both .NET Framework 4.6.2 and Visual C++ run-time components for Windows.
» Windows users can open Settings > System > Windows Update and view the Update history to verify if the .NET Framework is in place (look for updates related to .NET Framework 4.8.1), then navigate to Apps > Installed Apps and search for ‘Visual C++’ to see if a reference to Visual C++ 2015 (version 14.x) is present. If it is present, then you’re good to go, but if not, visit for installation instructions for all platforms.
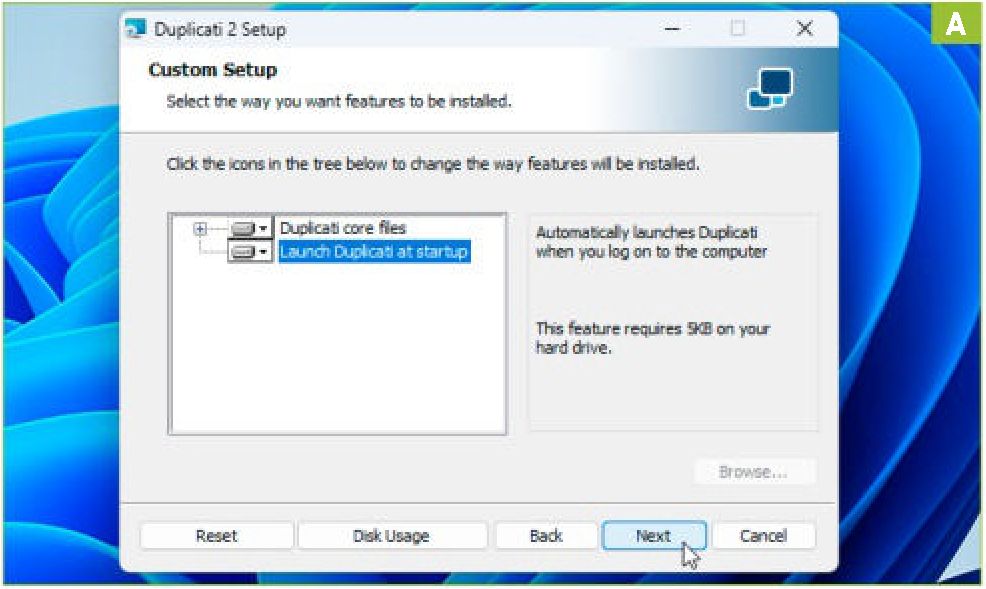
» Once both are present, head to (www.duplicati.com/download) and choose the latest Windows build (2.0.6.3 at the time of writing). Once downloaded, double-click the installer and follow the prompts. Stick to the recommended defaults— leave ‘Launch Duplicati at startup’ enabled [Image A] and ensure ‘Launch Duplicati now’ is ticked before clicking Finish.
FIRST-RUN WIZARD
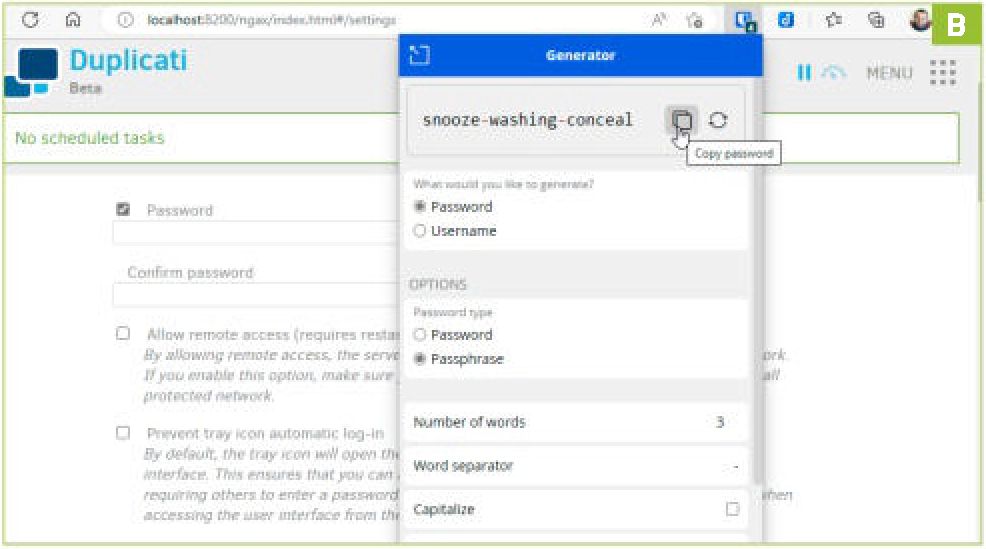
After a short pause, your web browser will open with a ‘first run setup’ wizard. First, you will be asked if you share your PC with others—if you are concerned about security, regardless of the state of your machine, click Yes to switch to ‘Settings > Access to user interface’. Tick ‘Password’ to set a strong password (we recommend using your password’s passphrase generator to create a lengthy, but memorable passphrase) [Image B].
» While you’re here, you will see an option to allow remote access. Ticking this allows you to access the Duplicati web interface from any other device on your network, which is essential if you’re installing Duplicati on a headless server. You can then access the program from any web browser on your network, using http://192.168.x.y:8200, substituting 192.168.x.y with your PC’s IP address. You might also wish to tick ‘Prevent tray icon automatic log-in’ for security reasons.
» Once done, scroll down and click OK. You’ll see a ‘Not logged in’ message—click OK to enter the passphrase and then click Sign In to return to the main Duplicati screen, ready to configure your first backup.
SET BACKUP ENCRYPTION AND DESTINATION
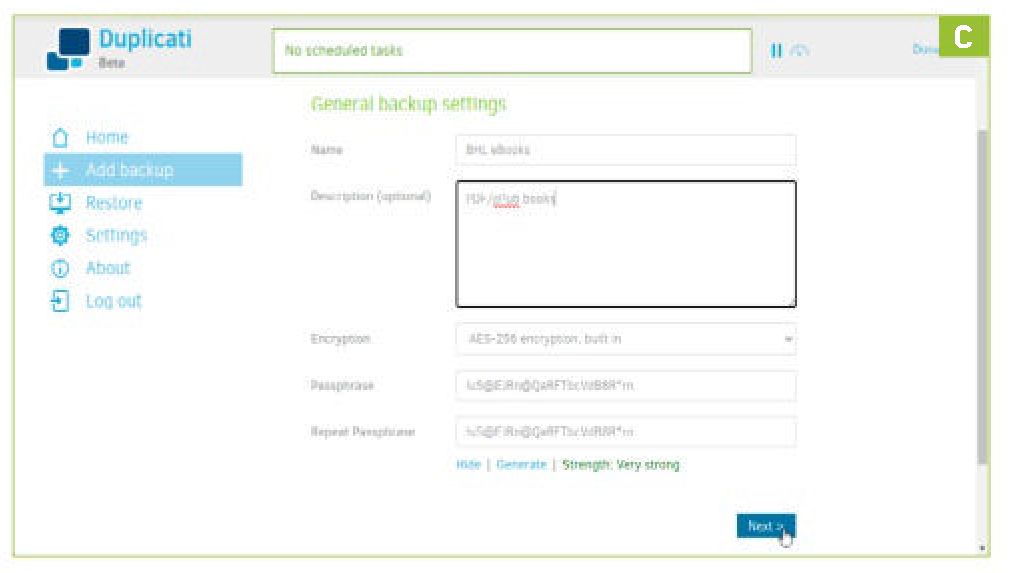
Click ‘Add backup’, leave ‘Configure a new backup selected’, and click Next. The wizard opens to ‘General backup settings’. Start by giving your backup a recognizable name and, if required, add an optional description that includes more details.
» Beneath this is the all-important encryption option — the built-in AES-256 encryption option is sufficient for most people’s needs. Duplicati can generate a random 14-character password for you if you wish (make sure you store this somewhere safe, such as in your password manager), but if you’re feeling ultra-paranoid, use your password manager to generate an even longer password or passphrase [Image C].
» Once set up, click Next to choose where to save this backup. The ‘local folder or drive’ option is selected by default, and all locally attached drives will be visible for selection. To back up to a network folder, click ‘Manually type path’ and then type the path you’d use for a direct connection – typically \\HOSTNAME\ path or \\192.168.x.y\path.
» If the network folder requires authentication, enter your username and password, then click ‘Test connection’—you should get a message saying ‘Connection worked!’ if the folder exists. Otherwise, you’ll be prompted to allow Duplicati to create the folder if necessary.
BACK UP ONLINE
To select an online destination for your backup, click the Storage Type dropdown. The options are split into two types—‘standard’ protocols, covering the likes of FTP and WebDAV, and SFTP (SSH). Depending on which option you select, you’ll be presented with fields to fill in to make the connection. For example, FTP connections require a server and port, a path on the remote FTP server, plus a username and password.
» Beneath this is a long list of supported ‘proprietary’ protocols. These cover many popular cloud storage services, including OneDrive, Google Drive, Box.com, Dropbox, and Amazon S3-compatible storage. If you plan to use your personal or home Microsoft 365 storage, choose ‘Microsoft OneDrive v2’, then click the AuthlD link to open a pop-up window that will connect Duplicati to your Microsoft 365/OneDrive account. Other providers work in a similar way, although you may need to supply more details, which you can obtain by visiting your cloud storage provider’s help pages.
» You’ll also need to manually specify the path to where you want your backups stored. If you’re unsure, type /duplicati to create a dedicated folder on the root directory of your online storage before clicking ‘Test connection’. Once confirmed, click Next to continue.
MANAGE CLOUD BACKUPS
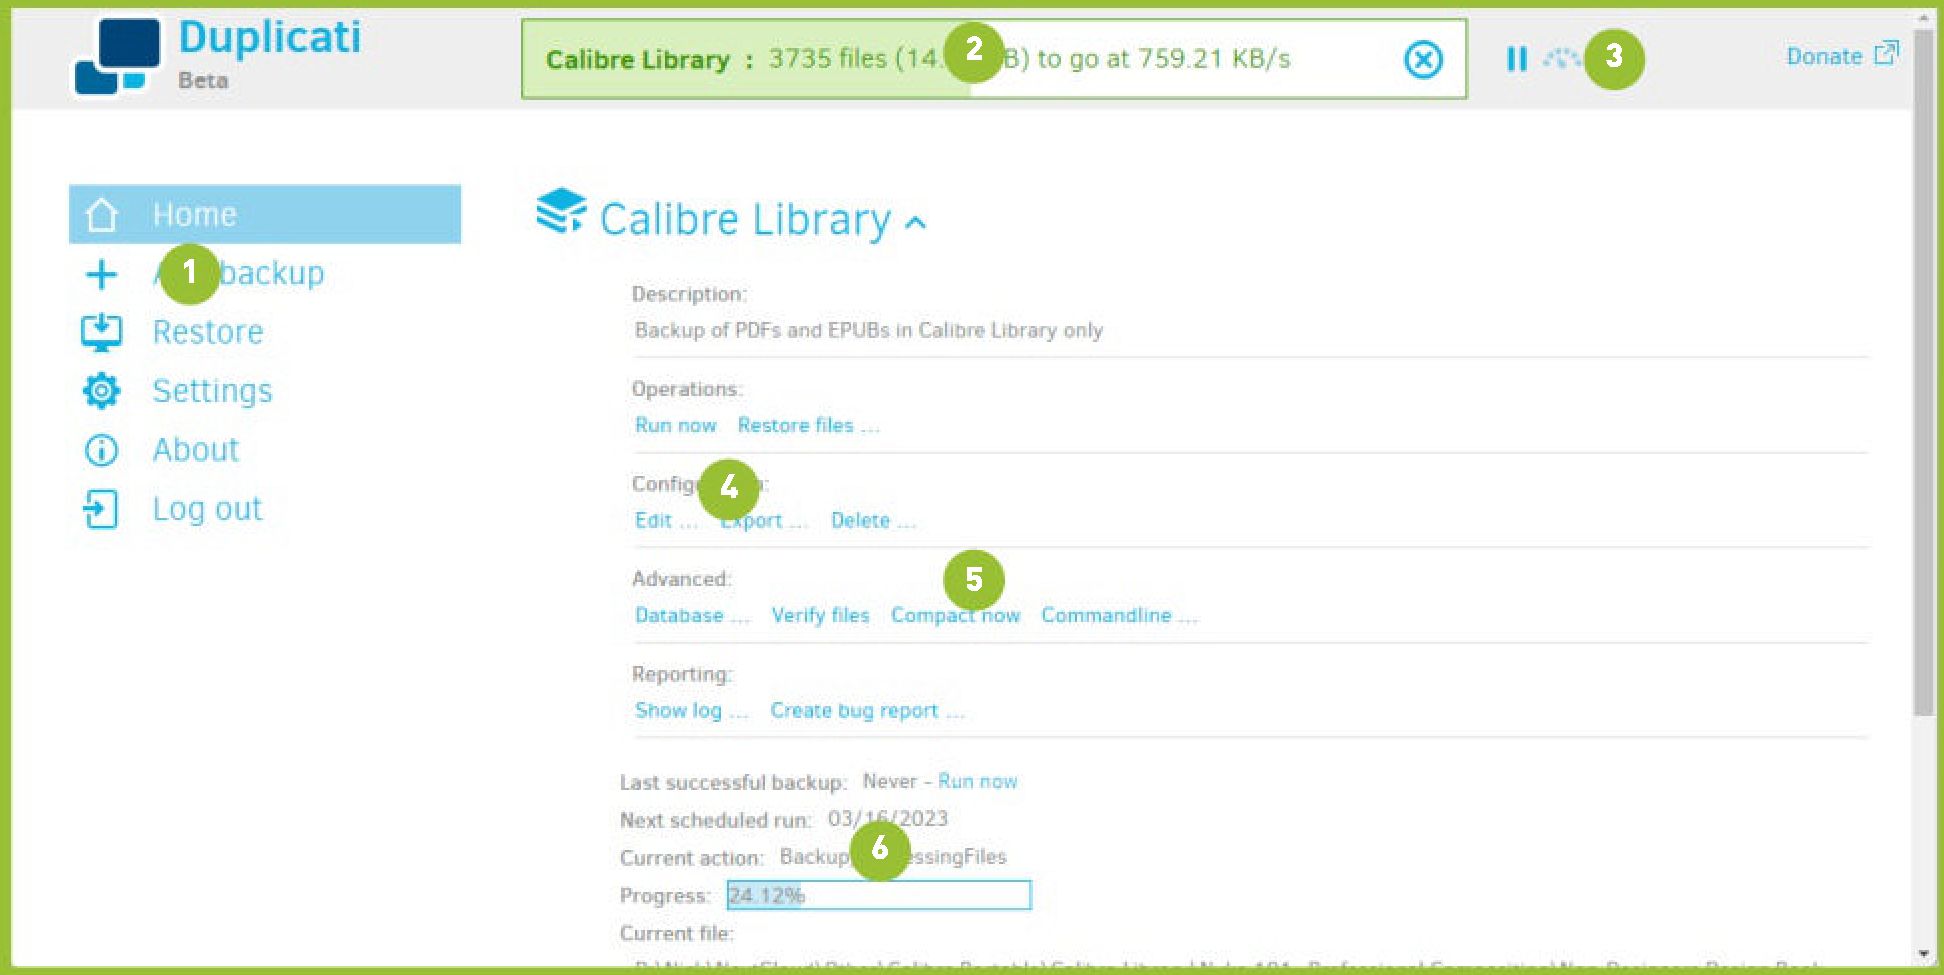
- 1. KEY CONTROLS
Use these controls to create and restore backup jobs, plus tweak Duplicati’s core settings. Click About to access system logs.
- 2. TRACK PROGRESS
This tracking bar gives you a clear indication of how your backup is progressing and how fast it is uploading to your cloud storage.
- 3. SET BANDWIDTH LIMITS
If your internet connection grinds to a halt while Duplicati is running, click the speedometer icon to set appropriate upload and download limits.
- 4. CONFIGURATION
Use these controls to edit the selected backup job, plus export it as a file for backup purposes.
- 5. ADVANCED FEATURES
Verify your backed-up files, compact or repair the underlying database and access command-line options for the backup job.
- 6. BACKUP SUMMARY
Get an overview of this backup job here—useful if another backup job is currently running, plus controls to manually run or restart it.
NON-STANDARD RESTORATIONS
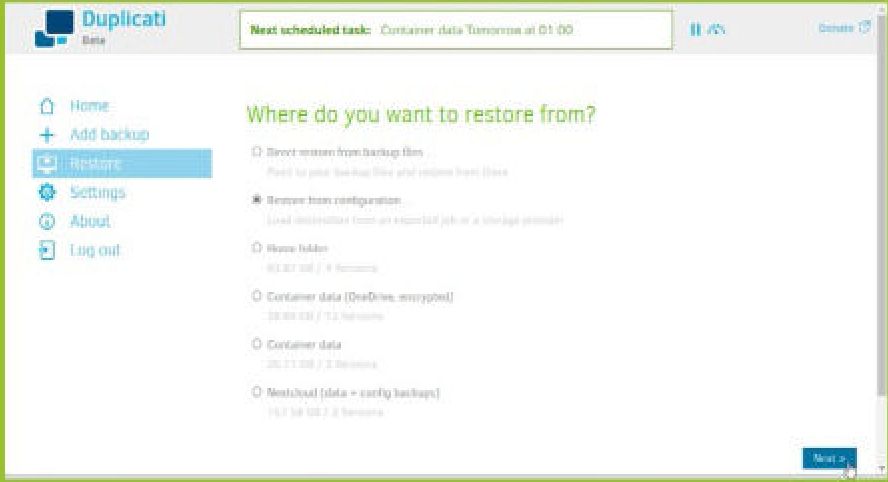
If you’re looking to restore data from Duplicati to a new computer or after reinstalling Windows, then you will need to install a fresh version of Duplicati. Once that’s done, there are two options available. The first and simplest option is to make use of the exported configuration file you took in step 7. From the main Duplicati screen, select ‘Restore > Restore from configuration’ and click Next to select your backed-up configuration file and enter your password. On clicking Next, the backup job should be restored, and you can start the restoration process from there.
If you didn’t back up the configuration file, it’s a longer process but all is not lost. Choose ‘Restore > Direct restore from backup files…’ and click Next. You’ll be presented with a similar wizard to the one that created the original backup. Choose the backup location—a simple folder selection in the case of a local or networked drive, or by reinputting the information and linking to your online provider.
You will need to enter the passphrase used to encrypt the backup. From here, you can select which files you want to restore and where to restore them, just as with other restoration methods.
SELECT WHAT TO BACK UP
Next, choose when you want to back up. Duplicati provides convenient shortcuts to your key user folders, including the hidden AppData\Roaming folder (marked as ‘Application Data’) where many programs store their user settings. Beneath this is the familiar Computer shortcut to all your drives, and there’s an option to ‘Show hidden folders’ if you need it.
» Just click > next to an item to expand it. You can select multiple folders, subfolders, or files by placing a checkmark next to each one or you can simply select a top-level folder and explore the Filters and Exclude options to restrict what’s backed up, if necessary. As you add check marks, the selected items will appear under Source data to help you see exactly what you have selected.
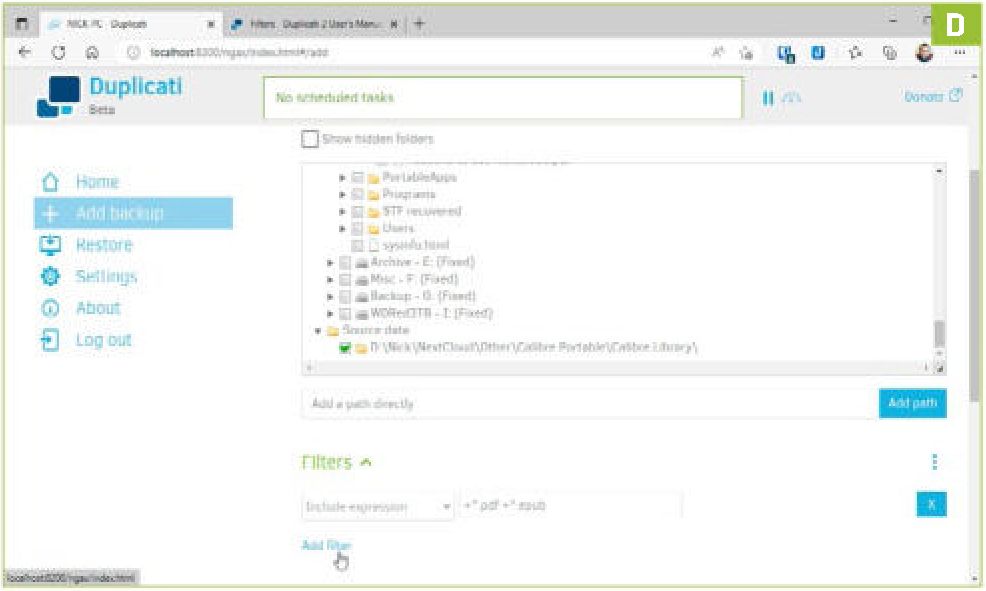
» The Exclude section enables you to strip out hidden system and temp files from your backups, along with any files larger than a specified size, which can be expressed in anything from bytes up to terabytes. Filters invites you to choose from a range of simple or sophisticated exclusions, from simple folders or files to including or excluding both simple and regular expressions. For example, let’s say you only want to back up the actual eBook files (so PDF and EPUB) in your Calibre library, you’d create an ‘Include expression’ filter containing the string ‘+*.pdf +*.epub’ [Image D].
» For a comprehensive look at setting up filters, see Duplicati’s user manual (https://duplicati.readthedocs. io/en/latest/appendix-d-filters/). Once you’re happy with your selection, click Next again.
SCHEDULE AUTOMATIC BACKUPS
This step allows you to schedule regular backups of your data —leave ‘Automatically run backups’ checked, select a time and date for the first backup, then choose to run it again at selected intervals, ranging from minutes to years. From here, you can also specify which days the backup is allowed to run too [Image E].
» Click Next and you’ll see two general options displayed. The first is the ‘remote volume size’, which refers to how your backup file is broken into manageable chunks for optimized uploading over the internet. By default, these volumes are 50MB in size, but you can increase the size of each volume to avoid hitting your online storage’s file limits, albeit that comes with a greater risk of file corruption and slower restores. The rule of thumb is to only increase the volume size if you have a fast and stable internet connection and don’t frequently find yourself restoring files from backups.
» The second option is ‘Backup retention’. By default, all backups are kept and while Duplicati uses incremental backups for subsequent updates to your backup to minimize drive space, you may still wish to change this. Four options are provided, and the smart backup option is a good default choice.
» Beneath the two general options, there is a collapsible ‘Advanced options’ section, containing a staggering number of additional tweaks for advanced users. For this tutorial, we’re going to stick with the simple stuff as it’s flexible enough for most people’s needs, but there’s a full list with definitions for reading as part of Duplicati’s online manual (https://duplicati.readthedocs.io/en/latest/06-advanced-options/).
YOUR FIRST BACKUP
Once you’re happy with your backup selection, click Save.
You’ll be returned to the home screen where your first backup job will now be listed. Click ‘Run now’ to take your first backup, then click the ~ button next to the backup job name to reveal lots more options.
» The first backup may take hours or even days to complete, depending on its size. If you find that uploading brings your internet connection grinding to a halt, click the speedometer button to set a maximum upload speed—no more than 75 percent of your total upload bandwidth—which you can get from (www.speedtest.net). Note that you will need to convert the figure from Megabits per second (Mb/s) to Megabytes per second (MB/s) by dividing it by eight.
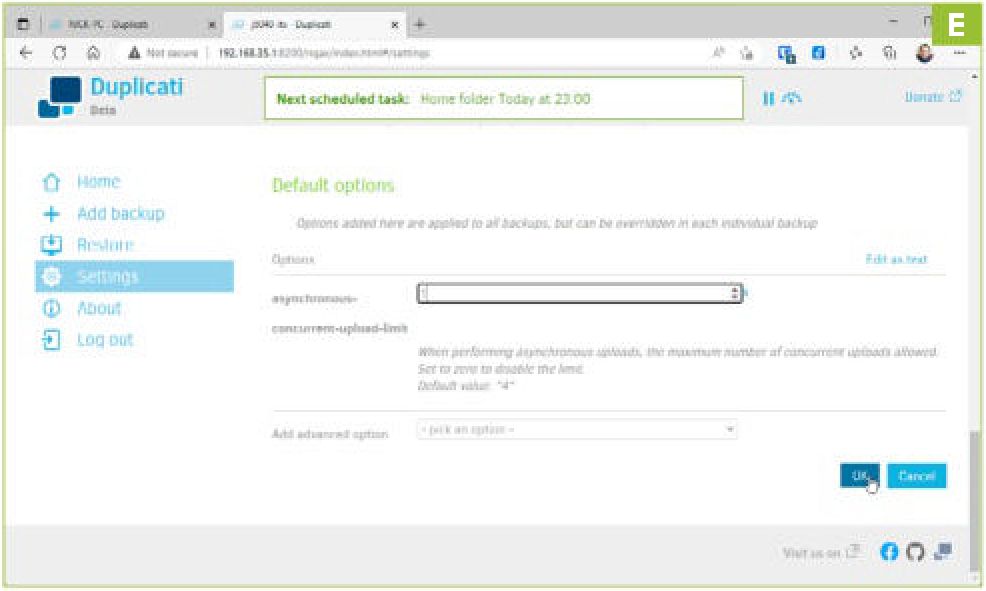
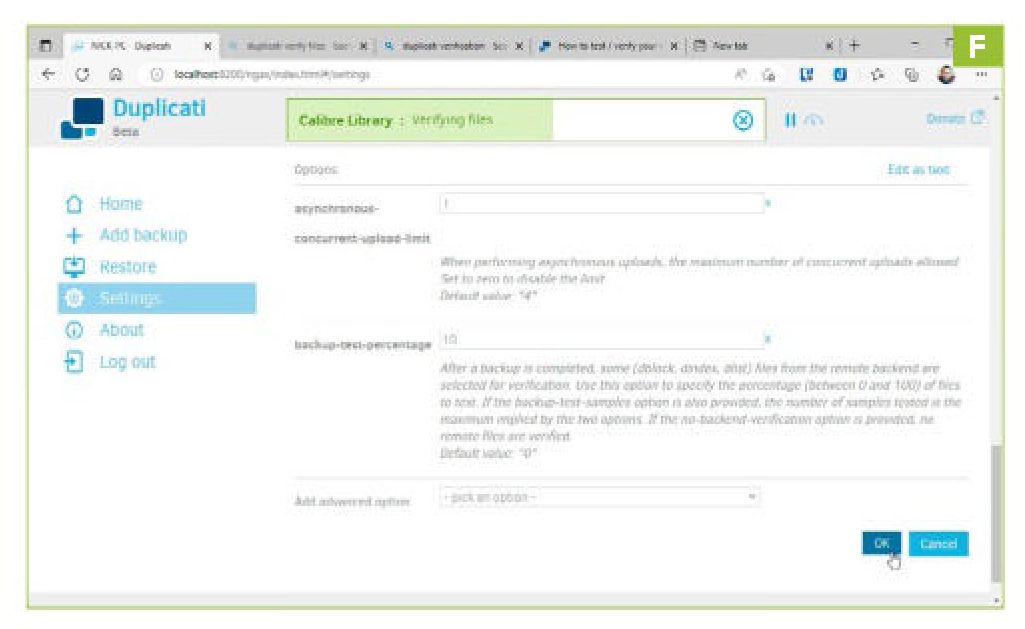
» You’ll also need to tick the ‘Max download speed’ box, which can be left at the default 10MB/s, then click Settings on the left, scroll down to ‘Default options’ and click ‘pick an option’ next to ‘Add advanced option’. Select ‘asynchronous-concurrentupload-limit’ under Core Options and set it to 1 as shown in [Image F]. Click OK, then click ‘Run now’ to start your backup.
» You can now leave Duplicati to its own devices. It’s best to periodically check in to see how the backup is progressing, and in the meantime, protect your Duplicati backup configuration by taking the time to export it—expand your backup job’s settings and click Export under Configuration. Leave ‘To File’ and ‘Export passwords’ selected, tick ‘Encrypt file’ (and supply a password) to protect it, then click Export. Store the file somewhere safe.
ADD MORE BACKUP JOBS
You can now move on to your second (and subsequent) backup jobs, following the same procedure we’ve outlined above. Complete your first backup job before running the second one —initial backups will always take longer than subsequent ones, because only the changes are recorded and added to the backup volume, resulting in faster (and smaller) backups.
» You can edit the backup settings at any time, so it might be worth skipping the scheduling of backups until each job has been completed once. Then you can expand each backup set in turn and click ‘Edit’ under Configuration to set up non-conflicting schedules—either on separate days or with a minimum of one to two hours between jobs.
» After a backup completes, a limited verification process is applied. This basically tests just one of the uploaded files to ensure it’s working as it should. Visit (https://forum.duplicati. com/t/how-to-test-verify-your-backups/3700) to find out more about how the verification process works.
» If you want to verify more of the backup each time the job is run, add the ‘backup-test-percentage’ advanced option under Settings, then choose a suitable figure (10 percent ensures that the entire backup is tested over ten runs, for example).
RESTORE BACKUPS
So, what if the unthinkable has happened and you need to recover some data that you’ve lost from your backup? If you’ve been forced to wipe your system and reinstall Duplicati, check the boxout on irregular restorations for details on how to recover your backups; otherwise, it’s a simple task of opening Duplicati, clicking Restore, then selecting the relevant backup job and clicking Next.
» Whichever restoration option you choose, you can then select which folders to restore using the file picker—just tick the top-level folder to select everything in your backup. You can search for specific files and folders by keyword too.
» If you have multiple versions backed up, you can use the ‘Restore from’ dropdown menu to select an earlier version if you wish, although in disaster-recovery cases you’d usually leave the latest version selected.
» Once you’ve made your choice, click Continue. You can restore to the original location or select a folder path to restore to (click the Browse button). By default, existing files will be overwritten, but you can opt to save a copy with a timestamp in the specified location instead if you so wish. Look out for the ‘Restore read/write permissions’ box—ordinarily, you’ll want to preserve these, so tick this before clicking Restore and waiting for the files to be copied back to your PC.
FILE ENCRYPTION ON THE HOP
Duplicati makes use of AES encryption to scramble your backup files. Based on the free AES Crypt tool ( aescrypt.com), you can use it as a standalone to encrypt (and decrypt) files on the fly—a perfect tool for storing or sharing sensitive files with others in an ad-hoc fashion.
Once installed on your PC, simply right-click a file and select ‘AES Encrypt’ from the ‘Show more options’ menu. Enter a strong password and click OK, then wait for an .aes file to be generated. This can be stored securely or sent to a trusted contact, with whom you’ve shared the password privately on a separate, secure channel. All they need to do is install AES Encrypt on their PC, then double-click the file you sent them. They’ll be prompted for the password at which point a copy of the unencrypted file will be generated.
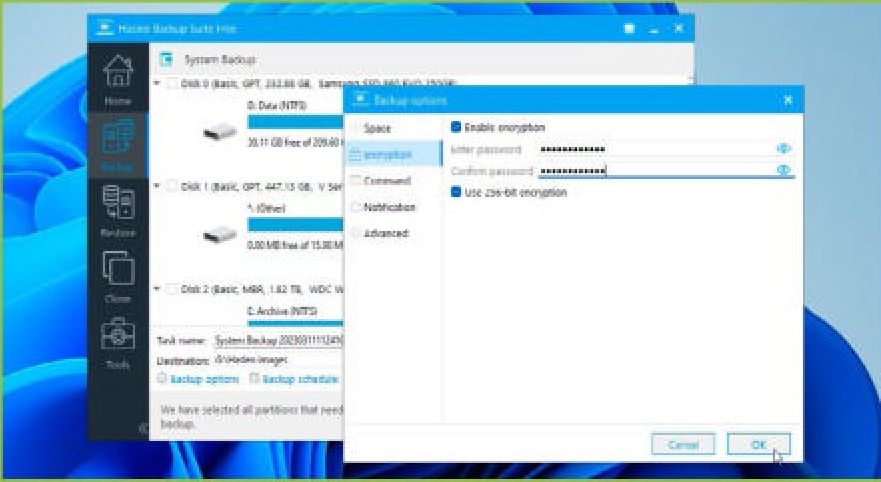
It’s also worth checking your drive imaging tool to see if you can encrypt system backups—Hasleo Backup Suite users should select Backup Options > Encryption tab (check ‘Use 256-bit encryption’ for maximum protection), while Macrium Reflect users should click Advanced Options while editing their backup job and select Password. Again, select the 256-bit AES option for maximum encryption.


