50 Ways To Work faster

BE MORE PRODUCTIVE, they say. Work smarter. Do five days’ work in the space of four! Now, we’re not suggesting that this article is going to shave two hours from your working day, but even if you find two tips out of these 50 that make a difference, we think that’s worth celebrating. Read our 50 Ways To Work faster.

Never has been this subject been more topical, either. On the one hand, we have generative AI tools popping up all over the place that promise the world—even if that world has six fingers and dresses the Pope in a white puffer jacket. As we will see, there are practical ways to take advantage right now.
On the other hand, companies such as Adobe and Microsoft are desperate to keep you subscribing to their software. To do so, they continually update their software with extra tools, many of which (as you will see) can shave a few minutes from a task, or automate it all together.

ADOBE LIGHTROOM CLASSIC
QUICKLY SELECT PEOPLE
If you’ve taken a portrait, it’s easy to select the person without having to brush around them first. Open the image in the Develop panel, and then select the Masking tools, which are found by clicking on the circular icon under the histogram. You should see small circular thumbnails of any people in your image in the right-hand pane. Click on them, and the red mask highlighter will appear over the person in the image.
That should open a sub-menu that allows you to mask only certain body parts, such as hair, teeth, face, skin, or lips. Select the appropriate body part or the entire person, then click Create Mask. Now, you can make isolated adjustments to exposure, colors, saturation, and so forth to get the desired effect.
BRIGHTEN SKIES WITH EASE
Once again, open your landscape image in Develop mode and click on the Masking tools. This time, select the Sky button from the righth and pane. Once the sky has been selected, you can adjust the temp, tint, and hue settings until your dull gray sky is a more pleasing blue.
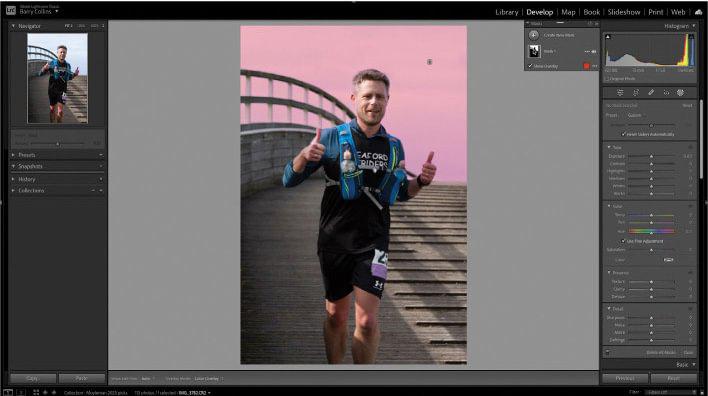
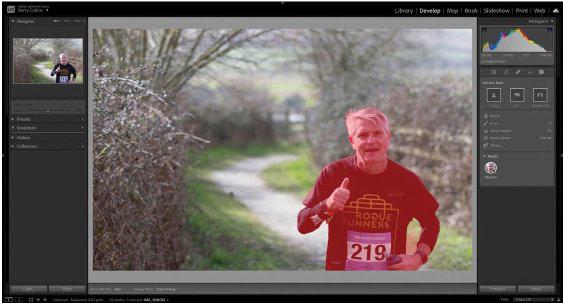
The advantage of using the Sky mask tool rather than brushes is that the selection is accurate, even picking out the sky in the gaps between the bridge rails in our photo, so you don’t end up with parts of the image being wrongly colored or having to spend ages fine-tuning the mask.
CONTENT-AWARE REMOVAL OF STRAY OBJECTS
If you have a stray crisp packet on a beach or a distracting interloper in a landscape, you can swiftly brush them out of history. In the Develop mode, click on the sticking plaster tool in the right-hand pane, and make sure content-aware removal is selected at the top of the pane that opens—it’s the icon that looks like an eraser.
Now, brush over the part of the image you wish to vanish away, using the mouse scroll wheel to adjust the size of the brush, if necessary. When you’re done, Lightroom should hopefully have removed the miscreant and filled in the background with something suitable.
AUTOMATIC PEOPLE TAGGING
Automatic people tagging makes finding people in a big library easier.
In the Library panel, press “O” on your keyboard to enter People mode. You should now be presented with a sea of thumbnails showing the faces of anyone in the open picture folder or collection. Lightroom does a pretty good job of matching faces, batching together all the pictures containing a particular person. Enter the person’s name beneath their thumbnail, and not only will all the pictures in that folder/collection be appropriately tagged, but Lightroom will attempt to identify that same person in other folders/collections, too.
LENS CORRECT ON IMPORT
Lightroom now applies automatic lens correction for modern mirrorless cameras, but doesn’t for older DSLR models.
To have all of your images lens-corrected in one hit, you can create a preset that does this at import. Launch Lightroom with the Develop panel open on an image to which you’ve already applied lens correction, and then click Develop | New Preset from the application dropdown menu. Select the option to Check None and reselect the options you want under Lens Correction (such as chromatic aberration and enable profile corrections). Now, call this preset “Lens correction”, and click Create.
The next time you import, you’ll be able to save time by selecting the Lens correction preset.

MICROSOFT EXCEL
DEAL WITH COMMA-SEPARATED VALUES
De-mangle badly formatted data, such as a list of names in the “Collins, Barry” format, and break it down into first name and surname with the new TEXTBEFORE function.
Let’s say the name above was printed in cell A2. To extract the surname alone, you’d enter the following formula: =TEXTBEFORE(A2, “,”)
A2 is obviously the cell we’re targeting and the “,” part specifies the delimiter, in this case the comma between surname and first name. The TEXTAFTER function works in a similar way.
INSERT DATA FROM A PHOTO
If there’s a table in a printed document that you don’t want to go through the hassle of entering manually, you don’t have to. Excel now offers the option to insert data from a photo, letting you snap the table using the camera on your smartphone and upload it to Excel. You’ll find the Insert From Picture option in the Insert tab of the Ribbon.
You can review and correct the data before Microsoft imports it—the cleaner the photo, the better. We were able to grab data off a website by snapping our monitor, but scans or screenshots worked even better. It’s not flawless, but it’s much quicker than doing it by hand.
GET AI TO WRITE YOUR FORMULAE
If you struggle to wrap your head around Excel formulae, ask an AI to help you. Services such as ChatGPT—now freely accessible via Bing in the Edge browser—are able to write Excel formulae for you.
I asked Bing to help me create a formula that counts how many times the word “Google” appears in a spreadsheet. It replied:
“You can use the COUNTIF function to count the number of times a specific value appears in a range of cells. For example, if you want to count the number of times “Google” appears in cells A1 to A10, you can use the following formula: =COUNTIF(A1:A10,”Google”). This will return the number of cells in the range A1 to A10 that contain the text “Google”.”
QUICKLY SET GOALS
Let’s say your website has a traffic target of an average of 250,000 visitors per month in Q1. You know the figures for January and February, but want to know how many visitors you need in March.
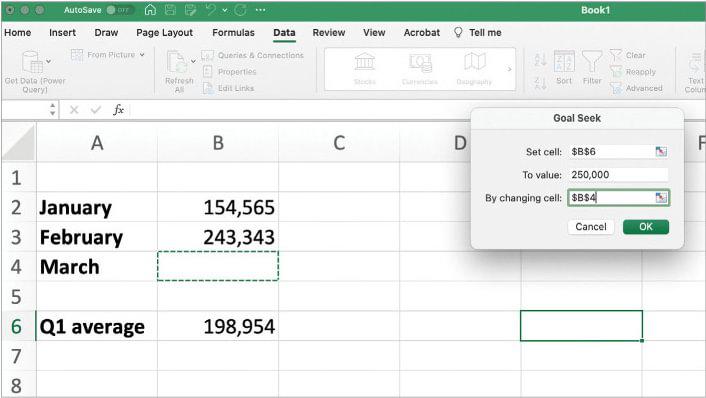
Excel has a goal-seeking feature that can get you this answer. Open the Data tab, click What-if Analysis, and choose Goal Seek from the dropdown. In the example below, we need to get our Q1 average in cell B6 up to 250,000, so we select $B$ as the Set Cell, enter 250,000 as the To Value, and it’s the figure in cell B4 that we need to change to know what traffic we need to achieve in March. Press OK, and Excel will do the sums and spit out the goal.
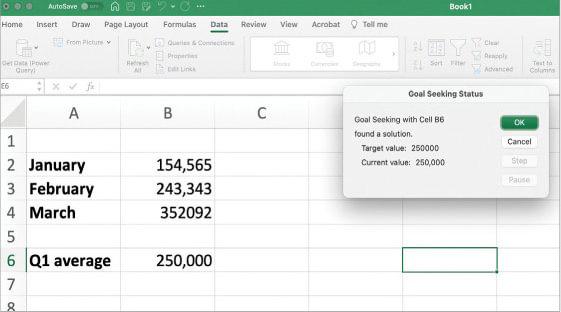
You can later replace the goal figure with the actual figure and the spreadsheet will recalculate the true average.
FILTER HUGE SHEETS
Let’s say you have a spreadsheet containing every transaction from an online store in the past six months. You can use filters to show only the sales of certain products, sales within a given month, sales that exceed $ and so forth.
You can apply filters by clicking Sort and Filter on the Home tab, and then Filter. A filter dropdown will appear at the top of each column, where you can determine what to filter by. You can filter on more than one column, so if you need to find all sales that exceeded $ in August, you just need to adjust the filters at the top of the date and transaction value columns.
MICROSOFT WORD
Word’s Style Sheets are powerful, yet widely ignored, according to reader, Geoff Campbell.
“I do a lot of load tests, for example, with 40-page results reports in a nice, sober business layout, maybe 5,000-ish words and lots of supporting graphs,” he wrote. “They all share exactly the same look, generated by the style sheet, so that reports from a decade or more ago are instantly recognizable against ones done last week, and I know that if I tweak a paragraph attribute, it will be reflected through the whole document instantly. It’s a massive time-saver.”
ROLL YOUR OWN WORD TEMPLATES
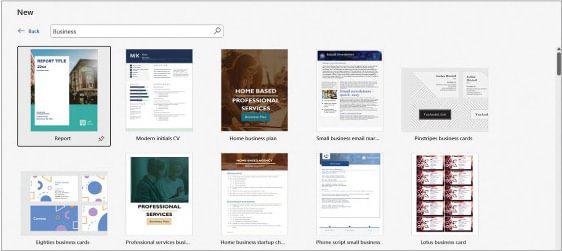
Martin Bailey advocates “roll your own templates”, using them for documents that “I’m going to need again: add the headings and cover sheet, and save it as a template before adding any content”. In addition, he uses ClipName to “turn filename paths into URLs or clickable Word links”. This simple (and free) utility adds an extra item to Windows Explorer’s right-click menu.
CO-AUTHOR DOCUMENTS
It isn’t only Google Docs that lets you collaborate on documents in real-time. You’ve been able to co-author in Word since 2016, though encrypted document support took longer. Naturally, Microsoft insists the file is saved to OneDrive (or SharePoint Online), at which point you can invite people to collaborate via the Share dialog.

POWERPOINT
USER SURFACE EARBUDS TO CONTROL YOUR PRESENTATION
You can press the spacebar or mouse left-click to go to the next presentation slide, but for the last word in cool, use the Surface Earbuds ($ from Microsoft). After pairing them with the Surface Audio app in Windows 10 or 11, you can then use gesture controls.
First, start a presentation (by pressing F5), then right-click on the slide. Under “Surface Earbuds Settings”, choose “Use Gestures to Control Presentation”. It will now work for all presentations.
The actions are intuitive: simply swipe forward or backward on the left earbud to, well, go forward or backward. You can double tap to play or pause videos, too.
PRE-RECORD PRESENTATIONS
If you find yourself repeating the same presentation online over and over again, use the option in PowerPoint to record yourself doing it. You can still answer “live” questions at the end of the presentation, of course, or share it with your audience and let them view the session in their own time. Click the Cameo option from the Record ribbon, and you can insert yourself into the presentation complete with numerous effects and blurring options. It’s all intuitive, so have a play and, when you’re happy, click Export Video to share it with the unsuspecting world.
REHEARSE WITH SPEAKER COACH
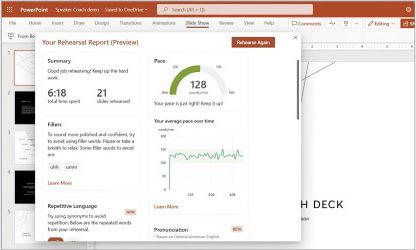
This isn’t a short-term time-saver; it’s one for the long term. You see, Microsoft has a tool that allows you to rehearse your presentations in private, but Speaker Coach doesn’t just sit there and watch; it gives you a report at the end of the presentation with feedback on your pitch, pacing, over-use of euphemisms, and much more besides.
To use Speaker Coach, open your presentation in PowerPoint for the web in Microsoft Edge. Obviously, you’ll need to be signed in via your Microsoft account. Click on the opening slide, and then choose Slide Show from the Ribbon. Now, hit “Rehearse with Coach”, and after giving Edge access to your microphone, talk away as you normally would. When the slideshow ends, you will be given a report, complete with surprisingly useful insights.
INSERT APPLE PHOTOS WITHOUT CONVERSION
Here’s a quick tip for anybody who still converts Apple photos before inserting them into Office applications: you don’t have to. In fact, ever since summer 2020, all the Office apps have supported HEIF and HEIC images (as taken by iPhones), so all you need to do is browse to the pics in question via the Insert tab (then select Pictures | From device).

SLACK
MEET IN HUDDLES
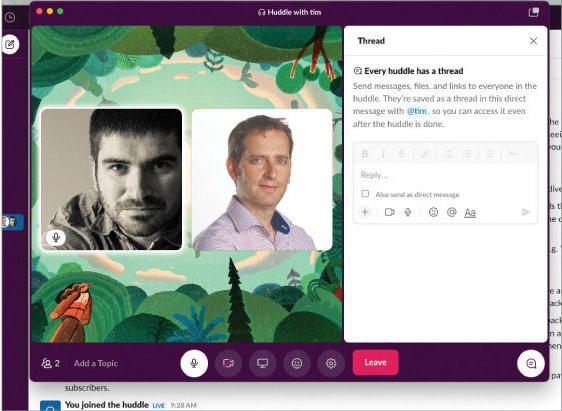
Why spend 20 minutes trying to sort something out in text messages that you could have settled with a two-minute chat? Huddles are a clever solution to that problem.
Available in any Slack channel, they allow all members to quickly join an online call and discuss something. Anyone can dip in and out of a Huddle, and you don’t have to set up invites or schedules. Just flick the Huddle switch at the bottom of the channel’s menu, join in by voice or video, or type the command/huddle.
Our only criticism of Slack Huddles is that it’s not always obvious when somebody has started one—the notifications could be better.
CREATE A TO-DO LIST
Another of Slack’s irritations is its immediacy: people see you’re online and expect an immediate answer. That’s not always possible, and it’s easy to lose track of conversations. One way around this is by saving messages. Click on any message, and you’ll see a small bookmark icon that allows you to save it. The sender doesn’t see you’ve saved the message, but it’s lodged in your saved message queue, creating a pseudo to-do list of messages to reply to when you have time.

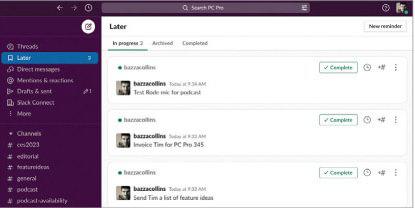
If you need to create a to-do list item yourself, you can direct message yourself and then save that message.
INCLUDE CONVERSATION HISTORY
A lot of Slack communication takes place in DMs between a select group of team members. If you want to bring a colleague into the conversation, you would—until recently—have had to bring them up to speed on what’s previously been discussed, as Slack barred them from seeing past conversations. Now, when you add a colleague to a DM group, there’s an option to let them see previous conversations, meaning you can let them read back and bring themselves up to date. Just make sure there’s nothing sensitive in there.
MASTER THE SLASH COMMANDS
If you’re using Slack on desktop, the Slash commands can be extremely useful for performing quick actions without having to dive into menus.
Two of the commands we commonly use are/collapse and/expand./collapse hides all in-line images and thumbnails that appear when someone shares a link in a channel, making it much easier to skim back through discussions, while/expand does the opposite.
Other useful commands are/remind to set a reminder for a @user, or a #channel and/status to quickly change your Slack status (such as “in offsite meeting”). The full list can be found at tinyurl.com/2zf4fuun.
SEND EMAILS TO SLACK
Slack was originally pitched as an email killer. It didn’t, of course; it just created another way to communicate. That means there are still times when messages relevant to your Slack conversations are received via email, especially those from external clients who don’t use Slack.
However, this is a convenient way to forward emails to Slack channels or conversations so that you can discuss, say, project feedback from clients with the group. To do this on Slack’s desktop app, open the channel/conversation that you would like to send the email to, and click the down arrow next to the channel/conversation’s title at the top of the screen. Now, select the Integrations tab, and then “Send emails to this channel”. When you click that, you will be given a long, obscure email address that you can forward messages to.
Slack can handle attachments, so you don’t need to worry about PDFs or suchlike being left behind. This feature is only available to paying subscribers.

OTTER
INSTALL THE BROWSER EXTENSION
Otter has a Chrome extension (which works in Edge and other Chromium-based browsers) that makes it dead simple to get full transcripts every time you have an online meeting. When the meeting starts, you’ll be prompted to record the meeting in Otter, with a live transcript appearing in the browser alongside your Google or Zoom meeting. It’s a visual reassurance that everything is being recorded.
SYNC YOUR CALENDAR
Another tip is to sync your calendar with the service. This means that when you create meetings in Google Calendar, you can press a button to have Otter sit in and take notes. A link to the meeting notes is then added to the calendar invite itself, so you can always dip back into your calendar and find the transcript or notes from the meeting.
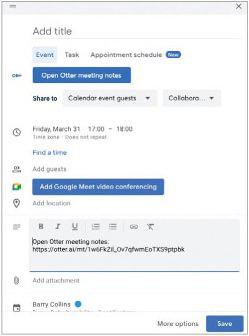
You can tweak your Otter settings to have it automatically transcribe all of your video meetings, although there may be some meetings you don’t want a record of.
VIEW THE AUTO-SUMMARY AND ACTION POINTS OF MEETINGS
Otter is not bad at creating automatic summaries of meetings. It seems to listen out for people posing questions, and uses those as summary headers of the meeting, allowing you to subsequently jump straight to the section of the transcript in question.
Otter also allows you to go back and pick out the action points from meetings, which can be assigned to attendees. Simply go back through the transcript and highlight any part of the meeting that consists of an action point. A pop-up menu will appear, from which you should choose the tick icon. From here, you can assign it to a particular attendee. Action points are then emailed to attendees to ensure they’re aware.
SHARE MEETING NOTES
It can, of course, be enormously helpful for all attendees of a meeting to have the Otter transcript, not only the meeting organizer. If you’ve created the meeting in Google Calendar and pressed the button to add Otter meeting notes, you’ll see a dropdown menu that allows you to share the notes with all attendees or other colleagues. That latter option could actually be more useful, as it allows you to bring absent colleagues up to speed on a meeting they’ve missed, without you having to give them a verbal or written update yourself, saving time and duplicated effort.
SEND OTTER TO MEETINGS ON YOUR BEHALF
Calendar conflicts sometimes mean you can’t be in a meeting, but it is possible to send Otter on your behalf. Join the meeting and switch Otter on, and you can then put yourself on mute, switch off your video and let Otter take notes. Of course, it won’t participate, but you will be able to go back into Otter after the meeting has concluded and find out what you missed.

MICROSOFT OFFICE
EXPLOIT ONENOTE
John Johnson is one of many readers who relies on OneNote. “I can make or refer to notes, update to-do lists, or draft emails and documents from my phone or laptop,” he says, and “action those when back at my desk, or vice versa.” He also uses his “phone to dictate in OneNote, then pick up on PC.”
PIN FILES AND FOLDERS IN THE SAVE DIALOG
In terms of time spent versus time gained, this must be one of the best tips around, and it applies to Word, Excel, and PowerPoint. In the same way that you can pin documents in Explorer and programs to the Taskbar, you can pin favorite documents to the Home and Open views in Office apps.
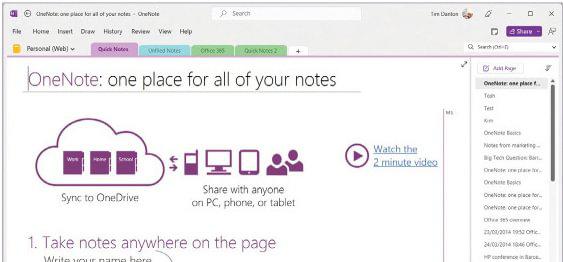
Open up PowerPoint (or Word, or Excel) and head to the Home dialog. Hover your mouse over the document you wish to pin, and Share and Pin icons will appear. Now, when you click on the Pinned option, your document will appear.
Pinning folders is a bit more convoluted. First, choose “Save As” for an open file, then browse to the folder you wish to pin, and right click it. You’ll see the option “Pin to Recent list” on the context-sensitive menu, so click it. The next time you head to the Open dialog, click on Folders (rather than Presentations) underneath the Search box, and your pinned folder will sit in the Pinned section at the top of the list.

GOOGLE DOCS
AUTO-GENERATE SUMMARIES
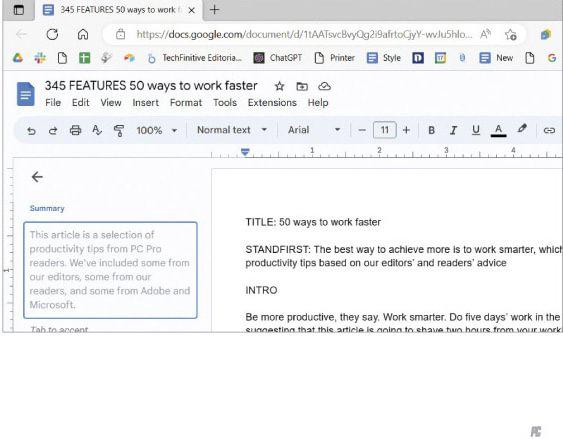
This is a feature that will soon become commonplace with the advance of AI tools, but if you’ve got a long report in Google Docs and need a quick summary, Docs can do this for you, provided you’re a Workspace subscriber. To create an automatic summary, click View | Outline, and then click the little button next to the Summary field. In a few seconds, the AI should give you a heads-up of what the document is about. You can then copy and paste that text into the document itself.
USE SMART CHIPS
Smart Chips are a relatively new addition to Google Docs. You’ve probably stumbled across them by accident whenever you’ve typed the @sign. When you do so, you’ll be presented with a dropdown menu showing a series of items you can insert into your docs.
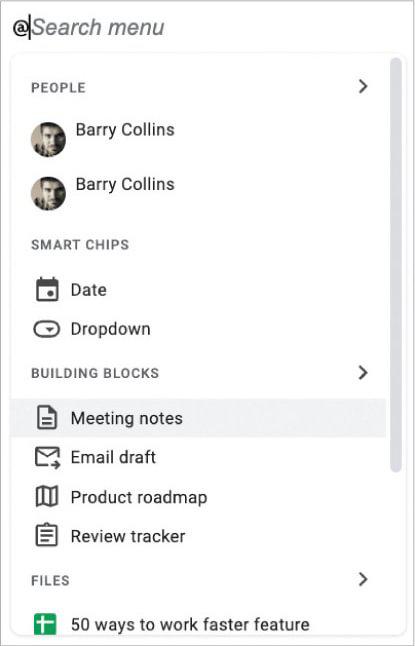
If you’re writing a business proposal and need colleagues to review a certain section, you can grab their attention by typing @and then their name. If you’re setting a deadline for something, you can type @then the date—and that’s smart enough to understand commands such as “next Thursday” or “two weeks” and insert the relevant date.
You can also use smart chips to insert things such as meeting notes or product roadmaps, which is useful for internal project management when you need to keep everything on track.
DISCUSS A DOC
Collaboration has always been one of the great strengths of Google Docs. However, that can also lead to edit skirmishes and people working at cross purposes.
If you need to talk to a colleague to sort out a document disagreement, Google Meet is now built into Google Docs. You can talk about the doc with the video window appearing in a sidebar to the right, allowing you to quickly sort out something that might otherwise descend into a long comments thread that takes ages to resolve.
BRING ON THE SUBS
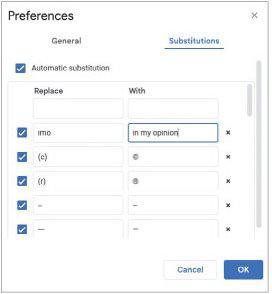
If you find yourself regularly typing the same long phrases over and again, you can use substitutions to save some of the fingerwork. This is basically Google Docs’ equivalent of a text expander and you’ll find it under Tools | Preferences | Substitutions.
So, for example, you could type “imo” and have it automatically replaced with “in my opinion”. The annoying thing about Google’s substitutions is that they ignore capitals and everything comes out in lower case. Hopefully, someone at Google Towers will read this and get it fixed.
CREATE A QUICK PDF
There’s a neat piece of URL hackery you can perform to quickly share a Google Doc via PDF, without going through the rigmarole of File | Download | PDF, saving the file locally and attaching it to an email. Instead, remove the word “edit” from the end of the URL of the doc you’re working on and replace it with “export?format=pdf” (without the quote marks), then copy that URL and send it to clients directly. However, be aware that the PDF is refreshed with the latest version of the document every time someone downloads it. If you want to send a PDF of a document in a fixed state, download and export using the method above to have Otter sit in and take notes. A link to the meeting notes is then added to the calendar invite itself.

GENERATIVE AI
SHORTEN SEARCH TIMES
There’s a reason Google’s share value dropped 10 per cent when its AI demonstration went wrong: AI search is the future. What’s more, Microsoft has already taken a clear lead with its integration of AI into Bing, while Bard remains in the pre-release stage. Let’s say you’re looking for cheap phones. A Google search will bring up a list of articles that cover the subject, but Bing’s AI tool provides a shortlist of five candidates and provides nearby locations where you can buy them.
SKETCH OUT A BLOG POST
There are a huge number of AI writing tools to play with, but our favorite so far is Writesonic. If you want to write a blog post then Writesonic can take you through the process step by step, providing suggestions along the way—even writing the whole thing for you from a couple of prompts. As ever, it’s no substitute for an expert writer, but we think it’s better than much of the waffle you see in blog posts elsewhere. Final note: you will need to check details, but thanks to GPT-4, it now adds references.
AUTOMATICALLY SCHEDULE YOUR DIARY
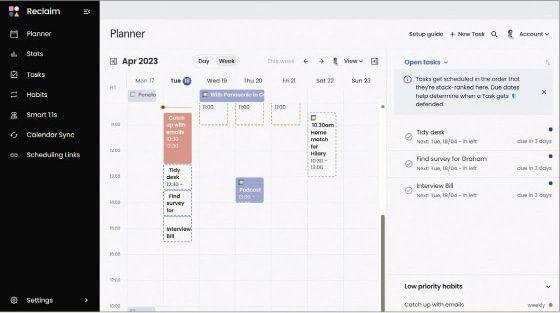
There are numerous AI diary tools out there—and Microsoft is going to bring its own once Copilot arrives—but none will magically sort out your life. However, if you’re willing to invest some time (and give it access to your Google Calendar and Slack), then Reclaim. ai is worth investigating. It’s most effective when implemented across a team, but even if you’re just using it for yourself you should find its automatic scheduling of meetings (and decompression times, lunch, and team catchups) will help—and maybe improve your focus, too.
SUMMARIZE CHUNKS OF TEXT
Just as Otter.ai can summarize meetings, AI tools can turn someone’s rambling collection of paragraphs into a neatly formatted summary that’s far easier to understand (or you can use it to improve your own writing before it’s sent out). You don’t even need to pay for these tools, as Bing AI, ChatGPT and Google Bard will all happily convert a few paragraphs of prose for you in a matter of seconds. And, based on our tests, these AI tools cut out the fluff rather than removing the important info.
LET AI DO YOUR RESEARCH
Let’s say you want to find out all the training services on offer to doctors. In the past, that meant digging through Google, following links, and chasing numerous dead ends. With AI such as ChatGPT, you ask the question and see what information it brings back. Some of it may be out of date or even wrong, but it will still save time.
FLESH OUT YOUR IDEAS
Why not let AI enhance your creativity with some extra ideas? For example, if you were writing an article about time-saving ideas, you could ask it for its suggestions.

MICROSOFT WINDOWS
POWER UP YOUR SCREENSHOTS
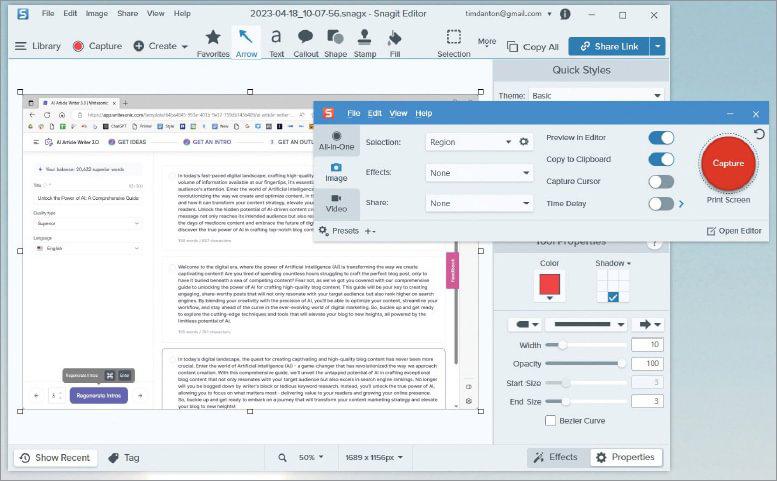
“I now use the newer snipping tool (Windows+Shift+S),” wrote Si Mellor. “Once you draw your box on the screen, it copies this straight to the clipboard.” But Robert Schifreen upped the stakes. “Greenshot (freeware) is better,” he declared. “You can save the clipped image to a file directly, open it in an editor, copy to clipboard, etc. And it hooks into the PrtSc key rather than requiring you to press three keys.” Martin Bailey added that he uses SnagIt for “screenshots on steroids”, such as capturing a right click menu via a delay timer, and uses ArsClip to “store multiple recent clipboard copies across all applications”.
SUPERCHARGE FILES AND FOLDERS
While Mike Halsey describes himself as an “old-skool guy” who sorts “files, emails and documents into a strict folder structure so I can find them again easily”, two of our readers had a different approach. “I do a lot of file manipulation,” wrote John Wright. “Using bash (via git-bash) is a great way to find, filter and manipulate text files.” (We recommend giving Everything a whirl, too.) Robert Neuschul relies on ExamDiff Pro (prestosoft.com) to compare files and directories within Windows.
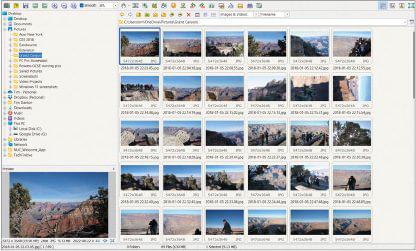
REPLACE THE WINDOWS IMAGE VIEWER
Who hasn’t been annoyed by the slowness of the Windows image viewer? Or its lack of features. That’s why Robert Neuschul switched to Fastone Image Viewer, even using it to “process Raw files as well as JPG/PNG”.
WIN+X
As Paul McCool pointed out to us, keyboard shortcuts “can take time to learn…but the time saved all adds up”. We agree, and as a starter for ten may we suggest adding Win+X to your armory. This bypasses the usual graphical Windows interface so you can jump straight to, say, the Task Manager.
TOUCHPAD GESTURES
If touching a keyboard is simply too much effort, here are four of our favorite touchpad gestures on Windows. Swipe down with three fingers: all your active windows disappear to reveal the desktop beneath. Swipe up with three fingers: all your open windows spring into action. You can also switch between open applications by swiping left/right with three fingers, or upgrade to master level and add a fourth finger to switch between desktops.
LOAD UP POWER AUTOMATE
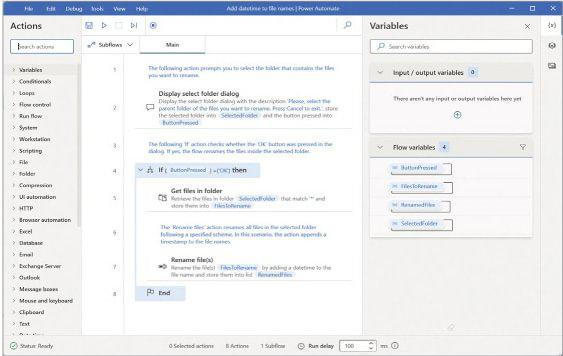
Power Automate isn’t for beginners, but if you want to get your hands dirty in coding, you may find that it saves you an immense amount of time by automating workflows to the nth degree. It’s built into Windows 11, but you may need to download the app from the Windows Store if you’re running Windows 10.


