Manage Your Email Using Vivaldi
What you need: Vivaldi browser
Time required: 30 minutes
The free Vivaldi browser is based on the same code as Microsoft Edge and Google Chrome, so it can use many of the extensions you’re already familiar with. It also has some extra tricks up its sleeve, like built-in ad and tracker blocking and, in the latest version, an email client. Being able to pick up your email in a browser rather than webmail means you can use just one platform for communicating with family and friends, checking your calendar, streaming TV, listening to music and more. No need to switch between multiple programs, or to visit several webmail sites to access all your inboxes. Here we explain how to set up and use email in Vivaldi.

STEP 1
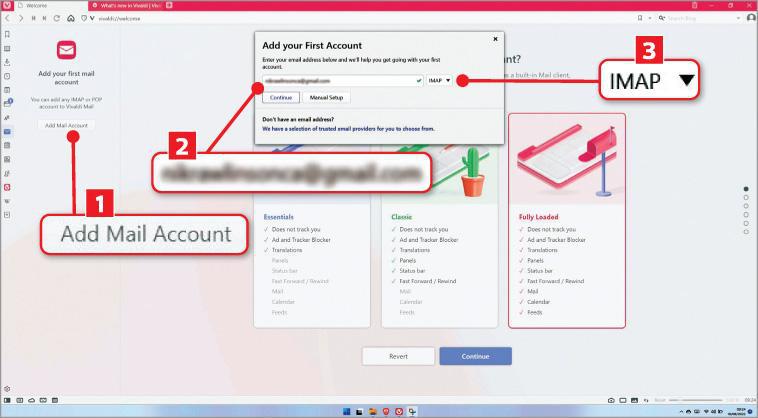
Download the latest version from www.vivaldi.com. Open it and click Add Mail Account 1 in the sidebar to start setting up the email client. Some accounts, like Gmail, Hotmail and Outlook.com, are easy to set up as the server that hosts them can automatically share its configuration settings with the program that wants to connect. We’ll start by setting up a Gmail account. Type your email address 2 and click Continue, leaving IMAP 3 selected in the dropdown menu to the right (this specifies the type of server; the alternative would be POP3).
STEP 2
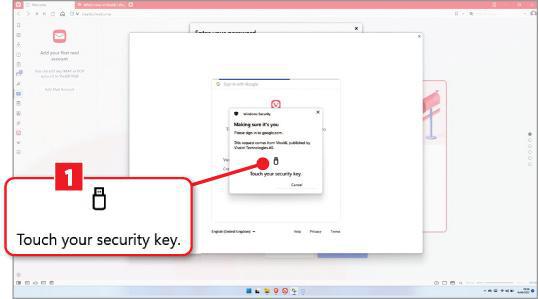
Gmail lets you log in using a system called OAuth (Open Authorisation), or by generating a one-time password that will only work for the Vivaldi email client (and nowhere else). In this instance, click Use OAuth, and the standard Google login prompt will appear. Enter your Google Account email address and click Next, then enter your password and click Next again. If you have secured your Google Account using two-factor authentication – such as codes displayed in Google Authenticator, or a security key 1 – complete this extra step when prompted.
STEP 3
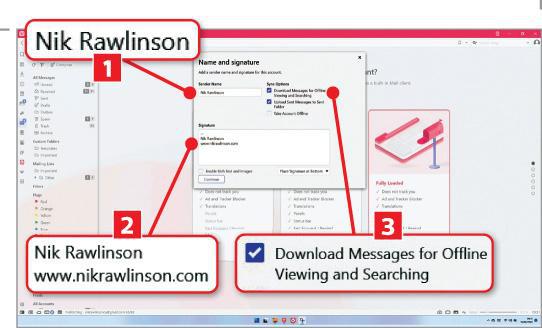
Google will warn you that Vivaldi wants to access your account, and tell you what information it will be able to access. Click Continue. Use the window that appears to fill in your name 1 as you want it displayed in recipients’ inboxes, and optionally to provide a signature to appear at the bottom of your emails 2. Tick the box next to ‘Download Messages for Offline Viewing and Searching’ 3 so Vivaldi behaves like a regular email client, letting you access your inbox when not connected to the internet. Click ‘Continue’, followed by Open Vivaldi Mail.
STEP 4
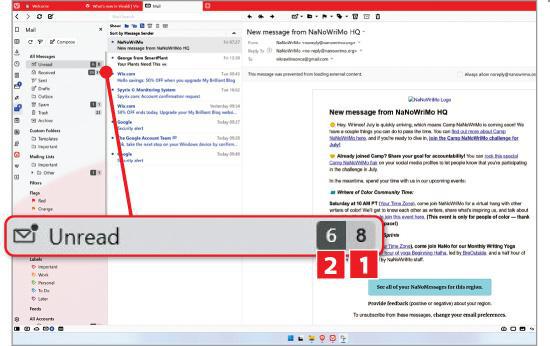
Vivaldi will start downloading your messages. As with other email clients, it shows you how many unread messages are in each folder, using a number in a grey box 1. However, it also distinguishes between unread and unseen (the number in the black box 2). A message isn’t considered ‘read’ until you specifically mark it as such by clicking it and pressing K or G on your keyboard. This is a handy feature, as it allows you to work your way through your messages without the ones you want to come back to automatically losing their unread status.
STEP 5
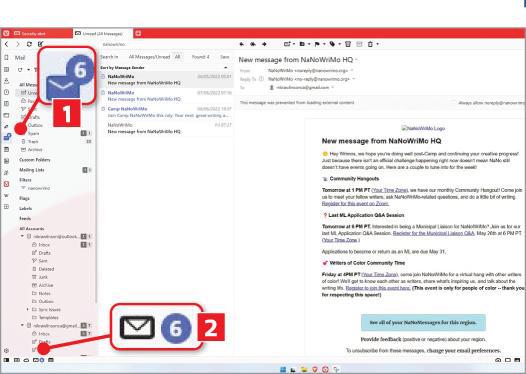
Click the toolbar’s envelope icon 1 to hide and show the email sidebar. New messages will continue being collected from your inbox, even if it’s hidden. When messages arrive, you can preview them while browsing the web, without switching to the email panel and interrupting your flow. To do so, click the envelope icon 2 on the status bar, which pops up a panel showing the subject lines and arrival times of the unread messages in your inbox. Clicking one opens it in the regular email view in a new tab.
STEP 6
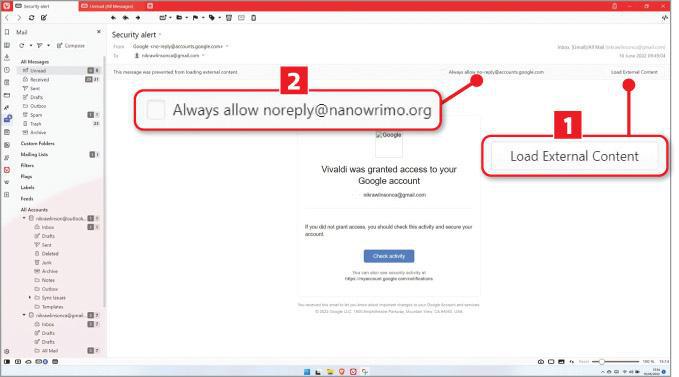
Senders of marketing emails and spam frequently embed images with unique names into their messages. Because these are loaded from their server when displayed in an email, the sender can detect when you’ve opened their message, so knows that your address is valid and worth targeting again. Vivaldi therefore blocks external images as a precaution. To display images in a message you trust, click Load External Content 1. Or, if you always want to trust a particular sender, tick the box beside ‘Always allow…’ 2.
STEP 7
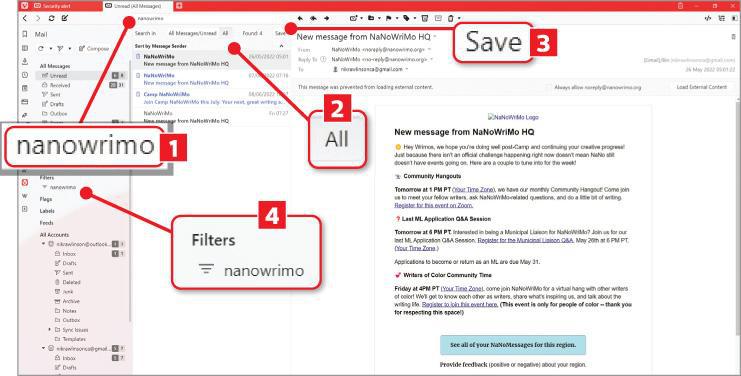
When you want to find something, use the search box 1 above the message list to search for a sender, subject line, or something in the content. By default, it will only search in the folder selected in the sidebar, so click All 2 to expand the search to include all your folders. If this is a search you’re going to perform frequently, save time by clicking Save 3. This converts it to a filter in the sidebar 4. Click this filter to repeat the search in the future.
Next issue: Record screen videos with sound


