HOW TO… Check If Someone Is Snooping On Your PC
Your computer is full of personal data. From letters to your insurer and emails from your doctor to your tax return and list of your passwords, the documents and files stored on your hard drive are a treasure trove for an identity thief. Even if your data isn’t stolen, it could prove embarrassing if accessed by an unsuspecting friend or family member.
14 pages of easy-to-follow workshops and expert tips
What you need: Windows 10 or 11 Time required: 30 minutes
Of course, as a Computeractive reader, you’ll already know the importance of securing your PC using a unique and complex password, a thumb or fingerprint, or facial recognition.
That said, we’ve all on occasions been called away to the phone or to answer the door and left our computers unlocked. Some of us may even lend our laptops to friends and family members for short periods.
It’s in these moments that your data is most likely to be accessed without your knowledge. This may not be done with malicious intent, but if it happens, it’s in your best interests to find out what was accessed and when. We’ll show you how to do this.
Even if you never leave your computer unlocked or share it with anyone, many of these tips can help you quickly locate hard-to-find files you’ve been working on recently.
Check ‘Recent documents’ lists
Most programs include a list of recently accessed documents in their File menu. If you have a subscription to Microsoft 365, the lists in Word, Excel and PowerPoint will synchronise between each installed version on any of your devices, and also reflect files that have been opened or edited using the web versions. Click ‘File’ at the top of the window, make sure Home is selected in the sidebar, then check the contents of the Recent tab below the Search box.
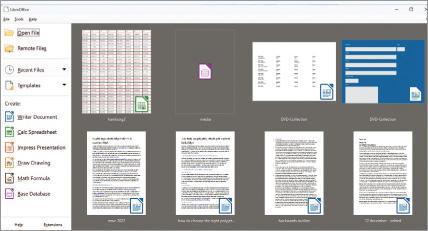
If you use LibreOffice, recently accessed files are shown in the suite’s home screen (see screenshot), to which it returns every time you close one of its programs (Writer, Calc, Impress and so on). You’ll also find them by clicking File and hovering over the Recent Documents sub-menu.
When you log into Google’s online office suite (https://drive.google.com), the home screen shows a mix of suggested files at the top of the page, and recently accessed files below. Don’t assume that any file appearing in the list of suggestions has been accessed recently: often it will be there for your convenience. Let’s say that you always write an email newsletter on Thursday afternoon to send the following morning: on Thursday morning, Google will add the newsletter file to the list of suggestions on your Google Drive homepage, making it easier to find when you turn to that job later in the day. By Friday morning, Google will have removed it, not restoring it until the following week.
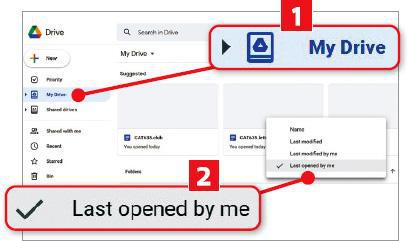
In Google Drive, your documents can be ordered according to when you most recently modified (edited) them. So, if anyone gained access to your account and merely opened a file but didn’t change anything, it wouldn’t be reflected in this list. To check whether this has happened, click the heading next to the arrow (1 in our screenshot above) and select ‘Last opened by me’ 2 in the menu.
Check ‘Recent files’ lists in Windows
If you found nothing suspicious in your program menus, it’s a good indication that nobody has been snooping on your PC. But what if they were to open a file without using the program that it’s associated with? WordPad, for example, which comes with Windows, can be used to open and edit Microsoft Word documents, even if Word is set to automatically launch whenever you double-click a. doc or. docx file. So, to avoid a document showing up on your Recent Files list, a snooper only needs to right-click it and choose to open it in WordPad from the context menu.
WordPad has its own recent documents list, which reveals whether someone has used it to open a file without Word being involved, but you don’t want to have to check every installed program on the off-chance someone has used it as a way to spy on you. Happily, you don’t have to, because Windows logs everything that happens on your computer to compile a handy reference point. In both Windows 10 and 11, you’ll find a list of recently accessed files in File Explorer, by opening a new window and clicking Home in the sidebar.
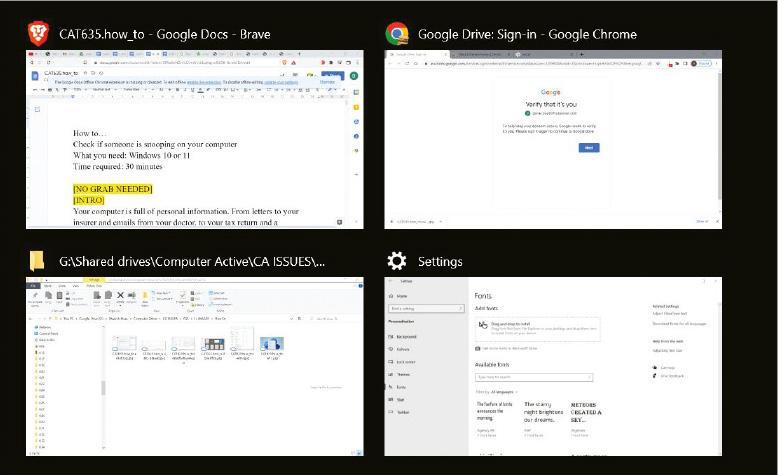
In Windows 10, files opened recently are also shown in the timeline, which appears in Task View (see screenshot below). Open this by clicking the Task View button on the taskbar (it looks like a film strip and usually sits to the right of the Cortana icon), or by pressing Windows key+Tab.

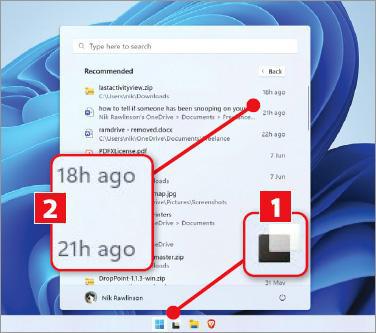
Task View is also available in Windows 11, where its icon looks like a white square on top of a black square, slightly misaligned (1 in our screenshot above right). However, it doesn’t include a timeline of recently accessed files. Instead you’ll find these by opening the Start menu and checking the Recommended section below your most frequently used programs. This shows only the six files accessed most recently, so for a longer, more detailed list, click More. This reveals the times and dates on which each file was last opened 2, which will help you identify any entries for which you weren’t responsible.
Sort your files by date
Every time a file is changed, its time stamp is updated. Usually, a program will only consider a change to have been made if you amend its contents and save the result. Anyone who only looks at a file and closes it without doing anything may therefore get away with it – unless the program they opened it in saves status changes, like the location of the cursor, as well as any edits. In this scenario, any scrolling down to read a document that doesn’t fit on screen may give them away.
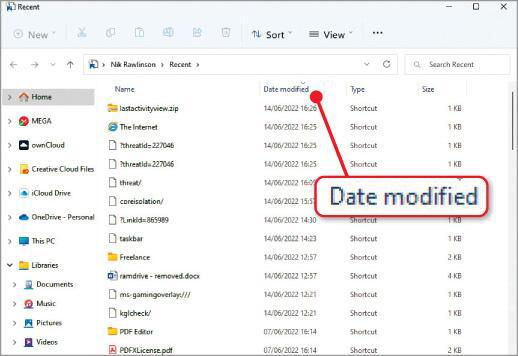
If you suspect someone has edited one of your files, press Windows key+R to open the Run window, type recent, then press Enter. This opens a File Explorer window showing files that have recently been edited on your computer. Click the ‘Date modified’ heading (see screenshot above) to sort them into reverse chronological order, with the most recently accessed at the top.
To target a specific folder, rather than searching everywhere, open a File Explorer window and navigate to the folder that contains the file. If you’re not sure what has been accessed, click This PC in the sidebar, then double-click C: in the main window. Open the Users folder, then open your folder within it. Now click in the search box at the top right of the File Explorer window and type * to select all the files in your User folder.
Now, in Windows 10, click View followed by ‘Sort by’ and select ‘Date modified’ in the menu. In Windows 11, click Sort on the toolbar and select ‘Date modified’. In each case, this organises the results so the file modified most recently is sent to the top of the list, making it easy to scroll back through each of them to check their modification dates against the times you know for sure you weren’t at your computer.
One word of warning: dates on recently edited files may be influenced by edits that were made elsewhere if your files are synchronised online, or if macros or other scripts have been set to automatically update them every so often.
Check when your PC was turned on
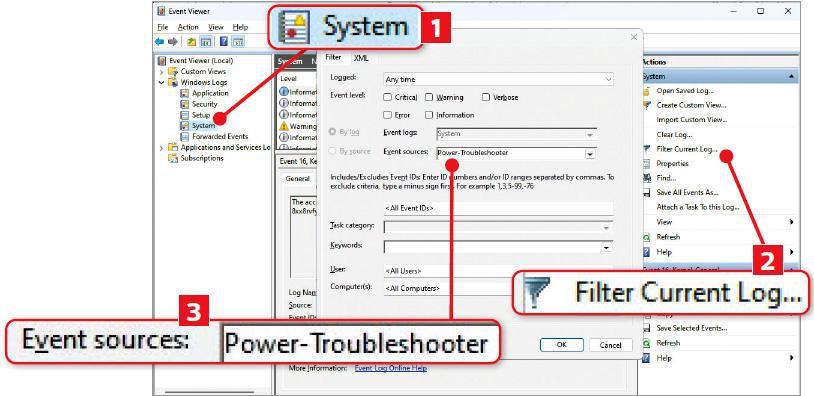
Click the Start menu and type event, then click Event Viewer. This is a tool for viewing the Windows log, where programs record what they have been doing. Click the arrow beside Windows Logs to reveal that section’s contents, then click the entry for System inside it (1 in our screenshot below).
Next, click ‘Filter Current Log…’ on the right 2 and in the box that opens click the dropdown menu beside ‘Event sources’. Now select ‘Power-Trouble-shooter’ 3, then close the menu and click OK.
Doing this isolates when Windows has logged your computer being switched on or woken from sleep. Click any event in the list for more details, paying particular attention to those with a date and time stamp during which you know for a fact you weren’t at your computer.
Install a third-party program
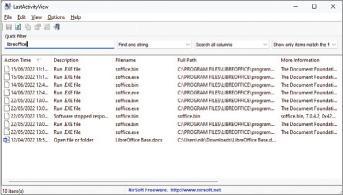
Event Viewer is a powerful tool, but not that easy to use. A simpler option is the free LastActivityView (www.snipca.com/42269), one of NirSoft’s many useful programs. Extract the downloaded ZIP and launch the ‘LastActivityView.exe’ file, and it will display a list of events in reverse chronological order (see screenshot below), without many of the more technical entries included in Event Viewer.
Much of what you’ll see is still generated by Windows itself, rather than any proof of activity by a person, so a good tip is to expand the window until you can see at least all the columns between Action Time (furthest left) and More Information (column five). Many of the entries with ‘Microsoft Corporation’ in the More Information column are background processes upon which Windows relies.
As with our other tips, focus on times when you know you weren’t at your computer. And, if you have reason to suspect that a particular program was used to access your data without your permission, you can search for it using Quick Filter. Press Ctrl+Q to open the Quick Filter toolbar, then type the program’s name. Be as specific as you can for the best results. Typing word, for example, pulls up results for both Microsoft Word and WordPad, but word.exe results in just the former. You can also search for file names, rather than programs, in exactly the same way.
If your Quick Filter search reveals damning evidence that you want to present to whoever you suspect of nosing around, you can export the result. Click ‘View’ and select ‘HTML Report – All Items’. This generates a web page containing the results, which you can save by pressing Ctrl+S in your browser, or print with Ctrl+P.
How I check for PC snoopers
I use many of these tips, particularly checking lists of recently modified files. If I ever suspect someone has accessed my PC without permission, I immediately change my password. The same is true of websites I frequently visit, which I also secure using two-factor authentication (2FA), or physically by inserting a YubiKey security key.
Nik Rawlinson


